On new and some older models of motherboards, for one reason or another, problems with installing Windows 7 may occur. Most often this is due to wrong settings in the BIOS that can be fixed.
During BIOS settings to install any operating system difficulties arise, since versions may differ from each other. First you need to enter the BIOS interface - restart the computer and before the operating system logo appears, press one of the keys in the range from F2 before F12 or Delete. In addition, keyboard shortcuts can be used, for example, Ctrl+F2.
The next steps depend on the version.
AMI BIOS
This is one of the most popular BIOS versions that can be found on motherboards from ASUS, Gigabyte and other manufacturers. AMI setup instructions for Windows installation 7 looks like this:

After saving and exiting, the computer will restart, booting from the installation media will begin.
AWARD
The BIOS from this developer is in many ways similar to that from AMI, and the setup instructions before installing Windows 7 are as follows:

In addition, nothing needs to be configured.
Phoenix BIOS
This is already an outdated BIOS version, but it is still used on many motherboards. The instructions for setting it up are as follows:

In this way, you can prepare a computer with a Phoenix BIOS for installing Windows.
UEFI BIOS
This is updated GUI BIOS with additional features, which can be found in some modern computers. Often there are versions with partial or full Russification.
The only serious drawback of this type of BIOS is the presence of several versions in which the interface can be greatly changed, due to which the items you are looking for can be in different places. Consider UEFI setup to install Windows 7 on one of the most popular versions:
Despite the large number of steps, there is nothing complicated in working with the UEFI interface, and the probability of breaking something with an incorrect action is lower than in a standard BIOS.
In this simple way, you can configure the BIOS to install Windows 7, and any other Windows on your computer. Try to follow the instructions above, because if you mess up some settings in the BIOS, the system may stop starting.
Hello dear subscribers and guests of the site. IN this material I want to talk in detail about BIOS firmware. We will find out what it is, what usefulness it brings, its functions and how the BIOS is configured to install any Windows versions.
What is the BIOS subsystem
To begin with, I would like to talk about the definition of Bios, and only then about the settings.
BIOS is a basic input / output system, which is a set of firmware that resides in non-volatile dynamic memory CMOS ( Complementary Metal Oxide Semiconductor Complementary metal oxide semiconductor (CMOS).
The BIOS is responsible for the status of all components in the PC configuration, as well as for starting the operating system. When the system starts, the BIOS launches the POST firmware, which polls all components (disks, RAM, video card, processor), if everything is fine, then the download continues. If the BIOS noticed a problem during internal arrangement, you will hear a characteristic sound signal or their combination. About sound BIOS signals can be read.
The BIOS chip is located on the motherboard. Of course, the location of the BIOS on different boards it will be different, but characteristically it is located next to the non-volatile memory - a round CMOS battery. Such a microchip system board has two types:
- EPROM– the data on the board will be destroyed by ultraviolet radiation, these BIOS chips were relevant before. Currently using the type
- EEPROM– the data is erased by means of an electrical signal.
What is a POST self-test program
POST is a very important procedure when you turn on your computer. The BIOS uses POST to test the hardware for faults and malfunctions. Checking hard drives and SSDs, setting the frequency of system buses, initializing equipment such as video cards, sound cards, monitors, disk drives, random access memory(RAM), and external connected devices.
In general, using POST, a lot of tests are carried out to check the equipment, and if something is wrong with one of the components, the BIOS will display a corresponding message on the screen and a sound signal. Upon successful completion of the tests, you can hear one beep - a squeak. Provided that in system unit built-in speaker. This is not the case on laptops.

In addition, BIOS allows you to configure a lot of settings that will help you install Windows or new hardware, as well as a little. There are a lot of secrets and nuances when working with this technology, which will not fit within the framework of this article. Therefore, I recommend that you read a wonderful book - 1000 and 1 Secret BIOS A.V. Kubin P.A. Dmitriev. In this book you will find a lot of information on working with BIOS, including with all types of manufacturers - AMI BIOS, AWARD BIOS and Phoenix BIOS.
Basically, the BIOS is a very old technology that has somehow survived to the present day. Although now there is a more advanced technology - BIOS UEFI. Created in 2007 with Intel, Microsoft and AMD. Unfortunately, it is impossible to reflash a regular BIOS to UEFI.

More about it BIOS type I wrote .
Briefly about BIOS partitions
Now I will briefly talk about the main sections of the BIOS, where all the basic settings are made, including for installing Windows.
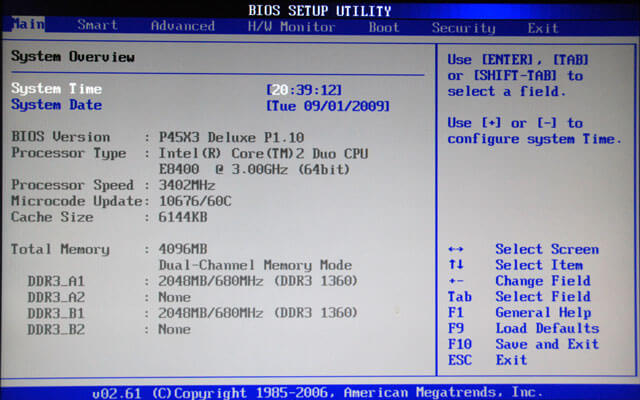
Main
In this section, it is possible to configure the system time and date, some parameters of disk drives, options for issuing messages to the POST program, keyboard and OS. The Main item is in the AWARD BIOS or AMI type.
Advanced
In this section, we will find processor options, memory options, setting the bus frequency, changing port parameters. In general, this section is for enthusiasts who are engaged in overclocking.

Boot
This is the section that we need today. Here we can configure the boot order of devices - disks, flash drives and other devices. In simple words in order to boot from an inserted USB flash drive with Windows, you need to set this device to the first place.

power
In this paragraph, you will find options that are responsible for the power consumption of the PC. Here you can monitor the operation of the computer and set the time to turn off or turn on the PC.

exit
The very last section responsible for exiting the BIOS. Here you can exit without changing the settings you have made, as well as saving them. In addition, here you will find. Read about it at the link provided, if you're interested.

BIOS setup for installing Windows and other programs
So we moved on to the main topic of our article. First you need to enter the BIOS, but on different models motherboards and laptops do this differently. We read the article. More information on the entrance is in the passport to the motherboard, I hope you have it preserved.
Let's say that with a simple method you got into the BIOS, now with the help of the arrows we go to the Boot tab. There you will find the option Boot Device Priority.
In the picture we see 3 devices. To boot from an optical disc, you need to put CDROM in the first place, and if you boot from a USB flash drive, then naturally USB will be in the first place.

If you have a different type of BIOS, where there are completely different settings and location of options, then the device priority settings are in the section Advanced BIOS Features.
In this section you will find a subsection First boot device, which is responsible for the first bootable device when the PC is turned on. Next comes the subsection Second, responsible for the second device and Third is the third device.

Saving settings is done on the main BIOS screen using the Save & Exit Setup option.

I talked about all the main nuances. As you can see, setting up the BIOS on a computer is very simple. The main thing is to know the translation of each function. I want to make your life a little easier. When booting from devices, it is not necessary to enter the BIOS and set the boot settings. This can be done very quickly with . Turning on the computer, you press the key responsible for this menu (just like when entering the BIOS) and a window appears where the connected devices are displayed in order - flash drives. Arrows choose desired device and press Enter. Everything, you booted from this device.
Now . We read this article if the BIOS refuses to see the flash drive.

Now that you know how to set up the BIOS for Windows installation, I want to recommend a few articles on the topic of system installation. It describes in detail how to create a bootable USB flash drive or disk with Windows:
Now that's all. I hope this article will help you in some way. If you have a request, for example, to supplement this article with some information on the topic, then write about it in the comments and I will add it.
site prepared step by step instructions how to reinstall windows 7.
A proper reinstallation of the operating system consists of the following steps:
- Saving data to external media.
- Create a boot disk.
- Formatting the hard drive (optional).
- System installation.
- copying working system via Acronis True Image.
- The system is placed on top of the old one.
- Everything is removed and reinstalled.
The first and last paragraph is required if you are afraid of losing important files during reinstallation.
Saving data
There are two options for reinstalling the system:
In the first case, all data is saved (settings, passwords on sites, files, etc.), but glitches can also be saved. If you put on top, then this section about saving data is irrelevant for you.
Formatting a drive will delete all data. There are several ways not to lose the necessary files:
- Copy your personal information to another drive on your computer. Suitable if you have 2 hard drives.
- Reset files to an external drive (HDD, flash drive, memory card, smartphone).
- Save files in the cloud (Yandex Disk, Dropbox, Google Drive).
- Confidential files can be stored in WinRar archive with a password and send it to yourself by email. After reinstalling Windows, the archive will remain in the mail.
What to copy from old Windows? Check out the following places:
- Desktop, My Documents, C drive.
- Bookmarks in the browser.
- Browser and torrent download folders.
- Saving games.
- ICQ/Skype correspondence.
Additionally, you can all installed programs(Start > Control Panel > Programs and Features) so that after installing a clean OS, it's easy to remember all your favorite programs. Fill in the screen in Vkontakte or Facebook, then it will not be lost.
Create a boot disk
If you have a licensed Windows DVD, create boot disk(flash drive, memory card) is not necessary, you can skip this section.
More often there is no disk, then you need to download the Windows 7 image from the Internet and burn it correctly to an external drive. We recommend looking for an image of Windows 7 Ultimate (aka Ultimate), if you have more than 4 GB, then choose not the x86, but the x64 version.
Just copying the image will not work, you need to do boot drive, for example, through UltraISO. To do this, you need to download the program itself and find a drive with a capacity of 4 GB or more:
- Run UltraISO with administrator rights.

- On the File menu, click Open.

- Select the downloaded OS image file.

- Select it, click "Boot" at the top, and then "Burn Hard Disk Image...".

- In the new window, check: 1 – if the flash drive/memory card/external drive is selected correctly; 2 - whether the image file; 3 - the recording method must be "USB-HDD +", click the "Burn" button.

- All information from the flash drive will be deleted.

- The image recording process will begin.

- Wait, the successful completion of the operation looks like this.

The device is ready, now you can reinstall Windows from it. Save it, it might come in handy. By the way, you can use the drive after that - upload any files to the free space, the main thing is not to accidentally delete the “system” files.
Video on writing an image to a USB flash drive via UltraISO:
It is not necessary to use a flash drive or special card memory card reader. You can take a card from your phone as a memory card, and the phone itself will act as a card reader. Even the built-in memory of the mobile is suitable for a boot drive, if it is defined as a drive during a usb connection in the system.
How to set boot via BIOS
Reboot the computer, look carefully at the displayed messages, somewhere they will indicate which button to press during boot to get into the BIOS. It can be Del, F1, F2, Esc, Tab or another. As a last resort, use the "scientific poke" method.
 The button to enter the BIOS is indicated when the computer is restarted.
 Bios are different. In them you will expect something like the following. In the first case, you need to go to the "Advanced BIOS Features" section. 
In the second "Boot", control the arrows on the keyboard. 
In any case, this setting is somewhere nearby, you will find the boot order (may look like First / Second Boot Device), select the first drive where you installed the Win7 image.

Look for a section with an exit from the Bios Setup Utility with saving the settings. The computer will restart and boot from the image, which will begin the installation of Windows 7.

Operating system installation
As we have already said, reinstalling Windows 7 is possible in 2 ways: over the previous copy of Win and with the removal of the old system. If you want to put on top and save all the data on the disk where you put the OS, then do not format it.
Tip: If you only have one physical disk, but large enough (from 200 GB), first copy important data, and then divide it into logical drives C and D. It is convenient to install Windows with formatting on C, and permanently store files on D. This will also be useful for Acronis True Image. You can partition the disk during the reinstallation of the OS.
- You've copied important files, made a boot disk, set BIOS to boot, and rebooted your PC. About a minute you will be shown the download.
- Then Windows will please with a window, check the language settings, click "Next".

- Accept the Microsoft license terms.

- Select the installation type. Above "install over the old OS or upgrade", below "complete reinstallation of Windows 7".

- Specify which drive to install the OS on. If you wish, you can format (do not format if you want to save data on it), click "Next". If it gives an error about the impossibility to put on this disk, then turn off the computer, disconnect all other disks and USB drives, and run the installation again. Also here you can divide the physical disk into logical ones, carefully - do not confuse which one you want to share, when dividing, all information from it is deleted.

- 10-20 minutes copying files. After that, the computer will restart. This means that the copying of the files is completed, and then the installation takes place from the hard disk. It is necessary to disable booting from the image in the BIOS, and set it back from the HDD. The flash drive is no longer needed, you can get it from USB. If you do not change the BIOS settings, then after a reboot, booting from the USB flash drive and copying will start again.

- After the reboot, a window will appear for specifying a username and password (you do not need to enter a password).

- If there is a key, enter it, if not, just click Next.

- Select update settings. The license is updated without problems, pirated version activation may fail. Postpone the decision until later if you don't know what to do. Many people turn off updates.

- Specify the time zone.

- A little download and you are in Windows 7.

Video by reinstalling Windows 7:
- Disable hibernation mode (relevant for systems on SSD, allows you to free up disk space).
- If the OS is on the SSD, transfer the temporary files and browser files to the HDD.
- Disable updates (there will be no unnecessary consumption of traffic, activation will not fail, you will not have to wait several minutes before shutting down to install updates).
- Install drivers for the video card, sound card.
After installing all applications and settings, use Acronis True Image to make a "clone" of the local drive. In case of problems, you can restore an exact copy of the system and the entire C drive in 5 minutes, and you do not need to reinstall everything again.
After that, you are a happy owner of a customized clean OS, and no experiments or failures are now scary. If something goes wrong - 5 minutes and everything is fine again!
If download iso image from Windows distribution and even burning it correctly to a DVD disc or creating a bootable USB flash drive using the same UltraISO is practically not difficult for anyone. Then with the second stages, directly installing the operating system from a disk or flash drive on a PC, many have difficulties.
There are three ways I know how to start installing Windows.
1) the simplest and most unreliable is to open the image with Windows already running through virtual drive and start the installation, but there are many factors that can interfere and give an error at some stage of such an installation.
2) Insert the flash drive we created into USB connector or a DVD disc with Windows into your drive, no matter what version, either windows 7 or windows 10, even win95. This works for everyone. Then, when you turn on the PC, call BOOT menu, this is a list with media from which you need to boot, select the media we need and press ENTER. You can read more about how here.
3) It differs from method 2 only in that we specify what we want to boot from not through the boot menu, but in the BIOS of our device.
In this article, we will talk in detail about how to install Windows from a USB flash drive via BIOS or Windows boot 7 from the BIOS flash drive.
Booting Windows 7 from a BIOS flash drive
Installing Windows from a USB flash drive through the BIOS begins by calling the BIOS menu or it's also called Setup, this is most often done with the Delete button immediately after turning on the laptop or computer, press continuously until you see blue screen with some text, but it happens that you need to press another button, it's F2 or F10 or Esc. You can try all the options until you see the desired result, or you can read a text like "Press DEL to run Setup" in the welcome window of the mother firmware, it tells us that in order to get into the BIOS, you need to press DEL.
And so, after we got into the BIOS SETUP UTILITY, we look for the Boot tab and use the arrows to go there. We need the line Boot device Priority

Here the logic is simple, the higher the device in the list, the higher the priority in the download queue. That is, the top one in the list is loaded first, and so on in turn until the system boots.

And so, using the arrows, select the first drive in the list and press ENTER, we see a list of all possible devices from which the computer can boot.

If we want to choose to boot the BIOS via a USB flash drive, then select USB interface, this is Removable Dev or something with the text "USB" included, or if the flash drive is already inserted, then the name of the flash drive manufacturer will be written. If you need to select a DVD drive, then usually this line begins with the words CDROM: or DVDROM: or it can also be written by the manufacturer of the DVD drive.
If you make a choice, then press ENTER and in the same way select the second device in turn, the second in the list should be your hard drive on which Windows will be installed. If the BIOS does not see the USB flash drive, then try inserting the USB flash drive into another USB connector and do everything again.
To save all changes to BIOS Setup, you need to go to the Exit tab before leaving and select the Exit & Save Changes line and press ENTER.

After that we can windows bios install via flash drive or dvd drive. bios with a blue screen is no longer available for everyone. In 2017, more and more often you can see the new generation BIOS, it is more graphically thought out, there are pictures of the icon for an understandable association, if you are not strong in English so as not to be mistaken. But essentially all the settings are the same.
Attention!- after our changes in the BIOS, now the computer will always boot first from the USB flash drive, then from the hard drive, so it is important when installing Windows after the first stage of installation, when the laptop or PC reboots, YOU MUST HAVE TO PULL THE FLASH DRIVE FROM the USB connector, or pull out the disk from DVD-roma. Otherwise, the first stage of the installation will be repeated indefinitely.
Now we know how to set up the BIOS to install windows from a USB flash drive. And having a bootable USB flash drive with the image of WINDOWS 7 or 10, we can easily install or reinstall the OS on any device.
Attention! In some assemblies, the default settings are already set for Chrome browser, the start page leads to search engine go.mail.ru. Everyone has the ability to change the search engine to any other.
This article describes how to install or reinstall Windows 7.
Before starting the installation, you need to complete a few preparatory steps. At the beginning of the article, we have placed detailed content so that you can quickly view the entire sequence of actions and go to the necessary part of the instruction.
If you are interested in a specific question (eg installation errors, how to enter and configure the BIOS, etc.), the links in the content will take you directly to it.
If you are a beginner, then just follow the guide from start to finish: each item is described in as much detail as possible and includes links to auxiliary instructions.
What should be ready before starting the installation
Review the list below to verify that your computer and system are ready to install or reinstall Windows 7, and follow the steps to complete the preparation.
What are the installation types, how to save personal files and programs
There are two types of installation:- A complete reinstallation of the operating system (OS), when the hard disk partition (or the entire disk) is completely erased, including all your programs, documents and files.
- An OS update that updates only system files.
If you haven't done so already, read the article on preparing for installation, from which you will learn:
- how to save all important personal data;
- what programs will be needed immediately after installation and where to download them;
- is it possible to copy installed drivers where to find drivers after installation;
- analysis of some special cases;
How to legally download the original image of Windows 7 x64 or x32 for free.
Download original image you can legally with the help of the program "Windows ISO Downloader": the download of the Windows image file will be done with Microsoft official site.
Program file Windows ISO Downloader
with version 5.21
(dated September 20, 2017) is attached to the article (to the right of this text).
How to download the image correctly is shown in the figure below:
 Select the Windows 7 partition, then the desired edition of the Windows 7 image, and then the Confirm button.
Attention!
We strongly do not recommend enjoy builds of Windows 7 - use only original system images.
Microsoft has several aircraft hangars of a variety of equipment designed to test the operation of the operating system on various combinations of devices. Therefore, the official OS image works correctly for the vast majority of users.
Build authors don't have that kind of testing capability, so a certain percentage of users will experience issues while running the build that can only be resolved with a full reinstall of Windows.
Which version of the image to choose: 32 bit or 64 bit
Everything is very simple: a 64-bit OS is needed in two cases: so that the computer can “see” 4GB or more of RAM and so that you can work with “heavy” programs or games. Attention!
Some new programs and games may not run on 32-bit Windows.
Conclusions:
- If the amount of RAM is 4GB or more, feel free to choose x64 (64 bits).
- If the computer is old and complex programs (for example, audio and video editors, systems for designing, multimedia packages) are not used, choose x32 (32 bits).
The easiest way to see how much RAM you have is to right-click on the icon "My computer" → select item "Properties" in the context menu.
In the window that opens, the amount of RAM will be indicated, as well as the bit depth of the system currently installed.
Which version of Windows 7 should you choose: Home, Professional or Ultimate?
There are various versions (editions) of Windows 7, some of which differ greatly in functionality. You can read more about Windows versions.
Most often, when installing, choose between the versions of " professional
" And " Ultimate
».
The best choice in terms of image version would be «
Windows
7
professional
»
.
But don't worry if you have a different edition of Windows - the installation process will be the same. In the editorial " professional
" Unlike "Ultimate"
there are no services that most users will never use.
You probably haven't even heard their names: DirectAccess, Unix Application Launcher, BranchCache, BitLocker, and so on. Accordingly, hard disk space version «
professional
»
take less.
How to burn an image to a DVD disc or USB flash drive?
If you have already recorded the image and the installation from it went well, then you can immediately proceed to the next chapter. If you don't know what programs can be used to burn an image to a disk or flash drive, then the following auxiliary articles will help you: Please note that installation from a flash drive is more reliable and also faster. If you have a flash drive with a capacity of 4 GB or more, then it is better to install from it.
The process of reinstalling Windows.
So, the preparation for installation is completed: all personal data is saved, the media with the operating system distribution kit is created, and the partition on which the image will be installed is prepared.
Boot device priority setting in BIOS
- Restart your computer and enter BIOS.
- on the personal computers most often buttons are used to enter the BIOS « DELETE» (« Del»), « F2", "Fone", "Esc»
- on laptops - keys «
F8", "Fnine", "F12", "Esc»
- After going into the BIOS, you need to find the menu section responsible for installing devices to boot the OS.
The section can be located in different places (depending on the type of motherboard and BIOS version), so you need to find the menu « FIRST BOOT DEVICE », « BOOT » or « BOOT DEVICE ».
- You need to go to this menu section and set the drive to the first place DVD or HDD(your Flash drive) depending on which media the image is on.
- After that, you need to exit the BIOS, saving the changes.
Most often, to save changes before exiting, you need to press the key « F 10" , and then confirm saving by pressing « Y » or by selecting « Yes » in the dialog box.
In the article you will find instructions with examples:
- how to enter BIOS or UEFI with examples of different BIOS screens.
- how to find option BOOT DEVICA PRIORITY.
- table with a list of keys for entering the BIOS on laptops from different manufacturers.
Autorun installation of Windows from a DVD disc or flash drive
If you did everything correctly, then after restarting your computer you will see the following:
- if you are using DVD media, you will see the inscription "Press any key for load from CD..." (press any key to boot from CD). You must immediately press any key, because after a short amount of time (about 10 seconds) the boot will start from the next boot device installed in the BIOS.
- if you used a flash drive, the installation will start immediately
When installing an operating system, you must be careful and careful about functions that you do not fully understand.
The site administration is not responsible for the result of your actions.
Installation start
Attention!Your computer may have gray and blue USB connectors. If you are installing the OS from a USB flash drive, then be sure to plug the USB flash drive into the connector USB2.0 (grey), otherwise the installer may not see it.
You can judge that the operating system installer has started to work by the line that appears at the bottom of the screen.
 Figure 1 Installer Windows 7 copies files from the media for further OS installation.
When the preparation for installation is completed, you will see the inscription Starting Windows
.
After that, the Windows 7 installation window will appear.
 Figure 2. Installation start Windows 7: Select the language, time format, and layout to be installed.
We will leave the time format, the language to be set, and the keyboard layout unchanged (as shown in Figure 2). Click on the button "Further"
, after which you can start the process by clicking on the button "Install"
.
 Figure 3. Installation start Windows 7
You must now read and agree to the Microsoft License Agreement and click the button again "Further"
.
 Figure 4 License agreement for installation and subsequent use Windows 7.
Selecting the type of installation
- A system update will allow you to reinstall Windows on top of your existing operating system.
- A full installation will allow you to select an existing partition to install or repartition your hard drive. The system will be installed clean, so this option is more acceptable (we wrote more about installation types at the beginning of the article).
 Figure 5. Selecting the type of installation of the operating system.
Choose "Full installation ( Extra options)», as shown in figure 5.
 Figure 6. Selecting a hard drive for further installation Windows 7.
Hard disk partitions for system installation
After moving to a full installation, we will be presented with a list hard drives, where you can create or select partitions for installation. At this step, there may be several options for the development of events.
- You have only one in your system HDD.
- You have a separate hard drive (perhaps an SSD) where the operating system will be installed, and separate drives for data storage.
- The installer does not see the hard drive, or other errors occur (below are links to articles that discuss these problems step by step)
If you have more than one hard drive, then move all your important data to the drive where your personal files will be stored and turn it off so that you don't accidentally mix up the drives when creating partitions or formatting. If you have only one hard drive (or SSD), then it is advisable to split it into parts (if the disk capacity allows it).
The disk must be divided into parts so that at least 50 GB is allocated for the system, possibly even more, because. for normal operation Windows 7, it is desirable that the system partition has at least 15-20% free space.
The disk is partitioned to make it easier to reinstall the operating system in the future.
For example, you have only 1 hard drive in your computer with a capacity of 500GB.
You split it into 2 parts: 120GB (disk " C:") and 380GB (Disk " D:» )
Now on disk « D:» you store music, movies, photos, software installers, folders with drivers, games, etc., and on the disk « C:» you install programs for work.
Files from the "Desktop" and "My Documents" folders are also stored on the disk «
C:».
When in the future you want to reinstall Windows, you just need to transfer (copy) all important files from the desktop and other folders on the disk «
C:»
to disk «
D:»
, then perform a full reinstall with a disk format «
C:»
.
If the disk is not partitioned, then you will have nowhere to transfer data from the disk «
C:»,
and you won't be able to format it.
Partitioning a Disk
At this step, you can create partitions on your hard drive if:
- the hard disk is not partitioned (new or all partitions were previously deleted);
- There are no important files on the hard disk, and all information can be deleted.
If you are going to repartition the disk (and all important files have already been transferred from it), then you need to:
- Delete all partitions of your disk sequentially using the button "delete" . Attention! All files on these partitions will be deleted!
- Select the unallocated partition that appears with the mouse, click the button "Create" (See Figure 6).
- Specify the size first for the system partition (which will be the drive « C :» ), then create a partition for the drive « D :» (and other disks if necessary).
Selecting a partition for installation
If partitions on the disk have been created before:
- Select the system partition (on which the OS was previously installed).
- Click on the button "Format".
- After formatting, select the cleared partition and click on the button "Further".
- Analysis of various types of errors when installing Windows 7 (including by codes).
- What to do if the installer does not see the device (drive, hard disk, keyboard or mouse, etc.).
 Figure 7. Creating a partition on a hard drive
In our case, no section has been created yet, so you need to click on the button "Create" (Figure 7), then specify the volume of the created partition (Figure 8) and click on the button "Apply" .
Figure 8. Selecting the volume for a hard disk partition
 Figure 9. Confirmation window for creating a partition
After that, the operating system installer will inform you that an additional partition will be created to store system files:
 Figure 10 Installing Windows 7
Click on the button "Further", after which the installation will begin (copying all system files and the OS setup process).
The process of copying files will take 15-30 minutes and will not require any action from you.
 Figure 11. Installation completion window
When the files are copied and unpacked, the computer will restart.
At this point, you must remove the DVD or Flash drive from your computer, as the installation will continue from the hard drive where the required files were copied to.
After the reboot, you will see a window with the installation completed.
 Figure 12. Entering the username and network name of the computer for the installed system.
The completion process will take a few minutes, after which the initial setup of the operating system will start.
Completing Windows Setup and Initial Setup
When the setup process is complete, you will be prompted to enter a username to create your account, as well as the computer name for subsequent network identification (under this name your computer will be visible in local networks Windows).
 Figure 13. Setting a password for an account (optional).
You will then be prompted to enter a password and a password hint. If you want to protect access to your account with a password, then enter it. Or you can skip this step by clicking the button "Further"
.


