Thinking of migrating from Android to iPhone, but don't know how to transfer data? Do not worry, in the article we have collected the simplest ways to quickly transfer important information.
Method 1: Through the mobile program Move to iOS (Go to iOS)
This method allows you to transfer: phone records, messages, photos and videos, bookmarks from an Internet browser, accounts and calendar data. Also, some free applications in the presence of programs in the App Store.
- Download the Move to iOS app for free on your Android device.
- Run the application, follow the instructions of the program. Click on the "Next" button, and then select "Search code" in the upper right corner. At this time on the new iPhone, you must perform the initial activation. If you have activated before, you will need to perform a data reset or transfer data in some other way.
- Connect your iPhone to a Wi-Fi network.
- On the activation screen, go to the "Programs and data" section, where select "Transfer data from Android".
- In the new window, click continue until a digital code appears.
- Enter the code on the phone where the data will be transferred from. Wait until the "Data Transfer" notification appears.
- Mark the data on the Android device that you want to transfer.
- After the information about the transfer of data appears, you should put the device aside. The duration of data transmission is affected by the amount of information transmitted. If necessary, connect the device to a wall charger.
- When finished, confirm the data transfer. Check if all data has been transferred to the new device.
Method 2: Through the iTunes desktop program
iTunes allows you to transfer photos, videos, and music.
- Connect your Android device to your PC, find and copy the necessary data to your computer: photos, videos, music.
- Disconnect your Android device and connect your iPhone.
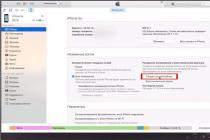
- Open iTunes, click on the phone icon.
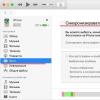
- In the sidebar, select the category of data that you want to sync.
- Check the box next to "Synchronize". Next, select the folder where the required data is stored, the synchronization settings, and then apply.


Method 3: Through cloud storage - Dropbox, Google Drive, Yandex Drive, etc.
Allows you to transfer files from the above methods, as well as documents, including PDF and archives.
- On an Android device, open the cloud storage client, where you add the files that you want to sync. To do this, click on the "add" button.
- Specify the folder where the files are stored. And then, wait for the synchronization to finish.
- Download the cloud storage client on your iPhone. Log in to the application to access the files.
Method 4: Through the desktop recovery program
Data recovery programs are also suitable for transferring data. This method is convenient in case the mobile device is damaged or partially non-functional.
To extract information from an Android device, Wondershare Dr.Fone or EASEUS Mobisaver is suitable. Similar utilities work on a similar principle. It is necessary to connect the device to the PC via a synchronization cable, wait for the phone to be detected. Next, select the type of files you want to extract. Wait for the extraction to finish, and then save the information to the PC. The resulting files will remain transferred to the iPhone using the methods described above - iTunes or cloud storage.
Method 5: Using the MobileTrans program
Easy way to transfer contacts, messages, calendar, call history, photos. More music, video, apps and program data across platforms. To transfer data, follow these steps:
- Install and run the MobileTrans program.
- Connect iPhone and Android to PC.
- Select the Phone to Phone Transfer option.
- In the next window, select the device for transferring data - iPhone, and the device for receiving - Android.
- Select the type of files you are interested in, and then click on the "Start Transfer" button.
- Wait for the end of the data transfer.


Method 6: Via Android Data Apps
Transfer files are also able to applications SHAREit, Xender, Zapya, Send Anywhere and AirDroid. The main condition is the use of the program of one service on the transmitting and receiving device.
Principle of operation:
Install the app on iPhone.
June 26, 2019 14:35As the smartphone market saturates, we have more opportunities than ever before. However, when you switch back and forth between Android and iPhone, it's still very difficult, partly because of the sandboxed systems. It makes sense that Apple designed Go to firmware app for new iPhone users who have used Android before. This tutorial will tell you how to use Apple Move to iOS app in details.
Part 1
As the name suggests, Move to iOS app helps you transfer data from Android to new iPhone. If you use it for an old iPhone, the current data will be overwritten.
The Apple Move to iOS app lets you transfer contacts, message history, camera photos and videos, web bookmarks, mail accounts, and calendars.
How to use an alternative to migrate to iOS
Step 1 Connect your Android to iPhone
MobieTrans is a desktop program, so you need to download and install it on your computer.
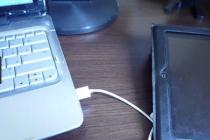
If you want to transfer data from Android to iPhone, run the program and connect your Android phone and iPhone to your computer with USB cables.
Step 2 Preview Android data before sync
Select the source Android device at the top of the window and you can view all the data. For example, to view photos, select the Photos tab from the left sidebar. Then check the photos you want to transfer to the target iPhone. Click the "Other Data" tab and select the other data you want to move to iPhone.
Note: It does not currently support transferring a note from iPhone to Android, Android to iPhone, etc., and will support it in the future.
Step 3 Selectively Transfer Android Data to iPhone
After selecting the data, click and expand the Phone icon on the top ribbon, and then select the target iPhone to start transferring data from Android to iPhone without "Move to iOS" app. Based on our research, it only takes a few minutes to transfer all Android to iPhone. Moreover, the Move to iOS alternative is able to automatically decode data that is not compatible with iOS.
Output
Now you should understand what the Move to iOS app is and how to use it to transfer data from your old Android phone to your new iPhone. If the app is not available for your device, you can try Apeaksoft MobieTrans. It is not only easy to use, but also helps to get rid of various restrictions.
Transferring data between Android smartphones is not a complicated procedure. All the necessary information can simply be copied to a memory card, and then inserted into a new device, if not, then the computer should be used as storage.
But what if the user is faced with a task on an iPhone? Everything is doable and you should not have any difficulties if you follow the advice in this article.
Move to iOS is a dedicated data transfer app
The easiest way to transfer is to use the official Apple utility called Move to iOS and is available for download.
The main disadvantage is that the program is not suitable for all devices. To work correctly, you need a version of Android 4.0 or higher, as well as iOS 9.0. You can transfer data to different Apple devices - no older than iPad 4, iPad mini 2, iPod 6.
During the transfer, you can not perform any other actions on the devices, in particular, even a phone call can interfere with correct operation. It is necessary to disable any programs that affect the operation of WiFi, such as Smart Network Switch. Also on "apple" devices there should be enough memory to accommodate the transferred information.
Before carrying out the procedure, both devices must be connected to the same WiFi point.
So:
Please note that applications cannot be transferred, they will have to be installed manually from the AppStore. The only exceptions are those applications that are available on both Google Play and the AppStore.
An attempt to transfer to an iPhone or other Apple device may fail if the connection between devices is interrupted, for example, due to network problems, it is also recommended to connect the devices to power to eliminate the risk of battery exhaustion.
If the transfer process is interrupted or the data is stored incorrectly, then you need to erase the result, reboot both devices, and start over.
Manual contact synchronization
Unfortunately, the restrictions imposed by Apple are quite strict, since most older models work very slowly under the new iOS 9 and its installation does not make any sense. Often the original smartphone is too old and runs on Android less than 4.0, in which case you will have to transfer personal data manually.
The best way to do this is with cloud storage services.. If the numbers are located in Google Contacts, then transferring them is not difficult. Just add to the menu "Mail, Contacts, Calendars" on your iPhone and log into your account. iOS will automatically suggest . You can do the same with Twitter and Facebook profiles, all contacts stored there will also be synchronized. Do not forget to add the necessary mailboxes if you are not going to install a special application.

If the phone book is stored locally, then you should export it to VCF format, you can do this in the settings. At first:
- Select the export / import item in the "Contacts" menu, and find the function of transferring to an SD card (Export vCard). You should not use the automatic file name as it will be hard to find, place the result in the root partition of the drive. Please note that some contacts can be stored on a SIM card, and you often have to change it, since the connector in the iPhone only supports microSIM, so you need to export such contacts separately.
- Now you need to copy the received files to your computer and launch iCloud after connecting your iOS device.
- Next, click on the settings icon and find the "Import business card" item, specify the path to the files.
Ways to transfer media
Users who purchased music through Google Play will only need to install a special application on the iPhone that synchronizes all tracks. To transfer photos, it is also better to use cloud storage, such as Dropbox. Thus, you can not only keep all the pictures at hand, but also not worry about their safety in case of loss of the device.
You can transfer files (music, photo, video) in the classic way. To do this, you first need to save all the necessary data from Android to your computer. Music can be found in the Music or Downloads folder. Photos on devices are located in the standard DCIM folder, of course, if no changes were made by the user. Also, this address may change due to the use of a third-party camera, sometimes other folders may be used.
After saving the content you want from Android to your computer, connect your iOS device to your PC and select it in iTunes. From the "File" menu, select "Add Library" and point to the media library with files. Now go to the "Photos" tab and specify the path to the pictures, it remains only to synchronize the contents.
There is another way. It is not necessary to save the files on your computer, for example, you can put them in the mail and then download them from another device. The main disadvantage is the limited space, often tens of gigabytes of data need to be transferred, but even when using cloud storage, it will take a long time to wait for a full download, since the upload speed of many providers is much less than the download speed. This method is best suited for transferring books and documents, especially since a copy in virtual storage will help you not to lose them in case of an unforeseen situation.
The only thing that cannot be transferred is the applications. The fact is that most of them have separate versions for both operating systems. You can download the necessary ones in the AppStore, but if they are paid, you will need to buy them again, since previous purchases are active only for Android. If there is no such application for iOS, then you need to consider alternative options.
Transferring programs from Android to iPhone can be done through Move to iOS, but you need to understand that not all applications will work on the Apple system. If the program is not in the App Store, then it will not work to transfer it along with all the data from the Android device.
Transferring data from Android
The easiest way to partially transfer apps from Android to iPhone is to use the Move to iOS app, which is available as a free download on Google Play. To perform the operation correctly, you will need:
- Android 4.0 or higher.
- iOS 9.0 or higher.
- iPhone 5 and up.
If we talk about other Apple devices, then the iPad must be at least the fourth, iPad mini - the second, and iPod Touch - the sixth generation.
Before transferring data from Android to iPhone through the Move to iOS program, take a few preparatory steps:
- Turn on Wi-Fi on your Android phone.
- Connect your iPhone and Android smartphone to a power source so that they do not run out of power during data transfer.
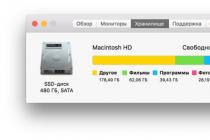
- Make sure the amount of information you want to transfer will fit on your iPhone's internal storage.
- Update Chrome on Android to the latest version if you plan to transfer your bookmarks.
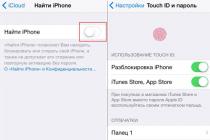
Turn on your iPhone, select your country and language, activate your device, set up Touch ID or Face ID, and create a passcode to get to the restore or transfer information and data screen. If you want to move information to a phone that previously had settings, you will have to reset and reactivate.

Once the transfer is complete, click "Finish" on Android. Return to the iPhone, tap "Continue" and complete the smartphone setup. After starting the system, make sure that the necessary information has been transferred.
To ensure that the contents of your Android device are transferred without errors, do not perform any actions until the operation is completed. The Move to iOS app must remain always open on the screen. If you open another program or receive phone calls, the information will not move. If errors occur during data transfer:
- restart both devices and try again;
- turn off data transfer via the mobile network on your Android phone;
- Turn off all apps and settings on your Android device that may affect the stability of your Wi-Fi connection. Delete all known Wi-Fi networks, except for the one used to transfer information.
Android apps won't show up on iPhone after transfer, but you can quickly find and install them in the App Store.
Manual data movement
We figured out that the Move to iOS program for transferring contacts and other information from Android to iPhone only works when you set up your phone as new. If your iPhone is already in full use, and you do not want to erase settings and content from it, use the manual data transfer from Android. Each content type will have a different order of movement.
To transfer mail, calendars and contacts, it is enough to set synchronization with Google services. For example, on Android, you can sync data with a Google account, and then add it to your iPhone accounts, gaining access to all the synced information.

You can use cloud storage or iTunes to transfer music, photos, and videos. In general terms, the procedure is as follows: you transfer media files to your computer, then add them to iTunes, connect your iPhone and sync.

With books and documents, everything is much easier. If you use popular readers or applications for working with text files, then they always have accounts. Accordingly, in order to gain access to your information, you only need to install the application on your iPhone and log in to the account that was used on Android.
If you want to have the games and apps you used on Android on iPhone, head to the App Store. All popular services and games have versions for iOS, and even if they don't, you can easily find alternatives.
Buying a phone has always entailed the not-so-pleasant procedure of “moving” from an old device to a new one, but recently the need to synchronize and other personal information has been added to the traditional transfer of contacts. It's good if your next smartphone is on the same platform as the previous one, but if you decide to "cross over to the enemy camp", then the task becomes much more complicated. In this article, we will consider two options for transferring data - from iOS to Android and vice versa.
iOS can synchronize contacts, calendar and mail with a Google account, and if you once chose Gmail as your mailbox, there is nothing to worry about - just log into your account on your Android smartphone and all your information will immediately become available on a new phone.
If you didn’t expect to “move” from iOS in the future, then most likely you have this data tied to iCloud, in which case the procedure will be somewhat more complicated.
Contacts
To transfer contacts on your phone, you need to connect an iCloud account and allow them to be synchronized (settings - iCloud - (sign in to your account) - turn on Contacts). Now they need to be “pulled out” from the cloud - for this, on the computer, open the www.icloud.com page, enter your account, then go to the Contacts item and select the necessary contacts.

After that, in the menu called by pressing the gear button, select the Export vCard item, and a VCF file with a list of contacts will be downloaded to your computer. Now open the page www.google.com/contacts, in the left menu, select the "Import contacts" item and open the downloaded VCF file (if you already have a preliminary version of the updated "Contacts" available, in which import does not work yet, you need to open the "More" list in a similar menu on the left, select import, after which you will be prompted to switch to the old version of this service). After that, it remains only to enable contact synchronization in the settings of the new Android smartphone.
Calendar
The transfer of events in the user calendar looks very similar - in the iCloud settings we allow calendar synchronization, on the www.icloud.com website we go to the appropriate section and in the list of available calendars click on the Share icon to the right of its name. In the menu that appears, enable the Public Calendar option and copy the link that appears (webcal://....). We insert it into the address bar of a new page, replace webcal with http, and then press Enter - as a result, a file with a name of hundreds of characters and without an extension is downloaded to the computer. This is a plain text file, which can easily be given a more decent name. To connect it to Google Calendar, open the page www.google.com/calendar, find the Other Calendars item, select Import calendar in the drop-down menu and open the newly downloaded file from the computer - after that, all events from it will be added to your calendar on your Google account.

There shouldn’t be any problems with “moving” the mailbox - if you don’t use Gmail, but iCloud (or any other service), just find any client on Google Play that supports it - for example, Mailbox or myMail.
Bookmarks
Here we will consider the most common option - using the standard Safari browser on iOS and "moving" to Chrome and Firefox, which are popular on Android.
Transferring bookmarks from Safari is also carried out using iCloud (in the device settings, of course, you need to enable their synchronization), however, this is not done using the resource website, but the iCloud for Windows client.

It should be marked "Bookmarks", in the options specify the browser (Chrome or Firefox), click Apply and select Merge. After that, the utility will offer to download the iCloud Bookmarks extension for one of these browsers, and as a result, your bookmarks from mobile Safari will appear in the desktop browser. If you have chosen Chrome, you do not need to do anything further (provided that you have logged into your Google account in it). With Firefox, the task will be somewhat more difficult (especially if you have not previously used user data synchronization in this browser) - you need to set up synchronization in it, for which you need to log into your Firefox account (or create one), do the same on an Android smartphone and enter the code obtained there in a desktop browser.
If you don’t want to install iCloud for Windows, you can get by with iTunes instead (for this, bookmark synchronization with iCloud must be turned off in your smartphone settings). To do this, you need to connect your iPhone to a PC, launch iTunes, open the device page in it, go to the "Details" tab, find the "Other" item in it and select the "Sync bookmarks with:" item (where there may be options for Internet Explorer and Safari) , then click "Apply". Now the bookmarks from the iPhone are merged with the bookmarks of one of these desktop browsers - you just have to run it and export the bookmarks to an HTML file, and then import them in the standard way to the desktop versions of Chrome or Firefox, from where they are “sent” to Android using the method described in the previous paragraph -smartphone.
Photo/video
To transfer photos / videos, you can use the Google+ Photos service - to do this, you need to install the official Google+ client on your iPhone, connect to your Google account in it and turn on auto-upload for photos and videos, then select "Download all photos and videos". Once the download is complete, you'll be able to see all of your content in the Photos app on your new Android smartphone. If you do not want to use the Google+ service, you can perform this procedure without connecting to the Internet at all. To do this, you need to connect your iPhone to your computer via USB, open File Explorer, right-click on the smartphone icon in the list of devices and disks and select "Import images and videos". After that, an import window will appear in which you can configure the parameters of this procedure (select a folder, delete files after copying is completed, etc.). Now it is enough to connect an Android smartphone to the PC and use Explorer to copy the resulting folder to its memory (or to an SD card).
Music
Perhaps one of the most difficult tasks when “moving” is, of course, if your music library is stored in iTunes, and not in the form of MP3 tracks organized into folders (in this case, the whole task comes down to simply copying files from a PC to a smartphone using any file manager).
Google itself recommends using its Google Play Music player, which can upload your iTunes library to its “cloud”, from which you can then listen to it not only on an Android smartphone, but also in a browser on a PC. To do this, you will have to install the Google Music Manager utility on your PC and indicate in it that your music library is in the iTunes library, and then wait for the download to finish (in total, at the moment, the service allows you to download up to 50 thousand tracks, which will be more than enough for any user ).

If streaming "broadcasting" your own music over the Internet does not appeal to you, and you don't want to bother with downloading each album separately (or you use another audio player instead of Google Play Music), you will have to turn to one of the third-party utilities. Unfortunately, they tend to be shareware, like iSyncr for example. This procedure can also be performed using the DoubleTwist audio player, for which there is a desktop client with an interface similar to iTunes.
ANDROID → IOS
As noted at the beginning of the article, iOS can synchronize contacts, calendar and mail with a Google account, so if you used it on an Android smartphone, the task of “moving” from Android to iOS will be much easier than vice versa.
Contacts
If your contacts on your old phone are linked to a Google account, transferring them will be a breeze. First you need to make sure that contact synchronization is enabled on your Android smartphone (most likely, Settings - General - Accounts & Sync), and that the smartphone itself has connected to the Internet at least once after you edited your contacts for the last time. Now it’s enough to add a new Gmail account in the iPhone settings (Settings - Mail, addresses, calendars) and enable synchronization for all available items (Mail, Contacts, Calendars, Notes) in it - after which all of the above will appear in the new smartphone.
If you stored contacts locally, on the phone itself, then the task becomes a little more complicated - in a regular “dialer”, you must first export all such contacts to a separate VCF file (internal memory or on an SD card), and then import them back, but no longer in the phone's memory, but in a Google account. Further actions, as you might guess, repeat the procedure described above. If your contact application does not support import/export of all entries in bulk, you will have to edit each contact individually, manually transferring it to your Google account.
If you want to finally break with the "Google past", contacts should be imported into iCloud. To do this, we create a copy of them in a VCF file (either on the phone, as described above, or on the contacts.google.com website, where you need to select the vCard format), and then import them on the www.icloud.com/#contacts page (calling the menu settings using the gear button and the Import vCard item). Note that in the first case, you may receive an error message "Unable to import vCard" without any explanation - most likely, this means that your VCF file was created in 2.x format, while iCloud requires a version not lower than 3.0.

Calendar
Google Calendar is automatically connected to your new iPhone along with contacts, mail and notes (as described above), so no additional steps need to be taken (except to make sure that sync is also enabled in your iOS settings in your Google account settings for calendar) .
If you plan to abandon your Google account, the calendar should be imported into iCloud, and this is no longer such a trivial task. Of course, if you have a Mac, everything is simple - on the page www.google.com/calendar you need to select the desired calendar, in its settings, click on the ical button in the "Closed calendar address" section, copy the suggested URL, paste it in a new tab and press Enter - after that, an ICS file will be copied to your computer, which you need to "feed" to the system application Calendar.

For owners of Windows-based PCs, everything is more complicated - they will have to use iTunes and Microsoft Outlook for this purpose, since iTunes can only synchronize calendars with this program. You will need to import the resulting file into Outlook, then connect your iPhone to your PC, open iTunes on your device's tab, go to the "Details" sub-item and select the desired calendar in the "Sync Calendars" section. Another option is a third-party utility - for example, Copy My Data (Android, iOS), which can transfer not only the calendar, but also contacts, and photos / videos.
Of course, it's easiest to keep using your old Gmail account, but you can also create a new @icloud.com account. To do this, in the iOS settings, select the iCloud section and enable the Mail application in it - after that you will be prompted to register a new mailbox. And in order to receive correspondence sent to the old address, you need to enable redirection for it - in Gmail we call the settings (gear in the upper right corner), in which in the “Forwarding and POP / IMAP” tab we add a new iCloud address using the button “ Add forwarding address. After that, a confirmation letter will be sent to it - click on the link, return to the Gmail settings and make sure that the correct address is indicated in the "Forward copies of incoming messages to addresses:" line, and then click "Save changes".

Bookmarks
Most likely, you used Chrome on Android, but on iOS you will switch to Safari (if you plan to continue using Chrome on iOS, you don’t need to read further this section - the browser itself synchronizes your bookmarks on a new device).
So, in Chrome, select the bookmark manager (Ctrl-Shift-O), click on the gear in the upper right corner and select "Export bookmarks". We import the resulting HTML file into Internet Explorer, after which we connect the iPhone to the PC, launch iTunes and select "Sync bookmarks with: Internet Explorer" in the device properties. A little lower, in the "Add-ons" section, check the box next to the bookmarks and click "Apply" - after that your bookmarks will appear in mobile Safari.

Photo/video
Everything is simple here. We connect the Android smartphone to the PC via USB, copy the photo and video files to any folder on the hard drive (usually they are located on the device in the DCIM folder), then we connect the iPhone, launch iTunes, go to the "Photo" tab in the device menu and turn on synchronization, after which we select the folder in which the necessary files are located. If it contains a video, additionally check the box next to "Include video in synchronization."

If you do not have iTunes (and do not want to install it), you can use third-party synchronization utilities - for example, the already mentioned Copy My Data, or PhotoSync (Android, iOS).
Music
The transfer of music, as well as photo / video, is also carried out elementarily, and according to the same scheme. The music library is copied from the Android smartphone to the PC, dragged to iTunes, after which synchronization is performed in the settings of the connected iPhone on the "Music" tab - either the entire library in a crowd, or only selected artists.
Results
As you can see, the procedure for transferring personal data, although rather troublesome, is ultimately solvable - after it, all that remains is to “transfer” your favorite applications, or rather, install their versions for the new platform or find the most suitable analogues. However, this is a topic for a separate article.