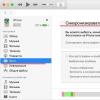
If you have a computer running MacOS (MacBook or iMac), then you have noticed the “kernel_task” process in the “Activity Monitor” more than once. What is it and why does it load the system - we will consider in our article.
This system process can significantly load the hardware of the device (especially the processor). The load is accompanied by an increase in the speed of the coolers of the cooling system.
What is the process
Apple's website states that the main function of "kernel_task" is temperature control by "suppressing" performance-demanding programs.
If the computer begins to heat up, then the process starts and limits the application that caused this temperature increase. The load percentage of "kernel_task" proportionally depends on the heating.
How to disable
This problem is especially worrisome for owners of older Mac models (2012 and earlier) due to the low performance of the device itself. You can solve this by removing some components. Let's consider two options.
Important! All actions you do at your own peril and risk. Be careful.
For macOS Yosemite and above
If your operating system version is younger than El Capitan, then the shutdown process will look like this.
- Go to the "Terminal" → enter two commands in turn:

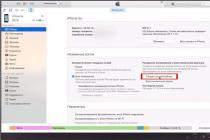
- Open About This Mac.

- "Details" → "System Report".
- Make a note of the information from the “model ID” item (for example, “MacBookPro5.5”).

- "Go" → "Go to folder".

- /System/Library/Extensions .

- Right-click on the "IOPlatformPluginFamily.kext" file → "Show Package Contents".

- "Contents" → "PlugIns" → right click on "ACPI_SMC_PlatformPlugin.kext" → "Show Package Contents".
- In "Contents" → "Resources", find the file with the name of your Mac (for example, "MacBookPro7,1") → delete it.

- Restart the PC → open the "Terminal" → write 2 commands:

Note! If the method did not help, then try the next one.
For macOS El Capitan and later
In the new versions of the "apple" system, system integrity protection is installed, which is better known as "SIP". Because of this, the method differs from the previous one.

Note! To re-enable protection, you must enter csrutil enable instead of the above.
Owners of the new MacBook Pro laptops and iMac Pro desktops are faced with the sudden appearance of a kernel panic error (analogous to BSOD from Windows for MacOS).
The appearance of the error is evidenced by numerous complaints from the Apple technical support forum and third-party resources. The window with an error and the subsequent reboot of the system occurs 1-2 times a day, more often after unlocking the device.
Causes of the problem
Based on the data available today, the problem is caused by the built-in Bridge OS and a special T2 chip, which are responsible for non-power-intensive computer functions - controlling the speed of rotation of coolers, sound processing, and so on. The problem occurs only on computers with a T2 chip. However, there is currently no direct evidence of an immediate cause in T2 and data on the prevalence of the problem.

Attempts by users to fix the problem by cleaning the drive and reinstalling the OS, restoring a copy of the OS through Time Machine, disconnecting peripheral equipment, and even changing the computer did not give full effectiveness. Based on this, it can be assumed that the problem is hidden deep within the system.
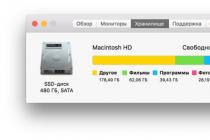
Got an old laptop Macbook Pro 2010 year, which slowed down a lot. Suspicions fell on the disk, since the HDD was installed in those models, it was decided to replace it with an SSD with an already installed MacOS taken from another car.
The problem did not go anywhere and there was no visual improvement. After several checks, resets NVRAM And SMC, since the cooler was spinning at 100% speed, when I was almost sure that the problem was in the piece of iron, I accidentally looked into “ System monitoring” and saw there the CPU usage at 140-250%.
The problem was that the process Kernel_task
ate CPU resources and did not allow the entire OS to work.
Here is what Apple themselves write about this process:
The kernel_task process helps manage CPU temperature by reducing the availability of CPU resources for computationally intensive programs. In other words, the kernel_task process is started when there is a risk of overheating the CPU. By itself, it does not cause such situations. When the CPU temperature drops, the activity of this process automatically decreases.
A solution to the problem was found:
1) First, turn on the display of hidden folders:
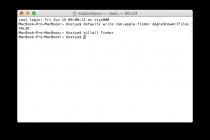
- We go to the "Terminal"
- We drive 2 teams:
defaults write com.apple.finder AppleShowAllFiles TRUE
killall finder
2) Then we determine the computer model:
- Click "About this Mac"
- Next, click the "More" button
- Click on "System Report"
Wherever the hardware is found and remember the "Model ID". In my case, this is a MacBook Pro7,1
3) Follow this path:
/System/Library/Extensions
Choose file IOPlatformPluginFamily.kext, right click and select "Show Package Contents"
4) Go to Contents/PlugIns , then on the file ACPI_SMC_PlatformPlugin.kext also select "Show package contents"
5) Next to Contents/Resources find the file with the laptop model. As you remember: I had a MacBook Pro 7.1. Delete this file! (If the required file is not available, delete the nearest models, for example, there is no 8.1, delete 7.1 and 9.1)
6) Restart your computer. You will probably have to do this procedure after every Mac OS update.
To return the folder display as it was before, run the command in the "Terminal":
defaults write com.apple.finder AppleShowAllFiles FALSE
killall finder
If you can't delete the model ID
In the event that you have MacOS El Capitan or higher, the system will not allow you to delete the identifier file, since you must first remove the system integrity protection (System Integrity Protection or SIP for short).
SIP can only be disabled from recovery mode. You need to reboot, get access to " Terminal” and enter the shutdown command.
- Turn off the Mac and hold down the keys ⌘R (Command + R) when turning it on;
- After loading, we get into the recovery menu. Open the section " Utilities" and run " Terminal»;
- We enter the command:
csrutil disable - Reboot Mac.
To enable protection, you need to enter recovery mode again, open the terminal and enter the command.
Many readers have met or at least heard about such a phenomenon as the “blue screen of death” (BSOD), which appears in operating systems of the Windows family when critical system errors occur that it cannot cope with without a full reboot. OS X has something similar. Critical errors at the Mac OS X kernel level are called "kernel panics". The kernel is the heart of the system, responsible for the interaction of both components and peripherals, as well as the software of your computer. Therefore, if a critical error occurs in the kernel, often a restart of the kernel, and therefore the system, is required to recover from it.
Most often, such critical errors appear as a gray screen, against which you are asked in different languages to forcibly shut down your computer due to an error. 
However, this does not always happen. Sometimes kernel errors lead to a complete system freeze or spontaneous reboots and shutdowns of the computer. In this case, the main sign of "kernel panic" will be the appearance of a corresponding entry in the system logs with a name like "Kernel_ YYYY-MM-DD-HHMMSS _computer name.panic" where YYYY-MM-DD-HHMMSS is the sequentially specified year, month, date and time of the occurrence of the error with an accuracy of seconds, and computer name- computer name.
Many hardware malfunctions, both internal (for example, RAM) and peripherals (such as external drives), as well as software malfunctions, can lead to this kind of error. Unfortunately, when diagnosing critical system errors, the "circle of suspects" is very large, since the kernel interacts with every process and service in the system, not to mention every external and internal device. As with many things with Mac OS X, when critical errors occur, it's much easier to try out a few general approaches to fix the problem than to try to pinpoint the culprit using reports and logs.
Possible causes and solutions.
Malfunction or failures of random access memory (RAM)
Memory issues are one of the most common causes of critical crashes. If you are unable to trace the dependence of the occurrence of "kernel panic" on the connection of any specific devices or the launch of certain processes, it is worth checking the RAM.
To do this, you can use the Apple Hardware Functional Test (AHT) or, if your Mac was released after 2013, Apple Diagnostics. If your computer came with a system software disc, insert it into the optical drive, turn off the computer, and then press the D key the next time you turn it on.
Devices that shipped with OS X 10.7 and later also support running web-based tests. To do this, make sure that your Mac is connected to the Internet and hold down the keyboard shortcut ⌥Alt + D at startup.
To test the RAM, you can also use third-party utilities, such as Rember or Memtest.
It is also worth noting that some versions of the system or firmware may be more (or less) compatible with one or another type of equipment, and therefore their updates can lead to conflicts with the equipment and critical failures. This happens rarely and more often it happens the other way around, but still there is a possibility.
NVRAM and SMC failures
A small sector of your computer's memory called Non-Volatile RAM, or NVRAM, stores certain settings that OS X can quickly access. Errors can creep into the settings stored in NVRAM, which in certain cases can lead to a kernel panic. In order to eliminate possible NVRAM memory errors, it is worth resetting it. To do this, turn off the computer and the next time you turn it on, hold down the ⌘Command + ⌥Alt / Option + P + R keys and hold them until the computer restarts and you hear the boot signal a second time.
On older Macs, this information was stored in parametric RAM (PRAM). Resetting NVRAM on Macs with Intel processors is done using the same key combination and is similar to resetting PRAM.
If you are using a wireless keyboard, there is a small chance that your computer will not respond to key presses on it. In this case, you should connect a USB keyboard (it doesn't matter if it's an Apple or Windows keyboard) and try again with it.
In addition, Intel-based Macs have a system management controller (SMC) that is responsible for many low-level functions such as battery life management, thermal management, laptop lid response, and many other aspects of powering your Mac. In case of problems with the operation of the computer, the SMC settings should also be reset.
On laptops with a non-removable battery:
- Turn off your computer.
- Connect the MagSafe or USB-C power adapter to a power source and to your computer.
- On the built-in keyboard, press ⇧Shift + Control + ⌥Alt/Option (left) and the power button at the same time.
- Release the keys and the power button at the same time.
On Mac laptops with a removable battery:
- Turn off your computer.
- Disconnect the MagSafe power adapter from the computer, if connected.
- Remove the battery.
- Press and hold the power button for five seconds.
- Release the power button.
- Reconnect the battery and MagSafe power adapter.
- Press the power button to turn on the computer.
On Mac Pro, iMac, Mac mini and Xserve:
- Turn off your computer.
- Disconnect the computer power cord.
- Wait 15 seconds.
- Connect the power cord.
- Wait 5 seconds and then press the power button to turn on the computer.
Malfunctions of external devices (peripherals)
Firewire, Tunderbolt and USB devices are also very likely culprits for crashes. The reasons may be very different, but the main one is that these devices very often access the controller of your computer, exchanging data packets with it, and if the controller receives an incorrect packet, this may cause a failure.
In this case, "kernel panic" can occur immediately when the device is connected, at system startup, if the device was already connected to the Mac, and at the moment the computer wakes up from sleep mode.
In the latter case, one workaround might be to disable the computer from going to sleep in System Preferences → Power Saver.
A more common approach to this problem is usually to disconnect all external devices and connect them in series. Thus, by enumerating options, you can determine which device is causing failures, although this can be quite difficult in some cases, since sometimes the problem may not appear immediately, but after several minutes, or even hours.
Having found out which device is causing crashes, it is worth checking for updates to the firmware of this device and drivers for it, as well as updates to the system itself. It is likely that the problem is more of a software nature and updates will fix it.
If you use hubs or splitters that allow you to connect several devices to one physical port on your computer at the same time, you should at least temporarily abandon them, as they can also cause critical errors.
Finally, if none of the above helped, you should try connecting a similar device of a different model or manufacturer. Unfortunately, it happens that some peripherals may not be compatible with your computer for one reason or another.
Malfunctions of components
Recurring crashes can be caused by faulty, damaged or misconfigured components such as built-in Airport and Bluetooth controllers and other network devices, hard drives and solid state drives, and sometimes faulty or malfunctioning processors.
Often such problems can be solved by simply reconnecting the appropriate components. If you've recently upgraded your Mac (especially if you did it yourself), it's worth making sure that all PCI, PCI Express, AirPort, and other expansion cards are correctly connected to the appropriate slots.
Cache errors
Temporary files created by the system and user applications play an important role in the operation of OS X, which is why if some kind of error appears in them, subsequent access to them can lead to a crash. Before proceeding with a detailed diagnosis of the problem, it is worth starting with clearing the cache, as this can save you time and effort. You can use specialized utilities like Onyx or Cocktail, or manually delete temporary files. Whichever option you choose, we strongly recommend that you make a full backup of your system beforehand!
- open Finder and press the keyboard shortcut ⌘Command + ⇧Shift + G
- In the window that opens, enter /System/Library
- Click the "Go" button
- In the folder that opens, find the files named "Extensions.kextcache" and "Extensions.mkext" and delete them.
- In the same directory, find the "Caches" folder, select all its contents and delete it.
- Again, press the combination ⌘Command + ⇧Shift + G and enter /Library/Caches/ in the window that opens
- Highlight and delete all contents of the folder again.
- Finally, press ⌘Command + ⇧Shift + G again and type in ~/Library/Caches
- Delete the contents of this folder.
- Reboot the system and check for critical errors.
Malfunctioning Mac OS X components and kernel extensions
Mac OS X components and kernel extensions is a very broad topic, not only because they are vulnerable to a huge number of different malfunctions, including data corruption, hardware incompatibility, incorrect permissions settings and many others, but also due to its multiplicity. For example, you can look in the /System/Library/Extensions folder, each file in which extends the functionality of the Mac OS X kernel and can be the cause of the “kernel panic”. On average, the system has about 250-300 kernel extensions (and this is far from the limit), which can turn error diagnosis into searching for a needle in a haystack.
In this case, if you are sure that the problem really lies in the system files, it may be easier and more efficient to reinstall the system over the existing one from the recovery partition (accessed by holding down the ⌘Command + R key combination when turning on the computer), which will leave intact user data, but will replace system files with known working ones.
In some cases, critical errors may appear after updating or upgrading the system, which also most often refers to problems with system files. The easiest way to solve such problems would be to restore from a backup to the time before the update, but there are other ways that we wrote in one of ours.
Incorrect settings
Incorrect settings of your system or damage to the files themselves, in which they are stored, can also cause critical failures. Often the behavior of the system can suggest which settings are not configured correctly. For example, if the problem occurs when the computer or drives (due to inactivity) enter or exit sleep mode, disabling features in the System Preferences → Energy Saver menu can probably help.
If you cannot determine the source of the problem, you can use one of the general approaches and create a new account. This way you will reset all user settings for the new account and you can check if this solves the problem. If the problem has been fixed in the new account, but you have not been able to determine its cause, it may be more convenient to transfer all the data you need to the new user and delete the old one.
In addition, starting the system in safe mode can help. To do this, turn off the computer and the next time you turn it on, hold down the ⇧Shift key. In this way, you will not only temporarily disable all third-party kernel extensions, system add-ons and settings that can lead to crashes, but also clean up some temporary files that can also cause the problem.
And finally, if you have an external drive (flash drive or external drive), you can perform a clean install of the system on it, then restart the computer and hold down the ⌥Alt / Option key when turning it on. As a result, a list of devices from which you can boot the system will be displayed on the screen. Select your external drive and press ⏎Enter. Thus, you can check the operation of a computer with a clean system without third-party software and additional user settings.
If the methods described above did not give a positive result, it can be said with almost certainty that the problem is of a hardware nature. In this case, attempts to independently solve the problem have little chance of success. It is worth considering the possibility of contacting a service center for qualified assistance with further diagnosis and troubleshooting.
Sometimes you notice that the Mac is not as fast as it used to be. Programs run slower, the processor heats up, and the fan runs at its limit. Today we will tell you one of the reasons for such a computer operation.
« configd' is the system configuration daemon that runs on top of the Mac OS X system. Most users will never see it because 'configd' runs in the background of the Mac. Also, this daemon can sometimes start to "act up", which causes unusual jumps in the CPU, and the sound of your Mac's fan becomes like a hum like in a wind tunnel. All this can be diagnosed by running Activity Monitor, and then sorting the processes by "% CPU". In case of incorrect work, "configd" will occupy somewhere between 20-95% of the processor resources. If this behavior continues for a minute or so, then this is a common occurrence that can be ignored, just let it work honestly. But there are times when "configd" can load the processor for several hours for no apparent reason.

Solving the problem of "configd" working through the terminal
To force "configd" to resume, we first kill the process with the "killall" command. Since this is a system process, it will be immediately restarted. In every case where "configd" will waste CPU resources, this trick will solve the problem.
Launch a terminal (located in /Applications/Utilities/) and enter the following command:
sudo killall config
You will need to enter the administrator password to run the command as super user. Running the command without sudo won't work.
If you left Activity Monitor open and sorted by CPU, you'll notice that "configd" disappears and reappears immediately, but it's no longer in the top of the list and doesn't eat CPU anymore. Now a normal daemon will be somewhere between 0% and 1% CPU .

If you have problems with configd after using the "killall" command, skip to the bottom of this article to learn more about troubleshooting this daemon.
Working with "configd" without a terminal
If you're not familiar with the command line, there are two other options:
- Close all running Mac applications
- Restart your computer
Restarting the Mac has the same effect as killing the configd process in the terminal. This method can help if the daemon's inadequate operation is caused by the incorrect operation of one of the running programs.
Diagnostic "configd and daemon help
Officially, Apple describes configd as follows:
« Configd" daemon is responsible for many aspects of local system configuration. "configd" saves the data used by the current state of the system, provides application notifications when this data changes, and performs a number of other agent configurations.»
If you want to try to diagnose the cause of the incorrect behavior of "configd", then first of all, you can look at the discrepancies in the PLIST files, which are located in the following directories:
/System/Library/SystemConfiguration/
/Library/Preferences/SystemConfiguration/
Another option is to restart "configd" but in advanced mode with the following command:
sudo /usr/libexec/configd -v
This command will export detailed information about what is happening in the system to the console. Comparing this information with what is in the system directories mentioned above can be very helpful in finding the exact cause of the daemon not working properly.
General experience has shown that some applications and processes invoke the "configd" daemon more than others. This occurs with some printers, Java-based applications, with repeated unsuccessful attempts to connect to the network. That is why sometimes resetting all system applications can be very effective in resolving this issue.