Many faced the problem of recovering the operating room windows systems 7 after crashes, viruses, or incorrect updates. Often, the problem can be solved only by reinstalling the entire system and the corresponding loss of many data, accounts on forums, bookmarks in browsers and other information, so meticulously collected in the course of the life of your computer. But at the same time, only a few people know that the Windows7 operating system has a built-in backup function. system files, allowing you to "roll back" 2-3 days ago and restore the operating system without reinstalling.
How to enable backups
First you need to enable this function... To do this, click Start - Control Panel and find the "Backup and Restore" item.
On the left side of the window there is a button "Create a system image". This is a very useful feature when you have new computer, with drivers, updates and initial setup. You can make an image operating system and in the event of a computer failure (for example, when the hard drive breaks down), restore performance without the tedious installation of Windows7, drivers and adjusting windows "for yourself." I highly recommend doing this!
Creating an operating system image
To create a system image, you need an external HDD, USB flash drive (16-32 GB) or, if you have a second hard drive in system unit, you can create an image there. Never store the operating system image in your home folder or on the C drive. In the event of a failure, you will not be able to take the image from there. So, when you have decided on the storage location, in the window that appears, select where to save the image and click "Next".

In the next window, the system will warn you that it will save. Leave everything unchanged and click "Archive". When the process is over, you will have a Windows7 backup configured for your computer and with your presets.
Setting up archiving
Also in "Backup and Restore" there is an item for setting up archiving. It is this setting that will allow you to "roll back" the system 2-3 days ago if a failure occurs.
By selecting the "Archiving settings" item, you must specify the disk on which the archive will be created. Again, this should not be the C drive (if the operating system is installed there). It is also worth understanding that if you use external hard disk or network storage, these devices must be available during the backup. The ideal option for an archive is a second hard drive in the system unit.

Select the location for storing the archive and click "Next".

If you do not know what exactly needs to be archived, then it is better to leave the recommended choice, but in the "manual" mode, you can configure archiving more flexibly. Let's consider the second option. Select "Give me a choice" and click next.

In the next window, select what you want to archive. You can create an archive of users' home folders: then the archive will contain "My Documents", "My Pictures", etc. for selected users. You can archive the entire C drive. You can also archive an image of the entire windows operating system (highlighted in red in the figure). Then, in addition to the original image, you will have a complete current windows image 7. I recommend checking this box. Keep in mind that if you have selected this item, then you will not be able to store multiple copies of images for different dates. There will be only the last archive. Click the next button and set up the backup schedule.

Set the frequency and time of archiving. Choose the day and time when the computer is most often turned on. This is the daytime of weekdays, for office computer or an evening for home. Click OK. When everything is configured, you can click "Save parameters and start archiving". Initial archiving will begin, which will be supplemented with new data, in accordance with the specified schedule.
Operating system recovery disc
Another important feature of configuring backup and imaging is the windows 7 system recovery disc.

This is the disk from which you can initially boot your computer if windows 7 is not able to boot normally. And after booting from the disk, you can select an archive or image from which the operating system will be restored. To create a disc, select the appropriate item in the "Backup and Restore" window.

The system will ask you to insert the CD into the CD drive. Click Create Disc. After completing the operation, you will have a recovery disc ready. If a failure still occurs, and there is no recovery disk, then it can be done on any other computer with Windows7. This is a universal disk that is not tied to a specific computer.
The rest of the article will tell you how to recover the system after a failure.
Good day, dear readers, Trishkin Denis is with you. A computer is a complex engineering system. Like others, it can fail from time to time. Therefore, it is important to monitor the safety of information. To do this, you can use different tools, one of which is the built-in application - backup. In the event of a system failure, this function will help you quickly put everything back in place. So how to do Windows recovery 7 from backup correct?
What is backup and recovery?( )
Operating systems from Microsoft have a tool that allows you to create a copy of information, and use it if necessary. Sometimes this is due to problems with Windows itself. In other cases, this outcome can be caused by hard disk. Therefore, many recommend transferring information to another medium, be it a portable hard drive or CD-ROM. Today technology allows you to put a copy even in cloud-based tools.
Create a restore point( )
The load point is used to return data on the computer, in the order and volume that was at a certain point in the past. It should be noted that this refers to system information and user files will not be affected in any way.
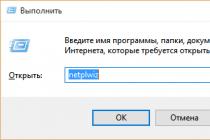
How to create the desired point? In order to get to the menu, you need to go to “ Start"In the search bar write:" ". In addition, you can go here via " Control Panel"By choosing" Show all icons».
Once in the window, there is an option to configure a scheduled backup. Or you can do it yourself.
So, we need:
Important! In this way, all registry data is copied.
Backing up personal data( )
We need:

Creating a recovery disc( )
A System Recovery Disc is a portable media that stores OS boot files that are used to start Windows. This option is considered the best compared to a regular backup, as it is possible to return everything as it was, even if the hard disk was damaged.
So, we need:

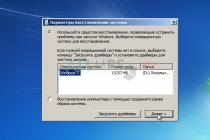
System Restore( )
How to restore the operating system to work? It's simple, you need:

It should be noted that this is how the registry is restored, and therefore there is no need to make any additional movements in this direction.
Resuming files from a backup( )
If personal information is lost for some reason, and you want to return it to its full functionality, you need to use the appropriate tool:

It should be noted that this can be done with data received from another computer. True, first they need to somehow be delivered to their own device.
Recovering from a disk( )
To return necessary information from a separate portable device, you must:

Description of recovery options( )
1 Startup Recovery - Helps get back important data that is used by the operating system during boot.
2 System Restore - replaces the files used by the OS. At the same time, it does not in any way affect user data, such as music, photos, and other things. This action cannot be undone. But in the future, you can choose a different recreating point, if there is one.
3 Image recovery. Of course, you need to copy the entire shell first. A system image is an archive of the partition on which Windows was installed. This returns all user files that were stored on disk at the time of creation.
4 Memory Diagnostic Tool - A tool that checks the appropriate sections on your computer.
5 Command line. Advanced users can use this tool to troubleshoot problems.

increase
Running the program from the command line( )
Recovering with Acronis True Image( )
Besides the standard Windows solutions, there are also third party tools. The most popular is the program Acronis True Image.
To restore the operating system to work, you need:

Then the process will start. After the end, you will need to reboot.
Bringing the system back to life via bootable media( )
It must be said right away that for this method you must have a bootable disk with the program. If there is one, then:

System Restore is a handy tool that can help restore not only Windows functionality, but also files in the shortest possible time.
It is important to understand that in order to achieve the desired effect, it is necessary to create backups... It is also better to use a bootable disk. Of course, this is not a panacea, but it still gives additional features save information, which today is often more valuable than money.
Hope you find this article helpful. Subscribe and invite your friends. You will learn a lot from me.
- Regularity. Making backups should be as regular as brushing your teeth in the morning.
- Examination. Check the backup you just made. It will be very disappointing if, at a particularly tense moment, your magic wand turns out to be a dummy. Open several files from the archive and make sure they work.
- Separation. It is better to store backups not in one place, but at least in two. For example, on an external hard drive and in the cloud. After all, disks sometimes fail, and cloud storage may not be available at the right time.
- Delimitation. Divide what you intend to store into several clear categories. Data of varying importance also requires a different approach to archiving.
System solutions
Windows
Windows has regular facility backup and restore, which allows you to save both individual files and an entire image from which you can restore the system in the event of a failure.
Windows 7
Go to the "Control Panel" by left-clicking on the "Start" button and selecting the appropriate item. In the "Control Panel" select "System and Security" → "Computer Data Archiving" → "Configure Backup".
Next, the system will ask you to specify the location to save the archive. Please note that if you want to back up data from drive C, you will not be able to save it there. To do this, you will have to select another medium, for example, a second physical disk, USB flash drive, DVD or a folder in local network... If you recall the principles of creating a backup, the archive must be stored on a separate medium, and not on the same computer from which the copy was made.
Next, the system will prompt you to automatically or manually select folders for archiving. Click on "Give me a choice" and in the window that opens, mark the folders that you want to save. Click Next → Save Options and Exit.
Now in the window "Back up or restore files" there is a button "Archive". Clicking on it will start the process of archiving your data.

Recovery follows the same principle. To do this, click on the item "Select another backup copy to restore files" and specify the one to which the backup was performed.
Windows 8 and higher
The built-in File History tool allows for real-time archiving. It only needs initial setup to work.
Go to "Control Panel". To do this, click on the "Start" button with the right mouse button and find the required line in the context menu.
Select a drive other than the system drive, a USB flash drive or network folder... Click Enable.
File History will automatically copy the following libraries: Documents, Music, Pictures, Videos - and standard user folders: Windows, Desktop, Favorites.
By default, backups are made every hour, but you can change this time, for example, to 10 minutes. However, this will require more disk space. The retention time for each copy can be adjusted in the Advanced Settings menu.
macOS
Time Machine is a standard Apple solution for creating backups of applications, files and folders, documents, videos, music.
To work with Time Machine, you need a third-party storage device, such as a USB flash drive, external hard drive, or network solution.
When connected external drive To Mac computer a prompt should appear: should I use it as a backup storage? Select "Use as backup disk».

If the window does not appear, the backup disk should be selected manually:
- go to the menu and open the Time Machine settings;
- click on "Select backup disk";
- select the one you want and click on "Use disk".

Backups will be automatically created once an hour, backups for the past month - every day, and all-time backups - every week. Do not be afraid that the volume of your hard disk will be small. Time Machine will save only changed information, and old copies will be automatically deleted as disk space becomes full.
Android
Android Backup Service
Designed to create data backups Google accounts... With its help it will be possible to save:
- data about Wi-Fi networks;
- desktop wallpaper;
- Gmail settings;
- annexes Google play;
- language and input settings;
- date and time;
- row settings third party applications.
To create a backup you need:
- open device settings;
- go to "Personal data" → "Restore and reset";
- enable "Data backup".
To restore data on another device, you just need to log in with your account. To restore the settings of the saved applications, go to "Personal data" → "Restore and reset" → "Auto recovery".
Synchronization
Android has a standard sync tool that allows you to save user contacts from Google Play apps, calendar, display settings, languages and input methods, Google data Drive and settings of some third-party applications. The tool requires a required Google account.
Android sync is enabled by default. If you want to get the most recent backup, do the following:
- open the phone settings;
- in the "Accounts and sync" section, select Google;
- put the necessary checkboxes and click "Synchronize".


The data will be automatically sent to the Google storage cloud. To restore them on another Android device, you just need to connect your account on it.
You can also synchronize most of the popular accounts: Skype, Telegram, Viber and VKontakte. To sync photos and images, Android has a built-in google solution Photo.
iOS
iTunes
Apple's universal app for receiving and playing content. Allows you to locally save data from a device connected to a computer under Windows control or macOS. This is especially useful when you don't have an Internet connection.
To create a copy when iTunes help do the following:
- connect the device to the computer;
- go to the "Devices" tab;
- click "Sync".
- Photo;
- notes;
- list of contacts;
- calendar;
- SMS / MMS messages;
- Safari browser;
- access point settings;
- application data;
- home screen view.
iCloud
Cloud service for storing user data. Like any cloud, it has two limitations: the need for Internet access and a relatively small (5 GB) amount of free allocated space.
To save data using iCloud on your device, go to Settings → iCloud → Backup and start the backup process.
ICloud stores:
- history of purchases in the App Store;
- Photo;
- Phone settings;
- application data;
- home screen view;
- ringtones;
- voice mail.
Software
Windows
License: commercial software.
Russian language support: there is.
A simple solution for creating backups. Allows you to save both individual files (photos, music or movies) and mail, for example from Microsoft Outlook or TheBat.
In the main window of the program, click "Create new task"→" Create a backup copy ". Select the data you want to save from the directory tree. In our case, this will be the "Music" folder on the desktop.


Finally, give the task a name and click Finish. Archiving is complete.
Data recovery follows the same principle. Select the saved backup, and then specify where you want to restore it.
The trial period for using the program is 30 days. The developers offer to purchase the full basic version for 800 rubles. There are other versions of Handy Backup - Professional and Expert. Their capabilities are much wider and tailored for professional needs, for our purposes, the Standard version is quite enough.
License: shareware.
Russian language support: no.
Another solution for backing up and recovering lost files. The interface is so simple and straightforward that even the absence of the Russian language will not be an obstacle.
First, choose where to save your data. Let it be removable disk E.

The next step is to specify the data to save. The program offers as a smart choice, where you can mark the desktop files at once, system folders"Pictures" or "Videos" and a tree of catalogs. Go to it and save the already familiar "Music" folder.

After clicking on the checkbox, the archiving window will open. On the selected disk, the program automatically creates a Genie TineLine folder, where it places the saved files.
Save and Restore features are available in Genie Timeline Free Basic Edition. Extended paid versions Genie Timeline Home and Genie Timeline Pro are much more powerful: email notifications, highly secure data encryption, and scheduling. But the Free version is sufficient for saving home files.
Genie TineLine has an iOS app that you can use to check the status of your backups on your computer.
License: commercial software.
Russian language support: there is.
Powerful tool for backing up and restoring data. You can store backups not only on physical disks, but also on your own cloud service Acronis. True, for this you will have to subscribe for a year, and the amount of space provided will depend on tariff plan... With the standard subscription, 50 GB are allocated, with the purchase of the premium version - from 1 TB.
Immediately after installation, the program prompts you to choose what data to send to the copy: from the entire computer, from disks and partitions, or individual folders.

Select "Files and Folders" and select the ones you want. Let it be the "Music" folder on your desktop again. Click "OK" and go to the storage selection.

Select flash drive E, click OK → Back up again. A copy of the Music folder was created on the flash drive.
Acronis has others useful functions... For example, "Archive" allows you to free up disk space by compressing files big size, and the Clone Disk tool will create a complete copy of the local disks, which in case of failure will allow you to restore the original state of the system.
The cost of the program is 2,700 rubles. A standard subscription for a year will cost users 2,400 rubles, an extended subscription - 5,100 rubles. Mobile applications work in conjunction with the desktop version and are downloaded for free.
macOS
Carbon cope cloner
License: commercial software.
Russian language support: no.
Utility for creating a duplicate disk. Support for the Russian language is not provided, but it will not be difficult to understand the interface.
In Source Disk, select the disk you want to copy. In Target Disk, specify the destination for the copy. Start the process with the Clone button.

The free period of using the program is 30 days. After Carbon Cope Cloner will cost 2 405.65 rubles.
Android
License: shareware.
Russian language support: there is.
Convenient solution for backing up and syncing Android applications that does not require root rights. However, for full functionality, you will have to install Helium on a computer running Windows, Linux or macOS.
After installing the application on your smartphone, you will immediately receive a notification about the need for a desktop version. For ease of installation and saving time, the program offers to send the link to a user-friendly messenger or email. From there follow the link to the program's website, download and run. Installation in the "Next" → "Next" → "OK" style is not difficult.
While the program is being installed, mobile app asks to connect the phone to the computer and enable USB debugging.


After receiving notification of successful synchronization, the smartphone can be disconnected from the computer.
Open the mobile app. From the list installed programs select the ones you need and click on the "Reservation" button. Specify where the backup will be stored and wait for the process to complete.


To restore from a backup, go to the "Restore and Synchronization" tab, specify the location with the copy, select required applications and click "Recovery".
The basic version of the program is free, the cost of the extended version is 149.86 rubles.
The extended version allows you to:
- disable ads;
- set up a scheduled backup;
- enable synchronization between Android devices;
- save data in the cloud.
Application cannot be installed by owners Motorola devices and some Sony models.
License: shareware.
Russian language support: there is.
The most popular application backup tool among Android users. Requires root access to the device.
To create a backup copy of one or more applications, open the "Backups" tab, which presents full list installed software. An exclamation mark next to an application indicates that a copy has not yet been created for it. The phone icon means that the program is stored on internal memory devices. The SD card icon indicates applications stored on the memory card.
Select an application and in the menu that opens, click "Save".


The backup has been created. Now, if you enter the application again, you can see the "Restore" button.
Titanum Backup supports group work with applications and backups. To do this, go to Menu → Batch Actions.
This function allows you to:
- check backups - both recently created and all of them - for errors;
- make backups of all installed applications;
- make backups of all system data;
- delete old backups;
- restore all backups;
- restore all system data;
- clear application cache;
- uninstall system or user applications.
The functionality of Titanium Backup is much wider, but for our purposes the listed features are quite enough.
The extended version of Titanium Backup costs 349 rubles. Its main features:
- creating multiple backups for the application;
- encryption of backed up data;
- checking all archives;
- batch freeze and thaw applications;
- synchronization of backups with the cloud.
iOS
iMazing
License: commercial software.
Russian language support: there is.
Compatibility: Microsoft Windows, macOS.
In fact it is file manager with the provided backup option. In many ways it is similar to iTunes, but it's much easier and more enjoyable to work in it. You can transfer data both via cable and via Wi-Fi, and there is no limit to the number of connected devices in iMazing.
When you connect your device to your computer, iMazing automatically backs up your device. The function of changing data directly in the saved copy is very useful: the next time you connect, the changed data is instantly synchronized.
The free period is 30 days, after which you will have to pay $ 39.99 for use on one computer.
License: commercial software.
Russian language support: no.
Compatibility: iOS.
A tool for backing up devices with. Allows you to save notes, contacts, photos, messages, call history and more.
To create a backup, just select what you want to save and click on the corresponding icon. A copy can be stored on a smartphone, computer, in the cloud, or sent by email.
To restore data, click on the Restore button in the menu on the left side of the screen.


BackupAZ costs $ 2.99.
iLex
License: free software.
Russian language support: there is.
Compatibility: iOS.
And this one software will require you to have a jailbreak. Free app iLex allows you to save absolutely any data from the device, moreover, it does not need a computer to work.
Having created a backup copy, save it to wherever it is convenient for you, and after reflashing the device or in case of loss, copy the archive to your phone and restore the necessary information.


Cydia
License: free software.
Russian language support: there is.
To do this, just go to Manage Accounts, enter your account and select Installable Purchases. This is the only way to do this only for purchased applications. Cydia does not save information about free ones.
Cloud solutions
Google drive
License: shareware.
Russian language support: there is.
Compatibility:
Allows you to store user data on Google servers, differentiate access rights to files and folders, open access and share them with other Internet users.
The repository includes:
- Google Drive - serves for storing files;
- Gmail - saves the user's contacts and is a powerful email client;
- Google Photo - Automatically finds images on devices and saves them to the cloud.
Free 15 GB. For a larger volume, you will have to pay from $ 2.99 to $ 299. The maximum storage capacity is 30TB, and the downloadable file is 5TB.
2 GB of storage is available for free use. The cost of 1 TB will be 9.99 €. Unlimited space can be purchased for € 10 per month.
Yandex.Disk
License: shareware.
Russian language support: there is.
Compatibility: browsers, Microsoft Windows, macOS, Android, iOS.
A cloud service of Russian origin, formerly Yandex.Narod. Like previous solutions, it allows you to save data in the cloud and share it with other Internet users. Supports synchronization between various devices.
Free users are provided with 10 GB. For an additional 10 GB, Yandex asks to pay 30 rubles, for 100 GB - 80 rubles, while the cost of 1 TB will be only 200 rubles.
Using the functions of the Windows Control Panel, you can:
- back up the specified folders on a schedule and restore them from a backup
- create a complete system image
- create a bootable Windows recovery disc
History of the issue
The information in this article applies to Windows 7, 8, 8.1, and 10. Initially, we were talking about backup options. copy windows 7 - creating file archives and disk images... In Windows 8, they were replaced by File History and Refresh Your PC, respectively.
Nevertheless, everything written is applicable to Windows 8 and 8.1, since it retains the functions of the previous system. You can find them by searching in the control panel.

Enlarge drawing
In Windows 10, the Refresh Your PC feature from Windows 8 made life long, but the old features of Windows 7 have survived. You can find them by searching for the word reserve in the start menu or the old control panel.

On this page:
Archiving Features in Windows 7
Windows 7 allows you to create both a backup of folders and a complete image of partitions hard disk.
| Archiving type | Technology and capabilities |
| User files |
|
| Partition image |
|
These features, combined with the ability to boot into a recovery environment without an installation disc, should satisfy the needs of most home users. Now they can do without third-party programs Reserve copy.
UI changes
The changes to the backup capabilities of Windows 7 have affected not only the technology, but also the user interface. In particular:
- redesigned interface of the main window of the control panel item
- created a new user interface for managing the space occupied by backups
- simplified file recovery using the wizard
- integration with the support center has been implemented to timely notify users of the need to create a backup
The elements user interface archiving is described in the steps below.
Configuring Regular Backup Options
By default, no backup is configured. Click the link Configure backup in the main window of the control panel item to set the archiving options.

The options for placing a backup copy of the files are shown in the table.
| Accommodation | Comments (1) |
| Internal hard drive | You can place archive files on:
|
| External hard drive | If scheduled backup is configured, external hard the drive must be connected at the time of the backup. Note... Windows 7 does not support creation images systems on flash drives. |
| The local network | Backups are supported only to network computers running Windows 7. Of course, you will need credentials to access the computer hosting the backup. |
You can place file archives on partitions formatted as in file system NTFS and FAT32. When backing up to a hard disk, files are located at the root of the partition. You cannot specify a subfolder for the archive, but nothing prevents you from placing other files and folders on this disk.
The rest of this article discusses how to back up to a partition on the internal hard drive. Having decided on the location of the archive, you must set the parameters for archiving. You can provide this solution to the operating system, or you can choose the folders yourself.

At self-choice you can create backups:
- custom files including libraries
- local drive folders
- complete system image

At the end, Windows 7 displays a summary of the backup options.


The schedule parameters you set are saved in the task scheduler, which is responsible for the timely start of archiving.
When you finish configuring archiving options, you are returned to the main window of the control panel item.
Backing up files
All archiving options are now displayed in the main window. Click the button Archive to start the backup process.

The archiving progress is displayed with a progress bar, but you can see the details by clicking the button View details.

After completing the backup, you can view the information about the used disk space and proceed to manage archives.
System imaging
This function has a number of limitations, which are useful to know so that later it will not be excruciatingly painful.
- Only NTFS formatted disks can be included in the image.
- The image can be saved only on a disk formatted in the NTFS file system.
- The image cannot include the disk or partition to which the image is saved.
- All system and boot disks or partitions (see the Disk Management snap-in) are forcibly included in the image.
- The image can only be saved to a network location in Windows 7 Professional, Ultimate, and Portable.
- Unable to restore a 64-bit Windows image to a 32-bit system.
- The size of the recovery disc or installation disc must match Windows bitness in a backup image. Unable to restore 64-bit Windows image using installation disk or a 32-bit Windows recovery disc, and vice versa.
- An image saved on a UEFI PC cannot be restored on a BIOS PC.
- When restoring a system image from dynamic disk, it is impossible to restore the configuration of disks and partitions saved in the image. Therefore, the image must be saved on a basic disk.
- The image cannot be restored to a partition smaller than the original disk.
- The image is saved to the root of the target drive in the folder WindowsImageBackup... If the folder is moved from the root of the disk or renamed, the image cannot be restored.
- Storing a system image on a different disk partition is not a backup. In the event of a disk failure, you will lose everything.
The first system image is a complete snapshot of the partition, while the subsequent ones are incremental, that is, they include only changes from the previous image. This feature, which saves disk space, is implemented using shadow copies. This principle of imaging is applied when storing them on internal, external and optical discs.
For internal and external drives, this principle applies as long as there is sufficient space on the drive. When the space runs out, a complete image is created, and all previous ones are deleted. As for network drives, then a complete image is always created on them, and the old image is overwritten with a new one.
Let's take a look at creating the first image.
- In Windows 7, in the left pane of the Control Panel item, click the link System imaging.
- In Windows 10, in the left pane of the Control Panel item File history below click the link System image backup, then System imaging.
A window with options for image placement will open.

In the next step, you will be able to select the partitions to back up.

If there are other partitions in the system, you can select them in this step. Having decided on the choice of sections, click the button Archive to start the backup process.
The image automatically includes the system partition and the partition on which the necessary for Windows boot files (it may differ from the system one in multiboot configurations). The solution to problems with including unwanted partitions in the image is in this article.
All of the following images are created in the same way. As I said above, they only contain the changed blocks. In order to create a complete system image again, you need to delete the existing images or move them to another partition.
You can also move them from the root of the disk to subfolders, however, please note that in this case they will not be seen by System Restore from the image. The location and content of the backups will be discussed further.
Space management
In the main window of the Control Panel item, click the link Space management... A window will open that displays information about the location of the archive, a summary of disk space usage, and links and buttons for viewing and managing archives.

Backup location
In addition to viewing detailed information about the used space, you can open the storage location of the backup - click the link Overview and the files will open in explorer.

Windows 7 recognizes the archive folder and provides easy access to recovery options, which can also be opened by double-clicking the folder.
Of course, the folders are of interest:
- % COMPUTERNAME% (in this case ADMIN-PC) - file archive
- WindowsImageBackup - folder with the partition image
File archive content
You can open the folder with the archive using the context menu. The contents of the archive are transparent to the user - inside are ZIP archives, and if desired, files can be extracted from there directly from the explorer.

However, it is more convenient to restore files from the control panel, for example, thanks to the built-in search.
Image content
An archived image of the system is created in VHD format and stored in the folder WindowsImageBackup along with supporting files.

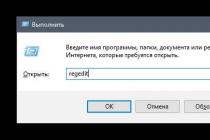
You can see its contents using new opportunity Windows 7 - connecting virtual hard disks in Disk Management snap-in ( Start - Search - diskmgmt.msc — Action — Join virtual hard disk).

You might be wondering if you can add files to the virtual hard disk. Technically possible, however from a recovery point of view Windows tools it will do nothing. Better to make a new image - the changed blocks are added incrementally based on shadow copies, which saves disk space.
Viewing and deleting backups
From the space management window, you can delete file archives and backup images.

Click the button Viewing archives in the space management window to see a list of archives.

Windows 7 finds all archives and displays the backup period and disk space used. In this window, you can delete unnecessary archives.
To remove the backup images, click the button Change parameters in the space management window. Image storage options will open.

The system prompts you to delete absolutely all images, or all images except the last one.
Everyone knows to back up regularly, but not everyone does it. Given the extensive backup options in Windows 7, you will only regret losing important data if you do not set up regular backups.
A separate hard drive is ideal for storing backups - internal or external, connected via USB or FireWire. If you have a network drive at your disposal, you can also use it. Storing backups on a different partition on the same disk where the OS is installed is not a good idea. In the event of a disk failure, you will lose both the system and the backups.
Since backups take up a lot of space, I can only give general guidelines that you need to adjust depending on the free disk space you have.
System partition images
- First image... Install Windows 7, then all updates and drivers. Making sure of normal work OS and devices, create the first backup image. If you kill the system during further customization and installing the software, you can return to initial state faster than reinstalling.
- Second image... Install all applications and configure the system as you wish. Since more fine tuning The OS is usually produced as you use it, run Windows 7 for a couple of weeks. After making sure that the OS is working properly, create a second backup image. If you delete the first image before doing this, you will have a complete image of a completely updated and customized system with your favorite set of applications.
- Subsequent images... Depending on the free disk space you have, create follow-up images monthly / quarterly. If a problem arises that requires an image restore, you can revert to a relatively recent system state.
User file archives
The frequency of archiving your files is determined by how valuable they are to you and how often you add or create new files. In general, I recommend backing up your data on a weekly or bi-monthly basis. Combined with monthly system imaging manually you will have an excellent backup set that allows you not only to return from the system to a recent working state, but also restore all your data and files acquired by back-breaking labor. You can always free up disk space by deleting old archives if disk space is needed for other needs.
In the GUI, it is not possible to set different schedules for imaging and archiving data. So if you want at different times automatically create an image and archive files, use the utility command line wbadmin and Task Scheduler.
Questions and answers
Why is another disk or partition forcibly included when creating a system image, and how can I avoid this?
Backing up the entire Windows operating system with its folders and profiles allows you to avoid irreversible changes on your computer due to errors. It is better to perform such a backup once a week and be sure of the safety of your data, than to skip this procedure and lose it once. You can independently configure data archiving and choose what is more important for you to save. In addition, the archive medium remains at your choice: a second hard drive, DVD, flash card, removable USB drive or network location. Prepare any of these media to back up on Windows 7. It doesn't matter if it's the first one or not, this article will cover both cases.
How to back up Windows 7 for the first time
This procedure and setup will not take you much time, and most importantly, it will not require installation. third-party software... Everything happens right on your computer and does not require an Internet connection.
- Go to the control panel via Start.
- Here you need to sort by category. To do this, take a look at the right top corner screen, there you will see the line “View”. Set it to "Category".
- Now select the "System and Security" section, which is highlighted in green.

- Among the whole list of options, you need to click on “Backup and Restore”.


- This is where Windows 7 backups take place. In the center of the screen, there will be a “Configure backup” link. Please note that there is a small shield next to it. This means that you will not be able to manage this item if you are not a computer administrator. Exit the guest account and enter the admin area.
- If you are already in the main account, then click on this link.

- The system will start the archiving mechanism for some time. Try not to touch the computer at this point and just wait.

- Now select the location where the backup will be backed up. This can be a disk, memory card, external hard drive, or any other storage medium other than your hard drive, which has Windows 7. This is done for security reasons, as in the event of a disk failure, you will lose both the system and the backup.


- If you have a network location, you can select it by clicking the “Save on the network” button. This will require his address, username and password.


- Once you have made your choice, click "Next".


- If you are an inexperienced computer user, then it is better to select the item "Provide Windows with choice."
- But if you want to independently mark the folders that will be backed up, then check the box “Give me a choice”.

- Check the boxes next to all directories to be archived. Of course, you can select all of them if you value the data very much.
- Then click “Next”.


- Now check the data and click on the “Save parameters and start archiving” button.


- Again, wait for a response from the system while it analyzes the data you entered.

- At the top of the window, you will see the process of backing up the system. By clicking the "View details" button, you can always cancel it if something went wrong.


- It remains to insert the storage medium and wait until all the data is written to it.

How to make a fresh Windows 7 backup
If you have already backed up the system before, but decided to make another copy right now, then it will take much less time, since all the settings have already been set.
Follow the same path as in the first step of the article:
- Control Panel - System and Security - Backup and Restore.
Select “Create New Full Archive” on the right side of the screen.


- The procedure will start instantly, and you can track its progress in the upper part of the window. As always, you need a storage medium to record the archive.
- Now you can easily customize your Windows 7 backups and burn them to media. Remember to keep these media in a safe place.