The most popular video hosting YouTube collects billions of visitors daily on its service. Having your own channel will help promote your business and raise the brand's popularity. Or it can simply be monetized through advertising, of course, provided that subscribers are offered valuable and interesting content. Today we'll talk abouthow to create a YouTube channel,what is needed for this and what nuances await the user.
What is needed to create a personal channel
It is not so easy to create your own channel on video hosting, before you directly start the process, you need a little preparation. First of all, it should be noted that a YouTube profile cannot be created without an active Google account. Therefore, if you do not have one, then the first thing to do is.
The following directions are popular on YouTube today: 
- video blogs and information directions;
- beauty blogs;
- music videos;
- reviews of films and popular videos;
- letsplay of different directions.
In addition, educational directions are quite popular, users are more willing to watch training videos explaining how to use this or that program.
If you manage to generate a unique idea and develop your own channel in this direction, then not only monetization will bring joy, but also popularity.
How to create a YouTube channel
Now let's proceed directly to answering the question,how to create a YouTube channel... The process takes place in several stages: the creation itself, design and filling.
Option one
This method involves creating a channel through the settings menu. In this case, the client simply receives a blank page that needs to be filled.
- Go to the site https://youtube.com we press the button "enter" in the upper right corner. If you have a Google account, then just enter your authorization data. If not, then click "register" and fill in the form fields, following the prompts of the system.

- After authorization is successful and you are in your own profile, you need to create a channel. It's worth noting that profile and channel are not the same thing. One account can have several channels of different directions. Open the menu section by clicking on the button in the upper left corner.
- We go down to the "Other features" block and go to "Settings".

- After that, in the window that opens, we find the menu item "Account" and in the work area we find the command "Show all channels or create a new one".
- By clicking on the link indicated above, the user will see the "Create channel" button, click on it.

- Following the prompts of the system, we create a + page, if it's simpler, we just give the new channel a name. We press the button "Create".

This completes the creation algorithm. By pressing the last command, the user is on a blank page with the given name. This is the answer to the question,how to create a YouTube channelexhausted, but we want to tell our readers a little more.
Option two
There is another option for creating a new channel, which is a little simpler than the previous one.
- Log into your profile and open the main page of the video hosting.
- Immediately after the search bar, find the video camera icon with a "+" sign inside. Click on it.

- Select the "Add Video" option from the drop-down menu.

- Specify the authorship of the content, by default this will be your Gmail profile data, and click the "Create channel" button.

- In the window that opens, upload your first video and set the degree of privacy (open access or limited).
- Wait for the video to download and process.

In this case, an untitled section will be created, you can change this in the settings during the design process. If a public channel is planned, then it must be issued without fail. In the case when the section is created for personal use only, this moment can be missed, at the request of the user.
Channel decoration

A beautifully designed channel grabs the audience's attention and increases the number of content views. If you are planning to create a platform for monetizing or promoting a personal brand, then this issue should be approached very carefully. It is better if the design concept is developed in advance. But if this is not done, then you can always return to this step and make changes.
- Go to the new channel and in the header of the main screen, find the button "Customize the view of the" Overview "page, click it.

- In the window that opens, click the "Add channel decoration" command.

- Select images and upload them to the editor. It should be noted that the size of the image must be at least 2560 × 1440, and its weight must not be more than 6 MB. The image can also be selected in the standard gallery provided by the service.

- In the preview section, make sure that users on all devices see exactly what you want. If necessary, you can crop the image and select exactly the desired part of it.
- Press the "Select" button and get the decorated channel header.

In the section "About the channel" you need to add its description. To do this, just click on the appropriate command. You can also add links to another Internet resource and e-mail for commercial inquiries. The more quality and relevant information about the channel is filled in, the more chances you have to attract the right audience and increase views of the content. In it, you can specify what kind of content is posted, how often new publications appear, who is filmed in them. And most importantly, you can insert a link to an external resource in the description. Description limit - 1000 characters.
Hello dear friends!
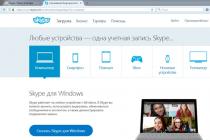
YouTube is currently the most popular video hosting service.
Its audience numbers several billion users from almost all countries of the world.
Such tremendous success of YouTube was ensured by its accessibility, simplicity, and convenience. Here you can watch various videos, as well as share links to your favorite videos on social networks.
If you also have your own channel on this hosting, then you can upload your own videos and comment on the videos of other users.
In this article, I will tell you how to create your own YouTube channel, and completely free of charge.
What is the channel for?
A YouTube channel is not only a means of communicating and exchanging data with other people, but also an excellent tool for promoting your business or attracting new visitors to your website or blog.
Besides, it’s an opportunity to make money, and it’s pretty good. You will be charged for advertising. Your earnings directly depend on the number and time of views.
Choice of topics
Before creating your own channel on video hosting, you must first decide what its subject will be. Think about how you might interest your users. This should be what you know best, on what you, as they say, ate the dog.
It is quite possible that this is one of the most popular directions today:
- Music videos;
- Humorous sketches, shows, stand-ups;
- Reviews of mobile devices, video games, viral videos, movies and more;
- Walkthrough video games, video instructions;
- Informational, news videos and video blogs.
If you can bring your unique idea to life, then this will be your added advantage. By doing what no one thought of doing before you, you can become famous!
Process of creation
To add a channel:
You can also create a channel from your phone or tablet, following approximately the same instructions.
Customization and design
Click on the pencil icon at the top of the screen and select "Add Appearance" from the menu. The background for your channel can be a picture offered by YouTube, a photo from your Google Plus album, or a beautiful image downloaded from a computer.

After uploading, you will see how your image will look on different devices. Select “Auto Correction” at the bottom of the screen and tweak the settings.
Read more about channel design
Creating a second channel
You may ask: "Is it possible to create a second channel with a different name?" It is possible and very simple. This is done as follows:

The channel (or channels) have been created, now we can proceed to their configuration and design.
Channel decoration
The default channel looks like this:
One of the main factors of promotion and traffic (in addition to interesting videos) is the appearance and attractiveness of your channel, the so-called channel header. Therefore, I immediately advise you to change it.
Click " Add channel decoration«
We have 3 options for changing the theme:
1.choose from the standard themes offered by YouTube
2. Download from the Internet
3. Create your images
The same goes for the logo.
Linked accounts
Removing the download limitation for long videos
Each channel you create has a limit on video uploads longer than 15 minutes. To remove this restriction, you must verify your account. Go to the channel settings, click on. Next, enter your phone number. After a couple of seconds, you will receive a six-digit confirmation code. We enter it and voila. The restriction has been lifted.
As you can see, nothing complicated. It remains only to upload the video to your new channel.
I deliberately left out all the settings. As a rule, the above is enough to start the channel launch. You will need the rest of the features (such as channel monetization) a little later, when you gain a certain number of views and channel subscribers.
Why create a YouTube channel?
For many, the answer to this question is obvious and they are only looking for answers to the questions - "HOW?"
"How to create a channel?", "How to set it up correctly?", how, how, how ...
I will definitely share my experience in the question of "how" on a variety of issues.
In the meantime, let's decide on an important question. "WHY?".
WHY you need a YouTube channel and how it can be useful for you
There can be many reasons for this, but I will highlight FIVE main areas:
- earn money for the videos themselves (there are different options here and we will consider them later)
- use video to attract customers or visitors to your site
- use video to promote your brand
- channel on youtube like repository for your videos that you post on other resources (for example, on your blog)
- use video channel for private purposes(for example, upload a video with the ability to view it only by link and use it as a video album for friends and family)
The list goes on.
If you are interested in at least one item from the "WHY" list and you still do not have a video channel on YouTube, then maybe it's time to create it
And now I will answer another question.
WHY I am writing about creating a video channel and promoting videos on YouTube
It seems that a lot of articles have been written on this topic and video lessons have been recorded. Why another post and another video tutorial on this topic.
Hmm, my answers are outrageously simple.
- Despite the fact that there is a lot of information on this topic, my Video Editing Clients and my friends from time to time ask different questions on YouTube and I often have to tell the same thing. Therefore, for me this is a great opportunity to record once and give a link to the post and video tutorial.
- With the creation of this site, I created a new video channel and I will have the opportunity to tell and show on the new channel what and how to do, taking into account my personal experience and my mistakes.
HOW to create, configure and promote a video channel on YouTube
On the blog and video channel, I will share my experience in creating, setting up and promoting videos.
All materials on this issue will be collected on a separate page
And those who do not want to waste their precious time to study, read and customize themselves, can order a paid one (consultation on setting up or setting up your channel)
Why do you need a YouTube video channel?
Share your experience and ask questions in the comments.
This article will show you how to create a YouTube channel in 2020 and set it up correctly. Videos and YouTube are increasingly being used by marketers to attract customers. Video bloggers make money from their content. Therefore, we decided that it would be relevant to make step-by-step instructions for our readers on how to create a YouTube channel.
Of course, creating a channel is just the first step, because the channel needs to be developed and promoted. Unfortunately, it will not be possible to fit all this in one material, so we will move gradually and start with the simplest.
Benefits and features of the YouTube channel
- Fast creation. After reading the article to the end, you will see for yourself that creating a channel takes a maximum of 5-10 minutes.
- It's free. You can create a YouTube channel for free, but content creation requires you to have a recording device and editing software.
- Video easier to perceive. Video content is much easier to consume than reading articles or books.
- Many unoccupied niches. It just seems that YouTube has videos about everything in the world. In fact, there is very little quality content on a specific topic.
Next generation video hosting - look.li... Watch your favorite channels, share videos with friends, create your own video collections.
Registering an account on YouTube
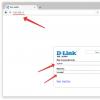
1. To register on YouTube, you need to go to the site YouTube.com and in the upper right corner click on the "Login" button.
2. On the opened tab, as an input, select "Other options" and in the menu that appears, click on "Create an account".

3. We make our own registration data required to create a new account.

In this case, you can use any e-mail as a mail - it is not necessary to start a mail in Google. To protect your account, it is better to indicate and confirm your real phone number to be sure that no one can hack your account.
At the end you must confirm your agreement with the privacy policy and terms of use of the service and click "Next" to proceed to creating and configuring your channel.
How to create a YouTube channel right now
Step 1:
Channel creation
After entering the site, a menu will be displayed on the left in which you need to select "My channel".

A pop-up window appears where you need to set the name of your channel and click "Create channel".

Step 2:
Name
How to choose a name for a channel? There are some simple but good options:
- If this is a personal video diary, then your name or surname... You can also use a nickname - the main thing is that it is easy to write and remember.
- Use company name, firm or brand name for a corporate channel.
- The most popular keyword written in Latin. For example, for a construction company, you can make the name stroitelstvo.domov(if it's free). Or if this is a children's channel or for parents, it will do Children's World.
Congratulations! The channel has been created, don't you agree that it was not difficult? Now you need to give it an appropriate appearance.
How to set up a YouTube channel correctly
Step 3:
In order for the avatar for the channel to be liked by both you and your viewers, you need to change it, and not leave it default.

To do this, hover the mouse cursor over the little man icon and click on the pencil.
The "Change channel icon" window will appear, click "Change" and go to Google+, where you need to upload a photo that will be the channel's avatar.

As an avatar, you should use a personal photo, a stylized illustration of your photo, a company or brand logo.
Step 4:
Channel cap
As an image, which will be the design (header) of the YouTube channel, you can use any picture or photo that you create yourself or choose from the YouTube gallery. Recommended size for image 2048 by 1152 pixels.
We have chosen by default for now, but it is better to use this picture as an area where your channel will be described or some offer will be placed if it is a commercial channel.
Step 5:
Page view
Now let's move on to the view settings. To configure the channel, click on the gear next to the subscribe button.

The main thing here is to enable the view of the "Overview" page. Thanks to this, tabs will appear on your channel: home, video, playlists, channels and about the channel.

Step 6:
Description

Step 7:
Logo
You can also add a channel logo, for this we click on the gear again, and there we select "advanced settings". Next, go to "Corporate identity" and click "Add channel logo". It is better to use a high-contrast image in .png format. Then we choose when this logo will be shown: at the beginning of the video, at the end, or throughout.

After that, the channel logo will be displayed on your videos.

In the same section, go to the "Status and Features" section to confirm your channel. This is done via SMS confirmation.
Step 8:
How to make a channel private and open
If you want to restrict access to videos posted on the channel, then you can make these videos private or available via a link. For example, if you will provide access only to those who paid for a subscription, bought a certain course or videos of individual lessons.

On the page with the video, below and slightly to the right of the video itself, select the desired option to restrict access to the video:
— available here;
— limited access(by e-mail).  In the same way, you can block access to other videos or playlists.
Step 9:
How to add the first video
And for dessert, the sweetest thing is how to add a video. Click the arrow in the upper right corner and select the video on your computer.

Then, if you need more fine-tuning, go to the Advanced settings section. Here you can enable or disable comments (by default they are open), enable or disable access to video view statistics (open by default), select a category for the video, set age restrictions, and more.