The names of the settings are for pure Android. In third-party firmware such as MIUI, Flyme, OxygenOS, look for something similar.
Step 1: Prepare to migrate your data

Make sure both smartphones are charged. Connect the old one to Wi-Fi. Otherwise, you risk spending a lot of mobile traffic.
Surely yours old smartphone already linked to a Google account. If you're not sure, open Settings → Accounts and find yours there.
If you don't have an account, you can add one. Click the Add Account button at the bottom of the screen and select Google. Enter your smartphone passcode, if prompted, and follow the on-screen instructions.
Step 2: Synchronize your old smartphone data with your account


On your old smartphone, open "Settings" → "Accounts" and select your Google account there. Click on it.
Tap More → Sync. Wait until the process completes.
Step 3: Back up your old smartphone data to your Google account


Usually backup enabled in Android by default, but not always. So let's make sure that all information - contacts, calendar, mail, settings, application data - is securely stored in your Google account.
Open "Settings" → "System" → "Advanced settings" → "Backup" on the old smartphone. Make sure the "Upload to Google Drive" toggle is enabled and the correct address is listed in the "Account" section. Then click "Start Copy" → "Continue".
The backup process will begin. It will save the data to your Google Drive. This operation may be delayed, especially if you have been using your smartphone for a long time and a lot of data has accumulated there.
When the process is complete, you can put the old smartphone away.
By the way, you can get to the backup panel not only from the phone settings, but also from Google Drive. To do this, open the application and click on the icon with three horizontal lines top left. Then go to "Settings" → "Backup and Reset". Everything else is identical.
Step 4. Recover data on a new smartphone
If the new smartphone is not activated


Turn your new smartphone and follow the setup wizard. Select your language and region and connect to the web.
The wizard will offer to transfer your data to a new smartphone. Click "Next" and select the "Copy from cloud storage" option.
Enter your Google account username and password and accept the terms of the license agreement.
Select the desired backup from the list and, if required, enter the password from the old smartphone. Specify what exactly needs to be transferred, and click "Restore".
Continue to follow the instructions of the wizard. The restore will run in the background.
When the setup of the new smartphone is completed, wait 10 minutes: Android will install all applications from the old device.
If your new smartphone is activated
Let's say your smartphone has already been turned on. For example, a consultant in a store showed you his work. In this case, there are two options.
Option 1
Open "Settings" → "System" → "Advanced settings" → "Reset settings". If there is no "Advanced Settings" item, select "Reset Settings" directly from the "System" menu.


Select Delete All Data → Reset Phone. Wait for the device to reboot.
Now follow all the steps from the previous instructions with the settings wizard.
Option 2
If you don't want to reset anything, open Settings → Accounts (or Users & Accounts, or Sync). Click the Add Account button at the bottom of the screen. Select the type of Google account.
Enter your smartphone passcode, if prompted, and follow the on-screen instructions. You will need to enter your email address and Google account password.


In the menu "Settings" → "Accounts", select the added Google account. Click on it.
Make sure that all required data types are checked. If they're not there, put them in.
Tap More → Sync. Wait for the synchronization to finish. So you transfer contacts, mail, calendar, but not applications to the new smartphone.
To copy them open Google Play and click on the icon with three horizontal lines on the top left. Open "My apps & games".


Go to the Library tab and install your apps manually.
Step 5: Transfer photos and videos to your new smartphone


The easiest way to do this is with the Google Photos app. Run it on an old smartphone. Go to "Settings" → "Startup and sync" and make sure the option is enabled. Then wait a bit for the download to finish.
Now all your pictures and filmed videos will be uploaded to the cloud and you can view them on your new smartphone through Google Photos.
If you don’t mind that the images will be stored in a compressed (but still high-quality) form, then you don’t even need to pay for their storage: you will be provided with an unlimited amount in the cloud. Otherwise, you will have to purchase a subscription to the service.
Step 6: Copy Music and Other Files


If you have a lot of things stored in the memory of an old smartphone (for example, a collection of MP3 music or some documents), all this can be transferred manually via a USB cable.
Connect your old smartphone with a USB cable to your computer. Select File Transfer mode and copy everything you need. Then turn off your old smartphone.
Connect new phone and transfer all your data to it through the "Explorer" or Finder.
In some cases, the computer may not immediately recognize the connected smartphone. Macs are especially guilty of this, to which they connect old Android. To deal with similar problem, read our .
In September, I talked about transferring data from one Android phone to another (). The described method allows you to transfer contacts with photos and ringtones, call history, SMS and MMS, all applications, GoLauncher EX desktop settings, photos, music.
It was not possible to transfer only one thing - data and program settings. For some programs, this is not important at all, in some (for example, twitter, facebook, instagram) it is enough to re-enter your login and password, but with games it is more difficult: data on the passage of the game cannot be restored so easily.
In order to be able to copy program data, the Android device must have root access. As it turned out, getting root on many devices is very simple. Yes, on my samsung galaxy S II, it is enough to copy two files to the memory card and run them from the recovery console by simultaneously pressing the "power", "home" and "volume plus" buttons when turned on (http://4pda.ru/forum/index.php?showtopic= 259348&st=9980#entry13059622 , for Android 4.1: http://4pda.ru/forum/index.php?showtopic=296324&st=180#entry14633175). You don't even need to be connected to a computer to get root rights.
After gaining root access, program data can be copied and restored using one of the special programs. Titanium Backup is often used for this, but it is paid and has a completely non-intuitive interface.
The GO Backup Pro program (https://play.google.com/store/apps/details?id=com.jiubang.go.backup.ex), which I suggested using in the September article, is good because it can work with both root-rights, and without. When there is no root, Go Backup Pro simply saves the applications, and then offers to install them one by one manually. As soon as root appears, GO Backup Pro starts installing applications automatically, as well as saving and restoring all settings and application data.
The program interface is very simple. There are only two buttons on the first screen.
On the second screen, you can choose what to save or restore.
The free version of Go Backup Pro has a 200 megabyte limit on the size of saved applications, but it can be very easily bypassed by saving all applications for 2-3 times (first, all data and applications, except for large ones, and then other applications separately).
Thus, with the help of the programs "Go Backup Pro" and "
The internal memory on your device may not be sufficient for all the applications you need. Modern programs and especially games are very voluminous. This problem can be solved by moving them to an SD card.
But there are also pitfalls. Cards are slower than internal memory. Therefore, games and other resource-intensive applications may slow down after the transfer. To reduce performance loss, preferably with a minimum speed of 10 MB/s. The higher the better.
In addition, relocated applications will stop working as soon as you remove the memory card. And when you insert it back, it is possible that some of them will start to fail and give errors.
Thus, applications are worth moving if you are willing to sacrifice their speed and stability for the sake of free space.
Can you transfer applications to a memory card
It is important to understand that not all devices provide such an opportunity. There is no list of models that support porting. To find out if your device is one of them, you just need to try moving the apps to the map. This process is reversible and uncomplicated.
In addition, even if yours allows you to transfer, you will not be able to do this with all applications. Some games and programs allow only part of their data to be moved to the card, and many do not support transfer at all.
How to move apps to SD card
Although the process of moving games and programs on different firmware is slightly different, the procedure is similar everywhere. This generalized instruction should be suitable for everyone.
Manually
First, make sure that the memory card is inserted into the device. Then open android settings and select the Applications section. In the list of games and programs, click on the one you want to transfer to the card.
When the menu of the selected application appears on the screen, find the navigation button and use it. After the transfer, in the same menu, you can return the application back to the internal memory.
If the button is missing or not clickable, the program may not support navigation. Repeat these steps for other games and applications. If nothing transfers, it's likely that this feature isn't available on your device.
Automatically
Some devices running Android 6 or later allow you to use the card as part of your internal memory. This option allows you to transfer all applications at once.
To make the card work as part of the internal storage, go to the settings and open the section dedicated to memory management. Find the SD card menu in it. Use the "Format" command, select the "As internal storage" option and follow the system prompts. If this option is not available, this feature is not available on your device.
Formatting will erase all data from the card. After that, it cannot be used on other devices until you format it again.
After confirm the transfer of applications to the card. From that moment on, the device will begin to perceive it as part of the internal storage, transfer old applications and install new ones on the card.
To return the program back to the device's memory, you need to use the "Format" command again, selecting the "As portable storage" option. Before formatting, the system will offer to transfer applications to internal memory.
Using third party software
If your device does not support any of the listed methods, but is unlocked on it, you can try to transfer applications using third party programs. For these purposes, there are, for example, Link2SD and App2SD utilities. But even their creators do not guarantee the performance and stability of this method. So be careful.
When buying a new smartphone, the first thing to do is to transfer the entire important information from one device to another. The safety of numbers and other personal data may be at risk during flashing or if the phone is lost. Therefore, it is important to take care of security and know how to transfer contacts from android to android.
The instruction is suitable for gadgets of all companies, Samsung, Lenovo, HTC, Sony and others. The main thing is to carefully study the scheme before making manipulations.
There are many ways to port numbers. Some of them require a USB cable or Bluetooth functionality. Let's talk about them below.
Simple methods to transfer data from android to another gadget:
- by using personal computer and micro USB cable;
- use applications, add-ons and services from Google;
- export contacts to android via Bluetooth;
- save numbers to a memory card;
- save the list of subscribers to the memory of the SIM card.

Let's take a closer look at how to transfer contacts from Android to Android with minimal cost time and labor. A person who has not previously performed such operations will be able to cope with the methods described below.
With a SIM card
Memory card
Talking is the easiest way. In fact, this is not always the case, but it is worth mentioning. In the application of the same name, press the "three dots". And make a backup copy of all titles (Export to SD card item). The saved file is transferred to another smartphone or tablet. We open it in any way, the system itself will determine and unzip the .vcf format file
With the help of messengers
With a Google Account
To transfer all the necessary numbers from one device to another, you can use your Google account and virtual cloud space. In it, they are saved and become available within 30 days after deletion. You can make changes to the synchronized Google account when the device itself is not at hand.
Using the function is simple: select the Gmail menu and the Contacts (or Phonebook) folder. You will need the option "Select phone book”, where you need to set the file type parameter and save it. Now all numbers will be automatically transferred to the smartphone from Google drive.
Using Yandex Disk
Yandex.Disk is another method of copying data from Android devices using a personal computer. Using a virtual cloud is convenient, as it can be accessed at any time of the day, even from a third-party device. To use a virtual disk, you need to download the Yandex.Moving application on your PC.

Yandex.Disk is installed on the mobile itself. After activating the account and copying information from the old device, we launch the program on the new gadget and enter the same account. You can do this with a command.
The program may ask special code, sent to the user earlier via notification or SMS. You must enter it correctly and confirm the synchronization action to continue it. When the data export is completed, the program will notify you with a sound signal.
Yandex.Disk does not need to be deleted after the transfer, since the application serves as an entrance to the cloud space. You can also access the disk through a browser.
Import to Mi account
Suitable for Xiaomi. The manufacturer from the factory puts his own firmware with preinstalled services. With their help, it will not be difficult to drag people. Open "settings" and select "Export \ Import" and follow the instructions of the wizard.
Synchronization with Google
The fact is that all installed on a mobile phone Google services automatically synced to the cloud. This allows you to use import on android without much difficulty.
To use it, select the menu item "Accounts" - "Google" in the smartphone settings. Then click on Mailbox and check the box next to the “Contacts” item (in some cases it is called “Export / Import”). All personal data will be stored in google cloud account.

Bluetooth transmission
Bluetooth can be used for data transfer by users who have this function built into their smartphone. To do this, activate the data transfer on both devices. Then, on the phone from which the information is transferred, they start searching for a new device in the settings.
Open "Contacts" and mark the numbers to be transferred. All data necessary for the user is transferred via bluetooth.
By synchronizing with a PC
If all the described methods are not suitable for some reason, then you can transfer contact information through usb cable. Synchronization android data will happen instantly after installation special utility program MOBILedit.
Instructions for transferring personal information:
- Download the program from the Internet through the official websiteby clicking the download button. The program is distributed free of charge. After downloading the MOBILedit file, copy the contents of the Crack folder to the application installation folder. Open the utility and install the drivers.
- We launch the program, install "Phone - Connection via cable". On the mobile device itself, we allow synchronization with the PC.
- In the left panel of MOBILedit, in the "Contacts" menu, click "Export". The file type is *.csv.
- The program will prompt you to choose a storage path. The file needs to be given a name and saved in a folder.

The file with contact data is saved on the PC. Now they need to be transferred to a new smartphone and installed correctly. To do this, in the same way, connect a new device to the computer using a USB cable, press the "Import" button instead of exporting and select the saved document with the * .csv extension. We wait a couple of minutes and you're done!
Conclusion
- Synchronization is important because it is this action that saves all phone data.
- The transfer is possible with the help of bluetooth, as well as virtual disks from Yandex and Google.
- To transfer data using a PC, you can use the MobileEdit program. It is available for free on the official website.
- The virtual cloud allows you to synchronize multiple gadgets. The phone book can not only be transferred to desired smartphone or tablet, but also change it directly on the disk.
There are several ways to transfer phone numbers. Some methods require apps to be installed, others require a cable or PC. In any case, transferring data from one Android device to another Android smartphone is not difficult, a novice user can handle it. You won't have to manually transfer phone numbers for hours.
Video
One of the first questions that arises is how to transfer contacts from Android to Android, because transfer all numbers from one android devices to another manually takes too long, especially if you have a lot of contacts in your phone book.
Below we will talk about several ways that will help solve this issue in a matter of minutes.
Using a SIM card or flash drive (SD card)
If the phone numbers are not stored in the SIM card memory, then we must first copy them into it. To do this, go to Contacts"("Phone book") and open the section settings (on different models smartphones it can be virtual button at the bottom of the display or vertically arranged three dots or dashes at the top of the screen). In the settings menu that opens, click " Import Export”, then select the item from where you want to copy the contacts.
If the contacts are saved in the phone's memory, press " Import from internal memory", and then select " Export to SIM" (i.e. the point where we will copy):

If the contact numbers were saved in different places, for example, not only in the device’s memory, but also on the es-di card, then we first copy the data from the smartphone, and then in the same way from SD, and then we export it to the SIM card.
After selecting the storage location, a list of contacts will open, of which it will be possible to save the ones you really need, after which we press the button " OK” and the transfer procedure will be completed. Now we rearrange the SIM card into a new gadget and, if desired, transfer the data to the internal memory of the new phone in the same way or activate the display of contacts stored in the SIM card in the phone book. What you need to do for this: go to " Contacts", open the settings (see above), click the contact filter and select the item" SIM card»:

To transfer contacts from one Android to another using an es-di card, we perform the same steps, but instead of a SIM card, we select a flash drive (SD).
Through synchronization with a Google account
Most Android device owners have account in Google. This is necessary for downloading applications in the Play Store, but not only. Having a Google account, you can set up synchronization and save not only your contacts, but also other important data - various media files, messages, etc. This is very convenient if you need to restore important information if your phone is lost or broken.
To activate synchronization, go to the main settings of your smartphone, in the section " Personal data» find the item « Accounts”, Click and select your Google account, go in, and in the list that opens, mark the data to be synchronized, after which the selected information will be synchronized automatically and saved in your personal mailbox:

If synchronization has not been configured, then we will need to copy our contacts to the account. This is done in exactly the same way as copying from a SIM card: Notebook", Further " settings", then " import Export", select the source from where we will copy contacts, and then click the line with your account.
Now, to transfer saved phone numbers on new android smartphone, open a browser from it, turn on full version and go to the site mail.google.com, click on the left upper corner display on the inscription gmail and select " Contacts", and then " All contacts»:

The pop-up window will display full list numbers in the phone book. Choose " All contacts" (or maybe "Select All") and press the line " More».
Now select " Export”, and in the window that opens, specify Google CSV(where CSV is the file format in which the list of contacts will be located). After that, all contacts will be saved on the device from which the account was logged in, in this case, on a new smartphone.
If, for some reason, you could not log into your Google account from a new phone, then, and then.
*Note: if your smartphone model provides for enabling USB debugging to transfer contacts in this way, do not forget to activate this option first:

There is another way in which your contacts will always be at hand on any device from which you can create a Google account. To do this, after synchronization, all phone numbers must be saved in your Google account. For example, when creating a new contact, when the system asks where to save it, out of three options - phone memory, SIM card memory or in Google contacts, select the latter, and then, just log in on a new device and all contacts will automatically go to it:

Export Contacts from Android to Android via Bluetooth
To use this method, all contacts must be in the phone's internal memory. If some of them are on the SIM card or on external media, then they must be copied to the smartphone using the method described above.
We connect both Android devices and establish a Bluetooth connection on them: select in the settings and turn on the "Visibility for other devices" option. Then, on the old phone, through the Bluetooth settings, we find a new Android device.
In both gadgets (if necessary), we enter a single password, which should confirm that we are connecting via Bluetooth. Now we activate the “Transfer” option and wait for the end of the process.
Watch the video for more details:
Export contacts using third-party software
If for some reason you could not use the described methods or simply do not want to synchronize your contacts, you can use special applications which easily solve such problems.
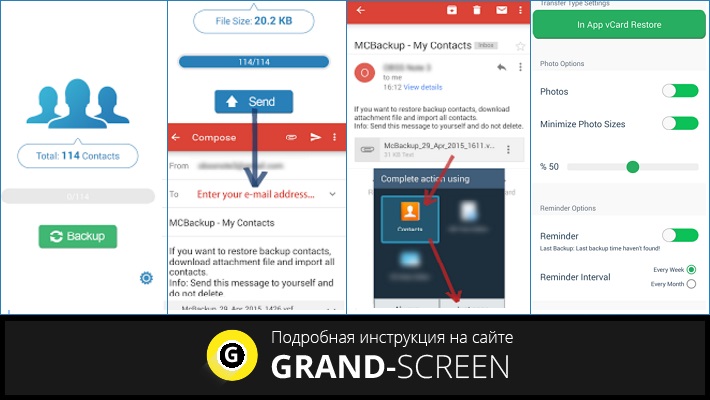
For example, application MCBackup - My Contacts Backup make a quick backup necessary information and send the file in the format .vcf to your mail. It will be enough just to go to mail client from a new device and open this file:
Another application is CM Backup - Secure Cloud will do backups all your data (sms, photos, calendar, etc.) including the phone book, and will provide 5 GB of free space in cloud storage with the ability to restore on the desired device:

On this, we believe that the question of how to transfer contacts from Android to another Android device is closed. There are plenty of ways to solve the problem, choose any convenient for you. Good luck!