Good day, dear readers and other personalities.
I thought and thought and suddenly realized that by some unknown miracle I had bypassed the mail subject. No, of course, I briefly wrote about, mentioned about, and on Twitter I talked a little about my love for, but from a programmatic point of view, I forgot to devote time to any particular mail client. Strange. Fixing it :)
As you already understood, today we will talk about mail, or rather, about a program that allows this mail to be received, stored, sorted, and generally do a variety of indecent things with it. Many of you will certainly be surprised, they say, why do we need a program, if in the modern world everything has long been integrated at the browser level - take it and go in and use it.
However, as a person of the old school (my mail started back in Windows 2000) and just a professional, I think that email clients have a number of advantages over browser-based solutions. I will tell you about them (advantages) (and even show you a little), as well as, in fact, I will teach you how to install, configure and powerfully use such a wonderful mail client as Thunderbird.
Advantages of local mail over browser mail
Before proceeding, I, as promised, will first talk about what I see as the advantages of local, so to speak, programmatic mail over the one that lives in the browser.
Firstly, this is the same, support for several mailboxes at once and in different services. I don’t know how anyone, but I have more than a dozen emails that live on a bunch of different domains: @gmail, @mail, @yandex, @site, etc. It’s natural to run from box to box in the browser, even if that I will have direct bookmarks on them, you will still be tormented: while you log in, while you check everything new, while you answer .. Long and dreary.


Connection security: STARTTLS
Port (for POP): 110
@gmail and @yandex
Connection Security: SSL/TLS
Port (for POP): 995
Authentication method: Basic password
When finished, you can press the button Retest"..
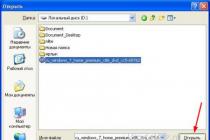
AND " Create an account" (after testing is over). The wizard will check the password and, if everything is correct, create an account, after which we will see something like this:


Now let's configure where on disk our mail will be stored.
Mail file storage location
It is better not to leave the initially proposed path, because it is buried somewhere in the depths of the system and, in case of problems with it, it will not always be possible to find and restore the folder later, and therefore it would be good to assign your own, which we will do now.
On the "Local folders" tab, press the "Browse" button and set the folder we created, say, with the name _mail somewhere on the disk. Having done this, click on "OK".
Of course, you can set up various rules for this very sorting (the default is "by date", but there are a variety of options, for example: "by sender", "by topic", etc., which, I think, you have already seen on previous screenshot).
Message filters in Thunderbird
We figured out the visual sorting. Let's look at the filters and try to create some of them.

Let's say that we have a huge number of mail comes with a mention in the subject of the letter, a certain site " SysAdmin Notes" and we want all these letters to be placed in the @from_site folder we created in advance (the folder is created by right-clicking on, say, the "Inbox" item). To do this, go to " Menu - Message Filters".
Here we select from the drop-down list the box for which the filters will be applied, and then click on the button "Create".

In the window that appears, fill in the appropriate fields, namely:
- Filter name : enter something that will let you know what the filter is
- Subject contains: In this example, I enter " SysAdmin Notes"
- In the Move message to field: from the drop-down list, select the folder we created. In my case it is @from_site
Done, click the "OK" button. The operation of the filter can be immediately checked by selecting for the field " Run selected filters on folder" folder where we want to apply the created filter (in this case, it's "Inbox") and click on the button " Run".

If everything is done correctly, then all mail will be sorted according to the rule you set.
Naturally, as in the case of sorting, you can create filters of various directions and variations, and you can configure filtering according to several rules at once, for which the "+" button in the list is used and a new rule is set.

Over time, when you set up all the filters you need, you will be terribly pleased with how much comfort has increased when working with mail.
Afterword
Here are the things.
It turned out to be very voluminous, but this is not the end yet :) Specially for Thunderbird, as well as for Firefox, there are various useful extensions designed to make your life more convenient, but we'll talk about them next time.
Stay with the project and you will learn a lot of new and useful things;)
As always, if you have any questions, additions, thoughts, thanks, etc., I will be glad to hear them in the comments to this post.
Mozilla Thunderbird is a free multi-platform email client that allows users to exchange emails with friends, family and work colleagues. Thanks to its wide functionality, this program can be used both at home and at work, and thanks to special extensions and add-ons, it can be easily customized to your own requirements. Let's see how to use Thunderbird, and what functionality the client offers us after immediately after installation.
Thunderbird is part of the standard set of programs in most modern Linux distributions, so most often it does not need to be installed. If you do not have this program by default, then you need to open the terminal and enter in the line:
sudo apt-get install thunderbird
After that, confirm the installation of the program and wait for the completion of all procedures. Stable versions are always available in the base Linux repositories, so no additional resources are required. You can also install Thunderbird through the application center (Ubuntu, Mint and other distributions oriented to the average user).
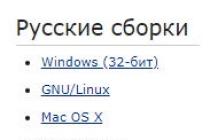
Since Thunderbird is available on all modern operating systems, the mail client can be installed on Windows and even Mac OS. To do this, just follow the link https://www.mozilla.org/ru/thunderbird and download the appropriate installer. The official site will automatically detect your OS and select the most optimal version. The subsequent configuration process looks exactly the same as in Linux.
Program interface
Externally, Thunderbird looks like most similar programs. By default, all your mail folders are on the left side of the window, and message previews, links to RSS feeds, newsgroups, and more are on the right. The menu bar contains links to the most popular user actions, such as receive mail, filter, address book, chat, and filter by tags.

All these elements can be edited and changed based on your own preferences. Just right-click and select "Settings" from the context menu.

How to set up Thunderbird
Setting up Thunderbird is one of the most important steps. The program contains many functions that can be difficult to figure out at first, so after the first launch we are greeted by a special wizard. At this stage, you can either register a new mailbox or use an existing one.

After clicking on the appropriate button, the mail setup in Thunderbird will begin. Here you just need to enter your e-mail, the name that will be displayed on the left side of the window and the password.

After entering the data, Thunderbird will check your credentials and, if possible, pull up the necessary settings to connect to the mail service. Here the user will be able to choose which protocol to use - IMAP or POP3. The first one provides remote access to letters on the server, the second one will download all letters to a PC.
When using corporate mail or a little-known service provider, you will need to enter the parameters for sending / receiving messages yourself using the "Manual settings" button. As soon as the data is entered, the program will automatically check the configuration and you can start working right away.

If you use multiple accounts, then click the menu button in the upper right part of the window, go to "Settings - Account Settings" and select "Add account" in the lower left part of the window

After that, set up in the same way as before.
Mail synchronization
Initially, Thunderbird downloads all messages and folders that are on your mail server, but later on the user can choose which folders to synchronize. To do this, click on the account name on the left side of the window and open its settings.

Navigate to the Sync & Storage category, then select the settings that best suit you. In the "More" menu, you can mark specific folders for the account, messages from which will be sent to your computer.


When finished, click the "OK" button, and for the correct display of all subfolders, restart the client. Thunderbird mail setup at this stage can be considered complete.
Search for messages in folders
Searching in Thunderbird can be done using both the quick entry string and the quick filter. To find the desired contact or message, just start typing a word in the appropriate field.


The search system in Mozilla Thunderbird is understandable and accessible even to users who have not previously worked with the program.
Creating mail messages
There are several ways to write a message in Thunderbird:
- click the "Create" button in the main window of the program, and then enter all the necessary data of the recipient;
- right-click on the address of the desired contact and select the "Send" item in the context menu.
The message creation window is a simple editor with basic features. The user can attach files to the letter, choose the size, color and font type, as well as dilute the letter with emoticons.
It is worth paying attention to several fields for entering the addressee - here you can select several recipients at once, as well as add blind copies that will be sent to separate mailboxes.
Working with contacts
Using Thunderbird is made easy with an extensive address book. To add a new contact, click on the name of the sender / recipient with the left mouse button and select the appropriate item.

If you have not previously sent or received messages to a particular recipient, you can add it manually through the "Address Book - New" menu. The contact card contains all the necessary information, and if necessary, it can even be supplemented with a photo.

Extending Thunderbird with Add-ons
Working with Thunderbird is facilitated by the ability to refine the program for your own needs. To do this, the developers have created a whole center of add-ons, where users can find all the most useful extensions, ranging from design themes to almost separate programs.
You can find the update center by clicking on the "Menu - Add-ons" button. The most popular plugins will immediately appear before you, and if necessary, you can open the full version of the site, where everything is categorized.


Your name - username (for example, "Alice Little");
Email address mail - your mailing address on Yandex (for example, « [email protected] » );
Protocol - IMAP;
Server name - imap.yandex. ru;
Port - 993;
SSL - SSL/TLS ;
Launch the program and click the button in the welcome window Skip this and use my existing mail.
In the window Setting up your existing email account Specify the following account settings:
Click the Continue button.
Click the button Manual setting and specify the following email server settings: Incoming mail
Server name - smtp.yandex. ru;
Port - 465;
SSL - SSL/TLS ;
Authentication - Normal password.
Also indicate the username - your Yandex login, for example, "alice.the.girl".
Attention. If you set up receiving mail from a mailbox like "login@yandex. en », the login is the part of the address before the "@" sign. If you use Yandex.Mail for Domain , you must specify the full mailbox address as a login.
Click the button Retest to check if the entered parameters are correct. If the verification was successful, click the Finish button.
If you want to always use Mozilla Thunderbird to send emails, in the System integration press the button Set as default.
Right-click on the account name and select Options.
Go to section Server Options and set in paragraph When deleting a message meaning Move it to the Deleted Items folder.
","hasTopCallout":false,"hasBottomCallout":false,"areas":[("shape":"rect","alt":"","coords":,"isNumeric":false)]))\ ">
Go to the Copies and folders section and set all folders to the value with the name of your Yandex mailbox.
","hasTopCallout":false,"hasBottomCallout":false,"areas":[("shape":"rect","alt":"","coords":,"isNumeric":false),("shape ":"rect","alt":"","coords":,"isNumeric":false),("shape":"rect","alt":"","coords":,"isNumeric": false),("shape":"rect","alt":"","coords":,"isNumeric":false)]))\">
Click the OK button to apply the changes and restart the program.
Problems with Mozilla Thunderbird
This step-by-step guide will help you resolve problems with your email program.
Select an issue:
What message did you receive?
If you receive a message that there is no connection to the server, try logging in to the Yandex.Mail web interface with the same username and password that you use in the program. Enter your username and password manually, without using the ones saved in the browser.
Mailers include the\\n protocol you want to use.\\n
Make sure you have specified the following server settings in your mail program\\\\n exactly:\\\\n \\\\n \\\\n
If you are using IMAP
- \\\\n \\\\n
connection protection - SSL;
\\\\nport - 993 .
\\\\n- \\\\n \\\\n
connection protection - SSL;
\\\\nport - 465 .
\\\\n\\\\n \\\\n \\\\n \\\\n
If you are using POP3
\\\\n \\\\n \\\\n Incoming Mail \\\\n \\\\n
- \\\\n \\\\n
connection protection - SSL;
\\\\nport - 995 .
\\\\n- \\\\n
mail server address - smtp.yandex.ru;
\\\\nconnection protection - SSL;
\\\\nport - 465 .
\\\\n\\\\n \\\\n \\\\n \\\\n\\\\n
For more information on how to check server settings in different mail\\\\n programs, see the section.
\\\\n")]))\\">
Make sure that you have correctly\\n specified the following server settings in your mail program settings:
\\n \\n \\n
If you are using IMAP
- \\n
mail server address - imap.yandex.ru;
\\nconnection protection - SSL;
\\nport - 993 .
\\n- \\n
mail server address - smtp.yandex.ru;
\\nconnection protection - SSL;
\\nport - 465 .
\\n\\n \\n \\n \\n
If you are using POP3
\\n \\n \\n Incoming mail \\n \\n
- \\n
mail server address - pop.yandex.ru;
\\nconnection protection - SSL;
\\nport - 995 .
\\n- \\n
mail server address - smtp.yandex.ru;
\\nconnection protection - SSL;
\\nport - 465 .
\\n\\n \\n \\n \\n\\n
Encryption of transmitted data.
\\n\\n")]))\">
Make sure that the protocol you want to use is enabled in the Mail Programs settings section.
Make sure that you have correctly specified\\n the following server settings in your mail program settings:\\n \\n \\n
If you are using IMAP
\\n \\n \\n Incoming mail \\n \\n
- \\n
mail server address - imap.yandex.ru;
\\nconnection protection - SSL;
\\nport - 993 .
\\n- \\n
mail server address - smtp.yandex.ru;
\\nconnection protection - SSL;
\\nport - 465 .
\\n\\n \\n \\n \\n
If you are using POP3
\\n \\n \\n Incoming mail \\n \\n
- \\n
mail server address - pop.yandex.ru;
\\nconnection protection - SSL;
\\nport - 995 .
\\n- \\n
mail server address - smtp.yandex.ru;
\\nconnection protection - SSL;
\\nport - 465 .
\\n\\n \\n \\n \\n\\n
For more information about how to check server settings in different mail\\n programs, see the Encryption of transmitted data section.
\\n")]))\">
Make sure that you have accurately specified the following server settings in the mail program settings:
If you are using IMAP
Incoming mail
mail server address - imap.yandex.ru;
connection protection - SSL;
port - 993 .
mail server address - smtp.yandex.ru;
connection protection - SSL;
port - 465 .
If you are using POP3
Incoming mail
mail server address - pop.yandex.ru;
connection protection - SSL;
port - 995 .
mail server address - smtp.yandex.ru;
connection protection - SSL;
port - 465 .
For more information on how to check the server settings in different email programs, see the Encryption of transmitted data section.
If the message "Authentication required" appears, "Sender address rejected: Access denied" or “Send auth command first”, authorization on the Yandex SMTP server is disabled in the mail program settings. Make sure the option is enabled User Authentication(for Outlook Express) or SMTP authentication(for The Bat!).
If a message occurs "Sender address rejected: not owned by auth user", the address from which you are trying to send an email does not match the one under which you are authorized on the SMTP server. Make sure that in the settings of the mail program, the return address is exactly the address from which the login is used in the authorization settings for SMTP.
If a message occurs "Login failure or POP3 disabled", the mail program cannot access the mailbox using the POP3 protocol. Make sure that you entered the correct password for the mailbox and that access via the POP3 protocol is enabled in the Mail Programs settings section.
If a message occurs "Message rejected under suspicion of SPAM", the content of your message was recognized by Yandex.Mail as spam. To solve the problem, open the Yandex.Mail web interface and send any one email as a test. This way you will prove to the system that the letters are not sent by a robot.
Check your computer for viruses with free antivirus programs: CureIt! from Dr.Web and Virus Removal Tool from Kaspersky Lab.If the mail program does not receive or send letters, check the correctness of the settings of your mail program, as well as the settings for connecting your computer to the Internet.
If you are using an antivirus program, firewall or proxy server, disable them and see if this reproduces the problem.
personal data and link a phone number to your account.
Read the step-by-step instructions for finding missing emails. Before you start, open Yandex.Mail in a new tab.
Select an issue:
When you delete emails, they go to the Deleted Items folder and are kept there for 30 days. During this period, you can restore them:
Go to the Deleted folder.
Highlight the letters you want.
Click the Go To Folder button.
If more than a month has passed since they were deleted, you won't be able to restore the messages - they were permanently deleted from the Yandex.Mail servers.
If the letters are not in the folder where they should be, then most likely they ended up in another folder, for example, in Deleted Items or Spam. If you remember the name or address of the sender, part of the text of the letter or the subject - try to search for letters in all folders in your mailbox.
Did you find letters?
You can recover emails:
Navigate to the folder where the emails were found.
Highlight the letters you want.
Click the Go To Folder button.
Select the folder where you want to move the messages from the list - for example, Inbox.
Why Emails Disappear and How to Avoid It
In the Deleted mail folder, 30 days are stored, in the Spam folder - 10 days. After that, they will be permanently deleted from Yandex servers. Why emails can end up in these folders without your knowledge:
Another user has access to your mailbox
Emails can be deleted by a user who has access to your mailbox: you may have forgotten to log out after working on someone else's device. To end the session, click on the link in the account menu Sign out on all devices. You can also do this on the Passport page - using the link Sign out on all computers.
Letters disappear in the mail program
service page
Set up a rule that deletes or moves letters Letters disappear in the mail program
If you use a mail program and delete letters in it, then they disappear on the service page. This happens because your program is configured using the IMAP protocol - while the structure of the mailbox on the service is synchronized with the structure of the mailbox in the program. To delete messages only in the program, but leave them in Yandex.Mail, you can configure the program using the POP3 protocol, but we recommend not to do this: letters may not be synchronized correctly with the server.
Set up a rule that deletes or moves emails Specify reliable personal data in Yandex.Passport and link a phone number to your account. Perhaps our security system found your account suspicious and blocked the mailbox. Most often this happens due to the fact that a phone number is not attached to the box or a fictitious name and surname are indicated in the Passport. It usually takes a couple of hours to unlock.
If you delete messages in a mail program, but they are still in their folders on the Yandex.Mail website, then most likely your mail program is configured using the POP3 protocol. Due to the peculiarities of the POP3 protocol, messages in the mail program may not be synchronized correctly with the server. It is recommended to use the IMAP protocol to work with Yandex.Mail. To migrate your email program from POP3 to IMAP, see Switching from POP3 .
If your email program doesn't show sent emails, then most likely your email program is configured with POP3 protocol. Due to the peculiarities of the POP3 protocol, messages in the mail program may not be synchronized correctly with the server. It is recommended to use the IMAP protocol to work with Yandex.Mail. To migrate your email program from POP3 to IMAP, see Switching from POP3 .
If you receive invalid certificate errors when activating SSL encryption in your mail program, make sure that your mail program and operating system are configured correctly:
Add a certificate to the list of trusted certificates manually (Windows)
Attention. If you are not sure that you can install the certificate yourself, contact a specialist.
To add a certificate to the list of trusted certificates:
Download the certificate. (If the linked file opens directly in the browser, click CTRL + S and save the file to your computer; you don't need to copy the text from the file.)
Open the Start menu.
Mail clients allow you to save a lot of time on checking mail. However, it is not always clear how to use them. Let's look at the example of Mozilla Thunderbird (hereinafter - MT) all the stages of installation and configuration in order.
First you need to download the installation package from the official page of the project. We choose the assembly that suits you - they differ not only in languages, in addition, each OS has its own version. Suppose the Russian language is what you need and your OS is Windows (absolutely any, the site will automatically select the right package for you). Click and start downloading.
Attention! If you already have this mail client installed, it is highly recommended to uninstall it.
Run the downloaded *.exe file and click next. You can choose to install the MT in the standard configuration (the checkbox opposite "Normal") or in the optional. The second installation method should be chosen if the standard path "c:\program files\mozilla thunderbird\" does not suit you. Click next.
Installation completes almost instantly, now launch the client. Let's move on to the next point.
2. MT setting
At the first start, the window of integration with the system pops up. It offers to use MT as the default mail client, newsgroup client, and . What is convenient - you can immediately configure Windows search so that it can search for messages. Choose whatever suits your needs. To prevent this window from getting to you every time you start it, uncheck the corresponding box. Click "OK" and move on.
The account settings window immediately pops up. If you already have an email, you should not make a new one. Click on "Skip this and use my existing mail".
Enter all required information in this window. The name can be anything, and the password and address are exactly the same as you specified when registering with the mail service (google, rambler, yandex, mail.ru, etc.).
The setup is automatic in most cases. Upon completion, you are prompted to choose between IMAP and POP3. Here, again, at your convenience. If access to the Internet is stable - choose the first one, if not - the second one. Click Done if the automatic setup was successful.
If not, resort to manual tuning. All the necessary data can usually be found on the site providing e-mail services. Click done when finished.
If you have several mailboxes, you can merge them - just click on "Create a new account" and do the above manipulations. Nothing complicated.
If everything went well, the client window will look something like this:
3. Additional settings
You can customize the MT for yourself by clicking on "View settings for this account". They are quite flexible, there is a frequency of checking for new messages, and ways to store them. You can also include a signature, edit the response form.
The anti-spam filter is already enabled by default, most annoying advertising campaigns will bypass you, but sometimes it's worth checking the "Spam" tab - no system can be perfect. From time to time, spam filters fail, "burning" messages that are needed.
3.1. Functionality check
To check if the client is working, click on the "Inbox" tab, if there are any (even if the account is new, services usually send welcome messages). If there are no messages, you can try sending an email to yourself. In the upper left corner there is a "Create" tab, feel free to click it.
In the "Compose message: %name%" window, fill in the fields as follows:
- To: your address
- Topic: any, for example - a test.
- In the field for entering the text of the letter, type whatever comes to mind. Let's say "one two three".
- Click the "Submit" button in the top left corner.
- If a notification window pops up about a new message received () - you have completed the mail client settings, if not, try repeating all the points, but this time be more careful.
4. Possible problems. Their decision.
- Typically, problems arise if the user installs all sorts of themes and add-ons for the email client. It can very much "slow down" or not start at all. Then you should “throw away” the recently downloaded updates and try to find a more stable alternative to them.
- Another common problem is an error when starting the program. At the same time, reinstalling or rebooting does not help - all efforts seem to be in vain. There is a way out, and quite simple. Find the profiles.ini file in the root of the installed client, right-click on it, run it through some text editor, such as Notepad, then press Ctrl + f, find the line “Default=1” and delete it. Save the file and close. Letters and profile will remain in place, and the program will start again. If it does not help, delete the file, but then you will have to create a new account.
- It happens that after the update the program stops working correctly - in this case, a simple reinstallation will help.
In contact with
Mozilla Thunderbird is one of the best email clients today, and it is second only to The Bat! (only due to the fact that there is no possibility to make a normal backup, but otherwise it is even better and more functional). Another advantage of this email program is that it is cross-platform.
In order to start setting up Mozilla Thunderbird, you need to have an already registered mailbox on one of the mail servers (gmail, yandex mail, mail.ru, etc.). We launch the mail client and on the main screen there will be an inscription E-mail. Click on it and in the window that opens, select the button Skip this and use my existing mail, if you do not have it, the program will offer to create it.
So, let's start setting up the mail client to receive email. To do this, enter the data from your account on one of the e-mail servers in the window. In my case, it will be mail.ru. You will also be prompted to create a new one. Enter all the required information and click Continue. In the next settings window, you will be prompted to select an IMAP or POP3 server, your choice will depend on your desires. Those. if you need security, you will choose IMAP, if the security requirements are minimal, then choose POP3. After selecting the server, you can click the Finish button and start using the mail client. The program will enter all server settings automatically. If you know the finer settings of your server, click the Manual settings button. A window will open with more detailed configuration of the incoming and outgoing mail server. To find out the ports or what authentication is on your server, in my case mail.ru, go to the site and in the Help section select the desired server: either IMAP or POP3. Because the Mozilla Thunderbird mail program goes to the Internet and checks the settings, then they will be correct for you. the client will receive all the mail from your account and download it to your PC, if not, it will give an error. If everything went without errors, click the Finish button and see what kind of mail the client received. Would you like to make more detailed settings? To do this, right-click on Local Folders and select Options.
A window with detailed account settings will open. You can change your account name. Here you can change:
That's actually all the settings of the Mozilla Thunderbird mail client. The article made sure that there is a wide variety of mail client settings. Also, you can create not just one mailbox, but several, thereby optimizing the viewing of mail from different mail servers in one program.