This installation method is suitable if you own a netbook or your CD / DVD drive is out of order and you need to install Windows 7. This method is also good because the process of installing Windows 7 from a flash card is several times faster than from a CD or DVD disk.
Before you start burning Windows 7 to a USB flash drive, copy all important data from the USB flash drive to other storage media (hard drive where Windows will not be installed, another flash card, disk, etc.), as in the process of formatting and recording image of Windows 7 on a USB flash drive, all data on it will be destroyed.
First way
If you are creating a bootable USB flash drive while in the Windows 7 operating system, then you will need a program Windows 7 USB/DVD Download Tool, which can be downloaded from Of. Microsoft website at the link.
If you are creating a bootable USB flash drive under the Windows XP operating system, you will need to install Microsoft .NET Framework 2.0 And Microsoft Image Mastering API 2.0. Of course, if you already have them installed (more often for the first program), then you do not need to reinstall them.
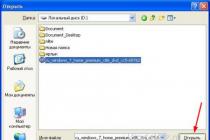
1) Insert the flash drive into the laptop.
2) Run the program. Click the button Browse.
3) Select the ISO image of Windows 7 and click the button Open.

4) After you have specified the ISO image of Windows 7, click the button Next.

5) Press the button USB device.

6) Your flash drive should appear in this window. Click the button Begin copying

7) Click on the button Erase USB Device

8) Click Yes.
9) The process of writing the Windows 7 image to a USB flash drive will begin

10) When the recording is completed, the status will change to Backup completed . close the program

Second way
For the second method, you will need a program UltraISO.
1) Insert the flash drive into the laptop.
2) Run the program. In Windows 7 and Windows Vista, it is recommended to run the program as an administrator.
The UltraISO program is paid, but you can use the trial period, consider this option. Click the "Trial period..." button

3) Select a menu item File ->Open...

4) Select the ISO image of Windows 7 and click the button Open.


6) In the field Write method: select USB-HDD. Click the button Format.

7) The formatting utility will start. Click the button Begin.

8) Click OK.

9) After formatting, a success window will appear. Click OK.

10) Close the program.

11) Press the button burn.

12) Click Yes.

13) The process of writing the Windows 7 image to the USB flash drive will begin.

14) At the end of the entry in the column event the message "Recording completed!" appears. Close the program.

Third way
For the third method, we need the WinSetupFromUSB 1.0 Beta 7 - program.
Note: the link is a newer version, but the principle remains the same.
1) Insert the flash drive into the laptop.
2) Run the program. In Windows 7 and Windows Vista, the program must be run as an administrator.

In field USB disk selection and format should be your flash drive.
Note: If the flash drive is not detected, then format it with the PeToUSB or HPUSBFW utility.
Also, the flash drive may not be detected if it is inserted into the laptop after the Winsetupfromusb 1.0 Beta7 program has been launched and in order for it to be determined, just press the button Refresh.
3) Press the button RMPrepUSB.

4) We mark such lines as: WinPEv2/WinPEv3/Vista/Win7 bootable (CC4), NTFS. Put a tick next to Boot as HDD (C:2PTNS). Click the button 6 Prepare Drive.

5) Press the button OK.

6) Press the button OK.

7) After that, this will appear Dos window.
Warning: Do not close this window. It should close automatically.

8) After Dos the window closes click the button exit.

9) Check the box next to Vista/7/Server 2008 - Setup/PE/RecoveryISO. Click on the square on the right.

10) A window will appear Folder overview in which you need to select the virtual drive in which the ISO image of Windows 7 is mounted.
After you have done this, press the button OK.

11) Press the button GO. The process of writing Windows 7 to a USB flash drive will begin.

12) When the recording is finished, this small window will appear. Click OK.

13) Close the program.

Fourth way
The installation method is quite simple, so anyone can do it! For this we need:
1) Windows 7 image
2) A flash drive with a capacity of at least 4GB
3) A program for creating and editing ISO images, ultraISO from the above method or a free MagicDisk
You can take any media from a regular flash drive to an SD card, but not less than 4GB!
4) Run the command line (in Windows XP, these are standard-> command line. In Windows Vista / Windows 7, open start, at the very bottom there is a search, enter cmd and open as administrator).
5) Next, on the command line, enter diskpart, the disk management utility will open.

6) Next, in the diskpart utility itself, enter: list disk, this will display all the physical disks of the PC, namely disks and not partitions.
Among them we are looking for our flash drive.

7) Then we execute the command select disk#, Where # this is the number of our flash drive.
In this case, the flash drive on the screen is number 1, therefore s elect disk 1. All further manipulations will be carried out only with this disk.
8) Execute the command clean, clear the drive, then the command create partition primary- create a new partition on the disk.
9) After creating a new section, write select partition 1, select this section for manipulation, enter active, thereby making the section active.
10) Now in order for the flash drive to be visible in bios, you need to format it in NTFS format, which we do with the command format fs=NTFS.
11) Next, you need to activate the process of connecting the device and assigning letters to it, we do this with the command assign.
Everything, the preparation process is completed.

Installing Windows 7
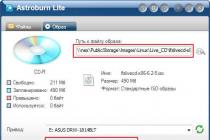
Distribution recording can be done with any file manager or free .
In this case, you need to somehow open the image of the installation disk with the OS, you can do this with any disk emulator, Alcohol or MagicDisk, create an image and copy everything from it with a file manager to our prepared flash drive.
Everything, the process of creating an installation flash drive is completed, now we are trying to install the OS by first setting it in bios.
Well, that's all, which of the four ways to create a bootable flash drive to use is up to you.
Enabling BIOS to boot from a flash drive
Before you start installing Windows 7 from a USB flash drive, you need to go into the BIOS and enable booting from a USB flash drive.
To enter the BIOS, you need to press a certain key when the computer boots. On desktop computers, this is the Del key. On laptops, the most commonly used key is F2.
Usually, when you turn on the laptop, a screen appears on which at the very bottom there is a line that says which key you need to press in order to enter the BIOS.
If you do not have such a line, then you need to look at the information on how to enter the BIOS in User Manual walking with a laptop.
1) We insert the USB flash drive into the laptop, if it is not inserted.
2) Turn on the laptop, if it is on, then reboot.
3) We go into the BIOS.
For example, the whole process will look like below, if your BIOS is different, then the principle will remain the same. If you have any questions - write in the comments.

4) Go to the tab Boot. In it, in the boot order, you need to put our flash drive in first place, using the arrow keys and the keys F5 And F6. That is, with the arrow keys we select our flash drive, and with the key F6 take her to the top.
To find out which keys you need to use to set the boot order, see the hints on the right.
The name of the flash drive must appear in the line USB HDD.
Also, a flash drive can appear in the line USB key.
To save the changes and exit the BIOS, press the key F10. (Depending on the manufacturer of the BIOS, the key may be different. See the hints on the right or below).

5) A window will appear asking you in English to Save changes and Exit? You are taking Yes.

6) After that, a reboot will occur and the installation process of Windows 7 will start.
Installing Windows 7 from a flash drive
If a bootable USB flash drive with Windows 7 was created using the WinSetupFromUSB 1.0 Beta 7 program, then a green screen will appear first. Select Start Vista/Win7/Server 2008 Setup or PE/Recovery ISO from partition 0.

Next, the Windows 7 setup program will launch.
Write in the comments what is not clear and what questions you have.
Microsoft has been developing and improving operating systems for a long time, but so far not a single distribution has officially appeared that could fully work from an external device on any computer. No matter how hard you try to protect your computer from breakdowns or virus infection, sometimes critical situations occur when the installed operating system can no longer function normally and stably, and you need your files and information that remained in the working folders along with the OS. That's what emergency boot disks, or Windows PE, were created for.
Good to know!
In order to boot such an operating system from an external storage medium, you must first perform the following steps:
- Make the device bootable by assigning boot sectors to it;
- Pre-download and correctly port Windows PE to a removable device;
- If necessary, add drivers to the image (this is especially true for SATA drivers).
It should be remembered that the speed of the operating system that is loaded from an external device is much slower. This is due to the fact that the speed depends on the speed of the device itself, as well as the frequency of the bus through which the signal goes from / to the device. If you run the OS from USB devices, then the speed drops by about ten times (The average download speed of information from a USB flash drive is 10 MB / s, the average speed of HDD SATA is 100-120 MB / s).
How is the process of loading and starting OS PE?
After pressing the power button on the computer, devices are polled, after which they are checked for readiness, and an attempt to boot begins according to the priority list stored in the BIOS settings. First of all, the boot sectors are read, which store the addresses where the bootloader is located to start Windows PE. After that, a pre-installed system image begins to load into the computer's RAM. It is worth noting that all files and settings that occur in the process of working with the OS at the next start will be lost.
How to set up the Windows PE boot process from a USB flash drive?
Currently, there are two types of BIOS. An old typical and simple one that is similar to MSDOS and contains only menu items that can only be navigated using the keyboard. The new one is UEFI, it differs significantly both in appearance and functionality. In UEFI, you can control and select all settings with the mouse and keyboard.
Organization of loading in UEFI
If possible, you can simply drag the desired device to the first place with the mouse pointer, thus changing the boot order. The classic boot organization method also works:
- Put Boot from USB or the name of your flash drive first.
- Start your computer.
Boot organization in a typical BIOS
- Connect the USB device before starting the computer.
- Go to the BIOS menu in the "Boot Device Priority" section (Buttons Del, F2, F12).
- Put Boot from USB in the first place (sometimes it defines it as a USB HDD, or you need to put a USB flash drive in the priority hard drive settings) or the name of your flash drive.
- Save your changes before exiting.
- Start your computer.
Alternative download method
This method is used if you can enter the bootloader menu separately by explicitly specifying boot devices for it.
In the event of a serious failure in the operation of the OS, it is not always possible to turn it on even using safe mode. In such cases, running windows 7 from a USB flash drive without installation will help.
To a beginner, this advice may seem strange, but experienced administrators always have such a drive with them. The bottom line is that windows 7 will boot from a USB flash drive on which the OS image was previously recorded, and not from a hard drive, as usual. Such a system has default settings so that unwanted changes will not be reflected when it is run.
Launch preparation
How can a regular user start windows 7 from a flash drive? To do this, you need to have a bootable USB flash drive, at least one free USB port on your device, and basic knowledge of English or an online translator at hand. It is advisable to select a flash drive that has already been used on this PC to create a LiveUSB, otherwise you may need to install a driver.
The following procedure is expected:
1. Insert the drive into the device that is turned off; in this case, the LED of the flash drive should light up only when the computer starts.
2. You need to go into the BIOS menu or a separate Boot Menu, if any. To do this, when the logo appears, you must press, depending on the manufacturer of the motherboard, F2, Delete, Esc or another key. Often, the tooltip is displayed at the bottom or top of the screen.
3. Most of the old BIOS versions do not support the mouse, the control is done using the arrows. Next, you need to go to the Boot Menu, Boot Settings or just Boot tab, it is responsible for the boot order. To run windows 7 from a USB flash drive without installation, you must set the Flash Device first.
4. To save, you need to use F10, then Enter. It is worth noting that changes in the launch order can be either permanent, in which case you need to repeat the previous two points and return everything to its place, or act within the current start only.
5. After that, the windows welcome screen should appear. You may need to enter an activation key, if windows was preinstalled when buying a PC, then it is in the documentation for the device. You should not try to enter there under your login, because the OS does not know it.
Possible mistakes
The steps described above will be enough to launch windows 7 from a USB flash drive, in almost all cases. When everything went well, you can start diagnosing, and then troubleshoot. If the result is still negative, then write down the error code displayed on the screen.
When nothing is displayed on the monitor, the reason is most likely in incorrect launch settings (p. 2-4) or an incorrectly recorded image.
If, after setting the boot order, the OS still reads from the hard disk, then perhaps the changes were not saved or the computer does not see the USB flash drive, then you need to dismantle and insert the device again, while restarting the computer, or repeat everything with a new drive.
WinToUSB: A tool to install and run windows 7 from a USB drive
Installing and running windows 8 / 8.1 from a USB drive is relatively easy, which cannot be said about windows 7. Unlike windows 8 / 8.1, windows 7 does not include the windows To Go function, which allows you to install and run corporate versions of windows effortlessly 8/8.1 from USB flash drives.
On the Internet, you can find many step-by-step instructions on how to install windows 7 on USB drives using various third-party utilities. Today I want to introduce you to another great and perhaps the best tool for installing windows 7 on USB.
It's about WinToUSB. It is a free and easy to use program that allows you to easily install Vista, windows 7, windows 8 and windows Server 2008 R2 on a USB drive. You only need to make a few mouse clicks. Moreover, WinToUSB can be used by users of professional editions of windows 8/8.1, which, as in the case of windows 7, do not have the windows To Go function mentioned above.
WinToUSB supports both USB flash drives and external hard drives. Another benefit of WinToUSB is that you don't have to download and install the Windows Automated Installation Kit (WAIK) to use this tool. In addition, it is fully compatible with MBR and GPT disks.
To install an operating system on a USB, you must have a windows ISO image or an installation DVD and, of course, a USB disk. It is recommended to use at least 16 GB storage.
Please note that since Microsoft did not include the ability to install windows 7 on USB, you may not be able to run windows 7 from a USB flash drive on absolutely all computers.
How to use WinToUSB
Download the WinToUSB installation file (link at the end of the post), install and run the program. Next, click on the button to the right of the "ISO File" field, navigate to the Windows ISO file and select it. If you want to use the installation DVD rather than a disk image, insert it into your computer's DVD drive, then in WinToUSB click on the large optical drive icon and select your installation disk in the "CD/DVD" field.
Now click "Next", select your USB drive in the "Please select the destination disk" field and click "Next" to start installing windows. And make sure that there is no important information on the USB, because. The program will prompt you to format it.
During my test, the program took about an hour to install windows 7 Ultimate. This process may be completed faster in your case, but it all depends on the capabilities of your computer and the speed of the USB drive.
The tool is compatible with all latest windows versions including windows 7, windows 8, windows 8 and windows 8.1. I tested it on windows 8.1 Update 1 and can confirm that the program works flawlessly.
Download WinToUSB
How to run windows from a flash drive without installation
For almost any modern OS, you can create a so-called live image on a flash drive - that is, the entire system in an almost installed form will be stored on a flash drive, and when you connect such a flash drive to a PC, you can start and work with it in the same way as with installed on the hard drive. Of the minuses - the first launch is quite long, and for comfortable work you need a USB 3.0 flash drive with a capacity of at least 16 GB and read / write speeds of at least 20-30 MB / s. Why is this needed? For example, to quickly deploy a workplace - instead of carrying a laptop with you, you can limit yourself to a flash drive. Also, this flash drive can help if the windows installed on the device does not start.
In order to create a live image, we need any windows 10 image (how to get it - read here) and the Rufus program (you can download it for free on the official website). Now we connect a USB flash drive to the computer, open Rufus, select the NTFS file system, select the ISO image in the "Create Boot Disk" menu, and select windows To Go a little lower:
That's it, now click Start and wait until the image is copied to the USB flash drive. You can also transfer the necessary portable versions of programs to it.
How to run windows from a flash drive?
Admin 9.10.2013 — 11:10 Workshop
Microsoft has been developing and improving operating systems for a long time, but so far not a single distribution has officially appeared that could fully work from an external device on any computer. No matter how hard you try to protect your computer from breakdowns or virus infection, sometimes critical situations occur when the installed operating system can no longer function normally and stably, and you need your files and information that remained in the working folders along with the OS. This is what emergency boot disks, or windows PE, were created for.
Good to know! In order to boot such an operating system from an external storage medium, you must first perform the following steps:
It should be remembered that the speed of the operating system that is loaded from an external device is much slower. This is due to the fact that the speed depends on the speed of the device itself, as well as the frequency of the bus through which the signal goes from / to the device. If you run the OS from USB devices, then the speed drops by about ten times (The average download speed of information from a USB flash drive is 10 MB / s, the average speed of HDD SATA is 100-120 MB / s).
How is the process of loading and starting OS PE?
After pressing the power button on the computer, devices are polled, after which they are checked for readiness, and an attempt to boot begins according to the priority list stored in the BIOS settings. First of all, the boot sectors are read, which store the addresses where the bootloader is located to run windows PE. After that, a pre-installed system image begins to load into the computer's RAM. It is worth noting that all files and settings that occur in the process of working with the OS at the next start will be lost.
How to set up the windows PE boot process from a USB flash drive?
Currently, there are two types of BIOS. An old typical and simple one that is similar to MSDOS and contains only menu items that can only be navigated using the keyboard. The new one is UEFI, it differs significantly both in appearance and functionality. In UEFI, you can control and select all settings with the mouse and keyboard.
Organization of loading in UEFI
If possible, you can simply drag the desired device to the first place with the mouse pointer, thus changing the boot order. The classic boot organization method also works:
Boot organization in a typical BIOS
Alternative download method
This method is used if you can enter the bootloader menu separately by explicitly specifying boot devices for it.
There are only a few problems that beginners face. And one of them is the BIOS setup for installing Windows from a USB flash drive. This is the first step that starts everything, and this is where almost everyone stumbles.
The problem is that there are different BIOS versions. And, having studied the instructions on how to enable booting from a USB flash drive in the BIOS, a beginner may still not be able to cope. And all because he simply has the wrong BIOS version, there is no such line as in the screenshot and, accordingly, nothing happens.
It doesn't matter what brand of laptop or computer you have. The version of the operating system (Windows 10, 8, 7 or XP) also does not play a role. Only the BIOS version matters. And the easiest way to find out about it is by running it.
Before entering the BIOS settings, you need to insert a bootable USB flash drive with the installation image into the USB port. At the same time, the main thing here is to write it down correctly. Otherwise it just won't load.
After that, restart your PC or laptop and constantly click the Delete or F2 button until the BIOS window opens. The button may differ depending on the brand of laptop or motherboard on the computer, so see the hint on the first black screen.
Then the BIOS is configured.
Award BIOS setup
How to understand that you have an Award BIOS? From the screenshot below:

If you have the same blue screen, then this is an Award. Most often this option is found on the PC.
Management in BIOS is carried out only using the keyboard - arrows and corresponding buttons (their list is usually indicated at the bottom of the screen).
Before setting the BIOS to boot from USB, you need to check that it is enabled (otherwise the USB flash drive simply will not be displayed). For this:

The instruction is as follows:


In the screenshot above, the HDD is in 1st place, and the USB flash drive is in 2nd place. It needs to be lifted up. As you can see from the prompts at the bottom of the screen, you can set the boot priority in BIOS using the + and - (plus and minus) buttons. Select the USB flash drive and press the plus sign - it should move to the first line. Then press Esc to go back.
Then highlight the item "First Boot Device", press Enter and select "USB-HDD". Press the Esc button again. To exit the BIOS, click the F10 button and then Esc (Save and Exit).

AMI BIOS Setup
AMI BIOS looks like this:

And most often it is found on laptops. Again, you first need to make sure that the USB controller is enabled. For this:

 Now let's look at how to boot a USB flash drive through BIOS on a laptop:

Sometimes, in order to change the device boot priority (put the USB flash drive in first place), you need to press other buttons. It can be not only + and - (plus / minus), but also F6 / F7, etc. Focus on the tips where it says what a particular button does (this little instruction is always either on the right or at the bottom).
Phoenix-Award BIOS Setup
The Phoenix Award looks like this:

This is a rare (or rather, old) version, but for the full picture, let's look at the Phoenix-Award BIOS through the BIOS.
First, go to the "Peripherals" tab and check that the first two items are set to "Enabled". If necessary, expose the desired.


After that, go to the "Exit" tab (in the top menu) and select the "Save & Exit" line to exit the BIOS.
UEFI BIOS Setup
The UEFI BIOS is a new and improved version of the old BIOS. It has a user-friendly interface, so setting up the BIOS for installing Windows is very simple here.
All you need to do is find the USB device icon, use the mouse to move it to the 1st position, and then click the “Exit” item (in the right corner) with the mouse. And don't forget to save your settings!
In this simple way, booting from a USB flash drive through the UEFI BIOS is carried out. Undoubtedly, this method is the simplest and most understandable. Actually, it was for this that a new graphical interface was developed.
When the PC or laptop reboots for the first time during the Windows installation process, you need to go into the BIOS again and restore the previous settings. That is, put the HDD-drive in the first place, and lower the flash drive to the second or third.
Or when a black screen appears after the reboot with the line "Press any key ..." ("Press any button") - do nothing.

Otherwise, Windows will start installing from the very beginning. And you can go around in circles for hours.
Once again: during the installation process after the first reboot, either go to the BIOS and return all the previous settings, or simply do not press anything. Alternatively, you can also simply pull the USB flash drive out of the USB port (but only when the PC or laptop reboots).
In order to install Windows 10 on a USB flash drive and run from it, you will need the drive itself (at least 16 GB, in some of the methods described this turned out to be not enough and a 32 GB flash drive was required) and it is very desirable that it be a USB-enabled drive 3.0 connected to the appropriate port (I experimented with USB 2 and, frankly, got tired of waiting to write first, and then start). An image downloaded from the official site is suitable for creating: (however, there should be no problems with most others either).
Using the command line to burn Live USB with Windows 10
There is also a way to make a flash drive from which you can run the OS without programs, using only command line tools and built-in utilities in Windows 10.

I note that in my experiments, a USB made in this way did not work, freezing at startup. From what I found, the reason could be that I have a “removable drive”, while for its performance it is required that the flash drive be defined as a fixed disk.

It is small and does not require installation: just unzip the archive downloaded from the developer's website to a suitable folder. In addition to it, you will need the distribution kit of the version of Windows that is installed on your computer. It is also important to observe the bit depth: if you have Windows 7 x64, then the distribution kit should be the same. It is not necessary to have an optical drive - it is enough to have an image on a hard disk, which you must first mount on a virtual drive (using DAEMON Tools Lite) or unpack it with an archiver into a separate folder.
As soon as you connect the flash drive and prepare the image, launch WinToFlash. You only need two actions: click on the big button in the first window and select the path to the OS distribution kit and the drive letter assigned to the flash drive by the system. After confirming the choice, the utility will do everything itself, and upon completion of the work, you will become the owner of a bootable media ready for use.
If you are a supporter of doing everything manually, with an understanding of the essence of the processes, no problem, all the same can be done using the built-in Windows mechanisms. For the "seven" it is done like this:
We connect the USB flash drive
Press the Win + R keys (“Run”), then type the command “diskpart” in the line and press Enter. We confirm the right to execute this command on behalf of the administrator
After displaying the prompt (DISKPART>), enter the “list disk” command, which will display a list of all disks in the system - you need to find your flash drive among them and remember the number assigned to it (for example, Disk 7)
But after all, a complete copy of Windows is not always necessary - in order to update the BIOS or perform a disk check with a proprietary utility, DOS is enough. Making a boot disk for it is as easy as shelling pears if you use the HP USB Disk Storage Format Tool utility. In addition to it, you will need some DOS files - you can take them from the FreeDOS package or use ready-made assemblies (there are plenty of them on the Internet).

The procedure is as follows:
We insert the USB flash drive into the USB port (the utility, as a rule, immediately determines the presence and letter of the USB flash drive)
Install the FAT32 file system and check “Create a DOS startup disc”
In the lower field, specify the path to the folder in which the system files are located
Click Start
After completion, copy the required files, drivers and utilities.
How to boot from a USB flash drive
Perhaps this is the simplest procedure, but for some reason it causes difficulties for many users. First of all, do not forget to insert the USB flash drive before turning on the computer, and not after entering the BIOS: most often, recognition and connection of USB devices is performed at the time the PC is initialized and is not controlled after. If your motherboard firmware successfully recognizes the bootable flash drive, you will be able to see it in the “Boot” menu and select it as the first one. You will probably need to specify a few additional parameters, such as “USB Legacy Support" and “Boot from USB - Enabled". If you are not sure, take a look at the instructions, the appropriate options should be indicated there. allow you to call the Boot menu (most often with the F12 key), and already select bootable media in it even without entering the BIOS Actually, these are all the necessary steps: if you did everything correctly, and the computer "sees" the USB flash drive in the BIOS, and you do not forgot to put it first in the list of boot devices - a few seconds after the reboot you will see the operating system loaded from the USB drive (or flash card).
How legal is this method?
Perhaps this is the most. Indeed, even being the owner of a licensed copy of Windows, you do not have the right to run it anywhere except on your own computer: Microsoft states in its EULA that you can copy the OS to external media, such as a flash drive, only for application on one, own computer, on which the OS is installed. So formally, you shouldn't even revive the second computer in the house by writing a bootable USB flash drive on the first one. Similarly, you are violating the license agreement if you use downloaded MS-DOS/PC-DOS components and third-party utilities from the Internet; best not to tempt fate and turn to FreeDOS.
If it seemed to you that creating a bootable USB flash drive is a complicated and abstruse matter, then most likely you don’t really need it. But sooner or later, many users will have to face the need to access the computer from external media, and, willy-nilly, they will be forced to return to this issue. So, without delay, according to the recommendations given, make yourself a bootable USB flash drive - it will come in handy in any case!
CD/DVD discs are obsolete today. They were replaced by USB drives.
The need to boot from a USB flash drive may arise when solving many problems:
- installing a new operating system;
- launch in Live CD mode;
- to treat your computer from viruses and malware;
- to correct errors that occur when loading the operating system;
- pre-installation of additional drivers;
- scanning the hard drive for bad sectors;
- launching the operating system installed on the USB flash drive.
On many systems, USB booting is disabled by default. Because of this, a user who wants to use a bootable flash drive may have problems changing the settings.
Features of booting from a USB flash drive
The order in which devices to launch is determined by the Bios settings, a built-in firmware designed to provide the operating system with access to the device APIs.
To boot the system from a flash drive, you need to go into Bios and change the startup order, or use a special boot menu. But this is not always easy to do, since firmware versions and types may differ on different motherboards.
If you need to boot from USB or any other storage device, you need to follow these steps:
- insert a disk or flash drive;
- turn on the computer or restart it;
- enter Bios or Boot menu and select USB device;
- if there are several connected devices, the system will automatically offer you a list to select the one you need.
Most modern motherboards work through a technology called UEFI. This is not just a more convenient graphical shell for the Bios firmware, but a new software that has more features and flexible settings.
Motherboards that work with uefi have received many new features, for example:
- to control the temperature of different devices and, in this regard, increase or decrease the speed of the fans;
- adjust the overclocking frequency of the central and graphic processor on those motherboards, where it is provided by the developer;
- work with many Bios settings from special software running the Windows operating system.
Video: select boot device in BIOS
Motherboard Asrock H77M-ITX
The easiest way to boot the system from a USB flash drive is to use the Boot Menu (boot menu). For every modern motherboard there is such an opportunity. To find out which combination or key you can do this, most often it is enough to read the system messages. In extreme cases, you need to refer to the documentation of the board.
Asrock H77M-ITX allows you to select the startup option using the "F11" button. On the first try, you may not be able to get into the menu, so you need to press the key several times. If unsuccessful, just restart your computer and try again.
As a result, you should see a blue background with the words Asrock UEFI setup utility. In the "Please select boot device" menu, you need to select the device you need to boot.

To configure the startup order of devices in the BIOS of the Asrock H77M-ITX motherboard, you must perform the following steps:

After restarting the computer, you should see the start of the launch from the USB flash drive.
Motherboard ASUS P8H77-I
You can get into the BIOS on computers with an ASUS P8H77-I motherboard in the same way as described in the previous section, using the keys Del or F2. The menu for selecting devices to boot can be accessed using the "F8" button.
The firmware interface is very different from the previous version. But the names of the various settings menus are almost identical.
To simplify operations, there is a primary setup mode and an additional one. In the initial setup function, that is, in the main window that you enter when loading Bios, you can select the startup priority. In the USB picture, it is labeled as with uefi.

If, after restarting the system, the boot from the USB flash drive did not start, you need to switch to the "Advanced Mode". This can be done using the "Advanced" button or by pressing the "F7" key.

To set the priority, do the following:

The computer will reboot, after which it should start from USB. If this does not happen, try changing the port and repeat the operation.
How to boot from a bootable USB flash drive in Award Bios
New motherboards that work with uefi are much easier to set up. However, the need to boot from a flash drive may also arise on older systems. The settings for using a bootable USB drive may differ slightly, although the principle of operation discussed earlier is the same.
One of the most famous versions of Bios is Award. There is no way to call the menu to select the launch priority. Therefore, we immediately proceed to setting up the BIOS.
In order to boot the system from a USB flash drive on a computer with a motherboard running Award, you need to perform the following steps:

If you did not start from the required drive, you need to check one more parameter: the USB controller must be enabled in the "Integrated Peripherals" menu.

AMI BIOS
This firmware management system is more modern, so there is already a menu for selecting the launch order. It is activated with the "F11" button. You can get into the BIOS settings using the "Del" or "F2" buttons.
To select a download priority, you must:

Phoenix Award Bios
Phoenix-Award Bios is quite rare, and its firmware is a little unusual. There is support for displaying the menu for quick selection of the boot drive, it is called by pressing the "F11" key.
Interestingly, you will not find a USB-HDD in the Phoenix-Award menu. But other gadgets connected in this way are provided for selection, for example Zip, CDROM and Floppy. To start from a flash drive, you need to select Hard Disk, and then the required USB-HDD will appear in the list.

As for priority management through Bios, this is done almost identically to AMI.
The difference is that in the "Boot" menu, you must select the following options:
- use the "+" and "-" keys to change the order. Removable Device should be the first one;
- by activating the Removable Device and pressing the "Enter" button, select the flash drive from the drop-down list.

The ability to boot the system from a USB flash drive is provided by almost any Bios microsystems. Knowing the key combinations and the necessary menu items, you can quickly change the launch priorities.
More modern motherboards with uefi give you a lot more control over your system. If necessary, you can run different operating systems from different flash drives to manage any software.