Despite the fact that developers strive for the ideal, a new update of a familiar application does not always bring pleasure to the user. It's more of a matter of habit though. However, many people want to leave the application as it was before the changes and are looking for information about how.
It is worth noting that VKontakte in the fall of 2017 completely updated its mobile app. This is one of the most tangible changes that the program interface has undergone in Lately, before that, a similar upgrade was presented by the developers in April last year. Almost everything has changed, from new user features to common organization workspace. And even "likes" are now red.
Despite the fact that the optimization is pretty good and the application itself has become more convenient, many (as, indeed, last time) want to continue using the old, more familiar version.
The whole problem is in PlayMarket
All Android users are well aware of the service for downloading and installing new PlayMarket applications. Depending on the settings set in this application, the programs installed on the user's device will be updated in two available modes:
- Manual - when PlayMarket just offers and recommends available updates, and the owner of the gadget independently decides which one to install and which one to ignore.
- Automatic - as soon as a new update appears in the Device Market, the installed program independently accepts it and updates itself. In this case, the user enters the application and sees the new design and interface (as happens with VKontakte).
In this connection, the first action that an adherent of the old software for VKontakte should do is to disable auto-updates of applications and switch it to manual mode.
To do this, go to the PlayMarket application menu, to do this, click on the "sandwich" in the upper left corner, in the menu that appears, go down and find the "Settings" section. In Group general settings we find the item "auto-update applications" and select the three proposed settings options "Never". 
At this point, the settings are complete. This was the first step in resolving the issuehow to return old version VK for Android.Now PlayMarket will not automatically update installed programs, and the user will be able to safely use the old-style program without fear of autocorrect. Obtain if necessary new version program, it is enough to go to the section of installed applications on your own and check for updates, and also, if necessary, start the upgrade.
After external settings that affect the version update are installed, you can start working with the program on the device itself.if Market doesn't automatically update apps anymore? In this case, everything is quite simple, the process is divided into two steps, which involve uninstalling the updated program and installing the desired version.
Uninstalling the updated app
This step is extremely simple and straightforward, you just need to completely remove the existing . If you are an inexperienced user and are worried that you will lose information or access to your account, then these are groundless fears. The old version will contain everything that is on your page now, it does not depend on the use of the software.
Delete installed application can be done in several ways:

After the updated version, you can additionally clear the cache and delete extra files on the phone. The procedure is not required, but it will not become superfluous.
Installing the correct version
After the smartphone's memory has been cleared of the remnants of the previous version of the program, it is time to take the final step in resolving the issue,how to return the old version of VK to Android.
The main question of this stage is where to get the distribution kit of the previous version of VK. Today on the Internet you can find a lot of offers to download and install any program, and not just VKontakte. Before turning to any source, you should first check its reliability. Installing software for mobile access to a personal VK page from a third-party resource can be fraught with unpleasant consequences, and VKontakte itself does not distribute previous versions of the application.
Before you download a package of files and install them on your phone, you should look for reviews about the source. Today, old versions of VK can be found on TrashBox or UpToDown.
Before downloading the distribution kit, you need to set the settings on the gadget. For added security, devices have default set parameters, which prohibit downloading and installing applications from third-party resources. To install an older version, you need to change these settings. Usually when trying to install desired program a pop-up window pops up. A warning about unauthorized actions and a suggestion to deny or allow the process. 
We allow the installation and wait for the process to complete. As a result, the userwill return the old version of VK to Androidand will continue to use the app in the old interface. If necessary, you can always update from PlayMarket. Still, updates often change the application for the better, you just need to get used to the changes.
Surely you have heard about the Android operating system, unless you yourself own a device running this shell. This platform was liked by a good part of gadget owners and is the most common operating system among mobile devices. Since 2009, when the first version of the "robot" was released, the developers have not stopped improving and modifying their brainchild. New versions and updates are released regularly. But is it always necessary to update your device and how to return the old version of "Android" after the update? We will talk about this in this publication.
Why are updates needed?
First of all, for the correct operation of the system. Developers optimize performance, improve the interface, fix lags, because it is practically impossible to release a perfect system right away, and minor malfunctions will be noticeable only during its active use. In most cases, you can find out about an update using a regular message that will appear in the notification bar. You can upgrade by going to the update center, downloading and installing the new version.
Why might gadget owners be unhappy with the update?
In most cases, after the update procedure, the device should work faster, and all the flaws should be a thing of the past. All that users can complain about is some changes in the interface or, for example, the disappearance of shortcuts from the desktop (accordingly, the applications themselves disappear). This is due to the fact that the installed programs are already outdated and simply do not match the new firmware.
New versions of applications or their analogues can still be found on the Play Market, and trying to return old version The OS due to the loss of old applications is a pretty stupid idea. What else can annoy owners in the new firmware version is the appearance of some programs that cannot be removed. For example, it can be new services from Google. And then users without exception begin to think about whether it is possible to return the old version of Android. But most of all those who want to return to the old firmware are among those who tried to reflash their device on their own. Here, a huge number of problems may appear, up to the point that your gadget can turn into a "brick", that is, generally stop showing signs of life.

So before performing such manipulations, make sure that you have enough knowledge and experience, and best of all, contact a professional. Reflash the device only in extreme cases, when you cannot do without it, because such a procedure completely deprives you of the warranty. But return previous version nevertheless it is possible.

How to return the old version of "Android" after the update?
To begin with, come to terms with the fact that the standard resources of the system do not provide for the option to roll back the system, as, for example, in the Windows OS. Accordingly, when you return to the old version, all installed programs and personal files will be deleted. Therefore, just before the procedure for returning the old version, make backup copies of all important documents, files, phone numbers, and so on. Get ready to say goodbye to user settings, saved accounts or applications, they will be erased all but the built-in ones.
Next, you will have to perform a factory reset yourself. How to do it - depends only on your version operating system, but most often this item is found if you go to "Settings" and to "Backup and Reset". Also, this parameter can be found in "Confidentiality". In any case, finding a factory reset will be easy. Next, you will need to perform a series of actions a little more difficult, that is, enter recovery. And how to return the old version of "Android" with it - read on.
Login to recovery
"Recovery" is a special boot mode for Android, with which you can reset settings or flash the system. If you buy gadgets in trusted certified stores and with an already installed OS, then they should have a stock "recovery" mode. How to enter the "recovery" depends only on your device model. The most common combination is the power button and the volume down key.
For example, if you do not know how to return the old version of Android to Lenovo, then this combination is suitable for most of their devices. I would like to note that before entering the "recovery", you need to turn off the phone. If you are looking for how to return the old version of "Android" Sony Xperia, then here you need to hold down three buttons already: those that we have already named, and the camera button. You can easily find more detailed instructions for various models on the World Wide Web. But what to do after entering boot mode?

How to return the old version of "Android" after updating through the "recovery" mode?
You can navigate through the menu using the " highlight", and to select a specific item, you need to press "select". this mode no need, if you delve well - it becomes clear that there is nothing complicated. Now look for the line with " wipe data / and select it. A new menu will open in which you will have to confirm the action. After - wait for the reboot and the OS will return with factory settings.
Charge your smartphone
What is worth noting in the first place is that before starting this procedure, you need to charge the device well. It does not matter how long the system rollback takes and how much the gadget will reboot after that.
If during such manipulations in the "recovery" mode the device does not have enough charge and it cannot complete its task, then, most likely, problems with its further use cannot be avoided.
The same applies to self-flashing the phone. For some users, certain system functions disappeared or did not work, up to the loss of touchpad functionality. In some cases, the firmware did not start at all and it was simply impossible to enter the OS. But even then recovery rescued again. If you cannot enter this mode or it simply does not exist, there are a number of simple utilities for flashing this mode directly through the "OS". Sometimes you may need a PC for this task.

We told you about how to return the old version of "Android" after the update. Take good care of your gadget and it will serve you for a long time.
Data-lazy-type="image" data-src="http://androidkak.ru/wp-content/uploads/2017/05/android.png" alt="(!LANG:android" width="300" height="206">
!}
 Sometimes it is useful to know how to rollback Android firmware to a previous version. This operating system receives regular updates. For example, Android 4.4.4 KitKat could have been upgraded to version 5.0.1 Lollipop at one time.
Updates make the system more secure as developers are always looking to find and fix vulnerabilities. In addition, after the improvement, Android gets a new GUI resulting in a more stylish and modern look.
Why is a rollback needed?
Changes sometimes concern not only functionality and visual design. Some applications that were really used in the previous version of the system may not be supported after installing the update, which is why the user begins to think about how to uninstall the new version of Android.
If there are concerns that switching to another version of the operating system may remove support for a particular application that was actively used by the previous system, then it would be wiser to wait until official update for this program. If the user has performed a system update, but for some subjective reasons is dissatisfied with the improvement and wants to return to the previous version, then he needs to perform a system rollback and remove the new software environment.
Next, we will tell you how to return the old version of Android after the update. Nexus 5 phone will be used as an example as it is officially supported Google, it has its own factory image file and bootloader that can be unlocked when restoring an old version. When performing this operation, the user will face the risk of losing important deleted data.
The user has to act at his own risk. The following steps may damage the mobile device without the possibility of recovery after an unsuccessful firmware.
Read also: How to Enable Android Superuser Root
Preparing to perform a rollback
Nexus devices are very handy for doing rollbacks. All you need to do is save your personal files, go to the developer page on Google and download any factory image ever released for the device. Then you should flash it via ADB data-lazy-type="image" data-src="http://androidkak.ru/wp-content/uploads/2017/05/14722200366071-300x225.jpg" alt="(!LANG:nexus" width="300" height="225" srcset="" data-srcset="http://androidkak.ru/wp-content/uploads/2017/05/14722200366071-300x225..jpg 350w" sizes="(max-width: 300px) 100vw, 300px">
!}
 (Android Debugging Bridge).
V this example using a Nexus 5 phone with installed system Android 5.0, which should be replaced by version 4.4.4 (you need to find this firmware on Android and download it to save it in an accessible place). If you need to rollback another device, you should search for suitable images for it using search engine Google.
So, how to restore the firmware on Android? In addition to the Factory image, there are a few more files you need to download to your PC. It will take android app SDK required for firmware implementation. In addition to the SDK manager, you also need a standalone SDK file. To use such software you need the latest Java environment. During the SDK installation process, you will need to specify where Java is installed.
After the installation is complete, go to the SDK manager to select Tools, Platform-tools, Android Support Library, Google USB Driver and install them. Now you need to go to where the Nexus 5 Factory image was previously saved. You should extract the contents of this file to the Platform-tools folder. From this point on, we can assume that all the prerequisites are met and proceed with the mobile device rollback procedure.
Downgrading process
It is necessary to sequentially perform the following actions:
- go to the settings of the mobile device, scroll down the page and find the section with the build number;
- click on the build number until a notification appears that the developer mode has been successfully enabled;
- a new section "Developer options" will appear in the settings, there you need to scroll down and enable "USB debugging";
- connect your device to your computer using USB cable and make sure the computer recognizes it.
Previous Versions are either copies of files and folders created by Windows Backup, or copies of files and folders that Windows automatically saves as part of a restore point.
Previous versions can be used to restore accidentally modified, deleted, or damaged files and folders. Depending on the type of file or folder, you can open it, save it to another location, or restore a previous version.
How previous versions are created
Previous versions are automatically saved as part of a restore point. When system protection is enabled, Windows automatically creates previous versions of files and folders that have changed since the last restore point was created. Typically, restore points are created once a day.
If the disk is partitioned or the computer has several hard drives, you should enable system protection for other partitions or drives. Previous versions are also created by Windows Backup when you back up files.
Note: If the file has been changed several times within one day, only latest version at the time the restore point or backup was created, it is saved as the previous version.
How to restore previous versions of a file and folder
Right-click a file or folder and select command .
A list of available previous versions of the file or folder appears. The list will contain files saved during backup (if for Reserve copy files using Windows Backup) and restore points.
Note: To restore a previous version of a file or folder added to a library, right-click the file or folder in the location where it was saved, not in the library. For example, to restore a previous version of an image added to an image library, but in a folder My drawings, right click the folder My drawings and choose Restore previous versions.
What is the difference between a restore point and a backup
If you restore a previous version from a restore point, the file is downloaded on your computer, so you don't have to do anything else.
To restore a previous version of a file or folder from a backup, after selecting the previous version and clicking the Restore button, Windows opens the File Restore Wizard, and then follow the steps in the wizard.
The drive or media where the backup is stored must be accessible so that items from the backup can be restored.
Why there are no previous versions of some files
Possible reasons:
- The file has not been modified. Previous versions are only available for files that have changed.
- restore point or backup copy was not created after the file was modified.
- The drive where these files are stored may not have system protection enabled. If system protection is not enabled, Windows cannot create previous versions.
Can recover deleted file or folder
If you accidentally deleted or renamed a file or folder, you can restore a previous version of a file or folder, but you need to know the location where they are saved.
To recover a deleted or renamed file or folder, follow these steps:
clue: If you don't remember the name of the file or folder or its location, type part of the name into the search field in the Computer folder.
Very often a situation arises when a computer or laptop starts to work unstable after installing a particular program, as well as after being infected with a virus. In this case, a function that will return the state of the computer a few days ago is very useful, thereby canceling unwanted changes in the system. This feature of Windows is called System Restore. How it works and how to use it, we will tell you in this article.
Restoring Windows to a Previous State
This option is really very useful. You can always use it after the computer has become unstable after making certain changes, such as installing a program or updating a driver.
But there are two conditions that must be met in order to successfully use Windows System Restore:
- The restore option itself must be activated;
- There must be a restore point with a rollback date that satisfies you.
In order to check if the recovery option is activated on your computer, you need to do the following:
Right-click on the "Computer" icon on the desktop or in the "Start" menu and select "Properties" from the menu that opens.
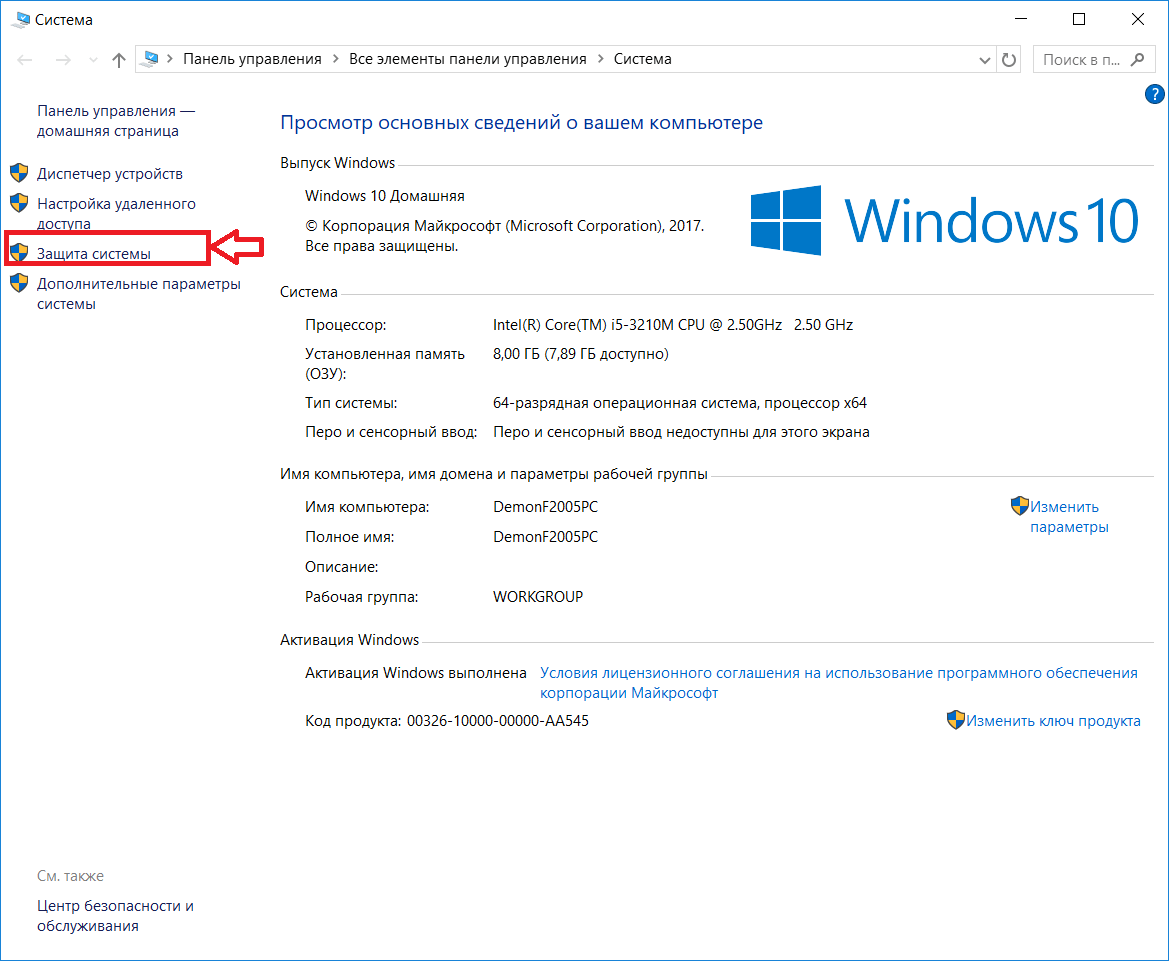
System protection
In the window that opens, opposite drive C should be "Enabled". This means that the recovery system drive activated.

Checking the activation of the recovery function
As already mentioned above, the second point is the presence of a restore point, the date of which suits you. Well, let's say you want to roll back to the state of the computer that was yesterday, and the nearest point is only a week ago. In this case, you must understand that if you use this restore point, then everything that happened to the computer over the past week (installation of programs, setting up services and services) will be canceled.
To see the list of available restore points, you need to click the "Restore" button in the same "System Protection" window.
If at the bottom there is a checkbox "Display all restore points", then you need to check it.
If there is a point in this list that suits you by date, then to restore the computer to this date, you need to select the point in the list with a single left mouse click and click "Next", agreeing with all the proposals of the recovery master.

Selecting a restore point
After that, the computer will be restarted and returned to those few days ago.