Hello.
Today every computer user has a USB flash drive, and more than one. Many people carry information on flash drives that is much more expensive than the flash drive itself, moreover, backups do not do (naively believing that if the flash drive is not dropped, flooded or hit, then everything will be fine with it) ...
So I thought, until one day Windows was able to identify the USB flash drive, showing the RAW file system and offering to format it. I partially restored the data, and now I'm trying important information duplicate…
What to do before recovery and what not?
1. If you find that there are no files on the flash drive - then do not copy or delete anything from it at all! Just take her out of USB port and don't work with her anymore. The good news is that the flash drive is at least determined by the Windows OS, that the OS sees the file system, etc. - this means that the chances of information recovery are quite high.
2. If Windows shows that the file system is RAW and prompts you to format the USB stick- do not agree, remove the flash drive from the USB port and do not work with it until you restore the files.
5. If the flash drive is not detected by computers and they do not see it at all, and you really need the information, please contact service center, I think, it will not do here on its own ...
6. And the last ... To recover data from a flash drive, we need one of the special programs. I recommend choosing R-Studio (in fact, we'll talk about it later in the article). By the way, not so long ago on the blog there was an article about programs for recovering information (there are also links to official sites for all programs):
Recovering data from a flash drive in the R-STUDIO program (step by step)
Before you start to Work with with R-StUDIO I recommend to close all extraneous programs that can work with a flash drive: antiviruses, various trojan scanners, etc. It is also better to close programs that heavily load the processor, for example: video editors, games, torrents, etc.
1. Now insert the flash drive into the USB port and run the R-STUDIO utility.
First, you need to select a USB flash drive in the list of devices (see the screenshot below, in my case it is the letter H). Then click on the "Scan" button
2. Should a window with flash drive scanning settings will appear. Several points are important here: firstly, we will scan completely, so the start will be from 0, we do not change the size of the flash drive (my flash drive is 3.73 GB in the example).
By the way, the program supports quite a lot of file types: archives, images, tables, documents, multimedia, etc.
3. After that the scanning process starts. At this time, it is better not to interfere with the program, not to run any third-party programs and utilities, do not connect to USB ports Other devices.
Scanning, by the way, is very fast (compared to other utilities). For example, my 4GB flash drive was fully scanned in about 4 minutes.
4. After completion scan - select your USB flash drive in the list of devices (recognized files or additionally found files) - click on this item with the right mouse button and select " Show disk contents«.
For example, select a photo or picture, right-click on it and select "preview". If you need the file, you can restore it: to do this, just right-click on the file, just select "restore" ![]() .
.
6. The last step very important! Here you need to specify where to save the file. In principle, you can choose any disk or other flash drive - the only important thing is that you cannot select and save the recovered file to the same USB flash drive from which the recovery is going!
The point is that the file being restored can overwrite other files that have not yet been recovered, so you need to write it to another medium.
Actually, that's all. In the article, we looked at step by step how you can recover data from a flash drive using the wonderful R-STUDIO utility. I hope you don’t have to use it often ...
By the way, one friend of mine said, in my opinion, the right thing: "As a rule, such a utility is used once, the second time there is simply no - everyone makes backup copies of important data."
All the best!
Deleted data recovery is the process of extracting information from a medium that cannot be accessed using a standard method. If the operating room Windows system unable to read any files due to damage file system, the presence of logical or physical errors on the media (hard, solid-state, removable disk), you will have to resort to using utilities to restore access to the files located on it.
What does the impossibility of obtaining access to information by a standard method mean? Probably everyone noticed that during the deletion of even huge amounts of data, the process of erasing them occurs in a matter of seconds, while copying this information requires a significant amount of time. For example, copying or moving a movie takes tens of seconds or even several minutes, and its deletion is carried out instantly. The whole secret lies in the fact that when copying to the media, the file is transferred sector by sector, and during its deletion, a completely different process takes place.
Information storage on flash drives and hard drives is organized in the form of a book with a table of contents. The table of contents is a file table of a section containing the names of files, their attributes and paths, as well as addresses of sectors with all fragments of the document, and pages are the files themselves. The content of the book, in this case, is the content of the document (text, video, sound, etc.). Before accessing the file, the operating system first accesses the partition table. Having received necessary information, the operating system or application starts reading the file, starting from the start sector, which stores the first fragment of the document. If the file is stored in a fragmented form, that is, the sectors with its contents do not go in a row, but are scattered throughout the disk, then the file table contains the addresses of all its fragments in the order they were read. When performing operations with files within one logical drive all actions are carried out not over the document physically (not over the sectors with its contents), but with the information of the file table that concerns this document.
During the deletion of documents or formatting of the medium, the same processes proceed - work with the partition table of the disk. When you delete a document, the corresponding areas of the drive (or the entire disk / partition during formatting) are marked as free. Physically, the information does not disappear anywhere, and with the availability of appropriate software, it is quite possible to get access to it. The only thing worth paying attention to is overwriting sectors with deleted data. Since these sectors are designated as free in the file table, when writing new information, it is written to free cells over the files designated as deleted. Thus, there is already a physical removal of documents or their fragments. Analogy: a book remains at its contents, but its table of contents is partially cleared, telling the reader that part of the book contains blank pages. It is this kind of algorithm for working with data that allows you to restore them - to get access to files using non-standard methods.
Before recovering deleted files from a flash drive
 Take note immediately important point! Do not write anything on the USB flash drive until the information you need is extracted from it. As mentioned earlier: during recording, your files, which are not physically touched, but marked as deleted, can be overwritten with new ones. In this case, the chances of restoring them will plummet, or even completely equal to zero. This is especially true for archives, text documents and programs. For audio, video and graphic files, rewriting of several sectors is not critical - they will be played and / or displayed, but with minor artifacts. Before you start restoring information, close all applications that can work with a flash drive in write mode in order to minimize the loss of information that can still be restored.
It is also important to check whether the information is really deleted, and is not hidden on the USB flash drive. To do this, you need to make visible files with the "Hidden" attribute. This stage is described in detail below, in the paragraph "Checking for hidden files", So there is no point in dwelling on it.
You should also know what file system you are dealing with. The procedures for recovering files from FAT and NTSF are similar for the user, but the results of the recovery programs can significantly differ in the efficiency of the data obtained.
The FAT file system and its later version, FAT32, store file data in multiple areas of the media. A descriptor for the document, including its title, size, and attributes, is found in the directory. The file location table also stores a list of clusters belonging to a file in the order in which they are accessed. Such a system for organizing data storage on a device has a significant drawback - during its partial or complete destruction, the data on the clusters allocated to the files also disappear. In this case, information recovery is possible, but on the condition that the utility accurately identifies its contents and collects the clusters belonging to the file in the correct order. And the recovery process in this case will take a long time.
 The loss of directories makes it impossible to accurately determine the 1st sector where the file begins, as well as its name (path to the file) and the space it occupies. In such a situation, you can collect documents from the cluster chains that are in the file table. The names of such documents will contain a random set of characters or be generated by the recovery program, for example, based on user settings. Only knowing what type of file we are recovering, for example, focusing on its size, can be accessed by changing the extension manually or using a program to determine the content of the document by its signature (more on that later). Resuscitation of a large number of different types of files in this case will turn into a very laborious and time-consuming process for the user.
In NTFS, all data about the file is recorded in the main table of the partition - MFT. Each of its records contains the name of the document, its attributes, security parameters and, most importantly, a chain of clusters in which the file itself is located, in the order they are read. Therefore, the quality of file recovery from disks formatted in NTFS directly depends on the degree of damage to the partition table and its backup.
This difference should be understood and taken for granted, especially when recovering information from a formatted or damaged flash drive.
Where did the files from the flash drive go?
If you did not delete anything from the removable drive, but some file or a lot of them disappeared from it, then someone else is guilty of this, for example, a comrade. The flash drive was used by other people - they could destroy all the data on it, for example, by formatting it before using it or deleting it. necessary information... Also the culprit could be a virus or antivirus program.
Many have come across a virus that changes the attributes of all files and folders on removable media to "Hidden", and multiplies itself under the names of your data. A not very attentive user, who did not notice the substitution, starts to open the document, but a virus program is launched instead. OK, when installed antivirus recognizes and eliminates it in time, giving it no harm. As it seems to many, the antivirus is the culprit behind the loss of data, but alas: it only removes malware that bears the names of your documents. Here you need to be more careful and look at the extensions of files deleted by the antivirus. Surely, in all it will be "exe", and your files are further stored on the flash drive, not being displayed in the explorer, until you follow the instructions described below.
 Real files hidden by a virus on a USB flash drive and "fake" ones with the exe extension
In order to make sure that the files on the flash drive are present, but not displayed, or absent, we check the amount of information posted on it. To perform this operation, we perform the following actions. We call the context menu of the flash drive and select the "Properties" item located at the end of the list.

We look at the volume occupied by the files. It is displayed next to Busy.

If there is no data on the flash drive, it means that the information was deleted by the user, during the process of formatting, damage to the file system, the presence of logical or mechanical defects in the structure of the drive. That is, they will have to be restored using specially developed applications.
Deleting files in the Trash
How can you recover data deleted from a flash drive to the Trash? None. There is no such concept and now we will figure out why. Do not even try to find files recently deleted from the flash drive in the Trash.
Remember! Removing files from removable USB drives is done without going through the Recycle Bin, as opposed to a similar process with hard and solid-state drives.
This can be understood from the dialog for deleting an object. Just compare the warnings about deleting data from a flash drive with a similar dialog about moving information to the Trash.


Most users do not pay attention to the contents of the dialog during the operation, and simply agree with the action by clicking the "Yes" or "Enter" button.
If you delete information from a flash drive, do it deliberately, there will be no chance to restore anything from the recycle bin, as is the case with a hard drive.
The lost will have to be restored in special applications, and no one guarantees 100% reliability of the data resuscitation process. The files are the same that were deleted from hard disk to the Trash, and after that it is emptied, it is easy to restore using special program... The best of the free offers will be discussed a little later.
Damage to the flash drive by a virus
There is a huge variety of opinions, the essence of which is that some kind of malicious program is capable of causing physical harm to a removable drive - and this is not true.
The only thing that a virus can do is hide files from the user's eyes or damage the file partition table, which was discussed earlier.
Consequently, the operating system will not be able to read the data and will most likely prompt you to format the device. In this case, the information on the carrier will remain physically, but it will not be possible to access it using the standard method. There are viruses that assign the "Hidden" attribute to all files and folders located in the root directory of the media. After that, such information becomes invisible in the explorer window and, as a result, the user does not see it. We'll talk about this in more detail later.
Recovering files after accidentally formatting a flash drive
 Formatting a flash drive is the process of programmatically marking up a drive and forming its logical structure. Formatting comes in two flavors: fast and full (or low-level). Quick formatting is clearing most of the file allocation table with their addresses and attributes, that is, physically no data is destroyed, and their structure remains intact, which allows you to determine it and restore the data. Full formatting consists in physically overwriting each cluster of a drive or partition - after deleting information about the location of files, a logical zero is written to each cluster (the minimum unit of information storage) of the drive. This process turns information recovery into a time-consuming and difficult, but still doable, albeit partially, task.
Many programs are able to analyze the information found on a formatted hard drive by its signatures to determine the contents of the file. Signatures are file labels that help programs identify them. As a rule, they are placed at the very beginning of the file, less often at the end, and look like a small fragment of hexadecimal code.
Search by signature
Analysis of found files and their fragments by signatures is the most effective data recovery technology currently available. It allows you to reanimate virtually any files: lost due to fast or low-level formatting partially overwritten or located in bad sectors.
In addition to the usual reading of deleted data, this method allows you to get access to absolutely any information located on the carrier, even partially damaged and one that is not referenced in the file system. Programs that support file recovery by signatures read data from the media and on the fly compare them with an online or offline database of signatures typical for various types of files for compliance. When the utility finds a match, it starts parsing the document header to extract the maximum length useful information... At the end of the procedure, the utility renames the document, specifying its inherent extension. Thanks to this algorithm, the application is able to determine the exact size of the file, because many types of documents contain in their header not only its size, but also the name, attributes, etc.
The advantages of the method include the ability to efficiently recover files from media. The disadvantage is operability only with known types of documents entered into the database. Also, the duration of the deep scan of the drive's file system can take tens of minutes or even hours, depending on the volume.
How to recover data after damaged USB device
 All modern flash drives consist of a controller, data storage cells, a crystal oscillator and several additional microcircuits. All physical damage to flash drives can be divided into several categories: mechanical - damage to the soldering, connector, deformation of the substrate, etc. due to careless handling of the drive (falls, impacts); electrical and thermal - arise as a result of sudden potential surges on the board elements, storage and use of the device at high ambient temperatures, or during overheating, which is very rare; controller corruption and malfunction is the most common problem, making it impossible to access data still stored on memory chips using standard methods.
Mechanical damage is the most difficult to eliminate: you will have to re-solder the missing contacts, replace the connectors, or completely desolder the memory chips and read information from them using special devices - readers or flash-readers.
In the case of electrical damage (for example, an element burned out), information is read, as with mechanical problems, by soldering memory chips, creating their images on specialized equipment for subsequent data recovery programmatically... If the controller is inoperative, you will also have to unsolder the memory chip and restore information using the same reader or Flash reader.
Instead of a conclusion: in case of physical damage to the elements of the flash drive or the failure of its controller or crystal oscillator, it is unlikely that it will be possible to independently recover data from the drive. This can be done in a specialized service center.
Checking the USB flash drive for hidden files
Probably, many users are familiar with the situation when the operating system does not detect files stored on removable media, although you are sure that they are. Before proceeding with the recovery of documents that you cannot find on the USB flash drive, you need to make sure that they are really missing. To do this, activate the option to display files with the "Hidden" attribute. This operation does not require any advanced IT knowledge from the user.
Just follow the instructions below.
Launch "Explorer", for example, go to the "My Computer" directory.
Let's focus on the main menu. In it, select "Arrange", and in the drop-down list of options, click on the item " Folder and search options».

In the window that appears, switch to the "View" tab. Scroll down the list of functions, where we move the switch to the position “ Show hidden files… ”As shown in the screenshot.
 Set the active item "Show hidden files"
This will provide the ability to see files and directories with the "Hidden" attribute. They are grayed out in the explorer window. We click "Apply" and agree to display hidden files by clicking "Yes" in the warning window. After that, the changes will take effect and you will not have to restart the system or the "explorer" process. Click "OK" to close the dialog box. The same can be done in a different way - through " Control Panel". We call " Control Panel"By a known method, for example, through" Start ". If the panel view is switched to "Categories", go to "".

Then click on the inscription: “ Show / display hidden files and folders».

When the elements of the control panel are rendered as icons, large or small, click on the inscription "Folder options". Next, we perform all the actions, starting from step 3 of the previous method for displaying hidden files and directories. Also, these actions can be performed using file manager Total Commander.

If your files still have not appeared, then the usual way to access them will not work and it will have to be obtained through specialized utilities.
Video instruction - how to check a USB flash drive for hidden files
Automatically fix system errors and recover bad sectors
Damage to the file system is a fairly common problem due to which Windows cannot read files located on a USB flash drive. This scenario can be caused by several factors:
- incorrect disconnection of the flash drive;
- power surges during the operation of the flash drive;
- physical wear and tear of memory cells, etc.
In order to try to fix this annoying error, it is necessary to scan the storage cells of the media for physical and logical errors. This can be done through a large number of applications, but we will take a step-by-step look at how to scan a USB flash drive using the console utility built into Windows. There are several methods to launch it.
Through the graphical interface
Go to "My Computer" or open the directory with the contents of the flash drive, call its context menu.

We activate the "Service" tab, which will allow you to start scanning the flash drive and click " Check" for start system program ChkDsk.

Set the check parameters, as in the screenshot, to correct physical and logical errors in the drive, and click "Start".

If the operating system asks you to unmount the device volume for scanning, quit all applications using it and agree by clicking "Unmount".

Then you will have to wait a few minutes, depending on the damage and size of the flash drive, while the utility checks it. At the end of the scan, the scan statistics will be displayed on the screen. If the utility has corrected errors and reassigned sectors, you can try to open the USB flash drive in Explorer to gain access to the information located on it.
The same is easy to accomplish with the command line
We call the "Run" dialog by clicking on the corresponding item in the "Start" menu or by pressing the combination Win + R. In the window, write "cmd" and click "OK" or "Enter" to start the command line.

We start the process of checking the drive. To do this, look at its label in the explorer window. V command line we write "chkdsk I: / F / R", where: сhkdsk - the command to call the disk check program; I: - disc label; / F - a flag that starts the program in the mode of repairing disk file system defects (analogous to automatic system errors); / R - the parameter responsible for fixing or reassigning bad sectors.
 Enter in the command line - chkdsk I: / F / R
We press "Enter" and wait for the completion of the verification procedure. If a question arises about the need to disable the device for other applications, we terminate all programs that can access the USB flash drive. Then click "Y" and "Enter".

At the end of the scan, the "Found.000" directory should appear on the USB flash drive with the results of the check, if the utility has found and fixed errors.
If, after checking the flash drive with an antivirus, the files disappeared
It happens that after connecting a USB flash drive to the USB connector, the antivirus program starts scanning it in automatic mode... And after completing the scan and removal of viruses, it turns out that all your files have disappeared on the drive, be it programs or text documents... The same can happen after manually scanning removable media. What happened, why does the antivirus delete files that are not viruses? Not the fact that all your files were safe: the same documents doc format may contain dangerous macros, and the antivirus could perceive executable files as malicious. As mentioned earlier, there are viruses that change file attributes to "Hidden", read more in paragraph "Where did the files go?"... In any case, if nothing is copied to a USB flash drive, there is a great chance that your data will be saved.
Free software for recovering deleted data (files) from a USB flash drive
 If your files nevertheless turned out to be erased due to accidental formatting or deletion, it is still possible to access them - you will have to use one of the freely distributed utilities developed to solve this problem. The market is flooded with such solutions, but most programs for resuscitation of information from flash drives are paid. Of the few free ones, a significant part does not cope with their tasks or has poor functionality, which is not enough for many users. Today we are going to take a look at the best free solutions for data recovery from removable drives. In the list of considered applications, they are presented as easy-to-learn utilities that can recover information after accidental deletion or quick format and professional solutions with which you can recover data from drives with a damaged file system, after full formatting or partial overwriting of files. Below are the most effective and functional reanimators of data from removable USB flash drives with detailed instructions that will help to restore information to a user of any skill level.
How to recover deleted information from a USB flash drive free program DMDE
DMDE is a professional utility for data search and recovery. Download latest version DMDE is available on the official website at this link. Working according to the scheme of debugged algorithms, the program is able to restore the structure of disk folders and files located in them. It has several built-in tools such as disk editor, partition manager, imaging modules and others. After downloading the application, it will have to be unpacked to any location, except for the partition from which you will restore files. Any archiver or built-in Windows tools for working with archives. When you start DMDE for the first time, you must specify your preferred interface language. Select Russian and click "Ok".

In the next window, we accept the license terms by ticking the “ I accept the terms ..."And clicking on the" Accept "button.

To view file recovery and edit disks, you need to select the medium with which we will work. If the device is connected, mark the item "Phys. devices ". Next, put a check mark next to " Show Sections". In the right frame, mark our flash drive and click "Ok".

The utility then scans the computer for logical devices and displays them in a list. Since we are using a USB flash drive, there will be only one volume on it. In the window, select the flash drive and click "Search FAT" or search "NTFS", depending on the file system of the flash drive.

It is better not to change anything in the window with setting the search parameters, and go straight to the search by clicking on the button of the same name.


The current file system is determined in the device properties.

Select a specific file system and click "Open Volume". It is not necessary to save the disk log.

On the left side of the window that opens, go to the "$ Root" directory - this is the root directory of our flash drive with the scan results. All information that the utility is able to recover is displayed here. We mark the documents we need with checkmarks, call their context menu and click on “ Recover files ...". The same can be done with the "Ctrl + U" key combination.


It is also worth noting “ Files in the current panel”If you want to recover only certain information. Click "Ok".


Then we will see a dialog box with a report on the work done on data recovery. We close it by clicking on "OK" and continue working in the program or exit it.

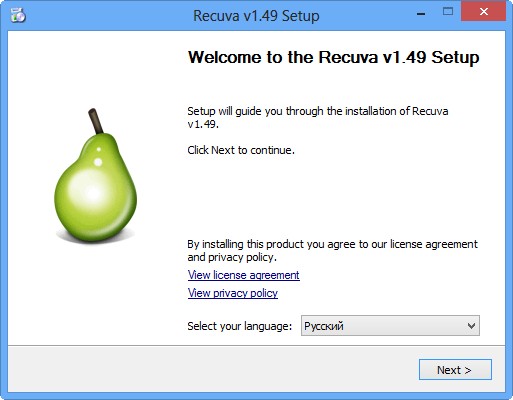
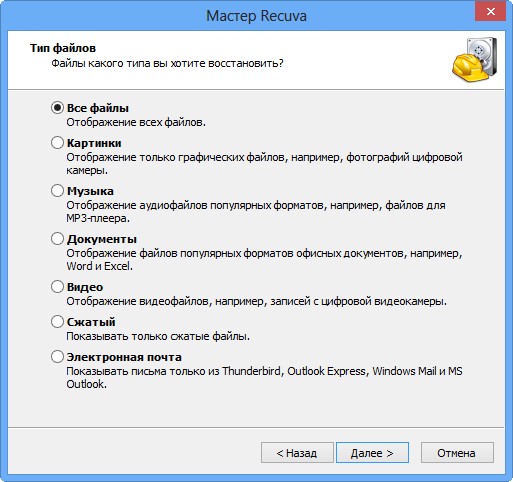
Recover deleted files from a USB flash drive with the free Recuva program
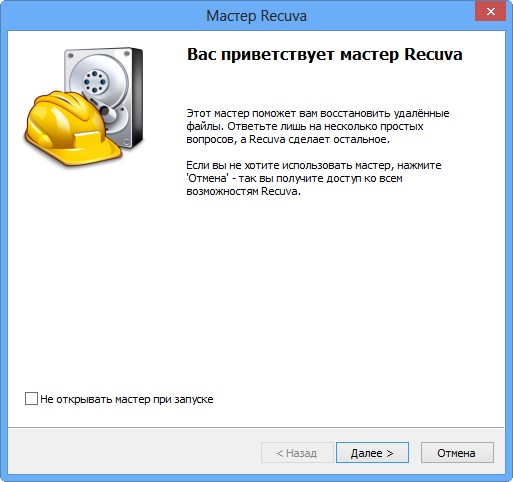
Recuva is an easy-to-learn utility for recovering lost data from the developers of Ccleaner. You can download the latest version of Recuva on the official website at this link. File recovery is carried out in the following way. We start the program in the wizard mode, if the settings have not been changed, it automatically starts in this mode. In the first window, click "Next". Then we select the type of data that you want to recover to determine the algorithm for scanning the flash drive.

If you want to recover, for example, photos, then there is no need to waste time searching and identifying other types of files. The same applies to other similar cases. When do you want to restore Various types documents, do not change anything, and click "Next". In the window asking about creating an image, it is better not to create it if no other programs are using the device in recording mode. Otherwise, you should create an exact copy of the drive to increase the chances of recovering lost data. We indicate the flash drive from which the information will be restored.

Move the radio switch to the position "On the memory card" if one removable storage device is connected to the computer.
 We indicate "On the memory card if one removable drive is connected to the computer"
Otherwise, the mark is transferred to the position " At the specified location". Then click on "Browse ..." and select the flash drive.

Click on the button labeled "Next". We turn on the in-depth analysis only if the necessary files for recovery were not found during a regular scan. It is better not to enable this option during the first scan. We wait while the utility searches for information.

In the window that opens with the search results, check the boxes required files and click on "Restore".

We indicate the path for the recovered data and click "OK".

The folder with the recovered data should not be located on the USB flash drive from which you are recovering it.
Upon completion of the procedure, we get acquainted with its results and close the window by clicking on its only button.

When restoring graphic files (photos), you should switch to the advanced mode by clicking on the corresponding button.

In this mode, a preview of the found graphic files is available, which will greatly facilitate the work if you need to access several images or photographs.

If some files are not found, you will have to perform a deep scan of the flash drive file system. To do this, in paragraph 6, put a tick next to " Enable in-depth analysis».

This process will take significantly longer, but the result of a deep scan will yield more results.
Recover deleted files from a flash drive with the free R.saver utility
R.saver is an easy-to-use utility for recovering information from media with different file systems: FAT, NTFS and exFAT. In addition to reanimating deleted data, the application is capable of reconstructing the damaged file system of a flash drive and gaining access to information that was lost by completely formatting the device (by signatures). You can download R.saver for free from the official website at this link. The program does not require installation and runs from any media. Below are instructions for working with R.saver, which will guide a user with basic computer skills. Launch R.saver. During boot, the utility checks the computer for any storage devices connected to it.

In the window that opens with a list of information storages connected to your computer, we go down and stop our gaze on a device named "JetFlash USB ...". We select the USB flash drive we need, if several of them are connected at a given time. You can navigate by their name and size.

We call the drive's context menu and select the action we need in it: “ Search for lost data"- if you want to recover deleted information; " Recover after formatting"- when you need to get access to information that was lost due to formatting the drive.

We are waiting for the procedure for completing the reconstruction of the file system. The process can take about ten or more minutes of time when scanning a USB flash drive of significant size (32 or 64 GB).


After finishing scanning the file system, the search window will automatically close. A list of data that can be recovered will appear on the right side of the program interface.

Select the required files (as in Windows Explorer using Ctrl and Shift). We call their context menu and click on "Copy to ..."

In the dialog, go to the directory where the program will restore the data, and click "Select".

Do not select the removable disk from which you are recovering information or its subdirectories as the output directory.
The utility will quickly cope with the process of copying files and will automatically close the copy window. In the case of the reconstruction of the file system after formatting the drive, all actions are performed in the same way, unless the reconstruction process can take a long time and before scanning you will have to select the file system of the flash drive from the list suggested by the utility.
Recovering Deleted Data Using PC Inspector File Recovery
PC Inspector File Recovery is a powerful English-language utility for recovering lost files at the sector level, which will allow you to access partially overwritten and lost information due to damage to the media file system or its formatting. You can download PC Inspector File Recovery for free from the official website at this link. The program does not have a Russian language user interface, so you have to deal with the English-language inscriptions, and this is not difficult. In the launch window, we are offered to get some privileges by purchasing full version programs. Press the green button labeled "Free Trial" to get started.

Click on the upper left frame with the image of the basket and the inscription "Lost File Recovery" - " Recovering lost files».
 Click the "Lost File Recovery" button
We choose our removable usb-drive, as a rule, it is located at the very bottom. We focus on the USB device icon, the size of the flash drive and its name. Click "Start" to start the scanning process.
 Select our flash drive and click "Start"
If it was not possible to find the necessary information using the usual method, then put a checkmark in front of "Enable Deep Scan" for the deep scan behavior at the sector level and select the file system of the drive.

It can be viewed in the properties of the flash drive, as in the screenshot.

We are waiting while the utility checks the drive for traces of files that can be recovered.

Upon completion of the drive test, a window will appear divided into several frames. The left one displays all detected data, ungrouped by data type: archives, graphic files, text documents, videos, etc. In the lower right frame you can see the names of all files of the selected type, and images and text documents can also be viewed in the preview window located above. Check the boxes to mark the files and / or types of files that we want to recover, and click on the orange "Recover" button to call the file recovery dialog.

In the dialog, indicate the directory where the program should restore the selected files. If necessary, you can create a new one by clicking on the "New Folder" button. Click on the green "Recover" button.
 Specify the folder where you want to recover files and click "Recover"
Depending on the amount of information being reanimated, the recovery process can take from a few seconds to a couple of minutes. Upon completion, a window will appear with congratulations on the successful recovery of files, and the folder in which the program created copies of the recovered data will open in Windows Explorer. We go into it and check the quality of its algorithms. If the files are not working, use deep check, as described earlier.


Recover deleted information using the Ontrack EasyRecovery Professional utility
Recover from the category of free distribution, capable of recovering a huge number of file types lost both due to careless deletion and when formatting a removable flash drive. You can download it from the official website at this link. Unfortunately, when we tested the latest version of Ontrack EasyRecovery Professional, it did not recover anything for us. We found an earlier version on the Internet that successfully coped with its task. Therefore, our instructions for data recovery will be from an earlier version of Ontrack EasyRecovery Professional than on the official website. But soon, we will definitely retest the fresh version and make a separate review of Ontrack EasyRecovery Professional. The utility, although it has a multilingual interface, has not acquired a Russian one. Let's start recovering files that windows explorer cannot detect on removable usb stick. In the main window of the application, click on the button labeled "Data Recovery", because we are interested in recovering files. Choosing a method of data resuscitation. In our case, "Deleted recovery" is suitable, since the information was lost precisely due to careless deletion of data.

We stop the selection on the device that will be scanned. Flash drives are usually displayed last in the list. Next, select the type of files to recover if you want to recover certain data (photos, documents). Click "Next".

The directory tree is displayed in the left part of the window with scan results, and the list of found files is displayed in the right part.

We mark the data we need with the checkboxes. And we click on the "Next" button. If necessary, you can use the preview function - the "View File" button.

Click on the "Browse" button to open a window with a choice of directory for file recovery. We indicate the recovery path and confirm it with the "OK" button. Also, the path to the output directory can be entered manually in the line before the "Browse" button.
 We call a window with a choice of directory for file recovery Ontrack EasyRecovery Professional
After specifying the path, click "Next" to start the operation of restoring the marked files.
 Choosing the path where you want to restore the files
The operation is completed, a window with its results appears in front of us. If necessary, the report can be saved by clicking on "Save" and specifying the path to the text file. Click "Done" to shutdown Ontrack EasyRecovery Professional.

When asked about the need to save the report, press negatively if it has already been saved or is not needed.
Learn to recover deleted files with Active File Recovery
Active File Recovery is a system data recovery utility that supports a huge number of removable flash drives and their file systems. You can download Active File Recovery for free from the official website at this link. Let's consider a chain of actions that must be performed to recover files lost in one way or another. A list of storage media is displayed in the left part of the main program window. Select a flash drive among them by clicking on the usb device icon.

We move the cursor to the detected file system, as a rule, it is one, call its context menu and select "Quick Scan" to start the process of a quick check of the file system.

Mode " Deep check"Or" SuperScan "run if the device was formatted or the previous method did not give the desired results. In most cases, a quick scan is sufficient to recover files deleted by mistake.
Using the "Ctrl", "Shift" keys and the cursor, select the required files. We call their context menu and stop at the item "Restore ..."

In the window with the recovery parameters, specify the path for reanimating the files (enter it manually or use the "..." button to call the output folder selection dialog.


After specifying all the parameters, for example, opening a directory with files upon completion of their recovery, click “Recover”.

Now you know how to get access to lost files in a matter of minutes, without spending a single penny on purchasing software, going to a service center or calling a wizard at home. But the recovery procedure is not always "smooth". Quite often, users encounter the following problems:
- data recovery software does not find the file you need;
- the recovered document does not open;
- an error appears when trying to open a reanimated file;
- information is partially restored, etc.
In this section of the article, we will consider these and other problems accompanying the process of retrieving lost information from removable media.
If the files are partially restored, what to do
 It happens that applications recover data partially - a reanimated file is a document with a damaged internal data structure. This means that the program found the file and determined its structure, but by the time of restoration, some of its fragments were physically overwritten. Indeed, during the deletion of information or formatting of the drive, the sectors that it occupied are designated as free, some information was written to these sectors. Also, fragments of the document could be located in damaged areas of the media. Therefore, it is recommended not to record anything on a USB flash drive before or during the recovery of data files.
As for our further actions on working with such data, here the choice stops between two options: try to restore files with another program, use an in-depth method of analyzing the drive, or resort to using utilities to restore damaged files, although their functionality is very doubtful in most cases ...
It is quite possible to work with some partially recovered documents. For example, an audio file or video reanimated with minor defects will play in most cases. Places with lost data are simply clogged with zeros - this means that in the playback of such a video or song there will be artifacts in places - flickering or image distortions that are not inherent in them, third-party clicks, atypical noise and interference of audio tracks. It is recommended to play damaged files with a powerful and unpretentious multimedia player VLC.  As for the archived data, there is always a chance to extract part of the files from the archive, which may also have a broken structure in relation to the original version. There are many applications for recovering damaged archives. To work with damaged archives, there is an IZArc archiver with integrated recovery algorithms for such archives. You can also use the utilities for Recovery Toolbox for Rar / Zip.
Corrupted graphic files, like other multimedia data, can be opened in most image viewing applications. In this case, some of the information will naturally be lost. The missing fragments will be painted over with some color, usually black. Try to open corrupted graphic files with regular Paint and re-save them.
Corrupted text files such as txt or doc can be opened with a text editor. If the document is slightly damaged, there is a high probability that some of the text will be available for txt documents. Even slightly damaged documents doc format, as a rule, open with errors, or contain an erroneous encoding. This causes a meaningless set of characters to be displayed instead of text. OfficeRecovery can help here. It analyzes the original document and refined algorithms adjust the data to extract as much useful information as possible. Next, a heuristic analysis of the file is launched, if possible, in order to identify the lost fragments. The utility adds user and received data into a complete file and saves it. But the performance of such programs is too low, and they, most likely, will not help out.
Nothing appeared on the flash drive after recovery
Only naive and inattentive users can argue that after recovering data from a removable USB drive, no information appeared on it. First, as it was said, it is not recommended to choose the drive from which the information is extracted as the output folder for saving them, because the programs warn about this. Secondly, nothing can appear on the flash drive, since the programs recommend specifying the path to the output folder or assign it automatically, for example, "My Documents" or some directory on the system disk.
Read the instructions in this article carefully. All your data has been restored to the directory you specified.
Flash drive asks for formatting
 Probably, many are familiar with the situation when, when connecting a flash drive to a computer, the operating system prompts you to format the drive. What to do in such a situation if there are important data on the flash drive, which, after formatting, will naturally disappear, and the chances of getting access to them will significantly decrease.
First of all, you will have to check the drive for bad sectors, as described in the paragraph "Automatic correction of system errors". Then we reconnect the device and in most cases the problem is solved.
The second method is to scan a USB flash drive using one of the free programs to gain access to data that Windows cannot read, for example, JetFlash Recovery Tool, which was discussed in the corresponding section.
Is it possible to recover files deleted from a USB flash drive a long time ago?
The time of file deletion does not matter. It is more important that the device is fully functional, and the sectors occupied by deleted files are not overwritten. How more action on writing data to the drive was carried out after deleting the files that you want to recover, the less chance of doing this.
If a file was deleted to the Trash and then the Trash was emptied, can the deleted file be restored?
 To begin with, deleting data from removable drives is past the Recycle Bin. When you delete something from a flash drive, the file is erased from the drive, without moving to the Trash, as is the case when working with a hard or solid state drive... It is possible to recover such data, but there is an important nuance. Remember that data written to a hard disk or removable storage device, files deleted from the recycle bin may be completely or partially overwritten, which makes them less likely to be recovered. First of all, this applies to documents erased from system disk- the operating system and a huge set of running applications... In this case, you should turn off your computer and boot from a USB flash drive or other disk to increase the chances of recovering still whole files.
The more actively the disk is used and the more time has passed since the deletion, the less likely it is to get back a full-fledged and intact document.
The program has recovered files, but some of them won't open, what should I do?
If after resuscitation some files do not open, then they were damaged or not restored at all - the program created an empty file with the name of the detected one, but could not transfer the contents of the deleted file to it for one reason or another. Use another data recovery software or enable an in-depth scan of your drive.
The program recovered the document, but it turned out to be empty. What to do?
In this case, the document turned out to be badly damaged and nothing can be done with such a file. Try to recover an empty file again, saving it under a different name or in a different location, or use another utility to recover information. In the end, you will have to contact a service center specializing in information recovery.
More and more people prefer to store photos from family holidays, work documents and other important data on flash drives. The owners of these USB drives are confident that this way the information will be safe and will definitely not go anywhere. Unfortunately, modern viruses can harm not only your computer, but also any removable media. If you are faced with this problem, then the good news is that information can be saved. From this text you will learn how to recover deleted files from a USB flash drive in the PHOENIX program.
Step 1. Install the program
First you need to install it on your computer. The download will take just a couple of seconds, since the distribution kit is only 10 megabytes. Double-click to launch the installer and follow the instructions that appear on your computer screen. Select the folder for installing the software, study license agreement and for convenience, immediately send the program shortcut to your desktop.
Step 2. Select drive
Start PHOENIX. In the start menu of the program, you will see information about what devices it supports. Click "Next" to proceed directly to data recovery. Select the USB flash drive in the list of drives. If the list shows only local drives, then make sure the USB drive is connected to your PC, and then click on the "Refresh Drive List" button. After that, the flash drive should appear in the list, and you can proceed to the third step.

Step 3. Specify the mode of operation
The program provides two modes of checking - fast and advanced searches. Both of them are suitable even for an inexperienced user who accidentally deleted a file from a USB flash drive. You don't have to think about how to recover data for a long time, because the program will do almost everything for you. It is enough to follow the prompts that appear on the screen.
 Selecting the operating mode
Step 4. Customize your scan
To speed up the search process, indicate which types of files have disappeared from the flash drive. PHOENIX can recover any images, text documents and tables, video and audio files, archives, HTML, PHP and other information. It will also be good if you remember the approximate size of the files. Select the appropriate option from the drop-down list or enter the required values manually. Ready? Start scanning and wait for it to finish.
 Scan setup
Step 5. Recover files
After a couple of minutes, the test results will appear on the screen. You will be able to familiarize yourself with all the data found that PHOENIX deemed suitable for recovery. If necessary, you can change the view of the report: customize the sorting of files, as well as their display. If you want to get more detailed information about any object, then select it and click "View". So you can find out the file size, the likelihood of its recovery, and other data.
 Remote files table
 Viewing file information
Check the boxes for all the items you want to return. Click "Restore" and choose your preferred save method. You can save the information on your computer's hard disk, burn it to a disk, or upload the recovered data to the Internet via FTP. Just click on the desired item and follow the prompts on the screen.
 Choosing a file recovery method
PHOENIX is a universal program for recovering deleted or damaged data. With our application, you can quickly, flash drives, hard drives and any other storage media in just a couple of minutes. Download the software and save valuable data right now!
Hello friends, in this article we will consider with you how to recover deleted files from a flash drive or how to recover files after formatting a flash drive... I often have to deal with such a problem and I want to tell you how you can solve it. The article is long and detailed, since I sincerely want to help users recover deleted files.
It is important to know that files on a USB flash drive may not be available for two reasons:
1) Infection of the contents of the flash drive with a virus. In this case, your files on the flash drive are intact, but they are modified by a virus program, moreover, the virus assigned them the "Hidden" attribute. In this case, we check the flash drive with an antivirus and remove the malicious program, then remove the "Hidden" attribute from the files. We do everything quickly and accurately (details are further in the article).
2) Second reason. In fact, your files have been deleted from the flash drive for some reason. Usually, users themselves delete files on a USB flash drive, for example, format a USB flash drive, but then remember that it had the necessary information on it. In this case, you need to resort to free or paid program on recovering deleted files, in this article we will recover files deleted on a USB flash drive using several very good similar programs. Now about everything in detail, but at the beginning of the article there is a letter from our reader Sergey.
How to recover deleted files from a flash drive that disappeared in a rather strange way. My story is this, I inserted a USB flash drive into a friend's laptop, copied the necessary information, then came home, connected the USB flash drive to my computer and was very surprised, my antivirus was alarmed and immediately removed ten viruses from the flash drive. Then I went to the flash drive and did not find a single file there. I read on the Internet that it is necessary to restore deleted files carefully, with some special program and in no case on a damaged USB flash drive. And I also read that it is quite possible that the files have not been deleted, but simply because of an error or a virus infection they have been assigned the "Hidden" attribute, this attribute must be removed by running some kind of "batch file". Tell admin how should i proceed and where to start? I myself tried to use two programs for recovering deleted information on flash drives, but unfortunately I could not find anything other than garbage on the flash drive.
How to recover deleted files from a USB flash drive
This information will be useful to all people who, even if not often, but deal with a computer and flash drives.
How to recover deleted files from a USB flash drive with the free program DMDE
How to recover deleted files from a USB flash drive for free with R.saver
How to recover deleted files from a USB flash drive with the free Recuva program
How to recover deleted files from a USB flash drive with the program Ontrack EasyRecovery Professional
If you have lost all the files from the flash drive, then it is quite possible that the flash drive is infected with a virus, the first thing to do is to check it with an antivirus, even if your flash drive is cleaned of viruses, the files will not appear immediately, first you need to enable the display of protected system settings in the operating system settings. files and hidden files and folders.
We enter the "Computer" window, then select "View" - "Options" "Change folder and search parameters",
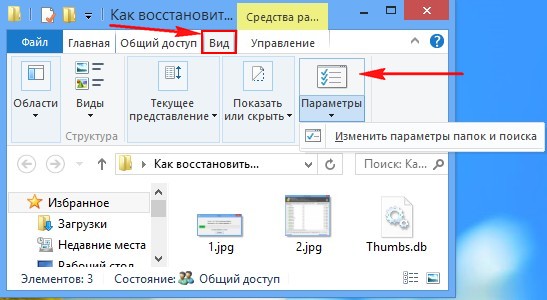
uncheck the box "Hide protected system files"and vice versa, check the item" Show hidden files and folders ", then click" Apply "and" OK ".

Now we go to our USB flash drive and see that all files and folders are in place, but they have a translucent appearance, which means the virus assigned them the "Hidden" attribute and it needs to be removed, this can be done using a hacker method.

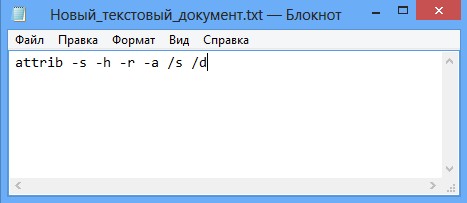
We will deal with the simplest programming, create a batch file, then copy it to the root of the flash drive and run it there. Many people think that it is very difficult, but it is not. "Batnik" is a bat file - the simplest type of executable file containing a sequence of commands, now you will see everything for yourself.
Opening Notepad

and copy this information into it attrib -s -h -r -a / s / d then save the file with the extension .bat.

We've got the following file. And now we copy it to the root of our flash drive and double-click it with the left mouse to launch it. A few seconds later, we go back to our flash drive and see - all our files are in place and without the unnecessary "Hidden" attribute

It's another matter if, after all the above manipulations, your files were not found on the flash drive, then the files were really deleted and they need to be restored. How to do it?
What if the files from the flash drive have really been deleted?
Note: please do not restore deleted files to the same USB flash drive where they were located, the deleted files will be overwritten, and if the recovery result does not suit you, then the repeated recovery of deleted files on the flash drive will be much worse than the first one. Recover files to a free partition of your hard drive or portable HDD USB.
Friends, there are a great many programs for recovering deleted files from a USB flash drive, but only a few of them can actually help you, here are some of them.
For example, I will delete all files on my flash drive and then format it. That's it, there are no files.


The flash drive contained media files, photos, text files, program installers and ISO image with operating system... After that, I will try to recover deleted files using programs: DMDE, R.saver, Recuva, Ontrack EasyRecovery Professional, R-Studio.
How to recover deleted files from a USB flash drive with DMDE
The very first program that we will use to recover deleted files from a flash drive is DMDE.
A fairly serious and reliable program from a domestic developer called DMDE is capable of recovering deleted information from various storage devices, including flash drives. Moreover, the program can!
We go to the official DMDE website http://dmde.ru/download.html

and download the program in the archive and unzip it. DMDE works without installation. We launch it. In the initial window Select device / disk (physical devices), select our Corsair flash drive and click OK.

There is a quick search for deleted files on the flash drive, often with the help of it it is possible to find files on the flash drive and restore them. Select the space of our flash drive with the left mouse and click on the Open volume button.

In this window, click (All found + reconstruction).

We agree to a virtual reconstruction of the file system.

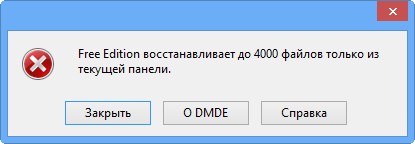
The files found by the program are displayed in the right part of the program window. If nothing is displayed, expand the $ Root folder located on the left side of the window. If you find the file you want to restore, right-click on it and select Restore Object from the menu. Then select in the explorer window exactly where you want to save the restored file, for example, on the desktop. That's it, your file has been restored. Unfortunately, the free version of the program will not allow you to restore an entire folder with files, you will receive such an error. So that life does not seem like honey, you will have to restore files one by one or buy a program. But we can recover one by one, if only the program finds the deleted files.
In our case, a quick search did not bring any results, so we use a detailed search. Click on the "Disk Partitions" button

Select our USB flash drive with the left mouse and press the "NTFS Search" button.

Search.

A detailed search will begin, which may take a little longer than a quick search, but the result will naturally be much better. The search reached 100 percent and lasted 20 minutes on a 16 GB flash drive. Let's look at the "Compliance" column, it is used to assess the quality of file recovery on the found volume. Double-click the left mouse on the first section.

Let's save the search log just in case.

Click again (All files + reconstruction).
Virtual reconstruction of the file system. OK.
Friends, DMDE found all the deleted files on the flash drive. As you can see, all found folders are marked with different icons: red dots, crosses, and so on. What does this all mean?

For example, a red dot on a yellow folder tells us that the folder contains deleted files that can be recovered. More Full description given in this diagram or the developer's website http://dmde.ru/manual/filepanel.html

But finding deleted files is not enough, the program still needs to restore them, so much so that they are in working order. Let's try to restore them, as I already noticed, it will not be possible to restore the entire folder at once, we will receive such an error,
then go to the desired folder and restore all files one by one. Right-click on the desired file and select "Restore Object".

We choose exactly where we want to restore files, for example, directly to the desktop.


Result 90 percent of the files on the flash drive have been recovered, and almost all of them are in working order. I am satisfied. But one thing is inconvenient, in free version files cannot be restored in batches. How to recover deleted files from a USB flash drive with R.saver
Good too free program from a serious developer of such programs UFS Explorer, is able to recover deleted files from various media and flash drives, including. Go to the official website of the R.saver program and download the program in the archive.
http://rlab.ru/files/Download/logicheskoe_vosstanovlenie_dannyh/R.saver/

R.saver, like the previously considered DMDE program, works without installation, unzip the archive and run the program.
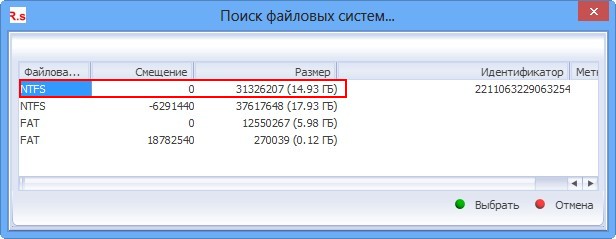
A quick scan of all drives is performed. We see that the program found one partition on our Corsair flash drive (volume 14.93 GB), right-click on it and select "Search for lost data" or "Recover after formatting".

We answer "Yes", since we want to perform a full scan of our flash drive for the presence of deleted files.

The file system is being reconstructed.

Then the file system is reconstructed by signatures using the IntelliRAW algorithm.

If you selected "Recover after formatting", then such a window will appear in which you must select a partition in size suitable for your flash drive, usually this is the very first partition.
And here is the result, in the left window of the program you can see all the folders found by the program, and in the right window their contents. I can say that the program worked as well as DMDE. Found almost all the information of interest.
Unlike DMDE, R.saver saves files much more conveniently, select the desired folder, right-click on it and select "Copy to ..."

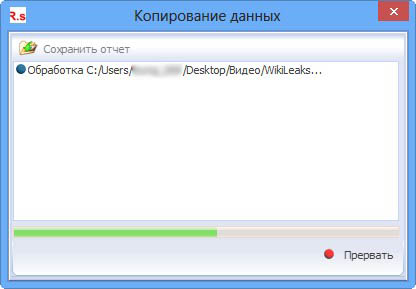
the explorer opens, choose where to copy, for example, directly to the desktop, click Select.

The recovered files are copied to the desktop.
All files that could be recovered in working order. Draw conclusions friends. How to recover deleted files from a USB flash drive with Recuva Not our program, the bourgeoisie came up with, but translated into Russian. Recuva pretty simple program with a minimum number of settings, a novice user can easily cope. We go to the program website http://www.piriform.com/recuva/download/standard
Download, install.

If you want to recover various files, select "All Files".
We mark the item "In the specified place" and click Browse, select our USB flash drive.
Need to recover files from a USB stick? Wondering how to recover deleted documents after formatting a USB stick?
V modern world information has become a part of every person's life. Today, most of the documentation and photographs are stored on electronic media, a computer can replace entire rooms that would be needed to store archives, and even libraries. More and more often, information is understood to mean something that is stored precisely in electronic form. All this is convenient, practical and rational.
But just as earlier the data accumulated over the years could be instantly destroyed, for example, by a fire, so today, in even shorter periods of time, tons of information can be destroyed due to a virus attack, hardware failure or careless disk formatting.
However, if after a fire it is not always possible to recover data, then problems with the disappearance of electronic data are actually easily solvable.
Wherever your information is stored: on a hard drive, on a flash drive or camera memory card, or any other medium, data recovery software will help you get back all your lost files.
Similar software By the way, it can be useful not only in case of loss of a large amount of data due to an electronic "natural disaster". It is enough to lose one very important document or, say, your favorite photograph, and you cannot do without the help of a data recovery program. Now imagine that that most important document was stored only on your flash drive (USB), and you have not yet managed to transfer that favorite photo from the camera's memory card to your computer. The slightest malfunction in the operation of a removable storage medium - and the problem of recovering data from a flash drive becomes your number one problem.
To prevent this problem from catching you by surprise, think about downloading a recovery program from flash drives.
RS program Partition Recovery Is a professional recovery of files from a USB flash drive and any other electronic media. The program will return the lost data to you, in whatever format they are stored. Just a few simple steps that even an inexperienced PC user can master, and the files you need are back at your disposal.
But remember that in order to recover data from a flash drive to be really successful, you only need to use proven programs for recovering from a flash drive. RS Partition Recovery is trusted by many users. After all, it really efficiently recovers files from flash drives and USB, camera memory cards (Compact Flash, xD, sD, Memory Stick), hard drive. At the same time, it is focused specifically on working with images, reads information from removable media faster, and therefore recovers data from a flash drive with better quality.
Protect yourself from accidental disappearance of data from a flash drive or from stationary computer memory, let file recovery from a flash drive and hard drive be a simple task for you and does not require special efforts... Download RS Partition Recovery software for USB flash drive recovery now.