For each system, a state is provided in which the system goes into the so-called sleep, in which all active processes stop before waking up. Hibernation in Windows 7 is as much an integral part of the system as turning it on and off. In this article, we will analyze the main points of this function - how to enable or disable hibernation in Windows 7, the main errors and problems.
Switching on and off
Sleep mode is primarily aimed at saving power to your PC. If it is important for a laptop to conserve battery power, then for a desktop computer, this function can interfere. In any case, each user has a different purpose for using the computer.
You can enable and disable hibernation in the Panel Windows management, where the basic configuration of the system is performed.
- To do this, find "Start" in the taskbar and go to Control Panel.

- Or in the Run window (Win + R combination) write control and click OK to go to Control Panel.

The power settings are responsible for the sleep of the device. It is in the plans (or diagrams) of the power supply that the sleep settings, turning on the device off, and others are spelled out. Windows options related to saving energy and turning off the device.
- Select the viewing option Large or Small icons and go to settings "Power supply".

Hibernation on Windows 7 is configured for each individual scheme, and you can either change the sleep time (increase or decrease), or completely disable this functionality.
- Opposite the scheme you are using, click on the button called "Setting up a power plan".

- Where you can set the required time not only for sleep, but also for turning off the monitor or display, after a certain amount of time.
- In meaning Put your computer to sleep choose the right time, but if you need to disable it, select the "Never" item.

- For laptops, there will be a choice of going to sleep, both when powered by a battery or from a network.
- Also, if the selected time gradation does not suit you, then you can configure the transition to sleep mode Windows computer 7 and exit from it in the wiring settings. To do this, in the same window, click "Change power settings".

- In a new window, open the "Sleep" branch, open "Sleep after" and specify the desired time of inactivity of the PC so that it automatically falls asleep. The time is indicated in minutes.

It is interesting! Many users ask hybrid sleeper windows mode 7, what is it and how is it different from the usual one? Hybrid mode- analogue of hibernation in laptops, only created for personal computers... Hibernation - energy saving, in which Windows keeps all active processes and applications in memory hard disk and actually turns off.
The difference between normal sleep and hibernation is that if you turn off the computer in a sleeping state, everything open files lost because Windows is paused. And during hibernation, if you turn on the computer, all applications will be restored, as they were saved to the drive. Hybrid sleep is enabled by default on PC.
Errors

Let's consider the most common mistakes, the absence of a sleep mode in the shutdown list, when the computer does not exit or, on the contrary, does not fall asleep, as well as the reasons that may interfere with this.
No sleep in PC shutdown options
Sometimes, on clean installed Windows, users may not find sleep or hibernation in the general shutdown list. This error may be due to the lack of a video card driver, which is partly responsible for the sleep of your device.
To remedy this situation, follow these steps:
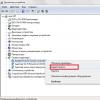
- Open first "Device Manager"- then find the Run (Win + R) item and write devmgmt.msc, then click on OK.

- Expand the list of video cards - select a discrete video card (some devices have 2 video adapters - built-in and discrete, discrete is usually more powerful and works in priority).
- Right click on it and select "Update Driver"
- Windows should automatically find the latest driver in the update center, if, of course, it was provided by the manufacturer of this video card. If multiple video adapters are present, update for all devices.

- If fresh drivers were not found or simply did not help, you need to update the drivers yourself. To do this, go to the device manufacturer's website and search for your video adapter model.
Then complete the driver installation. In case of errors or failures, it is recommended to perform a clean installation of the driver. Or through the installer settings (item clean install, with which old driver completely uninstall and install a new one) or through the Display Driver Uninstaller utility, which can also uninstall and clean the video adapter driver for subsequent installation.
- After installing the new driver, restart your PC and make sure that sleep (hibernation) mode is now active.
Important! If the above tips did not help, and hibernation is still missing, you need to install the chipset driver, which is responsible for the power plans of the device. For some motherboards, there is a separate ACPI power driver that should already be included in the chipset driver.
You can download the chipset or ACPI driver from the manufacturer's website motherboard or laptop.
PC does not wake up from sleep
There have been times when Windows 7 did not come out of sleep mode when I pressed the keyboard or mouse. Let us examine this case in more detail.
First of all, check if the keyboard and mouse can wake the device from sleep. To understand this, open "Device Manager"- then the Run window (Win + R) and enter devmgmt.msc, then click OK. 
First, let's check the keyboard. Expand the "Keyboards" list, right-click on the keyboard and select Properties. In the window that opens, go to the tab "Power Management"... Make sure there is a checkmark next to the item "Allow the device to wake up the PC".
We check the mouse in the same way.
Important! Often the cause of this error can be a conflict between the driver and the included quick launch, which is absent in Windows 7. But in Windows 8 and higher, the error is "cured" by disabling this function and updating the ACPI driver.
PC does not sleep
Sometimes, after Windows updates or drivers, the device does not go to sleep on Windows 7 after the required period. In this case, you need to check if all settings are correct and if sleep mode is enabled.
- First, try hibernating your PC yourself.
- If all is well, try setting the sleep mode value for 1-2 minutes and wait a little. If during this time the PC has not "fallen asleep", it is necessary to solve the problem.
- To begin with, turn off the wake-up timers and the prohibition on going to sleep for multimedia. To do this, go to the advanced settings of the power plan and in the Sleep branch, for the parameter "Allow wake timers" set the value "Disable" for all items.

- In the same settings, only in the branch Media options, for parameter "At public access to multimedia " set the values "Deny transition ..."

- After that, you need to open the window Command line, in the Run (Win + R) window enter cmd command and click OK
- We need to find out which devices prevent the computer from falling asleep. To do this, enter the command:
Powercfg -devicequery wake_armed

A list of devices that can prevent the device from entering sleep mode will be displayed. To disable this feature, enter the command:
Powercfg -deviceenablewake "value"
Where instead of "value" you need to enter a device from the previously proposed list. It is worth noting that you must enter the same as it is written in the list, for example:
Powercfg -deviceenablewake “HID Keyboard”
- If none of the proposed options helped and the computer still does not enter (does not turn on) Windows 7 sleep mode, then try updating the video card and ACPI drivers from the "PC does not wake up" item.
In this article, we figured out how to put Windows 7 to automatically hibernate, configure the transition (required time), as well as the main problems associated with this function.
Have a great day!
Computer video games, demanding on resources, demonstrate excellent graphics, but they also load the operating system to the limit, and on weak machines they do not run at all. Is this a reason to abandon Battlefield, Titanfall, Call of Duty, Forza Horizon and other giants? No. There is special programs speeding up games. Their action is aimed at suspending unnecessary processes and services, optimizing drivers and system parameters, adjusting the frequency and voltage of the video card. One of best programs designed to improve gaming performance. With the help of this free tool you will optimize the video and run the game in the best graphics mode. The Wise Cleaner studio program can be used on various operating systems. There is Russian-language support and a user-friendly interface.

Wise Game Booster offers several ways to optimize your OS to unleash the full potential of your computer. But it only configures processes and services, without changing the settings for devices and drivers. Automation is carried out in two modes - manual and automatic.

The tool, developed by the famous studio, is called the "brain center of the game universe." One program contains a whole arsenal of utilities that are indispensable for gamers. With the Razer Game Booster, you can not only speed up games, but also record videos, take screenshots, stream or online broadcast... In addition, the program also includes tools for PC diagnostics and application defragmentation. To use the program, you need to be a registered user. This program runs games in a separate, optimized mode. You don't have to study the settings and change the parameters - the free accelerator will do everything for you. With just one wedge, you can turn your PC into game device, which will launch the most demanding client projects.

Game Fire has a number of additional functions that will help clean your computer of "junk" files and thereby increase its performance. The program runs in the background without interfering with the comfortable gameplay.
Game prelauncher

A comprehensive tool to optimize your operating system to run demanding video games. With it, you turn your computer into game system... The program, created specifically for gamers, configures the PC so that all its resources are devoted to the game. To achieve this, almost all services, services, programs, libraries, and even the Explorer shell are turned off. These settings allow the program to free up more than 150 Mb of RAM.
Game Prelauncher is a great accelerator, but alas, is no longer supported by the developer.
A tool that will squeeze PC performance to the last bit, which will make it possible to significantly speed up games. The only catch is that meticulous users will not be able to get the full list of changes made - they remain behind the scenes.

If this is not so important for you, run the program and use its functions. What does GameGain do? Changes the registry and system files, freeing up RAM, fully utilizes processor resources and accelerates the rendering of pictures. A proprietary utility from MSI that is used to overclock graphics cards AMD Radeon™, NVIDIA. MSI Afterburner is widely known to gamers and is considered one of the most functional tools for producing fine tuning video cards. Using the utility, you will adjust the supply voltage, be able to control the cooling system, monitor 2D and 3D mode switches, and FPS.

The program also allows you to create game profiles and switch between them using hot keys. The principle of operation is the same as in MSI Afterburner, but unlike it, it only supports NVIDIA graphics cards. EVGA Precision X is the best choice for overclocking GeForce. The program allows you to set custom frequency, voltage or speed settings for memory, GPU, fans, etc.

Choose from 7 programs and optimize your computer for a comfortable gaming environment. Thanks to these tools, you can even play video games with a high degree of picture detail.
Hello everyone!
Insufficient quality graphics are a big problem for every PC user, and especially for gamers. No matter how great your computer is, if you are an amateur computer games, you want to get the most out of your car.
Of course, most often, to solve this problem, it is enough to simply change the video card. But the quality of graphics can be improved without a video card, using certain software methods.
In this article, I will tell you how to improve the graphics on a computer using various methods.
Hardware method
As I wrote above, the most simple method improving graphics data is the purchase of a new, more powerful video card. You can immediately go to the store and consult the seller about which card is best to install on your computer, or read review articles on this topic in advance.
It will not be difficult to install it. The card comes with a disk containing the installation program for its drivers.
An improved image can also be achieved by acquiring more powerful processor or increase random access memory.
Balanced system
It must be remembered that normal work computer is possible only if the system is balanced. If you have little RAM or a weak processor, then installing even the best video card, you will not achieve anything.
But on the other hand, if you have a weak video card, you should not think that increased memory or installing a new processor can solve the problem. In terms of cost, the processor and the card are almost the same (for gaming-type computers, it can be up to 15,000 rubles). Increasing memory will cost a little less, but it all depends on how exactly you want to increase it.
Programmatic way
If you want to improve the graphic performance, but do not have the financial ability to purchase expensive new products, then you can "pump" the video card using software methods, in other words, optimize its settings. To do this, you first need to find its settings, for this:
- Right-click on the desktop
- In the drop-down menu, select "Properties"
- Activate the "Parameters" tab
- If, in addition to the video card drivers, your PC has special utilities, then click on the "Advanced" button.
The above path should be used for Windows systems XP. As for Windows 7 and Windows 8, here you need to: go to "My Computer", in the drop-down menu, click "Properties", on the right select the item "Device Manager", you will find video adapters in the list. Find your video card, right-click on its name and call "Properties".
In my windows 10, I do this:
- Right click on the desktop
- I choose "Nvidia Control Panel"
- On the left in the menu, click on the item "control 3D parameters"
Having done the above manipulations, you will see the map settings panel. There will be a bunch of parameters, but you only need a small part of them to work.

Filtering, anti-aliasing
Since at present the most popular are NVIDIA video cards, we will analyze the settings using these cards as an example. In principle, others are configured in much the same way.
Among the many settings, you should be interested in “ Controlling 3D parameters", Because it is with this section that you will be working. In this section, the following points are of particular interest:
- Anti-aliasing - parameters;
- Vertical sync pulse;
- Anisotropic filtering.
The first and last settings are 32x, 16x, 8x, 4x, 2x. Moreover, the higher the value, the more pleasant and smoother the picture will turn out.
The vertical sync pulse (item 2) can be controlled by the parameters of the 3D application, be in a disabled or enabled state. For maximum graphics enhancement, it should be enabled.
In some cases, access to the "Parameters - anti-aliasing" setting may be closed. To set the desired values, you need to set "Increase application settings" in "Smoothing - mode".
That's all, dear friends! Now you know how to increase the clarity, brightness and other characteristics of the image.
By the way, the course “ Genius geek". Here, in a simple and accessible form, it tells about all the intricacies of working on a computer. A person of any age can master computer literacy with the help of this course. He is able to make a real computer "ace" out of any "teapot"!
Share the link to this article with your friends on social media. networks, for sure, one of them is a fan of video games, and this article will be useful to them. Don't forget to subscribe to updates. See you on the pages of my blog!
Sincerely! Abdullin Ruslan
Paint.NET - modern free graphics editor, which can easily replace the standard Paint for operating system Windows 7, 8 or 10. A lot of time has passed since the first Windows appeared. It developed, and the Paint developed with it. Paint.NET has little in common with him. Unless the simplicity and intuitiveness of the program interface has been preserved ...
FastStone Image Viewer is a tool for free viewing, editing and converting graphic images. This image manager will easily replace the popular ACDSee. FastStone Image Viewer, which you can download for free in Russian at the link below, has been receiving positive reviews on large independent forums. The program has in ...
PicPick - free app, ready to perform all the functions associated with the creation and processing of snapshots taken from the device screen. Thanks to this program, you can easily take screenshots, and then process and edit them within the capabilities offered by this software. Immediately after Peak Peak is installed and first launched, its control will become ...
IrfanView is a popular free (for personal use) program for viewing and editing photos, images, graphics, as well as for playing audio and video files. Due to its small size, the application is one of the fastest viewers. The program is easy to learn, installed without registration, a crack is installed separately, ...
GIMP is a bitmap graphics editor used for image retouching and free-form drawing editing, resizing, cropping, photomontage, converting between different image formats, and more specialized tasks. The program is often cited as a possible replacement Adobe photoshop... The developers made it possible to open documents ...
Joxi is a fast and easy-to-learn screenshoter for Windows. It compares favorably with analogs with its simple interface and quick mastering of control. On our site you can download Joxy for free and use it officially right now. At the first launch, the application will ask you to enter your mail and password. You will need this information to log into the cloud server. There you will find everything ...
XnView - Free Powerful Converter Editor graphic files... The program allows you to perform a huge number of different operations on images without losing the quality of the latter. You can download the Russian version of XnView for free from the link at the bottom of the page. Key feature editor is that it allows you to apply your functions as to a separate file, i.e. ...
Light Image Resizer is one of the best programs created for working with images: resizing them, as well as converting them to the desired format. In addition, the application provides the ability to perform the simplest processing of photos and add watermarks. The main advantage of Light Image Resizer is the ability to simultaneously process a whole batch of images at a given ...