Modern computers have great computing capabilities, so it is difficult to surprise someone with a two-, four- or even six-core processor. But a novice user who is not familiar with the features of the technical "stuffing" of the device may be interested in how to enable all the cores on Windows 10 in order to increase the performance of the computer.
How can I find out the number of processor cores?
You can find out how many cores are in the processor that is installed on your computer or laptop using the programs built-in Windows tools and in the description for the CPU.
In the CPU description
Check the instructions for the device to see which model is installed on your computer. After that, find the description of the processor on the Internet.
Healthy! You can also look at the model in the OS description: RMB on the Start → System → in the "System" block the name of the CPU is indicated.
On Windows
Programs
Many programs have been created that show the characteristics of the device.
CPU-Z
AIDA64
The shareware utility AIDA64 contains a large set of functions.
Run the program → Motherboard→ CPU → Multi CPU. 
Alternative option: Computer → Summary information → System board block → in the line "CPU type" LMC on the processor → Product information.
How many cores are used by default
Remember the main thing! In a multi-core processor, all cores work always and at the same time (read the article ""). Basically, they operate at different frequencies (depending on BIOS settings or special utilities which are shipped with the motherboards).
The benefits of running a multi-core CPU can be summarized as follows. If a person pours water into a bucket from one tap, he will do this work in one period of time. If you turn on the second tap, you can fill the bucket much faster, but the volume of water that can be placed in it in total will not increase.
By using two cranes, work is optimized. The same happens when using multiple cores in the CPU - it processes the data that comes in for computation faster and more efficiently.
Important! The processor works in multi-threaded mode only if the program it is running is optimized for this. If the software manufacturer has not implemented support for multi-core CPUs, only one core will be involved.
How to use all cores?
On Windows 10

Important! Each core must have at least 1024 MB random access memory otherwise you will have the opposite effect.
In BIOS
You can make changes to the BIOS only if they "crashed" due to a failure in the OS (read the article "" to learn how to start the PC if it is unstable). In other cases, all processor cores in the BIOS are enabled automatically.
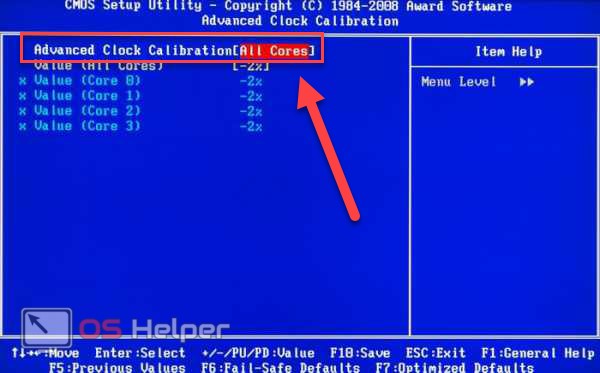
To enable all cores, go to the Advanced Clock Calibration section in the BIOS settings. Set it to "All Cores" or "Auto".
Important! Advanced Clock Calibration section in different BIOS versions can be called differently.
Output
During operation, all processor cores are involved, but they operate at different frequencies (depending on the settings made). You can enable all CPU cores when the OS boots in the BIOS settings or in the System Configuration options. This will shorten your PC boot time.
Personal computers and laptops with multi-core processors have tremendous computing power. Thanks to the parallel operation of all cores, the device is capable of showing impressive performance in computer games and programs. In this article, we will figure out how to enable all cores on Windows 10, with which applications you can view information about the processor, and so on.
Depending on the workload of the computer, the employment level of each core may differ from others. In addition, each core is capable of operating at a separately set frequency due to BIOS settings or software motherboard. The load on the computer is distributed evenly, which is why you get high performance.
There is only one case when a dual-core processor will not use the second core, and this is the procedure for turning on the PC. The BIOS uses the resources of only one core to start the operating system and bring the computer to readiness. You can use all the resources and speed up the process of turning on the computer a little. However, you should not wait for significant changes - you need to achieve faster turning on of the PC by other methods (for example, install it on an SSD).
Inclusion methods
You can activate all 4 cores in a 4-core processor at boot time in the following ways:
- across standard means systems;
- through settings
The instructions below are suitable for 32 bit and 64 bit OS. Home, Pro and Enterprise versions are supported. In order for the computer to start using all the power at startup, the following operation must be performed:
- Go to the "Run" application using the Win + R keys. Type in the line "msconfig" and press Enter to start.

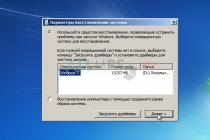
- In the window that opens, you will see the "Download" tab.

- In it you need to select your OS and click on the " Extra options downloads ".

- Check the box "Number of processors" and set maximum amount cores. It is also necessary to increase the "Maximum memory". PCI Blocking must be disabled so that the computer distributes the load evenly across all the number of cores. To complete the configuration, close the window with the "OK" button.

Tip: Do not set the maximum memory size to less than 1024 MB, so as not to achieve the opposite effect - slowing down the computer boot.
After saving the settings, you need to see how many cores are running now. If all parameters are reset, then reduce the "Maximum memory" and test again. In order not to repeat this procedure, in the "System Configuration" window, check the box next to "Make these boot parameters permanent" and exit with the "OK" button.
In BIOS
It is worth warning that changing the BIOS settings is recommended only if your personal computer has stopped booting. Without a minimum of knowledge, we do not advise you to use this method if the above works.
So, to enable a multi-core processor, you need:
- Run BIOS menu... This is done when the computer is turned on. On different motherboards, a separate key is responsible for starting. In most computers, these are Del, F1, F2, F10 and similar system buttons. On the boot screen, you will find information about your key.

- In the BIOS menu, open the "Advanced Clock Calibration" section. Here you need to set the parameter "All Cores".
- To save and reboot, press F10 and confirm the action with the Y key.
Now you know how to make the computer boot using all the processor cores.
How to find processor data
You can find out how many cores your PC is running and what characteristics the CPU has in the following ways:
- standard OS tools;
- third party utilities.
First, let's look at the built-in capabilities of the operating system.
general information
You can view information about the processor and its characteristics as follows:
- Go to "Options". To do this, right-click on the "Start" icon and click on "Options" in the menu.

- Then go to the "System" section.

- Now open the subsection "About the system".

- Find the marked line in the list of all information. The name and frequency of each of the cores are listed here.

You can learn more about the hardware through the "Device Manager". All ways to open this program presented below:
- To open Device Manager, enter the appropriate query in the search bar.

- You can also run the program through the "Control Panel". Open it in any convenient way, and then go to "Hardware and Sound" (1).

- Then click on "Device Manager".

- V command line you must enter "mmc devmgmt.msc" to launch the "Device Manager".

The application window looks like this:

In it, you need to expand the "Processors" branch. The screenshot shows a 4-core device as you see 4 identical lines. Right-click on one of the lines and select "Properties". In the window that opens, you can find all the information on the processor.
Third party utilities
If you are not satisfied with the functionality of the "Device Manager", you can install one of the third-party utilities. The most common are CPU-Z, AIDA64, and Everest.
CPU-Z can be downloaded from the official website at the link. At the first start, the utility will collect data about your PC configuration. In the first tab, all information about the CPU:

In the remaining tabs, you will find a detailed description of other equipment. For example, the SPD will have a detailed description of the RAM (Module Size, Manufacturer, and so on).
The AIDA64 program is downloaded from the creators resource. On the left side of the window, open the "Motherboard" branch and go to the CPU subsection. The Multi CPU column will indicate the number of processors:

The last utility is Everest. It is very similar to the previous software. It also contains all the information you are interested in about the CPU in the "Motherboard" section:

Outcomes
Enabling multithreading is possible only for the operation of starting a personal computer. In all other cases, the CPU uses all resources at the same time, so there is no need for manual tuning.
Video
Below is a video instruction with detailed description all actions and operations from this article. With the help of the visual aid, you will be able to understand the points and steps of the guide that you do not understand.
Most advanced users personal computers know that in Windows 7 by default, only one processor core is used and in order to use all the cores, you need to perform several not very complex actions. After completing them, your computer will start working much faster and you can notice improved performance not only when working with programs, but also in games.
Some users say that nothing needs to be turned on since the computer by default uses all the cores in the processor, but in order to prove the opposite, I performed several tests and made sure that the system boots faster when all cores are turned on.
Let's move on to the instructions ...
Go to the "Start" menu, click on "All Programs" and find the item "Standard" there. Here in the list we are looking for "Execute".

A new window will open, go to the "Download" tab and click on "Advanced options".

After that we put a tick on "Number of processors" and just below we select the maximum number of cores. There may be two or four of them, it all depends on your processor model. After clicking at the bottom of the window, click on the button "Ok.

In this window, we also click on "Ok".

Then a small window will open in which you will be asked to restart the system, we agree with this.

After restarting, you will notice how much the system performance has increased. By the way, don't forget subscribe for site updates :-).
Everything modern computers Are multi-core devices that affect system performance. However, Windows 7, however, like any other operating system does not use the processor cores at full capacity. This is due to the saving of resources of the PC itself. Therefore, if your programs do not slow down and errors do not crash, we do not recommend using all the cores of the graphics accelerator. This action should be performed in cases where the power of the PC is not enough to run standard programs and games.
Configuring the operation of kernels through the startup menu
This option for using all the power of the processor is the simplest and safest. It is suitable for all versions of Windows OS (except XP). Any user, even a beginner, can follow these steps.
- Press "Win + R" and enter "msconfig".
- The System Configuration window will open. Go to the "Download" tab and click "Advanced options".

- In the window that appears, put the "Number of processors" checkbox so that the item with the choice of cores becomes active. We set the maximum memory.

- Then we save the result and reboot the system. The multitasking mode will turn on.
IMPORTANT! If your PC turns off with advanced settings, check if your power supply has enough power.
Advanced processor settings with AIDA64
The AIDA64 program is useful not only for its reports on the status and characteristics of individual PC components, but also for unlocking processor cores. To use the capabilities of the CPU using this program, you should do the following:
- Run the program and select "Motherboard", "CPU" from the menu on the left.

- Next, turn on each of the cores and reboot the system.
If the kernels involved have not brought benefits, it is worth returning the settings back.
Engaging processor cores with CPU-Z
The CPU-Z program allows you not only to check what characteristics this or that PC component has, but also to optimize the operation of some of them. In order to enable all cores, you must do the following:
- We launch the program. Go to the "CPU" tab.
- In the "Theads" item, you need to set the same value as in "Cores".

- After rebooting the system, you need to check the changed parameters.
Overclocking the processor using BIOS settings
To use all the cores of the graphics accelerator, you should go to the BIOS. To do this, restart the PC and press "F2" or "Del" several times. Then you need to make the following settings:
- We find the section "Clock Calibration" (It is available only for AMD products). We set the value "All Cores". In the "Value" item, set the value as a percentage.

- After rebooting the system, it is worth checking the PC for operability.
These methods are quite simple and in rare cases cause the system to crash. However, if errors start to appear after editing the settings, you should stop unlocking the kernels and return the settings back.
For information on how to enable processor cores on PCs with Windows 7 and higher, see the video:
Owners of powerful PCs with multi-core processors usually want to tune the system to deliver full power to get the best performance, but often do not know how to do this. In this article, we will look at instructions on how to enable all cores.
What result can you expect
There is a fairly common misconception that a multi-core processor has the same performance as a multi-processor PC. As an example, you can imagine an analogy with loading material into a container for processing. Several workers can bring the product instead of one, if we imagine that the workers are processor cores. The transmission and reading of information is faster. Instructions with screenshots on how to overclock the processor.
Configuring kernels in BIOS
Sometimes, due to a dead battery on the motherboard or for some other reason, the parameters are reset to the default settings. In this case, it is usually necessary to check and set the parameters manually. To do this you need:
Enabling Kernels in the Configuration Utility
If the BIOS parameters are set correctly, but the kernels are still not active, you can try to change the settings in special program Windows configuration. For this you will need:

After the performed operations, we reboot the system.
Configuring kernels for a specific process
Using the task manager, you can enable the required number of cores for a specific program. This is done as follows:

Note: in the task manager, on the performance tab, you can see if all kernels are currently running. A different diagram is displayed for each of them.

Power settings
Sometimes, due to power options, the computer does not use all the processor cores. Most often, this situation occurs in laptops. To check the settings and set the correct value, you need to do the following: