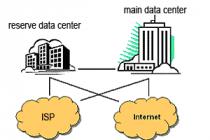
RAW or Jpeg - what's the difference and what format is the best for shooting?
How to ensure high-quality color reproduction - this question is of concern, probably, to any photographer. There are two ways to adjust the color rendering:
- Shoot in JPEG format and use camera settings - white balance, saturation, brightness, image contrast
- Shoot in RAW format (if the device allows it) and adjust the color rendition when processing photos on a PC
Both of these methods have their pros and cons, I will try to briefly tell you about them. But before we get into practice, let's first define what is the difference between JPEG and RAW formats.
JPEG format
The format gets its name from the acronym Joint Photographic Experts Group - the organization that created this format. JPEG is by far the most popular photo storage format, so all cameras without exception can save images in this format, and all picture and video playback devices (personal computers of all varieties, media, DVD, BlueRay players, digital photo frames and other devices ) are able to read this format and display the image on the screen. Compatibility with a large number of playback devices is the main advantage of the JPEG format. In addition, JPEG files are of moderate size compared to other graphic formats - BMP, TIFF.
However, JPEG also has its drawbacks. When a picture is encoded in the JPEG format, the data is compressed, as a result of which part of the data is lost. With a high degree of compression, the quality of the picture suffers seriously, so-called artifacts are visible on it, that is, distortions caused by the loss of too much information during compression.
The picture, I think, needs no comments.
Of course, the camera has several levels of image quality, for example, standard (standard, normal), good (good), best (fine, superfine). In standard quality, the photos are of a moderate size (a lot of photos can be placed on a USB flash drive), but in some cases artifacts may be noticeable in the photos. The most susceptible to deterioration in the quality of photos, replete with small details - in this case, compression can significantly degrade the detail of the image.
Photos taken in the best quality have a larger size in megabytes, fewer images fit on a flash drive, but the detail on them is noticeably better. When asked in what quality it is better to shoot in JPEG format, I definitely recommend using the best quality. Flash drives and hard drives are not so expensive as to save money on photo quality. Photos taken at "standard" quality may look good on a computer screen, but even with little processing, you can get frustrated.
If the conversation went about detailing when shooting in JPEG, one cannot fail to mention the setting of the photo resolution. If the device has a resolution, for example, 12 megapixels, then its maximum image resolution is about 4000 * 3000 pixels (this is enough for printing 30 * 45 cm). However, in the image quality settings, the resolution of the photos can be changed. Usually, the settings are marked with letters:
- S (English small - small)- the smallest resolution, which is barely enough for printing 10 * 15 cm. As a rule, it corresponds to 2-3 megapixels.
- M (English medium - medium)- medium resolution. Photo resolution can vary from 5 to 10 megapixels, which corresponds to a print format of 20 * 30 cm.
- L (English large - large)- the maximum resolution corresponding to the matrix resolution in megapixels. Modern devices have up to 36 megapixels, the print format is up to 90 * 60 cm.
The ability to print photographs on huge canvases is a dubious advantage for the average amateur photographer. However, by saving photos at the highest possible resolution, we get additional opportunities for cropping the image without any visible loss in print quality. This is the decisive factor in favor of the L mode, in which photos are saved to a USB flash drive at maximum resolution.
So, in order to get the maximum resolution combined with the best detail, in the photo quality settings, select the mode - maximum resolution (L) with minimum compression (best, superfine).
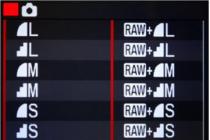
Sometimes, instead of verbally describing the compression ratio, pictograms are used. Here is an example of a quality selection menu for a Canon DSLR. For now, we are looking only at the left column:

We see that before the letters L, M, S there are pictograms with a smooth left edge and a stepped one. A pictogram with a smooth edge corresponds to less compression, with a stepped one - more. In the right column - different options for shooting in RAW format, which will be discussed below.
Setting the quality and compression ratio is half the battle ... Now you need to make a number of adjustments to ensure the best possible color reproduction. Color reproduction is adjusted in two steps:
- Setting the White Balance
- Adjustment of image parameters - contrast, saturation, sharpness.
White balance
You may have noticed that different light sources have different color shades. The candle gives yellow light, the setting sun is reddish, the fluorescent lamp is bluish. Our eyes and brain are designed in such a way that under almost any conditions a sheet of white paper will be perceived as white - even if it is lit on one side by a candle, on the other - by a fluorescent lamp. The brain will "force" itself to tell itself that the eyes are seeing a white object because it knows the paper is white.

Unfortunately, such a number will not work with a camera matrix. The camera does not know what color the objects we are used to have, therefore, in unusual lighting conditions, significant color distortion is possible. The most common example is when shooting without a flash in a room lit by incandescent lamps, the photographs often turn yellow.

To avoid such color distortion, it is in our power to "help" the camera decide which object should be "considered" white. This is done using the white balance setting function.
The easiest way to set white balance is to choose one of the pre-installed programs. Typically, a camera has several presets. They are usually as follows:
- Sunny
- Mainly cloudy
- Sunset Dawn
- Incandescent lamp
- Fluorescent Lamp
- Flash
- Custom white balance
In auto white balance mode, the camera itself tries to detect the type of light source and adjust the color rendition accordingly. Most often, he succeeds, but you should not rely on this function 100%. She especially loves to make mistakes in mixed lighting, for example, an incandescent lamp (yellowish tint) is on in the room, and daylight comes from the window (bluish tint). In this case, no one will insure against the appearance of yellow, or, conversely, blue faces in the photo.

This photo shows the auto white balance error in mixed lighting. To avoid such errors, in some cases it is necessary to resort to forced setting of the white balance in accordance with the prevailing type of lighting. In this case, setting the white balance "incandescent" would help. The landscape outside the window would turn a little blue, but the yellowness in the foreground would disappear, making the color reproduction closer to reality. Of course, there is a way out - each time to set the white balance in accordance with the source of the main lighting. We entered a room lit by incandescent lamps - set the white balance "incandescent lamp". We went outside - set, depending on the weather, "sunny" or "cloudy".
In cases with mixed lighting, when there is light from a window on one side and light from a lamp on the other, flash is often helpful. If it has sufficient power, it is able to "crush" other light sources and illuminate the scene with uniform light. In this case, the white balance must be set to either "flash" or "auto" (when the flash is on, the device will itself determine it as the main type of light source). The best results are obtained with an external flash, but for amateur “household” photography, the built-in flash is sufficient in most cases.
Manual (custom) white balance
Although the preset white balance modes cover most commonly used light sources, there are situations when none of the proposed modes is suitable. Take an incandescent light bulb, for example. High-power lamps (75-100 W) give light closer to white, while weak lamps (25-40 W) have a yellowish tint. A special case is energy-saving lamps, especially cheap ones, whose spectrum is such that even the human eye is sometimes unable to adequately assess the color picture.
Some devices have the ability to fine-tune the white balance relative to the preset one, however, in order to optimally adjust the color rendition for the given lighting conditions, you need to take several frames with different settings and select the setting with which the color rendition is as close to reality as possible. This takes a long time and is not always effective, since you have to focus on the picture displayed on the LCD screen, the color reproduction of which is not always ideal.
It's much easier to use the manual white balance function. To do this, you need to photograph some kind of white object (or just a sheet of white paper), and then indicate to the camera this picture as a sample by which the white balance should be set. I see no reason to describe in detail how this is done - different devices have their own sequence of actions, so I recommend using the instructions, everything is described in steps specifically for your device.
Most cameras can store one or more custom white balance settings. If you regularly have to photograph in specific lighting, it makes sense to keep the white balance setting so that later you do not have to worry about photographing a white sheet.
To illustrate the possibilities of manual white balance, I propose to compare the color rendition in two photographs:
Automatic BB
Handmade BB (white jacket of the left character was used as a sample of white)

The result is noticeable - in the first case, the photo has gone yellow, in the second, the color rendition is close to reality.
Picture style setting
The "picture style" function is, probably, in all cameras. With its help, you can adjust the brightness, contrast, color saturation, picture clarity, as well as "force" the device to shoot in b / w, sepia.
As a rule, the device already has a set of preset picture styles - landscape, portrait, natural tones, accurate reproduction of tones, and so on, as well as several "empty" cells for custom settings. Here is an example of the "select picture style" menu item for a Canon EOS 5D camera:

All presets are a combination of parameters:
- sharpness
- contrast
- saturation
- tone color

It is somewhat reminiscent of the TV picture setting function :) With contrast, saturation and tone color, I think everything is clear. Sharpness refers to the software "enhancement" of the contours of objects, due to which, the picture will appear sharper. The key word is "seem". In fact, software sharpening does not increase image detail. If the object in the photo is slightly blurred initially (out of focus, or the lens was unable to convey all its nuances), no software algorithm will be able to "come up" with the missing details. In the hope of improving the quality of the photo, you should not turn the "slider" of sharpness to the full.
As you can see, setting up your camera for JPEG shooting for the best result is not as easy as it might seem at first glance. This is precisely the main disadvantage of JPEG over another format - RAW - which will be discussed below ...
RAW format
What is RAW for and why is it better than JPEG?
The format gets its name from the English word "raw", which means "raw, unprocessed". In principle, this is quite consistent with the essence of the matter. When using the RAW format, the signal taken from the matrix is written as a file to a USB flash drive (the file extension may differ for different cameras). At the same time, the camera does not do any processing, allowing the user to process information on a PC using a special program - a RAW converter. This gives a huge advantage - the photographer does not need to worry about the white balance, brightness, contrast, saturation of the image - all this can be adjusted later on a good monitor. "Raw" data contains a large amount of redundant information, which, if necessary, will allow you to adjust all these image parameters as accurately and correctly as possible.
In the JPEG format, all "extra" data is discarded to ensure the smallest file size, which severely limits processing capabilities. If the brightness and contrast can still be adjusted, then the wrong white balance is much more difficult to correct, especially if the error is large. In this case, you have to sacrifice the naturalness of the colors. Here's an example where a yellowed photograph was pulled from JPEG and RAW.
Original version
Corrected version (JPEG)

Corrected version (RAW)

As you can see from the above examples, when trying to correct the white balance in JPG, the picture acquired a somewhat unnatural tint, as if the photo was taken on a cheap negative film that was scanned with a consumer scanner. Note that in this case, I did not make any special efforts to bring the colors closer to real ones, but this required several operations in Adobe Photoshop. You can read more about editing white balance in JPEG in this article /article45.html. The essence of the article boils down to the fact that it is possible to correct a minor white balance error in JPEG, but this is a rather non-trivial task. In case of a serious error in the white balance, it is, alas, impossible to restore the color rendition without any visible loss of quality, working with the JPEG format.
Main features of RAW
Instead of describing the possibilities of RAW here, I'll show you an example of how one initially unsuccessful photo was saved. During a summer trip to St. Petersburg, my wife and I visited the Hermitage, naturally, taking a camera with us. As in all museums, flash photography is prohibited in the Hermitage. Anticipating this situation, I took a fast Canon EF 50mm f / 1.8 lens. But the main trouble lay in the fact that in different rooms there was different lighting - in some there was daylight from the windows, in others - artificial lighting. If I was shooting in JPEG format, I would be tortured to set the white balance. Looking ahead, I will say that the shooting was carried out in RAW and it was possible to simulate the situation, what would be the result with certain WB settings in JPEG. So let's start from the beginning:
Auto white balance:

A terrible mixture of yellowness and redness! Such photographs are often obtained when the room is illuminated by a large number of incandescent lamps of relatively low power, in which case the photograph is colored yellow. Well, let's try to set the white balance "Incandescent lamp" ... Here's what happened:

A bit better. The yellowness has become less, but incomprehensible greenery has appeared. The result is also unsatisfactory.
The option with manual white balance is very time consuming, since this procedure will have to be carried out in almost every new room. Fortunately, there is a RAW file that allows you to set the correct white balance on your computer in 1 click.

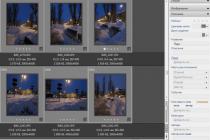
For RAW processing, we used the Digital Photo Professional program, which came with the Canon EOS 5D camera (on the software disc). As for other devices, I am more than sure that something similar is given to them.
The program has a very simple interface, so it will not be difficult to understand it. In fact, it duplicates the color reproduction settings of the camera, and also has a number of other functions.
To set the white balance, take an eyedropper (shown with a red arrow) and poke it at the place of the photo, which should look white or light gray. In this case, it was my jacket. What colors have become in the photo, you can see from the picture. The result obtained cannot be compared with the one obtained only with standard camera settings.

Digital Photo Professional allows you to "retroactively" set the color reproduction of the picture, which are available through the menu of the camera. Thus, you get the opportunity during shooting not to waste time on setting the white balance, choosing the picture style. This is especially true for reportage photography, where every second counts. The program allows you to do some things that are simply not available through the menu, for example - adjusting noise suppression, adjusting sharpness, correcting chromatic aberrations and distortion (distortion of straight lines at the edges of the frame). The only condition under which all this works is that the photo was taken in RAW format. Most functions are not available with JPEG.
I must say that the Digital Photo Professional program has relatively little functionality compared to the popular Adobe Photoshop Lightroom, but it should be borne in mind that licensed Adobe Photoshop Lightroom costs about $ 200, and updates to new versions of this program are paid (about $ 100 ). Digital Photo Professional comes to us completely free of charge and updates to newer versions just as free. However, there is a nuance - the program itself cannot be downloaded, it must be installed from the disk. You can only download the update to the latest version from the Canon website.
I see no reason to write a manual for Digital Photo Professional here for two reasons - firstly, it will be of interest only to owners of Canon devices, and secondly, such a manual already exists - http://www.ixbt.com/digimage/canon_dppix.shtml
Even if the JPEG version has the correct white balance, it is likely that the RAW version of the photo will have better quality. The reason is simple. The performance of a computer processor is much higher than the performance of a camera, and it can handle more complex image processing algorithms - improving detail, filtering noise, and other processing. Even if the processing takes some time, it is not scary for the computer - the user can wait. In photography, every second is worth its weight in gold. As a result, the algorithms used by the camera for processing the image taken from the matrix are squeezed into tight time frames so as not to reduce the speed characteristics of the camera. For example, those actions that a computer can do for 10 seconds, the device must complete in no more than 1 second. This inevitably affects the quality of processing, especially when the device does not have the most modern and high-speed processor. This is why the result of shooting in JPEG is almost always worse than properly processed RAW.
One more technical aspect cannot be ignored. When shooting in JPEG, pixel color information is encoded in 24 bits, when shooting in RAW - from 30 to 42 bits. It's not hard to imagine how many more color shades can be encoded in 42 bits instead of 24.
What are the main disadvantages of RAW format?
RAW is not available on all cameras. Owners of DSLRs and "top-end" cameras can be calm, but those who have relatively inexpensive compact devices may be disappointed - they most likely lack RAW support.
RAW files cannot be opened on any device other than a PC with dedicated software installed. Media players, digital photo frames, tablet computers will not display RAW photos. To do this, they need to be converted to JPEG format (on a PC, using RAW processing software).
The program for processing RAW, which comes with the camera on disk, has a rather meager set of features. More functional software is usually paid.
File size is about 2 times the best quality JPEG. If you go on a long trip in which you intend to photograph in RAW, stock up on a flash drive with an increased volume.
What is RAW + JPEG format?
In most devices, it is possible to select such a mode when photos are recorded on a USB flash drive in the form of 2 files - one RAW, the other - JPEG. This is useful in cases where the main shooting is in the JPEG format, but you need to be on the safe side so that in case of anything you can "pull" the wrong image out of RAW.
If the results in JPEG format are satisfactory for the photographer (or customer), RAW files can be removed painlessly. As you can see in the picture, you can choose different resolution and quality for the JPEG option. Keep in mind that when shooting in RAW + JPEG, the flash drive will run out faster than just RAW.
What format to shoot?
If you are interested in getting the most out of your camera in the best possible photo quality, I highly recommend shooting in RAW. All further chapters of the tutorial will assume that shooting is carried out in this format.
Questions for self-control
If your camera can shoot in RAW:
1. Install RAW processing software on your computer (if not already installed). If you do not know where to get it, look for it on the disc that came with the camera.
2. Take multiple photos in RAW + JPEG format. If shooting indoors, try to avoid using a flash.
3. Download the shooting result to a PC and process the RAW files in the installed program. Set the correct white balance (white area of the image), brightness, contrast, noise reduction level. Compare the results with the JPEG images.
If your camera does not support RAW
1. Check which image quality you have selected. Set maximum resolution with minimum compression.
2. Experiment with picture styles - change brightness, contrast, saturation, hue. Save your favorite settings as custom mode. How to do this - read the instructions for the camera.
3. Learn to set the white balance on a sheet of white paper.
"Raw", which is very close to the truth. Jpeg contains ready-made information, which is automatically generated by the software (it is enough to display the frame on a standard monitor). If you made a mistake and made the frame too dark or, conversely, overexposed, soapy or noisy, there is no way to fix it. Raw, on the other hand, “forgives” incorrectly set ones and allows you to do primary processing using much more sophisticated programs. That is why the weight of a Raw file is incomparably higher than that of a similar Jpeg frame.
Raw file content
1. Metadata: shooting conditions, set processing parameters, identification cameras;
2. Preview, most often in Jpeg format;
3. Data from the matrix.
This file weighs from 15 megabytes. Depending on the model, Raw may have the following extension: .nef, .cr2, .arw.
Raw capabilities
1. Correction of white balance;
2. Correction of exposure;
3. Correction of distortion;
4. Removing the effect of chromatic aberration;
5. Saturation, sharpness and contrast.
However, there is no hope that post-processing will improve everything. The frame should be clear from the start, because no shake or defocus can be corrected by the program.
Raw programs
Each DSLR manufacturer produces its own software that allows you to convert Raw to Jpeg or save it in another format, such as Psd, for further processing in Adobe Photoshop. No self-respecting professional will work with the Jpeg file itself, since the quality of the photo will only deteriorate from time to time.
Many novice photographers prefer to use the free utilities that come with the camera itself. Canon Utilities RAW Image Converter works for Canon with Raw, Nikon - Nikon Imaging and Capture NX, for Sony - Sony RAW Driver.
As for the universal software, the most popular is Adobe Photoshop Lightroom, it allows not only adjusting the image itself, but also preparing it for publication on a photo hosting site for sale, adding all the necessary metadata to it. Those who prefer to immediately work in Photoshop should install the Adobe Camera RAW plug-in, which “translates” this format into a language that the editor can understand. However, "Lightroom" and "Photoshop" have only one, but a very significant drawback - their cost.
About RAW format and RAW convertersFirst I will say a few words about RAW, then about converters, then I will compare the results of their work. The material is of an overview and informational character and is intended to broaden the horizons; the task of thoroughly understanding the peculiarities of the work of each program is not in front of me. It should be interesting for both beginners and advanced.
Digital photography is designed in such a way that the result of the shooting is half, and maybe more, depends on the computer processing of the frame. And the first program in the standard process of processing photos from a DSLR camera (or an advanced compact) is usually a RAW converter. I will tell you about what it is, why you need it, and what RAW converters exist.
RAW format
You need to understand: there is no such thing as "RAW format". This is the general name for image files that are not processed by the camera's processor. Each manufacturer has come up with their own format for "raw" pictures. These are NEF for Nikon, PEF for Pentax, CR2, or CRW for Canon. It is especially important that all these formats are closed, i.e. how to correctly read data from files is known only to the camera manufacturer. The only standardized RAW format is DNG, which was developed and is actively being pushed onto the market by Adobe. The latter does not release cameras, but wants to bite off her piece of the pie. DNG is supported by some digital cameras such as Petnax, Samsung or Leica.
So, a RAW file contains an unprocessed signal recorded in a certain way from the camera matrix. Also raw files contain meta data, shooting conditions, some processing parameters. Such a file is especially valuable in that it stores all the data received from the camera matrix, and not what remains after conversion. This gives incomparably greater freedom in photo processing compared to the TIFF format (I am not talking about JPEG at all - it means lossy compression) Of course, raw files take 3-8 times more space than JPEG; well, there is no such thing as high-quality and lightweight at the same time.
The lack of standardization of the raw file format is easily explained: it is profitable for each manufacturer of photo cameras to release a conversion program for its RAW format. For example, for Nikon (NEF) it is Capture NX 2, for Canon RAW it is Canon RAW Image Converter. It is the "native" program that most correctly displays colors in the photo, suppresses noise well, and so on. due to the fact that it "knows" how to read the file correctly. But that's in theory. In practice, the standard applications from the manufacturer have a number of drawbacks (for example, Capture NX 2 is extremely slow to work regardless of the PC configuration), which prompts the photographer to look for alternative ways to convert photos.
And a little more about RAW files
Many cameras have the ability to choose the bitness of the RAW file - 12 or 14 bits. The more bits are spent on the description of the image, the more data will be recorded in the RAW file, and, as a result, the picture will contain more details and colors. The noise will also decrease. More details on the comparison of 12 and 14-bit images can be found in this article.
Some cameras, mostly compact cameras, do not support RAW shooting by default. However, for a number of cameras it is possible to bypass this limitation. For example, using an alternative camera firmware called CHDK (Canon Hack Development Kit) allows you to enable RAW support for a huge number of Canon cameras. You can view the list of supported cameras and download the firmware here. In addition to RAW support, this firmware gives access to many other hidden settings, allows you to use the camera as a web camera, etc. A similar trick can be done with some Casio compacts.
A RAW file contains a lot of service information, for example, the date of shooting, the focal length of the optics, and the camera model. And if some data can be displayed by any viewer, then some of the parameters (for example, the "mileage" of the camera - the number of shutter operations) are shown by no means in every program. In order to see the full content of the metadata stored in a RAW file, I recommend using the free PhotoMe utility. Try it, learn a lot.
What's the best way to view RAW files on a computer? The most common application is ACDSee Pro, the main drawback of which is its extreme cumbersomeness and sluggishness. The day is approaching when the humorous question "Who will be the first to make their operating system, ACDSee or Nero?" a specific answer will be given. I recommend using the FastStone Image Viewer, which, being completely free, weighing 4.53 MB and supporting the Russian language, can read the RAW file formats of all cameras, and it works faster than ACDSee, unlike.
RAW converter
RAW converter is a program that allows you to get a finished image from a raw RAW file in one of the common graphic formats, and suitable for subsequent editing in a graphic editor. This process can be roughly compared to development by analogy with film photography. Any RAW converter has its own (different from others, which is important) algorithms for constructing an image stored in RAW, so the final image in different converters will look different. Also, any converter has basic functions for working with exposure, the ability to fine-tune colors, correct geometry and image defects. Some converters are able to catalog images, create backups, and even upload them to photo hosting sites such as flickr. Such programs are said to implement a "complete processing cycle", i. E. with the help of one such program, you can do all imaginable operations with a photograph, up to watermarking and posting on the Internet. All converters support the opening of the DNG format, as well as saving in TIFF, JPEG and PNG formats. Otherwise, the lists of supported formats vary. There are also destructive and non-destructive editing. In the first case, the results of the work are changed by the edited file. In the second case, the program saves the settings in a separate file, which makes it possible to mark any correction, as well as create several processing options. Non-destructive editing is used by all modern raw converters without exception.
About iron
A few words about the computer configuration required for comfortable work with converters. The basic advice is simple: the more powerful, the better. RAW files themselves are typically around 20-30 MB in size. Thus, to store 100 photos in RAW, you will need about 2-3 GB of disk space. The conversion process itself strongly depends on the converter algorithms, but usually it still loads the processor completely. The trend is that more and more programs are being "sharpened" for multi-core and 64-bit processors. For example, Adobe Lightroom, starting from version 2.6, is able to fully use 4 processor cores. As for the RAM, it must be at least 1.5 GB (when working with Windows 7). Better than 6 GB and Windows 7 x64.
"Explain to me clearly why shoot in RAW."
Here is a picture.
This is an uncorrected JPEG converted from RAW without any adjustments. In fact - intra-camera JPEG. Twisting the same RAW in DxO, we get the following:
Now let's apply the same settings, but to the in-camera JPEG. And compare:
Do you understand? On the left, it turns out as if we took a JPEG from the camera for the source. Right - if processed RAW.
So, go directly to RAW converters.
The following programs were included in the review:
- Adobe Camera RAW (Adobe Lightroom 3 Beta, Adobe Photoshop CS 4)
- ACDSee Pro Photo Manager 3
- Bibble 5 Pro
- DxO Optics Pro 6
- Nikon Capture NX 2
- CaptureOne 5 Pro
All these converters are designed to work under Windows XP / Vista / 7.
The review did not include:
- Corel Photo Paint X3. He also knows how to convert raw files, but it would be better if he could not.
- Converters that work only under Linux, Mac OS, etc.
- SilkyPix Developer Studio Pro 4.0. For some unknown reason refused to run on my system.
- Ufraw and RawTherapee (dcraw) because perversion.
Adobe Camera Raw (Lightroom 3 Beta, Photoshop CS 4)
Program website: www.adobe.com
Cost of Adobe Lightoom 2.6: about 11,000 rubles.
Supported formats: opening files of any raw and raster formats, saving in JPEG, TIFF, PSD, DNG, original.
Adobe Camera Raw (hereinafter ACR) is not a standalone program, but a plug-in for Adobe Photoshop, as well as the basis for Lightroom. Moreover, Photoshop CS 4 currently uses ACR version 5.6, and the latest Lightroom Beta 3 uses ACR version 6.0. ACR produces excellent quality pictures and has a lot of settings. Perhaps Adobe Lightroom is generally the most famous and used RAW converter. The program can remove chromatic aberration, vignetting and other image defects (in manual mode). The possibility of noise cancellation has also been implemented (partially disabled in the ACR 6 version). Among other things, Lightroom has rich cataloging, photo sorting, web preview generation, and supports many camera color profiles to display colors correctly. The strong points of the converter are speed, high image quality, integration with flickr.com, as well as the ability to save a set of settings in the so-called. "presets". This means that for the same type of processing of a series of photos, you need to process one frame, save the settings and then apply them to all other frames in the series. The program has a simple and logical user interface and is perfect for fast processing of large volumes of photos. Third party plugins are supported.
Useful links:
- sensible 2-hour lecture on Lightroom;
- 436 Lightroom presets;
- LJ community dedicated to Lightroom, where you can ask any question that interests you.
Also try holding Ctrl + Alt + Shift and clicking on the "Help" -> "About Adobe Photoshop Lightroom" menu =)
Bibble 5 Pro
Program website: www.bibblelabs.com
Price: $200
Supported formats: opening files of any raw and raster formats, saving in JPEG and TIFF.
The oldest of the RAW converters, Bibble dates back to 2000. Everything in it is arranged simply clearly and understandably. On the left is the folder tree, in the middle is the processed image, on the right is the settings panel, of which, frankly, there are so few of them. Only the most basic adjustments for exposure, color, white balance are available. It is possible to rotate the image to an arbitrary angle, it is possible to create presets of settings. Interestingly, the module (comes as standard) for emulating a film picture. In general - poor thing. it is not always possible to track changes in the picture using the histogram. But everything works just with reactive speed. Files are loaded quickly, converted in 2-3 seconds. The interface is minimalistic and straightforward. Perhaps Bibble will be for you the very program with which you start communicating with the RAW format.
DxO Optics Pro 6
Program website: www.dxo.com
Price:$ 149 / $ 299 Pro Edition / Elite Edition
Supported formats: opening files of any raw and raster formats, saving in JPEG, TIFF and DNG.
A program that is not particularly well known in our country, which provides extremely interesting opportunities. First of all, there are simple tools for correcting geometric distortions of the frame, "blockages" of objects at the edges of the picture, arising from shooting with a wide-angle lens. Also, the program is able to completely automatically correct distortion, depending on the camera and the optics with which the frame was taken; data is taken from EXIF "a. At the beginning of working with a picture, the program reads the meta-data, climbs into the Internet and loads the necessary correction module. And - voila, the" pillow ", vignetting and chromatics disappear. Probably the best of all the programs mentioned here.In general, all settings in DxO Optics have Auto position, which will help you significantly save time when working with photos.The output picture is bright and contrasty.The workflow is also clear and simple: choosing photos (adding them to a virtual project), correction, converting and viewing. Of the minuses - functionality of local color correction, as well as low speed of the conversion itself. On a 4-core AMD Phenom 9950 2.6 GHz processor and 4 GB of RAM, about 40 -50 seconds depending on the number of settings applied.
Phase One Capture One 5
Program website: www.phaseone.com
Price:$ 129 / $ 299 CaptureOne 5/5 Pro
Supported formats: opening all RAW-formats, saving in any raster format.
Initially, the program was designed to work with Phase One digital backdrops, but later it began to support the most common raw formats. The main charm is in a huge number of settings, for example, High Dynamic Range (there is little sense, however, it is not enough), the Color Editor based on the color wheel, a separate tool for correcting skin color, etc. In terms of color settings, this is the richest program ... I would also like to note the excellent implementation of the mechanism for increasing the lens, which is similar in action to Smart Sharpen (Remove Lens Blur). However, the instruments do not have automatic modes, and the output katrinka is not the best for my taste. If you want to get a good result, you will have to adjust the picture for a long time and painstakingly by hand.
Well, now a comparison of pictures. Everything was set up like this:
- set the noise reduction to Auto in each converter. Where there is no Auto, we select the best option with our hands;
- where possible, select the Neutral profile settings;
- correction of distortion, vignetting, chromaticity - back Auto;
- we do not touch the rest.
It is clear that all this does not pretend to be a strict comparison. But you can get a general idea. Those interested can download full sizes (JPEG, q = 100%).
JPEG, 45 MB
JPEG, 43 MB
- ACDSee - when the frame is made at low ISO, without aberrations, and will be finalized in Photoshop.
- CaptureNX - if your Nikon + frame needs to be tricky to pull up somehow.
- Capture One - Complicated. It seems that I don't like it just because I don't know how to use it =)
- DxO. The absolute winner. For guys with powerful hardware.
© 2014 site
The electrical signal generated at the moment of shooting by the matrix of a digital camera enters the camera's processor in the form of an array of digitized, but not yet processed, or, if you like, "raw" data. This data is then either written without further processing to the memory card in the form of so-called. RAW files, or they are pre-processed by the camera's processor, which forms on their basis a full-fledged image and saves it in the JPEG format. JPEG photographs are the final product of the photographic process and are fully usable for viewing, printing, publishing on the Internet, or any other practical need. Images saved as RAW files must be edited in a special converter program that allows you to convert the raw data provided by the matrix into a graphic image in JPEG or TIFF format. Shooting in RAW is used in cases when the photographer, for one reason or another, does not want to trust the processing of the image to the camera's processor and prefers to carry out the conversion on his own. In any case, all digital photographs are born as RAW data, and the end result is JPEG, but manual conversion provides more control over the properties of the final image compared to automatic in-camera conversion. It is important to understand that using RAW does not necessarily lead to better image quality, it just makes the process of taking a photo more manageable and predictable.
While JPEG is a legitimate graphics format with the extension .jpg, RAW does not stand for a separate file format, but rather a family of formats that have different specifications and extensions depending on the camera manufacturer: .cr2 (Canon), .nef (Nikon) , .arw (Sony), .pef (Pentax), .orf (Olympus), .raf (Fujifilm), etc.
In addition to the digitized brightness values for each photodiode of the sensor, the RAW file contains a JPEG image generated by the camera required for previewing, as well as various metadata, such as: specifications of the camera and its matrix, a description of exposure parameters, settings for white balance and image styles, date, etc. shooting time.
By its very nature, a RAW file is not an image, but it contains the information required to form an image. Because of this, a RAW file is often compared to a film negative in traditional photography. Digital negative is a good metaphor. Just as a traditional negative containing a latent image after exposure needs to be developed, a RAW file needs to be converted in order for the latent image to be released. And just like a traditional photographer has a choice: to give the captured film to a darkroom for automatic development and printing, or to develop and print with his own hands, controlling all the nuances of the photo process, so an unconventional digital photographer can choose: whether to entrust the conversion to the camera's processor or edit the files manually using RAW -converter.
Even though I shoot mostly RAW myself, I'm not encouraging you to follow my lead. This is an individual matter. Both RAW and JPEG have their own unique advantages and disadvantages, and therefore neither approach can be considered the absolute best.
Benefits of JPEG
- Shooting in JPEG saves time. Manual processing of images is not a quick process and requires special skills.
- A JPEG shot with a good camera looks better than a poorly edited RAW.
- JPEG files take up much less space on both the memory card and hard disk. Storing large numbers of RAW files eats up disk space faster than you would like.
- Since small files are written to the memory card faster, the camera's buffer is also emptied faster, allowing longer bursts to be taken with continuous shooting.
- JPEG is the most versatile and popular graphics format. Photos in JPEG are completely ready for use immediately after shooting. They can be easily opened in any program, and after decades they will still be available for viewing and editing. At the same time, RAW files cannot be rendered directly and need a specific converter that supports a specific RAW format, a specific camera and a specific lens. Photo equipment manufacturers have a nasty habit of changing their own standards from time to time, and no one can guarantee that current RAW files will be readable in the future.
Benefits of RAW
- RAW files are 12 to 14 bits (4096-16384 gradations), while JPEGs are only 8 bits (256 gradations). The high bit depth makes very bold image manipulations possible without the risk of posterization and other artifacts. The difference between RAW and JPEG is especially noticeable when trying to lighten dark areas of the frame.
- The photographic width of the RAW file is several stops higher than that of JPEG, which is important when shooting in contrasting lighting conditions.
- A RAW file does not formally have a color space, and all color manipulations are performed before converting the data to the sRGB gamut of the final file.
- White balance can be adjusted after shooting.
- Brightness, contrast, color saturation, noise reduction, sharpening and other image parameters are under the full control of the photographer.
- Editing RAW files is non-destructive: the original data during processing remains intact and you can always return to it for a new conversion.
- Different RAW converters interpret the RAW file differently, allowing the photographer to choose the program according to their taste and image quality requirements.
Which format should you choose?
Many novice amateur photographers, having learned about the existence of RAW formats, come to the conclusion that they need to shoot only and exclusively in RAW, since this is supposedly a sign of professionalism. This is fundamentally wrong. Professionals use both RAW and JPEG with equal success depending on their needs. For example, landscape photographers usually operate on a relatively small number of photographs, but they value image quality and pay a lot of attention to the individual processing of each shot, and therefore work mainly with RAW. Photo reporters, on the other hand, shoot mostly in JPEG, because they know that their footage will still be published in a small size, but the editor needs to promptly submit the footage just shot as quickly as possible in a form ready for publication.
Let's try now to figure out which format suits you personally.
You should shoot in JPEG if ...
- You are new to photography. Indeed, if you are only going to shoot RAW because you want to be able to retroactively correct exposure or white balance errors, wouldn't it be better to learn how to avoid those mistakes first?
- Image quality is not critical. This is true not only for reports, but also for most amateur protocol shots.
- You are producing a huge amount of photos and do not want to waste time converting them.
- Your pictures don't need aggressive processing.
- You are completely satisfied with the way the photos look at the exit from the camera. People don't associate with RAW files because of the good life, and if you manage to achieve the desired result using the camera, then there is no need to complicate everything.
You should shoot in RAW if ...
- You have time, desire, surplus disk space, and confidence in your own advantage over a soulless machine.
- You tend to subject your photos to deep creative processing. This is where the redundant information contained in the RAW file comes in handy.
- You strive to make the most of the dynamic range of your camera's sensor.
- You are simply not satisfied with the way the photos look when they exit the camera, and you are convinced that they will look better when they exit the RAW converter.
RAW + JPEG
Some photographers prefer to shoot in RAW + JPEG mode, which allows each shot to be recorded in two formats at once. There is a grain of reason in this. You immediately get ready-made photos in JPEG format and, if they are in order, continue to work with them, and in those cases when in-camera processing did not cope with its task, you turn to RAW files and convert them manually.
If you are the type of person who personally edits most of your photos, then the extra JPEG becomes redundant. Shoot in RAW, and if you need an in-camera JPEG for some shots, it's easy to generate from a RAW file. The image processing software supplied with the camera (for example, Nikon View NX or Canon Digital Photo Professional) usually allows you to convert an image "as is", successfully simulating in-camera processing.
Tiff
I see no point in shooting in TIFF format, even if this option is present in your camera. TIFF contains already interpolated and processed data and therefore cannot serve as an alternative to RAW if you plan to seriously edit your images. Also, TIFF has no practical advantage over JPEG, although it takes up much more space. At the same time, the TIFF format is quite appropriate for intermediate processing of already converted photos, as well as for their subsequent storage.
When shooting in JPEG, your work on the photograph should be considered largely complete as soon as the shutter is released. In this regard, all decisions affecting the final appearance of the image must be made in advance, and the camera settings must fully meet the shooting conditions.
Exposition
The exposition must be flawless. You will be able to lighten the shadows slightly, but the overexposed areas will be lost forever. When determining the exposure, one should focus on subjects that are significant to the subject, even if this automatically leads to overexposure or underexposure of secondary elements of the frame.
White balance
White balance needs to be determined as carefully as possible, since color correcting a JPEG file can be a headache. Learn to fine-tune the white balance, and in the most demanding situations, manually set the white balance.
Picture style
The Picture Style determines the overall appearance of a photo and affects parameters such as contrast, brightness, color saturation, color balance, and sharpness. Despite the fact that all these properties can be adjusted in Photoshop, it is still advisable to immediately guess with the style at the time of shooting. When in doubt, opt for more neutral styles with lower values for contrast, saturation, and sharpness, as these parameters are easy enough to increase later, but very difficult to decrease without damaging the image.
Quality
I advise you to shoot in high quality, i.e. with the lowest compression ratio. You can always resave images with lower quality, but you can't get rid of over-compression artifacts. Choose the resolution based on practical needs.
Color space
If sRGB is not set by default, then you must manually select sRGB. This is the most versatile color space and by choosing it, you insure against incorrect display of colors in various programs.
Noise reduction
It is advisable to choose the minimum required level of noise reduction so that the photos do not acquire an overly glossy look. Even better, the camera can automatically adjust the noise reduction level according to the ISO sensitivity.
Editing
As stated many times, JPEG is not designed for deep processing, but minimalist editing can be perfectly acceptable. Acceptable: slight increase in contrast and color saturation, selective sharpening, delicate brightening and darkening. Retouching debris and acne is also not a crime.
Shooting in RAW should be with an eye on the subsequent processing of the frame. When choosing shooting parameters, you should not only take into account the current conditions, but also plan in advance the further stages of the implementation of your creative idea. The more clearly you imagine the strategy for converting a future photo, the more controllable the entire photo process will be.
Exposition
Expose by light, guided by the ETTR (Exposure To The Right) principle. If the scene has high contrast, the photo may turn out to be quite dark. It doesn't matter - you can easily brighten it in the RAW converter while preserving the details in the highlights. It should be remembered that at the time of shooting you are trying to get not the final result, but rather a preparation for future photography.
If you are using a histogram to determine exposure, then remember that it is calculated based on a JPEG thumbnail, which means it is influenced by white balance and image styles and in some cases can lie about the actual exposure. Over time, you will learn to recognize these situations and make adjustments accordingly.
White balance
White balance settings at the time of shooting do not affect the RAW data in any way, but they do affect the histogram, and therefore it makes sense to adjust the white balance at least approximately by choosing one of the preset modes. You will do the fine tuning later.
Picture style
The choice of the picture style, again, does not oblige you to anything, but personally I am pleased when the photo looks more or less presentable on the camera screen. If you don't have time for aesthetics like this, then just choose Neutral or Faithfull.
Quality
Color space
The color space set in the camera (sRGB or Adobe RGB) has absolutely no meaning and does not in any way limit the really important color space choices that come out of the RAW converter. However, I prefer to have sRGB selected in the camera in case I feel like shooting in JPEG.
Noise reduction
Noise reduction settings can be safely ignored, with the exception of long exposure subtractive dark noise suppression. The latter affects both JPEG and RAW.
Editing
My personal procedure for converting RAW files is described in sufficient detail in the article "How to use Adobe Camera Raw". The popular editor-cataloger Adobe Lightroom uses the Camera Raw engine, and therefore conversion to Lightroom can be carried out using a similar protocol. DxO Optics Pro and Phase One Capture One PRO are also good converters. The programs offered by the manufacturers of photographic equipment are not very convenient, and their only purpose, in my opinion, is to quickly convert RAW to JPEG using camera settings.
Thank you for the attention!
Vasily A.
Post scriptum
If the article turned out to be useful and informative for you, you can kindly support the project by contributing to its development. If you don't like the article, but you have thoughts on how to make it better, your criticism will be accepted with no less gratitude.
Please be aware that this article is subject to copyright. Reprinting and quoting are permissible provided there is a valid link to the source, and the text used should not be distorted or modified in any way.
Raw (English raw - raw, unprocessed) - a digital photograph format containing raw data obtained from a photomatrix. Such files contain complete information about the stored signal, which does not have a clear specification (standard).
The RAW format in digital photography corresponds to the negative in film: it contains raw pixel information directly from the sensor of a digital camera.
Digital camera raw files typically contain:
- discrete voltage values of matrix elements (before interpolation for matrices using arrays of color filters)
- metadata - camera identification;
- metadata - technical description of shooting conditions;
- metadata - default processing parameters;
- "preview", usually a JPEG of medium quality.
The RAW file did not even go through dematrization.
Dematrization is a complex process, so most digital cameras use quality-influencing simplifications to convert a RAW file to TIFF or JPEG. A personal computer with a more powerful processor allows for more advanced algorithms. The same goes for image sharpness correction, which is computationally intensive. A RAW file simply contains the values of red, green, or blue in each of the pixels. Typically digital cameras process this file into a full color JPEG or TIFF file and write the result to the memory card.
When processing a RAW file, digital cameras must make several fundamental decisions, and therefore the original RAW gives the author more control over how the final JPEG or TIFF will look. The author himself chooses the necessary parameters in the process of converting the RAW format to JPEG on a computer.
The RAW file is converted to the final JPEG or TIFF image in several steps, each of which can make irreversible adjustments to the image. One of the key advantages of the RAW format is that it allows the photographer to make corrections on their own, as required by each image.
Types of RAW formats
Each manufacturer of photographic equipment at one time developed its own RAW format for its own camera matrices:
- .nef, .nrw for Nikon;
- .crw, .cr2 - Canon;
- .arw, .srf, .sr2 - Sony;
- .orf - Olympus;
- .raw, .rw2 for Panasonic;
- .raf - Fujifilm;
- .ptx, .pef - Pentax;
- .raw, .rwl, .dng - Leica;
- .srw - Samsung;
- .dcr, .kdc - Kodak;
- .mrw - Minolta;
- .3fr - Hasselblad;
- .x3f - Sigma;
- .dng - Adobe;
- .bay - Casio;
- .erf for Epson;
- .r3d - Red One.
Benefits of converting RAW to JPEG on a personal computer
Dematrization
Dematrization is a very resource-intensive stage, and therefore the best dematrization algorithms require more processing power than modern digital cameras have. Applying dematrization to a personal computer allows for better algorithms, since its processor is usually much more powerful than that of a typical digital camera. Better algorithms can squeeze a little more out of your camera's sensor for higher resolution, less noise, more accurate tints, and less moiré.
Flexible white balance
White balance is the process of eliminating unnatural color relationships so that objects that are white will appear as white in your photo. The color ratio in a JPEG image can often be changed by post-processing, but at the expense of color depth and color gamut. This is due to the fact that white balance is essentially applied twice: first when converting RAW and then again during post-processing. RAW files give you the ability to apply white balance to your photo after shooting - without wasted bit loss.
High bit depth
In fact, digital cameras record each color channel with much greater precision than the 8 bits (256 levels) per channel used in JPEG images (see “What is bit depth”). Most modern cameras record each channel in 12-bit precision (2 12 = 4096 levels), providing several times more color gradations than can be achieved using JPEG from the camera. Higher bit depths reduce the susceptibility of an image to posterization and increases flexibility in color space selection and post-processing.
Dynamic range and exposure compensation
The RAW format usually provides a much higher "dynamic range" than JPEG, depending on how the camera creates its JPEG. Dynamic range is defined as the interval of light and shadow that the camera can distinguish between completely black and completely white. Since the original color data was not logged using curves, the exposure in the RAW file can be subject to later exposure compensation. Exposure compensation allows you to correct metering error, or it can help bring out details lost in highlights or shadows.
Enhanced clarity
Since the RAW file was not processed, the camera did not apply any sharpness correction to it. As with dematrization, better sharpening algorithms are more resource intensive. Thus, sharpening performed on a personal computer can cause fewer halo defects with the same degree of correction.
Since sharpness depends on the intended viewing distance of your image, RAW also gives you more control over what type and amount of sharpening is applied (at your discretion). Sharpening is usually the final step in post-processing because it cannot be undone, so having a JPEG already corrected is not optimal.
Lossless compression
RAW uses lossless compression and therefore does not suffer from the compression artifacts seen with “lossy” JPEG compression. RAW files contain more information and are better compressed than TIFF, and, moreover, without the compression defects of the JPEG format.
Disadvantages of RAW format
- RAW files are much larger than comparable JPEG files and therefore fill the memory card faster.
- RAW files take longer to process as they may require manual work at every stage of conversion.
- RAW files often take longer to write to the memory card, resulting in fewer frames per second than when using the JPEG format.
- RAW files cannot be immediately presented to viewers and customers, since they require special programs for their download, and therefore they must first be converted to JPEG.
- RAW files require a more powerful computer with more random access memory (RAM).
Other considerations
One of the problems with the RAW format is that it is not standardized. Each camera has its own RAW format, and it may be that one program is not able to read all formats. Fortunately, Adobe has announced a Digital Negative Specification (DNG) to standardize the RAW format. In addition, any camera that is capable of storing RAW files must come with its own program to read them.
Good RAW conversion software can do batch processing and will often automate all the conversion steps except those you want to change. This can reduce or even eliminate the ease-of-use advantage of JPEG files.
Many newer cameras are capable of recording both RAW and JPEG at the same time. This allows you to immediately get the final image, but also keep the "negative" in RAW in case you want more flexibility later.
Outcomes
So which is better, RAW or JPEG? There is no definite answer, as it depends on the type of shooting. In most cases, RAW files are the best solution due to their technical advantages and the falling cost of large memory cards. RAW files give the photographer a lot more control, but at the expense of processing speed, footprint and ease of use. Sometimes the RAW hassle for sports and journalism isn't worth it, and landscape and art photographers often choose RAW to get the most out of their digital cameras.