Hello, friends! This article will show you how easy it is to record video from the monitor screen using Camtasia Studio, how to edit and convert video.
Camtasia Studio is the best tool for a beginner
It's no secret that the Camtasia Studio program is very popular with people who work on the Internet. It is used by most bloggers, the program is used to create their own information products, to earn money via the Internet.
The Kamtasia Studio program is the best suited for creating various training lessons and video courses. Now there are various versions of platforms on the Internet, the seventh and eighth are considered the most popular versions. There are Russian-language, there are English-language versions.
The Camtasia Studio program has a large arsenal of tools, has great opportunities. Working with beginners, it turned out that beginners do not need the extra bells and whistles of this platform, beginners need only three functions of the Camtasia Studio program - record video from the monitor screen, perform simple editing and convert the created video to mp4 format.
Despite the fact that the Internet is full of training courses on working with the Camtasia Studio program, they are of little interest to beginners. Why? The fact is that they do not need information on working with extra (for beginners) functionality, they need simple instruction for recording, editing and converting. Beginners do not want to spend extra time and study what they do not need now. For this reason, I decided to give such a simple instruction in this article.
The instruction will be presented in a short video, which will show a step-by-step algorithm for working with the Camtasia Studio program. The instructions will show only three actions - recording from the monitor screen, editing video and audio, converting the resulting video to mp4 format.
So, to start working with the Camtasia Studio program, you must have it. Where to get it? Firstly, you can download it on the official TechSmith website, there are also Russian-language versions.
The program is paid, but you can download the program for free with a trial period of 30 days, and later decide whether to buy it or not. Secondly, the program can be downloaded on various torrents, as well as taken from friends. Next, you need to install the program on your computer. Installation is not difficult, and we will not consider this issue here.
When installing Camtasia on a computer, it is advisable to install a shortcut on the desktop. Next, the program opens, a little training is conducted on English language, which can be immediately closed, and also remove the welcome window. The program is not critical to installed system on a computer - it works well with both Windows XP and Windows 7, as well as later versions of Windows.
All the details of screen recording, audio settings, editing and converting the resulting video are shown in the attached video tutorial, see it below:
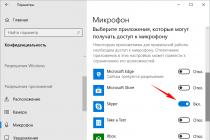
Very important setting is the audio recording setting. You can record video from the monitor screen and the sound that accompanies the video, for example, a video course. In this case, when setting up the audio, you should select a stereo mixer, or a line output. If you will record the monitor screen and at the same time accompany the video with your speech, then you need to select the “Microphone” mode or the “USB Microphone” mode from the webcam.
Important - before starting recording, the source should be shown by an indicator, if the indicator does not respond to sound, then everything is not in order with the sound, recording cannot be started. It happens that the computer is simply not configured sound card, for the sound to appear, this must be done.
The audio settings window looks a little different in Windows XP and Windows 7. The settings for Windows 7 are shown in the video, and for Windows XP are shown in the screenshot.

After recording, the video is easily edited and converted to many formats, we will only consider mp4. Watch the video lesson, apply the knowledge in practice and you will succeed, and over time, you will master other tools of the Kamtasia Studio program and begin to create professional video lessons and video courses. By the way, articles on the topic of working with the Camtasia program have already been published on the blog:
Good luck to you!
Get new blog articles straight to your inbox. Fill out the form, click the "Subscribe" button
Camtasia Studio - for recording screencast videos that demonstrate certain actions in games, software on the monitor screen.


You can download Camtasia Studio to your computer in Russian from the official website and full version through the bootloader for Windows 64-bit by clicking on the links at the end of the description.
This is one of the necessary utilities in the system, because most of the presentation, educational and other videos in this area: video courses on working with a computer and other video tutorials were created using Camtasia Studio.
How to download Camtasia Studio 8 in Russian for free
Due to the fact that it came out a new version Camtasia screenshoter, build 8 is no longer relevant. The link below is available for downloading the ninth edition of the program in Russian.
"Studio" - it consists of several applications that include the main editing editor and the following utilities: Player, MenuMaker, Recorder.
However, usually only the Recorder is actually used, in which the computer screen is captured and Camtasia Studio itself, where the finished recording can be edited and published so that users, such as Youtube, can download it for free. You can download Camtasia Studio 9 in Russian for free from the official website at the link below immediately after the description.
If you have problems downloading, we recommend installing Yandex browser on a computer where you can connect a VPN and check downloaded files for viruses.
Saved projects in the program have the camproj extension, screen capture is in the camrec format. Camtasia Studio 8 and 9 works with image files (jpg/jpeg, png, bmp, gif) with audio (avi, wmv, mov, swf, wav, mp3, wma) and video (mp4, mpg/mpeg,).
You can record additional tracks during screen capture - these are pictures from a webcam and two audio streams: a signal from a microphone and sounds played in the operating system. The webcam is used by the authors of the video tutorials to explain the demonstration of the training material on the PC screen (the video recording will be displayed on the screen in the corner - “picture in picture”).
The microphone serves the same purpose. In the audio options, you can select a recording device and mark whether or not you need to record system sounds (everything that is heard in the speakers: sound, music in videos, etc.). The signal during microphone recording is controlled by the slider. Hotkeys are changed in the settings, there is also the format and location for saving the video.
What's new in the latest version of Camtasia Studio in English
Ready-made elements in the library are audio intros, effects and some other details, the interface has also been updated, it has become more stylish. As well as:
- new plugins for animation of pictures, video and text;
- added workflow markers and subtitles;
- 64-bit engine support for faster processing;
- editing the canvas and dragging objects onto it;
- color correction (brightness, contrast, saturation);
- interface update and feedback.
You can download Kamtasia Studio 9 for free for Windows 7, 8 and 10 (only for 64-bit) and in Russian in the full version from the link below.
You will get an excellent software for video recording, screen recording and screen capture all rolled into one!
Camtasia Studio is a very popular video recording and editing software. Inexperienced users may have various questions in the process of working with it. In this lesson, we will try to convey information to you in as much detail as possible about how to use the mentioned software.
We want to draw your attention right away that Camtasia Studio is distributed on a paid basis. Therefore, all the described actions will be performed in its free test version. Besides, official version programs for operating system Windows is only available in 64-bit.
Now let's go directly to the description of the functions of the software. For convenience, we will divide the article into two parts. In the first, we will look at the process of recording and capturing video, and in the second, the editing process. In addition, we separately mention the process of saving the result. Let's look at all the stages in more detail.
Video recording
This feature is one of the advantages of Camtasia Studio. It will allow you to record video from the desktop of your computer / laptop or from any running program. To do this, you will need to follow these steps:
- Launch the pre-installed Camtasia Studio.
- In the left upper corner windows is a button "Record". We click on it. In addition, a similar function is performed by the key combination "Ctrl + R".
- As a result, you will have a kind of frame around the perimeter of the desktop and a panel with recording settings. Let's take a look at this panel in more detail. It looks like this.
- On the left side of the menu are the options that are responsible for the captured area of the desktop. By pressing the button "full screen" will record all your actions within the desktop.
- If you press the button "Custom", then you can specify a specific area for video recording. Moreover, you can select both an arbitrary area on the desktop, and set the recording option specific application. In addition, by clicking on the line "Lock to application", you can fix the recording area on the desired application window. This means that when you move the application window, the recording area will follow.
- After selecting the area for recording, you need to configure the input devices. These include the camera, microphone, and audio system. You need to specify whether information from the listed devices will be recorded along with the video. To enable or disable parallel recording from a camcorder, you need to click on the corresponding button.
- By clicking on the downward arrow next to the button "Audio on", you can mark those sound devices that also need to record information. This can be either a microphone or an audio system (this includes all sounds made by the system and applications during recording). To enable or disable these options, you just need to check or uncheck the corresponding lines.
- By moving the slider next to the button "Audio on", you can set the volume of recorded sounds.
- In the top area of the settings panel, you will see the line "Effects". There are a few parameters here that are responsible for small visual and sound effects. These include mouse click sounds, on-screen annotations, and date and time displays. Moreover, the date and time are configured in a separate submenu. Options.
- In section Tools there is another subsection Options. It contains additional software settings. But the default settings are enough to start recording. Therefore, without the need, you can not change anything in these settings.
- When all preparations are completed, you can proceed directly to the recording. To do this, click on the big red button Rec, or press the key on the keyboard F9.
- A prompt will appear on the screen telling you hot key "F10". By clicking on this button, which is set by default, you will stop the recording process. After that, a countdown to the start of recording will appear.
- When the recording process starts, you will see a red Camtasia Studio icon in the toolbar. By clicking on it, you can call additional panel video recording control. Using this panel, you can stop the recording, delete it, reduce or increase the volume of the recorded sound, and also view the total duration of the recording.
- If you have recorded all necessary information, you need to press the button "F10" or button stop in the above panel. This will stop shooting.
- After that, the video will immediately open in the Camtasia Studio program itself. Then you can simply edit it, export it to various social networks, or simply save it to your computer / laptop. But we will talk about this in the next parts of the article.


Material processing and editing
After you finish filming the required footage, the video will automatically be uploaded to the Camtasia Studio library for editing. In addition, you can always skip the video recording process and just load another media file into the program for editing. To do this, you need to click on the line at the top of the window File, then in the drop-down menu, hover over the line Import. An additional list will move to the right, in which you need to click on the line Media. And in the window that opens, select desired file from the root directory of the system. 
Now let's move on to the editing process.
- On the left side of the window, you will see a list of sections with different effects that you can apply to your video. You need to click on the desired section, and then select the appropriate effect from the general list.
- Effects can be applied in different ways. For example, you can drag the desired filter onto the video itself, which is displayed in the center of the Camtasia Studio window.
- In addition, the selected sound or visual effect you can drag not to the video itself, but to its track in the timeline.
- If you click on the button "Properties", which is located on the right side of the editor window, you will open the file properties. In this menu, you can change the transparency of the video, its size, volume, position, and so on.
- The settings of the effects that you have applied to your file will also be displayed here. In our case, these are the playback speed settings. If you want to remove the applied filters, then you will need to click on the button in the form of a cross, which is located opposite the filter name.
- Some effect settings are displayed in a separate video properties tab. You can see an example of such a display in the image below.
- You can learn more about the different effects and how to apply them in our dedicated article.
- You can also easily trim the audio track or video. To do this, you need to select the part of the recording on the timeline that you want to delete. The special flags green (beginning) and red (end) are responsible for this. By default, they are attached to a special slider on the timeline.
- You just need to pull them, thereby determining the required area. After that, right-click on the marked area and select the item from the drop-down menu. Cut or just press the key combination "Ctrl+X".
- In addition, you can always copy or delete the selected section of the track. Please note that when you delete the selected area, the track will be broken. In this case, you will have to connect it yourself. And when cutting out a section, the track will be automatically glued together.
- Also, you can simply split your video into several pieces. To do this, put a marker in the place where you want to separate. After that you need to press the button Split on the timeline control panel or just press the key "S" on keyboard.
- If you want to overlay music on your video, then simply open the music file as indicated at the beginning of this section of the article. After that, just drag the file to the timeline to another track.


That's actually all the basic editing functions that we would like to tell you about today. Let's now move on to the final step in working with Camtasia Studio.
Saving the result
As any editor should, Camtasia Studio allows you to save the captured and/or edited video to your computer. But besides this, the result can be immediately published in popular in social networks. Here's what the process looks like in practice.


This concludes this article. We have covered the main points that will help you use Camtasia Studio almost fully. We hope you get it for yourself useful information from our lesson. If after reading you still have questions about using the editor, then write them in the comments to this article. We will pay attention to everyone, and also try to give the most detailed answer.
Hello dear readers!
How many times have you filmed a family celebration yourself in order to save money on the services of a videographer? Many?
Then you know that you can get a beautiful and colorful film only with the use of special programs.
Or maybe you need to record a video lesson? Both can be done with a great program like Camtasia Studio.
Brief overview of Camtasia Studio
Camtasia Studio is one of the most popular video editing applications. Despite the fact that the program is only partially in Russian, it has clear interface. Thanks to the availability of detailed documentation, anyone can create a video using this product.
The whole process of creating a video is divided into 3 stages:
- record
- editing
- saving the video.
The product applies to Online resource of developers both free (demo version) and paid.
Before using this program, please familiarize yourself with the offered functions.
As a first step, Camtasia Studio offers built-in screen recording tools. As part of this product, there are a large number of various recording settings:
The next step is editing. For video editing, the program provides you with a huge set of tools for working with video files:

At the last stage of video creation, the program offers to use the built-in Production Wizard, which is an indispensable assistant. Even if you have never used video editors before, you will succeed. Step by step follow all the necessary steps, and the project will be ready.

How to use Camtasia Studio?
For clarity, I suggest using an example. I want to tell you how to record a TV broadcast from the monitor screen. You can do this in two ways:
- by clicking on the “Record the screen” button located at the top of the program window;
- selecting Screen Recording from the Tools menu.
In the first case, you will see a special menu and a dotted area, the parameters of which can be changed. By clicking on "Full Screen" you can select the entire screen.
The chain icon allows you to set a rigid link between the width and height of the survey area. If you press it, changing one parameter will change the second.
To start recording, press the red "Rec" button, and to end - on "F10".

When recording is stopped, the player will automatically launch and the captured video can be played back. After viewing, you can either save the project (by clicking on the floppy image) or delete it (by clicking on the trash can).
After saving the project, the program automatically proceeds to editing it. At this stage, you should first note the vertical and horizontal resolution.
You can add music to the video. To do this, click the "Import media" button located at the top of the window and select the music file stored on your computer. Drag the selected music track to the timeline.

When creating a video tutorial, ScreenDraw technology may come in handy. Its essence is that you can draw arrows, circles, and more in the process of recording a video. In write mode, press the key combination CTRL + SHIFT + D and at the bottom you will see a panel with drawing tools.
To add cursor effects, go to the “Effects Options” menu on the Cursor tab. In this window, you can choose not only the type of cursor, but also set its highlighting for each mouse click (left and right).

When all the necessary changes are made, the video needs to be saved. To do this, go to the main menu “file” item “create and publish”. You can choose "custom project settings" or set your own.
Then choose the appropriate format or leave everything as default.
Congratulations, you've created a video!
As you can see, everything is very simple! However, do not forget that the Camtasia Studio program is just a tool, the same as, for example, a paint brush.
Can an untrained person, having only one brush and paints, draw a masterpiece? Of course not. So in our case - having only one program, even if it is as beautiful as Camtasia Studio, you will not be able to create professional screencasts until you learn this art.
I hope today's material was useful for you. Share the link to the article on social media. networks, your friends may also want to create their own video. Subscribe to blog updates and see you soon in a new article. Bye!
Sincerely! Abdullin Ruslan
Hello friends!
In this article I will tell you about such an interesting program as Camtasia Studio 7... We will consider such points: what is it for, where to download it, how to install it, and finally - how to use it!
And also, some information about its prototypes, both paid and free!
And now, as always, a few of my stories ...
Everyone probably already knows or heard something about the fact that I want to create a separate section on the blog ( page) « Articles on order!“... But, somehow I don’t dare ... But is it necessary at all?
There are already about five posts on my blog under the so-called order, I myself make such requests to my readers. But, in order to somehow expand this issue - this is still deaf ...
In general, the idea is not bad, as for me ... People order posts and get answers to their questions absolutely free! And I will always have a couple of additional topics for writing a new post!
In this regard, I need the advice of my readers! I look forward to your advice, suggestions, or just opinions in the comments! Don't be lazy - write a couple of lines!
Friends, you must also be waiting for the release of my two e-books?
No, this does not mean that I'm lazy and my words mean nothing!
On the contrary, it’s even good that a bunch of promises and announcements hang on the blog - this means that the author really works and he is overwhelmed with a bunch of ideas, for the implementation of which there is simply not enough time ...
Yes, we are all masters of excuses, and there is also a little laziness in my words ... But, how could it be without it?
In his post "The most necessary and useful programs for the user and the webmaster!” I received another order and, accordingly, today's topic will go to its implementation.
Order still received 12 Mar 2014... From whom and how - I will not shoot a person! ( hint: link to the article above - look for a comment that was written by Irina ...)
Perhaps my active reader has already found all the answers to his questions and is not waiting for my article, but I will write anyway, but suddenly ...
Output " camtasia studio 7 training"Really delayed and maybe I have already lost my authority in the eyes of this person ...
To be honest, when I found out that I would have to write about Camtasia, there was only one thing in my head: “This is tough!”. Despite the fact that I started using this program, half of the tools are not even known to me ...
From the outside, it looked like I took the order and hid in a mink, like some kind of cowardly hare ... But, it wasn’t there - I’m a Hedgehog!
But, over time, my opinion began to change, I figured out my problems, which I wrote about, and today I will make a cool review!
After all, I know the basis and now I will tell you about it! Why not? Especially since I promised...
Well, it's time to talk about business!
Camtasia studio 7 training, or a guide for dummies…
What is this program for?
Camtasia Studio, one of the most popular screen capture programs, offers a flexible and friendly work environment and a smooth workflow that makes learning much easier and keeps editing time to a minimum.
Getting started making videos with Camtasia Studio is very easy. You will be able to follow the process and easily find help in case of a problem, as the program has detailed documentation, and the entire video creation process is divided into 3 stages - recording, editing and producing the finished video.
I think everything is clear here! With this program, you can easily learn how to make so-called "screencasts"!
Screencast(English) screencast) is a digital video recording of information displayed on a computer screen, also known as video screen capture(lit. "video screen capture"). Often accompanied by voice commentary.
To create screencasts, not web or video cameras are used, but special software ...
After my voluminous introduction, I think everyone has already noticed my phrase " Camtasia Studio 7«…
Despite the fact that there are already newer versions of the program, I wrote not 8, but 7! Are you wondering why? Then listen...
And despite all this, my personal experience has become!
I also tried to download latest version and keep abreast of new events, but then I got tired of it all!
Let's just say I'm not a fan of licensed software and always use pirated copies… Like most of us, I just don’t have the opportunity to run and buy every time desired program at crazy prices!
The point was this:
The new versions of Camtasia that I found were all paid, but the so-called key was attached to them ( pill, key...)…
And everything would be fine, if not for one but! The license was given only for a couple of weeks ( about a month), then the program did not work and no keys helped anymore!
After this situation, I downloaded a couple more programs and the result was the same ... But in the end, everything stopped on the fact that even the new downloaded versions no longer worked in trial mode ...
Therefore, I decided to find more old version program, which in my opinion should have been free. My choice was Camtasia Studio 7!
Finding a normal full version was not so easy! There were similar problems as with 8 ...
If you take this in general, then in principle the versions are not much different! Everything you need is there!
Where to download camtasia studio 7?
IN Lately they began to tell me that I often do not give links to download programs ... So, today I will correct myself!
True, again there is a small “but” ... I wanted to throw my installation into the free storage and give you a direct link, but the installation disappeared somewhere ...
Okay, I don’t feel sorry for anything for you: I downloaded the program again and uploaded it to Dropbox!
Good news - the program has been found! You can download from the link below:
<<camtasia studio 7 free download>>
For this version, camtasia studio 7, no crack is needed! Since the program is almost translated into Russian:
* Camtasia Recorder and Camtasia Theater tools are not translated...
This can be seen in the description of the program, on the distributor's website:
Name: Camtasia Studio 7
Publication type: Repack
Purpose: video editor, screen recording, menu creation for CD/DVD, etc.
Developer: techsmith
Year: 2010
Platform: PC
Version: 7.0.1 Build 57Interface language: Russian*
* Camtasia Recorder and Camtasia Theater tools are not translated
Tablet: Sewn in (not required)
Well, even with this remark, the program will not cause you any trouble! It has been installed on my computer for a month now and no problems have arisen with it yet!
How to setup camtasia studio 7?
Most likely, this item can be attributed to the installation of the program itself, rather than to its configuration ... This is not the case when we need to adjust the program for ourselves, here it is most likely the opposite - we adapt to it! Or am I just missing something...
But still, let's see! Screenshots and a short description will help you with this step:
Starting installation... After opening boot file and a small download you will have such a window! Press - " Further«.
We confirm license agreement and get to the next window ...
Choose the path where the program will be installed! In my version, this is as shown in the figure above!
Read the paragraphs and put a tick at your discretion! In my case it is
Files are being installed and unpacked! And do not think that you will have time to run to the kitchen for a cup of tea - installation is guaranteed in less than a minute!
The program is installed and ready to run! If you selected the item “ Launch Camtasia Studio 7 after installation“, then after pressing the button “ Ready» The program will automatically start running!
But, if not, then just run the program through the shortcut that has already appeared on your desktop!
We are done with the installation! Now we can move on to the more interesting part...
Camtasia studio 7 how to use?
There are a lot of tools in this program and you can write a whole encyclopedia, so I will give you the basics! And I’ll supplement the rest with a video lesson: mine, or I’ll take it from someone for temporary use ...
Well, if I’m too lazy at all, then I’ll just take it and send you to the management of the program itself! No, I won't send...
The manual there is in English - this is another additional minus! Don't worry, finding a manual on the Internet will not be difficult for you! ( although, not the fact that there is in Russian ...)
After the first launch of the program in front of your nose, on working environment programs, there will be many open files and there will be a training video in the bourgeois language ...
Don't worry, you can close it all like this:
Also, after launching, you will constantly see the following window:
This is the so-called welcome screen"... It can be disabled: uncheck the box that you can see in the picture above and click" close"! After this action, the window will no longer bother you!
Now, I'll tell you a little about how to write these promising screencasts!
So you have open program... Click on this button:
After that, you will have such a system on your desktop:
Why am I here toiling, watch the video tutorials better!
Friends, I was looking for normal video tutorials especially for you for a very long time ( with normal clear voice and good explanation) and finally found it! I'm too lazy to write myself, but I'll start soon ...
In general, now I will put all the lessons in order and you will learn Camtasia Studio 7 by heart!
- Introduction
- Screen video recording
- Panel Recordings
- Video production from the project
And that's just part of the video tutorials...
Yes, this is somehow wrong - I send all my readers to a complete stranger!
I think all my readers will not run away from my blog! After all, they subscribe to me for a reason, which means there is a reason ...
I heard information that Azamat Ushanov has a good course on this subject... After watching his Youtube channel, I found two videos about Camtasia Studio... In principle, their essence is the same, but I chose the best one and decided to show you!
The information is certainly not for dummies, but at some points he motivated me!
And this is what my video lesson looked like if I recorded it:
I don’t know, I didn’t use that, I didn’t use it either, it’s all garbage, but nobody needs it ... And the reference is garbage! =)
How to uninstall camtasia studio 7?
If you have such a situation and you still want to delete this program… What should you do?
Everything is simple here ... The program is removed simply and without any difficulties!
It can be easily and simply removed even using the standard system applet - " »! ( Start - Control Panel - The installing and deleting of programms )
But, if you have Uninstaller, that's great too!
And finally, you have a small list of similar programs for recording video lessons:
- jing- a program for recording video, in addition, can take screenshots from the monitor screen.
- UV ScreenCamera- a program for recording video from the monitor screen.
- wink- recording video tutorials and screenshots.
- UltraVNC Screen Camera- Similar to Camtasia Studio. Screen video recording.
- tipcam- video recording.
- Total Screen Recorder- records video in avi, wmv, swf, flv formats.
- Virtual Dub- video recording.
- webineria- a program for recording video from the screen in AVI format.
- Fraps- video recording.
Today we will not talk about these programs!
My choice - Camtasia studio! Camtasia is simple and convenient!
That's all for today!
If you have any questions on this topic, or just need some advice - write everything in the comments! I will answer everyone and try to help!
Your inquisitive Hedgehog was with you ...