Modern hard drives(HDDs) are becoming more spacious and less expensive, and many people find it better to buy one large drive - 2 - 3 - 4 terabytes, than several small ones. But not everyone realizes what difficulties they will face when installing an operating system on such a disk. The fact is that disks larger than 2TiB use a non-standard, new type of data organization - the GPT partition table. It contains "surprises" that await the inexperienced user.
The main differences between GPT (new) and MBR (old) disks
- Partitioning disks according to the MBR standard cannot address space exceeding 2.2 TiB, and there are no restrictions for GPT disks (or rather, their limit is an astronomical number by our standards - 8.6 billion TiB).
- GPT disks can only install Windows 64-bit, starting with Windows Vista x64. Windows XP 64-bit and all x86 versions since Vista can write to and read data from GPT partitions, but cannot boot from them. Windows XP x86 and older do not support the GPT platform.
- The GPT partition table is part of the UEFI interface - the new BIOS, so to speak. Computers with traditional BIOS the GPT framework is not supported.
But that doesn't mean modern, roomy GPT hard drives can't be used the old fashioned way - on non-UEFI computers or to install 32-bit systems. You can: for this, the GPT partition table just needs to be converted to MBR. Part of the volume - the one outside 2.2 TiB, will be inaccessible, but nothing can be done about it.
Convert Partition Table from GPT to MBR
Work with hard drive up to 2 TiB
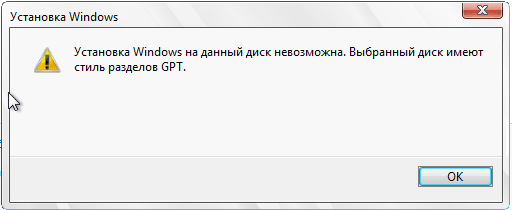
When installing Windows 7 x86 (32-bit) to a GPT disk, an error message pops up clearly stating the reason:
If your HDD less than 2 TiB, the problem will be solved by full formatting with the deletion of all partitions. This can be done through the "Disk settings" option from the distribution kit.
- When in the course Windows installations 7 you will get to the choice of the partition where to install the system, and you will see an error message - click the "Disk Setup" button.

- Select each section, starting from the bottom, and delete by pressing the button of the same name. You should have one total unallocated space equal to the size of your entire hard drive.

- Now you need to recreate each section. To do this, click the "Create" button, set the desired partition size and click "Apply". Repeat the operation as many times as you want to get sections. The system will ask you to allocate an area for its needs (boot partition 100 mb), it is desirable to agree.

- Formatting of the newly created partitions is done by clicking the "Format" button. After these steps, the hard partition table GPT disk will be converted to MBR suitable for 32-bit installation Windows versions 7. Further installation takes place without any peculiarities.
Working with a hard drive over 2TiB
To create MBR on disks, such large capacity utility required DiskPart included in the distribution kit of the seven. It starts and runs through command line.
- When you reach the choice of the installation location, start the command line by pressing “Shift” + “F10” on the keyboard. In the opened black window, enter: diskpart and press Enter.
- Next, command: list disk- to view all installed on the computer hard drives.
- Select the disk where you will create the MBR. If he is alone, enter the command select disk 0, if there are several - substitute the serial number of the disk that you need instead of zero.
- Next, delete all data and all markup from the selected HDD with the command clean.
- Command convert mbr converts GPT table to MBR.
- To close the console enter: exit.

- Then you can proceed to installing Windows 7.
Preparing a disk for installing Windows 7 using third-party programs: partitioning, formatting, and more
You can mark and format the HDD before installing Windows 7 using third-party programs, such as " Acronis Disk Director ”,“ Paragon Partition Manager ”, etc. There are enough applications for these purposes, but these two are familiar to very many and are the best in their class, so we will consider them.
Acronis Disk Director
Powerful disk management tool. Available in two versions - for Windows and as boot image... The second allows you to repartition, format, delete, move and recover volumes, transfer data from partition to partition without booting into Windows.
The principle of using Acronis Disk Director is intuitive - each of its options has a clear, unambiguous definition. The interface is English and Russian.

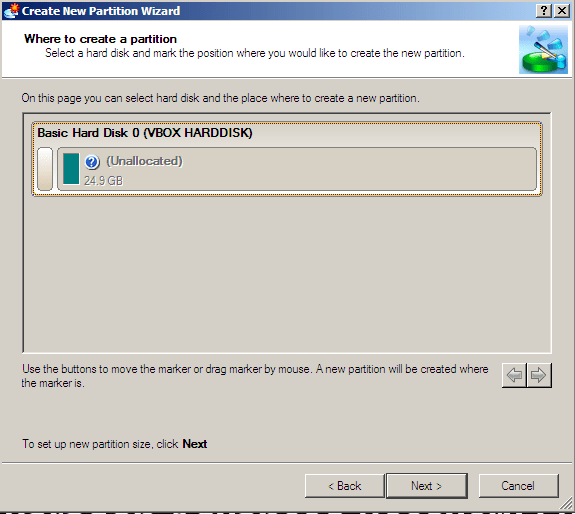
In order to divide the HDD into partitions and perform formatting in any of the proposed file systems (their list is quite solid), select the “Create partitions” item and follow the instructions of the wizard.

Acronis Disk Director has one very useful function- partition recovery wizard. It allows you to recover deleted volumes with all their data on a disk. Unless, of course, the information has been overwritten.

Paragon Partition Manager
Another fully featured set of disk management tools. It is a boot image with which you can do a lot of things: split disks into volumes, format in various file systems, do boot menus, create installation packages for OS distributions (not only Windows), manage system bootloaders, etc.
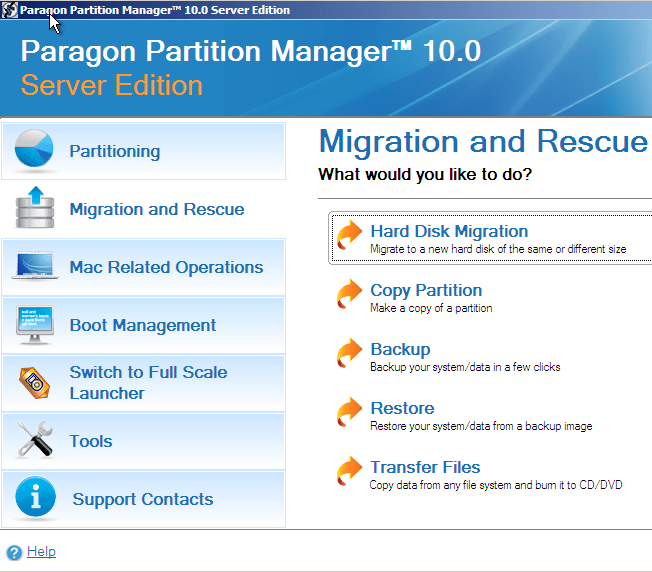
As for the functions of managing partitions, Paragon Partition Manager allows you to create, delete, divide, copy, restore, merge, make them backups and transfer to external media. You can even transfer the entire contents of your hard drive to another. In addition to the above, the application has network functions that make it possible to create a connection with other computers on the local network.
Despite the English-language interface, Partition Manager is quite easy to manage. Most of the options start a built-in wizard that guides the user through all the steps of the selected operation. It doesn't take much time to master the program, and the result of what is being done is always good.

Partition management, formatting and other operations through the disk manager
You can also redistribute disk space from under a running system through "Disk Management" - your own Windows tool 7. The tool is in the "Computer Management" set.
- Launch Control Panel and open the Administrative Tools application. Select Computer Management from the list of administrative tools.

- Next select "Disk Management".

- A "map" of hard disks and other storage devices installed on the computer will open before you - flash drives, memory cards and other things, if they are connected.
If the disks are divided into parts, the map will display each partition, otherwise called a volume, with its letter, size and type designation: primary or logical. Above is a table of properties of each volume. Here you can see which of them your system boots from - the boot partition has the "Active" attribute.
The active partition in Windows 7 is the 100-megabyte partition at the very beginning of the hard disk (MBR standard). It has no letter and does not appear in the explorer.
Right-clicking on one of the sections on the disk map opens a list of available commands: what operations can be performed on this volume.

So, on the logical partition D of our only hard disk, you can do the following:
- open (via explorer);
- change the letter;
- change the path to the disk;
- format;
- expand;
- squeeze;
- delete;
- view properties;
- read the help.
If you delete a volume letter, it will not appear in Windows Explorer like the rest of the hidden sections. Such as SYSTEM - where the Windows 7 bootloader is located, and the RECOVERY section. This protects the files stored there from accidental damage and deletion.
The “format” command will destroy all information, the “expand” and “shrink” commands are used to control the size of the partition. “Delete”, accordingly, will turn the selected area of the hard disk into unallocated space.
In a word, working with the disk manager is not difficult, but it requires attention and caution from the user.
Today I want to tell you about such a wonderful program as. What's so great about her? - you ask. And the fact that it can be used (data from a flash drive after formatting) or a disk, and the most interesting thing is that this program is available to anyone Windows user via the command line, in other words, does not require installation. And don't be intimidated by the phrase "command line" - its use is much more convenient and simpler than it seems at first glance.
So, after we inserted the flash drive into the USB connector, we launch the command line. To do this, click Start and in the search bar we write cmd, and press Enter.

In the command line that appears, we write, thereby launching the disk management program. Push Enter.


In the list of devices we find our USB flash drive - it can be recognized by its size. In my case it is Disc 6... Therefore, further we write the command. If your flash drive is number 4, then you need to enter the command. If under the number 2, then, respectively. Push Enter.

Then we enter the command clean, which will delete all files from a flash drive or disk. Push Enter.


Then we enter the command. Thus, we select the specified section and move the focus to it. Push Enter.

Then we execute the command. The system marks the partition as active. Push Enter.

Now it is necessary. It can be fast or complete. Full formatting is done with the command format fs = NTFS... If you don't want to wait and time is running out, then we do a quick formatting with the command format fs = NTFS QUICK... Push Enter.

We are waiting for the end of the formatting.

Now you need to assign a letter to the USB flash drive. We do this using the command assign... We press Enter.

A letter is automatically assigned to the USB flash drive, and after that, the media autorun is triggered.

Now you can exit the program. Enter the command exit and press Enter.

The last thing to do is to copy the operating system distribution files (the one for which we did bootable USB drive) on, in fact, our flash drive. After that, our flash drive will be bootable, and will boot absolutely everywhere, on any device. With its help, it will be possible to install your operating system anywhere.
I want to note that with the help of the program, you can carry out many manipulations with both hard drives() and with flash drives. The example considered today is only a small part of all the possibilities. I will consider other commands and examples of working with this program in the following articles.
Also read on this topic:
 Formatting a flash drive to NTFS
![]() How to recover data from a USB flash drive after deleting or formatting?
How to recover data from a USB flash drive after deleting or formatting?
 How to change disk size in Windows 2000 / XP / Vista / 7/8. Free of charge EaseUS program Partition Master Free
How to create a bootable UEFI USB stick for installing Windows 8.1 and 10?
How to change disk size in Windows 2000 / XP / Vista / 7/8. Free of charge EaseUS program Partition Master Free
How to create a bootable UEFI USB stick for installing Windows 8.1 and 10?
 How to freeze a row in Excel?
 How to create a disk image using Daemon Tools?
Almost all users of Windows-systems have heard about the presence in operating systems of such a tool as the command to format a disk or the "format c:" section. That's just not every user imagines the areas of using this tool, as well as the elimination of some problems that may arise at the formatting stage.
Windows 7 "format c:" command: what is it for?
Yes, indeed, this toolkit serves precisely for formatting hard disk or logical partition. But it works according to slightly different principles that are used in the operating systems themselves.
The "format c:" command (on Windows, "format c:" is used for formatting by default, but in others it may differ), can format disks and partitions different ways... For example, for removable media, fast formatting is most often used, for system disks - full format, sometimes it is necessary to create boot areas, etc.

The built-in tool, which can be called through the properties of the selected drive or removable media, does not always work. Damage to the file system can have its consequences, especially if a fast process is used. In addition, in the loaded and currently running operating system, format system disk impossible (the operating system itself is installed on it, and quite naturally, it does not allow itself to be deleted). We will return to these questions a little later, but for now let's see when exactly the use of the "format c:" command may be required (in Windows, "format c:", as it is already clear, can be used in an exclusively selective way and not for all media).
When is formatting required?
As for the scope of this command, for a start it is worth noting that it is in this form that it can be entered exclusively on the command line (using additional attributes). Although the built-in tool invoked through the GUI seems to be a complete counterpart to this service, this is not the case.

For example, many users are installing the system, so to speak, from scratch. In order for the installed OS of the same version over an existing, earlier or later modification not to inherit the system errors of the previous system partition, it is imperative to undergo a full formatting (and not a quick one, which only involves clearing the table of contents).
At the stage of installation, the installer itself will offer options for action. But quite often you can find situations when a message appears on the user's computer about the impossibility of performing such actions, since the selected partition belongs to GPT, and not to MBR. The solution to this problem is quite simple, but using the diskpart toolkit, followed by formatting.
Tool "format c:": how to format a partition in the system?
Let's start with the simplest option. Let's say the user's hard drive is divided into two sections (C and D). The first is systemic, the second is logical. The system will not allow you to perform actions with the C drive, but for the second section you can use the call to the drive properties through the RMB menu through the same "Explorer" and set the formatting. The same, by the way, applies to any kind of removable storage devices.
Don't like this way? Call the command line and write the required command in it, setting the required letter of the corresponding section.
Note: the "format c:" command in relation to the system partition works only if the second OS is installed in the virtual partition and only if it is booted at the moment. The explanation is simple: for example, the XP version is installed on the "C" drive, and Windows 7 on the "D" drive, which is currently loaded. Formatting the first disk will not be difficult, but only the system previously installed on it will be simply destroyed.
Formatting the system drive
Now a few words about the use of the "format c:" command in Windows 7, if only one operating system is installed on the computer. In this case, you cannot do without starting from a removable media. There are simply no other options.

Boot from a disk or flash drive, call the command console using the Shift + F10 combination, or use the recovery console, and then write the original command in its original form ("format c:") or select the proposed tool. You can, of course, add additional attributes indicating the change of the file system or quick formatting, but when it comes to completely cleaning up the content, it is better not to use such solutions. The same applies to the formatting process if viruses that cannot be removed by any means are in the system partition.
Command execution problems
Finally, execution of the "format c:" command may be blocked. In the case of installing two or more systems, this can only concern the fact that the command console itself is launched without the appropriate administrator rights.
When starting from a removable device, most often failures occur due to their damage (scratches on disks, the presence of file system errors on USB drives, etc.). Thus, before writing the installation distribution or recovery configuration to removable media of any type, you just need to check them visually or systematically).
Instead of a total
Of course, this is not all that can be said about the "format c:" command. If such a need is already ripe, additional attributes that can be used as an addition to the main tool can be viewed in the same command line by specifying "format /?" As the executable command, then choose a combination that is suitable for use in this situation ...

But this is only required if the user really needs such actions. Otherwise, you can use the standard string.
The command line is a program that allows you to manage operating system using special text expressions called commands. It is a versatile and advanced tool for diagnosing and fixing computer problems. Of all its functions, it is worth highlighting the ability to check for errors and format the disk through the command line in Windows.
The hard disk of a computer is a data storage for both the OS itself and users. A known weakness in Windows is its inability to clean up "trash" after itself: leftovers of unused files and uninstalled applications, registry problems and data writing. Therefore, periodically, among all other measures, it is necessary to diagnose whether there are errors. Also formatting may be required in many cases:
- When installing a new hard drive.
- In the presence of a large number of failures, glitches in work, virus infection.
- When reinstalling the OS.
Formatting is the layout of the data storage area, the formation of the file system, i.e. a set of logical rules by which access to the recorded information is carried out. Moreover, the old information is erased, the damaged areas of the hard drive are marked so that no data can be written there. Before formatting a hard disk, it is imperative to check it for errors.
Diagnostics with ChkDsk
Windows has a special tool called Check Disk (ChkDsk) that you run through the command line. It is possible to use it through the explorer window, but not with all parameters and other interface. The utility allows you to improve performance, fix problems and damage. Be sure to refer to this tool before deciding to format your media. Perhaps this will solve the problems of poor performance. To run the program do the following:

Disk check can be performed with different parameters:
- / f- fix errors;
- / v- shows the checked names of files and directories;
- / r- searches and repairs bad sectors;
- / I - check indexes with less thoroughness, used only for the NTFS file system;
- / x- with the f parameter forcibly dismounts the volume;
- / l: size- changes the log file to given size, only works with NTFS.
The parameter is written after the command, for example:

This means that the disk c will be checked, errors will be corrected automatically (/ f), sectors will also be checked for damage and an attempt will be made to recover information (/ r).
If checkdisk finds errors but cannot fix them, run the following command:
chkdsk with: / f / offlinescanandfix
This will make the so-called off-line diagnostics of the hard drive, you may also have to reboot.
Correct work of ChkDsk is possible only if the command line is run as administrator, and also only with FAT32 and NTFS.
Formatting
Formatting is a more radical way to tidy up your hard drive. All information on it will be lost, in most cases, it will no longer be possible to recover it. It depends on the chosen method and on the presence of damage. Exists special programs data recovery, but still it is better not to risk it and format the hard drive only after copying data from it to another medium.
Formatting via the command line can be done using the following algorithm:

As with ChkDsk, you can set parameters here. You can get help on the features with format / ?. Let's note the following most important ones:
- format with: / FS: filesystem - formatting in a specific file system, instead of "filesystem" you need to specify FAT32 or NTFS.
- / q - fast formatting. The table of contents is cleared, but the data itself is not destroyed. They continue to physically reside there, but Windows sees the disk as completely empty and writes information over the old data. If possible, we recommend that you do not use this option to avoid further media problems.
- / a: size-format with default cluster resizing.
- / v: label - create a volume label, that is, a disk name.
Formatting hard disk will allow you to use it again as new, increase its performance and eliminate errors. In conjunction with the ChkDsk and Format commands, you can also run commands such as DiskPart from the command line to partition the media into partitions with different sizes and names. Remember that if you bought and installed a new hard drive in your computer, you need to format it. And if you are simply not satisfied with the work of the old hard drive, try first to simply run a check using ChkDsk, especially if the OS is installed on it.
Command FORMAT allows you to format the disk / floppy in the command Windows prompt.
Command line format:
FORMAT volume
FORMAT volume
FORMAT volume
FORMAT volume
FORMAT volume
Command line parameters:
volume- Specifies a drive letter (followed by a colon), mount point, or volume name.
/ FS: filesystem- Indicates the type of file system (FAT, FAT32, NTFS, or UDF).
/ V: label- Volume label.
/ Q- Fast formatting. Overrides the / P option.
/ C- For NTFS only: Sets the default compression mode for all files created on the new volume.
/ X- Initiates unmounting the volume, as the first action, if necessary. All open volume descriptors will be invalid.
/ R: revision- for UDF only: Formatting in the specified UDF version (1.00, 1.02, 1.50, 2.00, 2.01, 2.50). By default, revision 2.01 is used.
/ D- UDF 2.50 only: Metadata will be duplicated.
/ A: size- Overrides the default cluster size. In general, it is recommended to use the default cluster sizes.
NTFS supports 512, 1024, 2048, 4096, 8192, 16KB, 32KB, 64K sizes.
FAT supports 512, 1024, 2048, 4096, 8192, 16KB, 32KB, 64KB, (128KB, 256KB for sector size> 512 bytes).
FAT32 supports 512, 1024, 2048, 4096, 8192, 16KB, 32KB, 64KB, (128KB, 256KB for sector size> 512 bytes).
exFAT supports sizes 512, 1024, 2048, 4096, 8192, 16KB, 32KB, 64KB, 128KB, 256KB, 512KB, 1MB, 2MB, 4MB, 8MB, 16MB, 32MB.
The FAT and FAT32 file systems impose the following limits on the number of clusters on a volume:
FAT: Number of FAT32 Clusters: 65 526 The FORMAT command will be aborted immediately if a violation of the above limits is found using the specified cluster size.
NTFS compression is not supported for clusters larger than 4096.
/ F: size- Specifies the size of floppy disks to be formatted (1.44)
/ T: tracks- The number of tracks on each side of the disc.
/ N: sectors- The number of sectors on each track.
/ P: times- Zeroes each sector of the volume the specified number of times. This option has no effect with the / Q option
/ S: state- Where "state" can be "enable" or "disable". Short names are enabled by default
Examples of using the command FORMAT:
format /?- display help on using the command
format /? | more- display help on using the command with page-by-page display mode.
format /? > C: \ formathelp.txt- display help on using the command with output to a text file C: \ formathelp.txt
format A:- format the floppy disk in drive A: with the default settings.
During command execution format messages are displayed:
Insert the new disk into drive A:
and press the ENTER key ...
File system type: FAT.
Check: 1.44 MB
The floppy disk will be formatted using the file system type FAT and a volume of 1.44 MB
If the disk to be formatted contains open files then the command format will give a warning:
The Format command cannot be run because the volume is in use by another process.
You can start Format if you unmount this volume first.
ALL OPEN VOLUME DESCRIPTIONS WILL BE FURTHER INCORRECT.
Are you confirming unmounting the volume?
The user has the option to undo or continue formatting by entering Y... After confirming the request, all files will be forced to close and the volume will be unmounted. This operation cannot be performed on the system disk.
The volume is disabled. ALL OPEN VOLUME DESCRIPTS BECAME WRONG.
After the start of formatting, information about its progress, a request for a volume label and the results are displayed:
File Allocation Table (FAT) is being initialized ...
Volume label (11 characters, ENTER - no label needed):
Formatting is complete.
1,457,664 bytes total on disk.
1,457,664 bytes available on disk.
512 bytes per cluster.
2847 clusters per disk.
12 bits in each FAT record.
Volume Serial Number: 3281-2839
FORMAT A: / T: 80 / N: 9- format floppy disk to FAT file system using geometry 80 tracks and 9 sectors per track (720kb floppy disk).
FORMAT F: / FS: NTFS- format a removable disk (flash drive) to the NTFS file system. Please note that NTFS is not supported on devices that are optimized for fast deletion. Therefore, in order to format a regular flash drive to NTFS, you need to change the optimization method, for which in the Windows Device Manager open the properties of the removable disk and go to the "Policy" tab
After installing the policy Optimize for execution formatting a flash drive partition to the NTFS file system will become possible:
Insert the new disk into drive F:
and press the ENTER key ...
File system type: FAT32.
New file system: NTFS.
format L: / fs: UDF / V: UDFTOM / Q- format the optical disk to the UDF (Universal Disk Format) file system. Formatted volume label - UDFTOM... Fast formatting (/ Q) is used, i.e. creating a table of contents without checking blocks. If the rewritable optical disc contains data, the program will ask for the label of the existing volume:
Enter a volume label for drive L: Disk19- label of an existing volume.
If the disk is not empty and the current volume format does not allow quick formatting, then the utility format will give a message:
Invalid current format.
The disc cannot be formatted quickly.
Start formatting unconditionally?
After answering Y formatting will continue:
Performing low-level formatting ...
Creation of file system structures.
Formatting is complete.
4.38 GB total disk space.
Available: 4.38 GB.
After formatting is complete, a rewritable optical disc with file system UDF can be used in both Explorer and the Windows command line to create, modify, and delete files and directories, just like a high-capacity floppy disk or USB flash drive.


