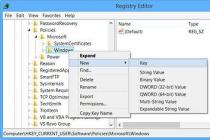
After creation boot disk Acronis Disk Director, insert it into our drive and restart the computer. During the reboot, a window will open where we select the item with the name of our program, as shown in the picture below.
The process of starting the program will begin, after it starts, in the window we will see the local volume that we need to split. As we can see the capacity of the volume that I will share is 24.9 GB of free space of 7.5 GB, your sizes will of course be different if you divide the disk on which it is located Windows system, then try to leave as much free space on this partition as possible. Select it and click on the item "Split volume", which is located in the left module of the window.

A window will open where in the " New volume size"we assign the capacity of our new partition, in my case 3.6 GB. You can also transfer the files you need to the partition being created, for this, check the box next to the item" transfer the selected files to the created volume "and press the select button, where we select the files that we want Click OK.

As we can see, our new section has already appeared, it remains only to start the process of creating this section.

To do this, at the top of the program, click on the "Apply pending operations" item that appears.

We check if everything suits us and click the continue button.

The volume splitting process begins. We are waiting for a while. After the process is over, restart your computer.

And as you can see in the picture below, the local disk has been created.

Oput your opinion on this article, and of course ask your questions if something suddenly went wrong with you.
Thank you for your attention!
For many PC users, work on the simplest setting operating system cause a feeling of apprehension and self-doubt. In turn, attempts to solve more complex problems requiring additional knowledge are self-destructed.
A striking example of this is the desire to break HDD(HDD) of a computer for several logical partitions using the Acronis program.
Many users are of the opinion that it is insanely difficult to work in Acronis Disk Director Suite, but we hasten to inform you that this is absolutely not the case.
This article will tell you in detail how to work with this program. Of course, we will not consider everything in a row, but will highlight the most basic manipulations with the HDD.
Instructions for creating logical disks in Acronis Disk Director
We launch the program.
If this is the first time you see the Acronis interface and do not know how to work with the program, then select “ Auto mode". In it, the most basic functions will be available.
Over time, when the key points are clear, you can experiment in the "Manual mode".
As a result, we see the following:

You need to click on the "Wizards" menu item.

As a rule, the first two points are the most demanded in work.
Consider "Creating Partitions"
For example, we have a 1 TB hard drive. Please note, this means that there is one HDD installed in the computer. In our example, the HDD is initially divided into three local partitions, and we will create another one, for this: press the item in the "Master" -> "Create partitions" menu, as a result we see the following:

To create a new partition, we will use the space from the "E" drive.


During this process, Acronis will lock the partitions. In this state, you cannot change files and folder contents.

As you can see in the screenshot, it is possible to use only 354.4 MB.
note... Before partitioning a disk, it is necessary and only then to use its space.

Important... If the partition being created is needed only for storing files, then select the "Logical" type. If for system installation, then "Active". By switching the types of sections, you can study their purpose in detail.
This example shows how to create a logical drive to host data files.


Do not enter anything and continue.

Having divided the disk into two parts, you can put programs on the "C" drive, and on the created "I" drive, let it be like in my example, you can store files, movies, music, installation files, and everything else. you please !!
Sometimes it happens that the computer starts to freeze, does not turn on or turn on, but hangs, and no manipulations help.
So, if the computer began to glitch all the time, and nothing helps, then there is only one way out, "demolish Windows" and install it in a new way. In this case, when you reinstall Windows, your "I" disk will not be touched !! It is very comfortable!!
Of course, if you have a bad card, or something in your computer is serious, then this disk will not help you either !!! With the help of Acronis, you can easily divide the disk into two parts correctly. I think you can find Acronis Disk Director Suite on the Internet. For beginners: We type in Yandex or Google: download Acronis Disk Director Suite for free and you will be happy!
How to properly partition a hard drive on a computer.
1. We launch the Acronis Disk Director Suite program, and see its general view. I have one disk, and all the information on it, I want to split it in two. See fig.

2. Select drive "C" with the left button, then press the right button, and find it in the "Resize" tab. See fig.

3. Now we will see such a window. See fig.

4. Now you need to hook with the mouse, if you hook correctly, then a sign will appear as in the picture !! Hooked, hold with the mouse left button and start resizing. Leave on the left for the system as long as you need, and let the rest be a disk for storing information. When you set the size you want, click on "Ok". See fig.

5. After you clicked on "Ok" you will see this below. See fig.


7. With the mouse, point to the "Unoccupied" section, select it, and right-click and select "Create Sections" in the menu and see this window. See fig. Select Logical and click "OK"

8. Now you have disk "I", the names may be different, depending on if you still have disks, see the picture. See fig.

9. Well, that's all, in principle, now, in order for the changes to take effect, you need to click the checkbox in the left upper corner, it is in the form of a checkerboard flag !! By clicking on the checkbox, it carries the "Run" function, you will see such a window. See fig. (how to partition the disk correctly)

10. In order for the process of partitioning the disk to go, click "Proceed". After that, the computer will ask for a reboot, and it will reboot. Acronis will work for a while, but not for long, it's smart !!! And when your computer boots up, you will see that your hard drive is divided into two partitions, that's all !!!
Hope you understand how to partition a hard drive correctly and now you can store information, movies, music on the created disk. Even if you have to reinstall Windows, then all the information that will be stored on the created disk will be safe, since you will be putting Windows on the "C" drive !!
Take your time, and then you will succeed, follow everything step by step, how to partition a disk correctly- it's simple!!
A series of messages "":
Part 1 - How to Partition a Hard Drive Correctly Using Acronis Disk Director Suite
A detailed guide to changing partitions on the hard drive using the utility Acronis Disk Director Suite 10.
Small introduction
Before moving on to partition operations hard disk, you need to figure out what a partition is and how partitions are generally organized on a hard drive.
At the beginning of the hard drive, in the very first sector, the master boot record is 512 bytes long. It is also called MBR. It contains a boot loader that directly starts loading the operating system, as well as a partition table. The partition table contains information where this or that partition is located on the disk surface. Roughly speaking, there are records like "from such and such an address on the hard drive to such and such a partition C: \ is located with the NTFS file system, type 07h, main, active." There can be only 4 such entries in the partition table... The sections that are spelled out there are the main... There can be only one active section among the main sections. The system will boot from it by default.
Naturally, not everyone was satisfied with the 4 partitions limit on the hard drive. This is how the extended section came about. An extended partition can contain as many logical ones as you want. This is how it was possible to bypass the limitation of 4 partitions per hard drive. Since an extended partition also needs an entry in the partition table, the hard drive can only have 3 main partitions and an unlimited number of logical ones. Now you can start working with sections.
The Acronis Disk Director utility is perfect for working with partitions. This utility is paid, but it costs very little ($ 15-20). There are also analogues: Partition Magic, Gparted but they are less reliable.
The advantage of this utility is that it treats user data with care. That is, when changing a partition or other operations, you will not lose data on the hard drive (except when formatting or deleting partitions). Another advantage of this utility is deferred operations. In other words, when working with the program, nothing really happens to the partitions of the hard drive. Changes are made only after pressing the button Execute and confirmation of transactions. Before confirming the operations, you can cancel any of them.
Another advantage of Acronis Disk Director Suite is the ability to create a bootable disk or USB flash drive. This is useful when Windows does not boot, but you need to perform partition operations. In this case, you can install Acronis Disk Director on another computer, burn a disk there, and then boot from it on a computer or laptop, where you need to manipulate the partitions. In fact, the Windows version and the Acronis Disk Director version that boots from disk are no different. Let's start our examination of working with this utility by describing the procedure for creating a bootable disk with this utility.
1. Creating a bootable disk or flash drive with the Acronis Disk Director utility
First of all, you need to install itself Acronis utility Disk Director. When you first start, you should choose Manual mode:

On the menu Service select item Create bootable disks:


In the menu on the left, select what we will write to disk or to a bootable USB flash drive:

This utility can be written to a disk or a USB flash drive, which at the time of creation is connected to a laptop, save as an image, and also organize network loading of this utility over the network. V this example we are interested in writing to disk:


That's all. Disc recorded:

Now you can boot from this disk (or flash drive) and work with the partitions.
2. Resizing and moving partitions
To resize and move a section, select the section that will be resized and click on the button Change section:

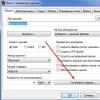
A window will open where you can reduce or increase the size of the partition, and change its location. Please note that in order to increase the size of a partition, there must be an unallocated area before or after it. It is formed after deleting other sections or after reducing their size. In the window, you can change the size of the section with the mouse, as well as move it, creating unallocated areas before and / or after the section:


You can also specify specific values in the appropriate boxes. When done press OK:

That's all. Now we have an unallocated area after the section where we can create a new section.
Important note: to apply the changes, you need to click on the button Execute Proceed
3. Creating and deleting partitions
As noted above, you need an unallocated area to create a partition. Select it and click on the button Create section:

In the window that appears, indicate the size of the partition, file system, type (logical main. On the hard drive, as mentioned at the beginning, there cannot be more than 3-4 main partitions), as well as the name, size and location of the new partition:

Push OK and we get the result:

Now let's look at how to delete partitions. To do this, select the desired section and click on the button Delete:

Acronis Disk Director allows you to either simply delete a partition or overwrite the sequence "0" and "1" in its place several times. This is necessary to reliably delete information. In most cases, a simple removal is enough:

Important note: as already mentioned, to apply the changes, you need to click on the button Execute(checkbox button), and then on the button Proceed... The laptop will restart and the changes will be made during boot.
Of course, creating, resizing, and deleting partitions are the necessary functions but there are better tools for everyday tasks. They will be discussed below.
4. Merging and dividing sections
Sometimes it becomes necessary to move certain folders to a separate partition. You can, of course, first reduce the size of the old one, then create a new partition on the unallocated area and transfer the files there. Acronis Disk Director has a separate tool for such cases called.
First, select the section that we are going to split and click on the button Divide:

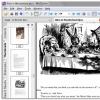
In the window that appears, select the files and folders that need to be transferred to the new section:

We share the free space between the old and new partitions:

So a new section has appeared:

Similarly, you can combine one section with another. First you need to select a section, which needs to be attached to another, and press the button To combine:


That's all. As in the previous cases, to apply the changes, you need to click on the button Execute.
5. Other operations on partitions
Also Acronis Disk Director allows you to perform the following operations:
- Copy and move sections. This refers to creating an exact copy and moving the partition to another unallocated area of the hard disk. For a successful move, the size of the free area must be larger than the size of the data on the partition;
- Change drive letter and label;
- Converting the FAT32 file system to NTFS, as well as changing the partition type from logical to primary and vice versa;
- Hiding sections. The section will not be displayed in Windows, but will be present on the hard drive;
- Formatting the partition, as well as changing the cluster size;
- Changing the type of section. This is sometimes useful when working with automatic Windows recovery... More details are described here:;
- Partition check and defragmentation;
- Working with files on a partition;
- Recovering partitions. A very useful thing. It is sometimes necessary if the partition table is damaged, when the entire hard drive acts as an unallocated area;
- Many other operations.
You can read more about the capabilities of this utility in this manual: /.
That's all.
You can ask questions about working with hard disk partitions in this forum thread:. All questions please state in the relevant forum topic.
You can express all comments and suggestions on the article itself through this contact form: Please note that if something is not working out for you, then you should only ask on the forum. Of this kind emails will be ignored.
How to break hard Acronis disk? Before we split the hard drive into partitions, let's figure out why this is necessary.
Important! All actions you do on your own risk.
There are several programs that can perform any actions with sections, I will focus on (a convenient, simple program in Russian) with which you can painlessly and without the risk of losing data perform operations on hard disk, break up.
To do not lose data, it is worth partitioning the hard disk with Disk Director Suite without being in Windows. To do this, we need to burn the Acronis Disk Director Suite disk image to a CD, set the computer to boot using a CD-ROM or DVD-ROM - you can read and. Having completed these actions, we see:
Select Full version if it does not start - Safe
Manual mode - OK.

After each operation don't forget to press the button Execute!

Suppose we do not have a single section, we need to select an unallocated area, click Wizards - Creating a section

You can set the size of the created section by moving the slider or enter the desired value in

Should choose Partition type Active. Active intended for installing an operating system on it, Boolean contains only files (D, E)

For Windows XP and 7, select the file system NTFS

Increase the size of partition C: Highlight section C, press Increasing free space

select section C ,
the size of which needs to be increased

select size D or another, where there is free space


If there is only drive C, but you need to create D, and so on, you must press
tags: split Acronis Disk Director Suite hard drive into partitions