This is an instruction on how to set up a MikroTik router step by step from scratch without using the factory configuration.
MikroTik router connection
For settings Wi-Fi router and we need MikroTik:
- Internet provider cable (Triolan, MaxNet, Volya, Airbites, Vega or any others);
- a computer or laptop with Wi-Fi;
- MikroTik router. It will distribute the Internet via cable, as well as via Wi-Fi to a laptop, smartphone, TV with Wi-Fi or a tablet.
- we connect the cable of the Internet provider to the first port of the router;
- we connect the computer to the MikroTik router with a network cable to any LAN port from 2 to 5;
- laptop and others wireless devices connect via Wi-Fi;
- plug the power supply into the "Power" connector of the MikroTik router.
Configuring a computer network card
So that you can go to the Mikrotik router settings on your computer, we will configure the network card to receive automatic settings.
Open "Start" → "Control Panel" → "Network and Sharing Center".

Let's go to "Changing adapter parameters".

Right-click on "Connect by local network"And select" Properties "

Click on "Internet Protocol Version 4 (TCP / IPv4)" and the "Properties" button.

Select "Obtain an IP address automatically" and click the "OK" button.

If the network card does not automatically obtain an IP address from the 192.168.88.x subnet, try specifying it manually (for example: 192.168.88.21) or.
Entering the MikroTik router settings
You can configure the MikroTik router in different ways:
- With the help of a special program Winbox for Windows OS. Download on the official website.
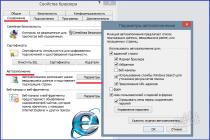
- Using your browser, navigating to 192.168.88.1. The proxy server should not be specified in the browser settings!
- Configuring via Telnet.
We will be configuring the Mikrotik router using the Winbox program.
We connect to the MikroTik router:
- Start the Winbox program and go to the tab Neighbors;
- Your router will appear in the list. Left-click on its MAC address;
- Click the button Connect.
Login default admin, the password is empty.

Resetting the router settings
Let's reset all the settings of the MikroTik router.
When you first log in, you will see a window like the picture below. Click the button Remove Configuration

If this window does not appear, reset the settings through the menu:
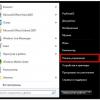
- Select the menu on the left System - Reset Configuration;
- Check the box No Default Configuration;
- Click the button Reset Configuration.
- Click the button Yes and wait for the device to reboot.

Description of network interfaces
MikroTik network interface configuration will look like this: first port ether1 will be connected to the provider (WAN port), other ports ether2-5 will work in switch mode to connect computers on the local network.
In order not to confuse the network interfaces, we will describe them using comments.
We enter the MikroTik settings using the Winbox program.
We write down the comment "WAN" for the first ether1 port:
- Open the menu Interfaces;
- Choosing the first interface ether1;
- Press the yellow button Comment;
- WAN";
- Push the button OK.

We write down the comment "LAN" for the second ether2 port:
- Choosing an interface ether2;
- Press the yellow button Comment;
- In the window that appears, enter the comment " LAN";
- Push the button OK.

Now their purpose is clearly visible in the list of interfaces.

Configuring the MikroTik WAN interface
Changing the MAC address of the WAN port
If your ISP blocks access to the network by MAC address, then you must first change the MAC address WAN port MikroTik router. Otherwise, skip this point.
To change the MAC address of the MikroTik port, open the menu in the Winbox program New Terminal and enter the command:
/ interface ethernet set ether1 mac-address = 00: 01: 02: 03: 04: 05
Where ether1- name of the WAN interface, 00:01:02:03:04:05 - allowed MAC address.
To return the native MAC address of the port, you need to run the command:
/ interface ethernet reset-mac ether1
Where ether1- interface name.
Dynamic IP Configuration
If your internet provider gives you network settings automatically, then you need to configure the WAN port of the MikroTik router to receive settings via DHCP:
- Open the menu IP;
- We choose DHCP Client;
- In a new window listed Interface: select the WAN interface ether1;
- Push the button OK to save the settings.

Now we have received the IP address from the provider, which is displayed in the column IP address.

- Open the menu New Terminal;
- In the terminal, write the command ping 8.8.8.8 Enter on keyboard.

Configuring Static IP
If you are using static network settings, you need to manually configure the WAN port of the MikroTik router.
Let's configure the static IP address and subnet mask of the MikroTik WAN port:
- Open the menu IP;
- We choose Addresses;
- In the window that appears, click the Add button (plus sign);
- In a new window in the field Address: prescribe static IP address / subnet mask;
- In the list Interface: select the WAN interface ether1;
- OK.

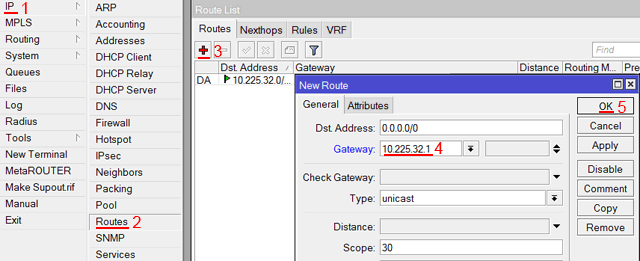
Let's configure the address of the MikroTik Internet gateway:
- Open the menu IP;
- We choose Routes;
- In the window that appears, click the Add button (plus sign);
- In a new window in the field Gateway: prescribe Gateway IP address;
- Push the button OK to save the settings.
Add the addresses of MikroTik DNS servers:
- Open the menu IP;
- We choose DNS;
- In the window that appears, press the button Settings;
- In a new window in the field Servers: we register the IP address of the preferred DNS servers;
- Press the down button (black triangle) to add another input field;
- In the new field, write the IP address of the alternative DNS server;
- Check the box Allow Remote Requests;
- Push the button OK to save the settings.

Let's check that there is Internet access:
- Open the menu New Terminal;
- In the terminal, write the command ping 8.8.8.8(ping google site) and click Enter on keyboard.
As you can see, there are 60ms pings, which means the Internet is connected and working. You can stop the execution of the command by pressing Ctrl + C on the keyboard.
On computers connected to the MikroTik router, the Internet will not work until you configure the local network, Firewall and NAT.
PPPoE setup
If you are using an ADSL modem to which a MikroTik router is connected via a network cable, you first need to configure the ADSL modem in Bridge mode.
Let's configure a client PPPoE connection on a MikroTik router:
- On the left, select the menu PPP;
- Press the Add button (plus sign);
- We choose PPPoE Client.

We configure the PPPoE parameters of the MikroTik connection:


After creating a PPPoE connection, a letter should appear opposite it R, which indicates that the connection has been established.

Let's check that there is an Internet connection:
- Open the menu New Terminal;
- In the terminal, write the command ping 8.8.8.8(ping google site) and click Enter on keyboard.
As you can see, there are 60ms pings, which means the Internet is connected and working. You can stop the execution of the command by pressing Ctrl + C on the keyboard.
On computers connected to the MikroTik router, the Internet will not work until you configure the local network, Firewall and NAT.
Combining Wi-Fi and wired interfaces into a local network
In order for computers connected to the router via cable and Wi-Fi to “see” each other, it is necessary to combine the wireless and wired MikroTik interfaces. If you have a router without Wi-Fi, then combine only wired interfaces.
Create a union bridge-local(bridge);
- Open the menu Bridge;
- Push the button Add(plus sign);
- In field Name write the name of the association bridge-local;
- Push the button OK.

Add wired ethetnet ports 2-5 to the union:
- Go to the tab Ports;
- Push the button Add(plus sign);
- In the list Interface select ethernet port ether2;
- In the list Bridge choose the name of the union bridge-local;
- Push the button OK;
- Add ports in the same way ether3, ether4, ether5.

We add the Wi-Fi interface to the association.
- Go to the tab Ports;
- Push the button Add(plus sign);
- In the list Interface choose a wireless interface wlan1;
- In the list Bridge choose the name of the union bridge-local;
- Push the button OK.

Assigning an IP address to a local network
Let's configure the IP address of the MikroTik local network:
- Open the menu IP;
- We choose Addresses;
- Push the button Add(plus sign);
- In field Address enter the address and mask of the local network, for example 192.168.88.1/24;
- In the list Interface choose bridge-local;
- Push the button OK.

DHCP server configuration
In order for computers connected to the router to receive network settings automatically, we will configure the MikroTik DHCP server:

Now network cable disconnect the computer from the router and reconnect to it.
Configuring Wi-Fi access points MikroTik
First you need to turn on the Wi-Fi module:
- Open the menu Wireless;
- Choosing a Wi-Fi interface wlan1;
- Push the button Enable(blue check mark).

Create a password to connect to the MikroTik access point:
- Open the tab Security Profiles;
- Press the Add button (plus sign);
- In a new window in the field Name: specify the name of the security profile;
- For better security, we leave only registration using the protocol WPA2 PSK;
- In field WPA2 Pre-Shared Key enter the password to access the Wi-Fi point;
- To save the settings, press the button OK.

Configuring Wi-Fi options MikroTik points:
- Open the tab Interfaces;
- Double-click on the Wi-Fi interface wlan1 to go to its settings;
- Go to the tab Wireless;
- In the list Mode: select the operating mode ap bridge(access point in bridge mode);
- In the list Band: we choose in what standards the Wi-Fi point will work, we have chosen B / G / N;
- In field SSID: write the name of the access point;
- In the list Security Profile select the name of the security profile in which we created the password for accessing the Wi-Fi point;
- Push the button OK to save the settings.

Now you can connect to the router via Wi-Fi.
On computers connected to the MikroTik router via Wi-Fi, the Internet will not work until you configure Firewall and NAT.
Configuring Firewall and NAT
In order for computers to access the Internet, you need to configure Firewall and NAT on the MikroTik router.
Open the New Terminal menu to enter commands.
NAT setup executed by the following commands:
ip firewall nat add chain = srcnat out-interface = ether1 action = masquerade
Where ether1- this is the interface to which the Internet comes from the provider. For PPPoE connections, the name of the PPPoE interface is indicated.
NAT settings are enough to make the Internet work.
Protect router- commands to protect the router:
ip firewall filter add action = accept chain = input disabled = no protocol = icmp
ip firewall filter add action = accept chain = input connection-state = established disabled = no in-interface = ether1
ip firewall filter add action = accept chain = input connection-state = related disabled = no in-interface = ether1
ip firewall filter add action = drop chain = input disabled = no in-interface = ether1
Protect LAN- protection of the internal network:
ip firewall filter add action = jump chain = forward disabled = no in-interface = ether1 jump-target = customer
ip firewall filter add action = accept chain = customer connection-state = established disabled = no
ip firewall filter add action = accept chain = customer connection-state = related disabled = no
ip firewall filter add action = drop chain = customer disabled = no
We assign the types of interfaces to protect the internal network ( external- external, internal- internal LAN):
ip upnp interfaces add disabled = no interface = ether1 type = external
ip upnp interfaces add disabled = no interface = ether2 type = internal
ip upnp interfaces add disabled = no interface = ether3 type = internal
ip upnp interfaces add disabled = no interface = ether4 type = internal
ip upnp interfaces add disabled = no interface = ether5 type = internal
ip upnp interfaces add disabled = no interface = bridge-local type = internal
Changing the password for accessing the MikroTik router
To change the password for accessing the MikroTik router, follow these steps:
- Open the menu System;
- We choose Users;
- Make a double click on the user admin;
- Push the button Password ...;
- In field New Password introduce New Password;
- In field Confirm Password confirm the new password;
- In the window Change password push the button OK;
- In the window User push the button OK.

To reset MikroTik to factory settings, do the following:
- Turn off the power of the router;
- Press and hold the button Reset;
- Turn on the power of the router;
- Wait for the indicator to flash ACT and release the button Reset.

After that, the router will reboot, and you can go into its settings with a standard username admin no password.
If you enter the settings using the Winbox program, the following window will appear:

Using the button OK you can quickly configure the default router.
Button Remove Configuration allows you to reset all settings for later manual setting router.
In this article, we will tell you how to quickly configure a MikroTik Wi-Fi point to receive the Internet using the simplified Quick Set menu.
This manual is suitable for all MikroTik Wi-Fi points with RouterOS Level3 and higher operating system: SXT Lite2, SXT Lite5, Groove 52HPn, SXT 5 ac, SXT G-2HnD, etc.
Configuration can be done via a Web browser or Winbox for Windows. The most convenient way to do this is through Winbox, since the program can connect to the device not only by IP address, but also by MAC address.
Sometimes after resetting the device to factory settings, it is not assigned the standard IP address 192.168.88.1. In this case, you need to connect to the device using the MAC address using the Winbox program and apply the standard configuration.
The article will discuss customization using the Winbox program. Configuration via a web browser is performed in a similar manner.
Connecting a Wi-Fi hotspot to a computer
First, connect the wireless hotspot to the computer via the POE injector as shown in the picture. After setting up Wi-Fi, the point can be disconnected from the computer and connected to a router or switch.
Configuring a computer network card
To get into the Wi-Fi settings of the Mikrotik point, you need to configure the computer's network card to an IP address from one subnet, for example 192.168.88.21 .
Open up Start -> Control Panel -> Network and Sharing Center.


Right click on LAN connection and select Properties.

Please select Internet Protocol Version 4 (TCP / IPv4) and press the button Properties.

Please select Use the following IP address, enter the IP address 192.168.88.21 , Subnet mask 255.255.255.0 and press the button OK.

Entering settings
If you configure a MikroTik Wi-Fi hotspot via a web browser ( Internet Explorer or other), write in the address bar 192.168.88.1 Is the default IP address for MikroTik devices.
Attention! In the web browser, the proxy server must not be specified in the settings
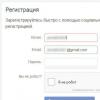
In the window that opens, enter Login: admin no password and press the button Login.

We will configure the MikroTik Wi-Fi point using the program, so download Winbox from the manufacturer's website and launch it.
Go to the tab Neighbors and press the button Refresh... Your point should appear in the list.
Please note that if you click on the MAC address, then we will connect to the device by the MAC address.
If you click on the IP address, then we will connect to the device by the IP address.
We click on the MAC address, after which it will appear in the field Connect To:, enter login admin without a password, and press the button Connect.

If this is the first time you have connected and set up the device, a window will appear as in the picture below. It offers to apply the default factory settings. Click the button OK.

Open the menu on the left Quick Set.

In the window that appears, we will configure the MikroTik Wi-Fi point to receive Internet from another wireless point.

Selecting the operating mode
First in the left upper corner select the mode CPE(customer).

In chapter Configuration it is necessary to select the network operating mode.

Mode Router- used when connecting to a Wi-Fi hotspot or base station provider and want to hide clients who will be located behind the point in a separate subnet. Otherwise, each client would have to conclude an agreement with the provider to connect to the Internet. In this mode, the provider does not see the subscribers behind the client's Wi-Fi hotspot. The wireless point acts as a router (Internet gateway) for clients.
Client Wi-Fi hotspot allows only one computer to be connected via cable. But if you connect a Wi-Fi router to the device, then you can distribute the Internet via Wi-Fi and cable to several subscribers (computers, smartphones, phones).

If you are using a Wi-Fi hotspot to connect to a neighboring Wi-Fi router, we recommend using Router mode. There are situations when, in Bridge mode, a client point connects to a Wi-Fi router and receives automatic network settings, but the computer cannot get the settings and access the Internet. In this case, use Router mode.
Mode Bridge- used when it is necessary to see all devices located behind the client's Wi-Fi point. Moreover, all subscribers are on the same network and can transfer data to each other.
For example, you have a main office and several remote warehouses that need to be combined into a common computer network... For this task, the Bridge mode is more suitable. When using this mode, the central router of the enterprise will distribute automatic network settings to all computers on the network, including remote warehouses.

Configuring Operation in Router Mode
In chapter Configuration select operating mode Router.
If your provider issues network settings automatically via DHCP, then in the section Wireless network
- Address acquisition- select Automatic.

If the provider uses static network settings, in the section Wireless network make the following settings:
- Address acquisition- select Static;
- IP Address- enter the IP address given to you by your provider. Usually static settings are specified in the contract with the provider;
- Netmask- specify a mask;
- Gateway- enter the gateway address;
- DNS Servers- specify the addresses of DNS servers.

If your ISP uses a PPPoE connection, in the section Wireless network make the following settings:
- Address acquisition- select PPPoE;
- PPPoE User- enter the username;
- PPPoE Password- enter password;
- PPPoE Service Name- enter the name of the service.

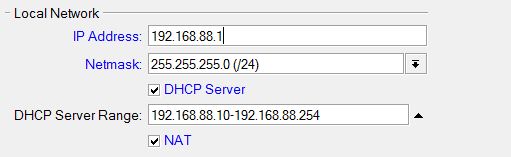
Now let's configure the local network in the section Local network:
- IP Address- specify the IP address of the client Wi-Fi point. Let's leave the standard 192.168.88.1 ;
- Netmask- choose a standard mask for our subnet 255.255.255.0 ;
- DHCP Server- check the box to enable DHCP server. It will allow you to automatically distribute network settings to clients located behind the device;
- DHCP Server Range- the range of IP addresses that will be issued to connecting clients. Enter the range 192.168.88.10-192.168.88.254 ;
- NAT- put a check mark to allow clients to access the Internet.
Configuring Bridge Mode
Select in the section Configuration operating mode Bridge.
If you want the client Wi-Fi point to receive network settings from the provider automatically via DHCP, then in the section Bridge
- Address acquisition- select Automatic.

If you are using static network settings, under Bridge make the following settings:
- Address acquisition- select Static;
- IP Address- enter the IP address of the client Wi-Fi point;
- Netmask- select a mask 255.255.255.0 ;
- Gateway- enter the gateway IP address (router IP address);
- DNS Servers- specify the addresses of DNS servers. You can specify the address of the router or DNS address google server 8.8.8.8 .

Setting up a Wi-Fi connection
Now let's make a Wi-Fi connection to the provider's base station.
In chapter Wireless make the following settings:
- In the column Network Name- select the name of the Wi-Fi point to which you want to connect;
- In field WiFi Password- enter the password for connecting to the Wi-Fi point, if used;
- Press the buttons Apply and Connect.

After the settings made, you should see Status: connected to ess and connection parameters.

If you configured the client point to operate on a subnet other than 192.168.88.xxx, then do not forget in the settings network card change the network settings to the required subnet. Otherwise, you will not have access to the Internet.
Solving connection problems
V latest firmware CPE client mode is buggy in the Quick Set menu. The problem is that QuickSet does not correctly save the password for connecting to a Wi-Fi point. In this case, you will see that the device is constantly searching for a network with Status: searching for network, as it shown on the picture.

There will be error messages in the logs MIC failure (14) like the picture below.

To fix this, do the following:
- Open the menu Wireless, go to the tab Security Profiles and double-click on the profile with the name default.

- In the opened window in the fields WPA Pre-Shared Key and WPA2 Pre-Shared Key re-enter the password to connect to the Wi-Fi point, and press the button OK.

After that, the device should connect to the base station in client mode. To check this, open the menu Quick Set. You should have Status: connected to ess and connection parameters.
Change the default administrator password
To prevent anyone other than the administrator from entering the Wi-Fi hotspot's settings, you need to set a password. There is no password by default.
To do this, in the section System in field Password enter a new password and confirm it in the field Confirm Password.

At the end we press the button OK to save all settings.
Now you can connect to the MikroTik client Wi-Fi point via Wi-Fi cable a router or switch to distribute the Internet to several subscribers.
Reset
If you are too clever with the settings and cannot enter the device, reset it to factory settings.
- Disconnect the power supply;
- Hold and hold the button Reset;
- Supply power;
- Wait until the LED starts blinking;
- Release the button Reset;
- After rebooting, connect to the device using the Winbox program at the MAC address, because the device can have an IP address of 0.0.0.0. In this case, you will not be able to access the settings via the web interface using the standard IP address 192.168.88.1.
- In Winbox, in the window that appears, click the button OK to apply the default settings. In some firmwares, this window may not appear, but the standard configuration will be applied immediately.
Mikrotik mAP lite (RBmAPL-2nD)- a new compact router from Mikrotik, equipped with a WiFi radio module (operating at 2.4 GHz (802.11b / g / n) and a classic Ethernet port.
Features of the Mikrotik mAP lite (RBmAPL-2nD) model:
1. Due to the magnetic base, this router can be placed on metal surfaces.
2. "Micro" size of the device will harmoniously fit into the design of your home or office.
3. Supports power supply both via network adapter and via Ethernet port using Poe technology (802.3at standard).
4. Several operating modes: access point and / or client station.
5. Built-in modern operating system Mikrotik RouterOS license Level 4.
6. Mobile, pocket, powerful router.
MikroTik mAP lite specifications
| CPU | Qualcomm QCA9533 650 MHz |
| RAM | 64MB DDR2 |
| ROM | 16 MB FLASH |
| Ethernet ports | 1x 10/100 Mbps Ethernet with Auto-MDI / X |
| WiFi module | 2.4 GHz, 802.11b / g / n, MIMO 2x2 |
| Transmitter power | Up to 20 dBm for RF (up to 22 dBm for other countries) |
| Gain | 1.5 dBi |
| Nutrition | microUSB 5 V, 1 A (power supply included); PoE 5-60 V DC to Ether1 port - Passive PoE or 802.3af / at (pins: 4, 5 (+); 7, 8 (-) or 3, 6 (+); 1, 2 (-)) |
| Maximum power consumption | 3.5 watts |
| Input voltage range | 5-60 V |
| The size | 48 x 49 x 11 mm |
| Temperature environment working | -30 .. +70 ° C |
| OS | MikroTik RouterOS Level 4 |
| Manufacturer | MikroTik |
| Brand country | Latvia |
| Guarantee | 12 months |
Modern development wireless led to the fact that many people, planning to renovate a house or apartment, do not organize low-current wiring for network switching, but use the capabilities of Wi-Fi. However, there are often situations when a cable connection is badly needed for a certain device.
When I moved to a new apartment, I found out that there was no low-current wiring or any sockets "for the Internet" in it, but I did not attach any importance to this, because all my devices work fine with wifi. But I faced the need to solve this problem when I decided to install an old Smart TV at home without a Wi-Fi module and an old satellite receiver with a non-working complete USB-WiFi adapter.
A device came to the rescue. Attention was drawn to the fact that the device can be powered not only via Passive PoE or PoE 802.3af / at (PoE +), but also via a USB port. The input voltage of the device is only 5V! Convenience is that you can power the mAP lite with a regular USB-microUSB data cable from any USB connector that has power! I also decided to use MikroTik as a router, "over the air" using mAP lite by connecting a satellite receiver and a TV to it, at the same time. Important: devices running RouterOS support Station Bridge operation mode, which allows traffic to pass through without having to configure NAT on the client device. All this makes it possible to connect to your wireless network any device not equipped Wi-Fi module- without laying cables, without using additional electrical outlets, and at a minimum cost!
Setting up your device to connect to a WiFi network is very simple. For example, we will carry out all the settings using the winbox program.
First, let's connect to the device in accordance with the quick guide and execute full reset devices - System → Reset Configuration.

After the first connection, open the Bridge menu and add a new bridge interface.


Now it is necessary for the device to receive network settings (address, DNS, gateway) from our central router. To do this, we enable the DHCP-client function on the interface of the created bridge: open IP → DHCP Client and click "Add". Make sure that the interface of the created bridge is selected in the “Interface” field.

Next, we connect our device to the general network. To do this, first, you need to specify the key that is required to connect to Wi-Fi: open the left menu "Wireless", the tab "Security Profiles" and add a new security profile. In the profile, you must fill in the field with the key and select the security modes relevant to the settings for connecting to your network.

We connect to the network: open the "Interfaces" tab and double click open the network interface settings; there open the "Wireless" tab and press the "Scan" button. Then we press the "Start" button. When the field below displays Wi-Fi networks, select your network with the left button and click "Connect". After that, you need to check that the device works in station-bridge mode (Mode = station bridge).

"Final touch": select in the Security Profile field a security profile with our name.

The mAP lite (RBmAPL-2nD) is delivered in a box made of cardboard already familiar to Mikrotik, although its design is somewhat different from other company products. In addition to the router itself, there is a power supply unit with a microUSB plug, an information leaflet and a metal plate, which we will talk about a little later.
The first thing that amazes is the size, the mAP lite is not just small, it is very small. For comparison, we took a fairly popular model of TP-Link TL-MR3020 3G router.


Even against the background of the TL-MR3020, the new product from Mikrotik looks very compact. What is really there, mAP lite (RBmAPL-2nD) is noticeably smaller than its older brother mAP. Something, of course, had to be sacrificed: the lite version lost its second network port, and the only remaining one was replaced by a special modification used in ultrabooks (thin laptops). Unfortunately, there is no USB support, which is a pity, because the processor itself supports USB, and the same 3G / 4G modem could be connected using an OTG cable.

mAP lite in background modern smartphone with a diagonal of 4.7 "
On the other hand, when using microUSB for an external modem, power would have to be supplied via PoE, and for this, at least, an injector and a standard power supply unit with a DC jack would be required. Therefore, after weighing all the pros and cons, as well as the cost of the device, any claims for the lack of USB port disappear by themselves.

As you already understood, with a standard configuration, the device receives power from a standard 5V power supply through the microUSB port, in the same way as hAP lite... At the same time, the network port also supports PoE In, and not only standard Passive PoE, but also 802.3at / af. In addition, the device supports a wide range of PoE input voltage from 10 to 60V, which allows it to be connected to any Mikrotik device with PoE Out support.

There are 4 indicators on the top panel: PWR, AP / CAP, ETH and WiFi. The presence of the CAP indicator will be very useful in cases where the mAP lite (RBmAPL-2nD) will be used in conjunction with the controller.

There is a multifunctional WPS / Mode / Reset button next to the network interface.
Pay attention to the rhombus on the back of the device, this is a special recess for the metal plate that comes with the kit. The fact is that the mAP lite (RBmAPL-2nD) is light enough, so the engineers equipped it with a magnet for attaching it to a metal base. If the base is not metal, a metal plate comes into play, on one side it has a protruding rhombus for even fixation on the mAP lite, on the other side double-sided tape is glued.

The blue coating on the plate is transport polyethylene, which prevents scratches, after gluing the plate, it must be removed before use. The mAP lite is fixed securely enough, and it can be removed quickly and easily.

Hardware implementation of mAP lite (RBmAPL-2nD)
In order to disassemble the device, you will need certain skills and a special tool, besides, during disassembly, you can damage the board and lose your warranty. For those who are interested in the internals of the novelty, we have specially disassembled the mAP lite (RBmAPL-2nD).
It's time to look inside the case.


The inner part of the case is used to the maximum, there is no free space as such. A thermal pad is glued to the top of the processor to improve heat dissipation from the chip. On the reverse side of the board, at the soldering point of the processor, a slightly larger thermo pad is installed, which additionally prevents the magnets from touching printed circuit board, which can lead to a short circuit.

The system is based on the Atheros QCA9533 WiSoC chip (QCA9533-BL3A, MIPS 24Kc V7.4 architecture) manufactured by Qualcomm with an operating frequency of 650 MHz. For this chip, the nominal frequency is 560 MHz, so 650 MHz is a slight factory overclocking. There is no cause for concern, since other Mikrotik products on QCA9531 / 9533 have similar CPU frequency: hAP lite, hAP lite TC, hAP, wAP, hEX lite, hEX PoE lite, SXT Lite 5 ac, PowerBox.
QCA9531 / 9533 features good performance, low power consumption and heat dissipation. In other solutions with a spacious case, the heating of the processor is practically not felt. mAP lite, in turn, has a compact body, and the processor is in contact with the body, so you can feel the heat during operation. It can be characterized as "above average". Taking into account the configuration of the device (only 1 network port), the processor frequency can be safely reduced to 550 MHz via Winbox, the heating of the chip will be lower, and practically will not affect the performance.
You can judge for yourself the dimensions of the RBmAPL-2nD PCB by looking at the photo below:


Volume random access memory is 64 MB (Nanya NT5TU32M16EG-AC chip, 512 Mbit, DDR2-800 SDRAM), which is unusually large for a device with such positioning. Permanent memory has a volume of 16 Mbytes (Winbond 25Q128FVSG chip, 128 Mbit, Flash), which is an established standard for almost all devices in the lower and middle price segment.
Both antennas are internal, implemented by etching on the board, according to the official datasheet, the gain is 1.5 dBi. In general, the technical implementation is pleasant.
Turning on mAP lite for the first time, operating modes
In our test configuration mAP lite was connected with a cable to the 5th port of the Mikrotik RB951Ui-2HnD router, i.e. the access point was powered by classic Passive PoE.
After turning on, an open MikroTik-XXXXXX wireless network appeared, and you need to connect to it to configure the access point.

By default, devices on RouterOS have a local IP 192.168.88.1, login admin, password is empty. The first step is to upgrade to latest version RouterOS, at the time of this writing, this is version 6.34.1. Updates are often released for new devices, our model is no exception.

The default settings assume automatic channel selection and support for all 802.11 b / g / n standards. For testing, the channel is selected manually, and the security type from Open is changed to WPA2 + AES.

The device operates under RouterOS with the 4th license level, therefore, it provides high flexibility of settings. In addition to the two standard modes Router and Bridge, there are as many as 5 operation modes available in the QuickSet quick settings panel.

By default, the WISP AP mode is used - the access point mode with advanced settings, there is also the Home AP mode - the simplified AP configuration mode. For use in conjunction with the CAPsMAN controller, the CAP mode (controlled access point) is provided, which makes mAP lite Mikrotik one of the most affordable solutions on the market for building a wireless network in hotel rooms.
To connect to a remote wireless network, the CPE mode is provided. Last mode rather unexpected - PTP Bridge, i.e. the mode of creating a wireless bridge between two devices.
Testing mAP lite
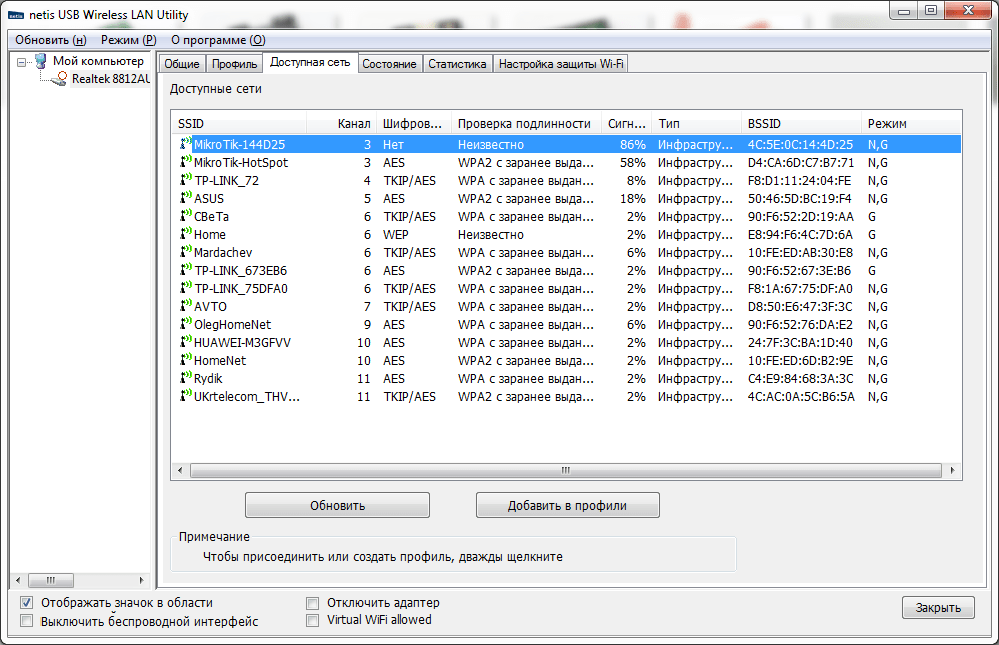
As mentioned earlier, mAP lite was originally connected to RB951Ui-2HnD (5th port with PoE Out). In the RB951 local network (subnet 106.0 / 24) there was a PC connected via twisted pair, and the JPerf server was running on it. A second PC with an external Netis WF2190 adapter (Realtek 8812AU chip, external antennas, MIMO 2x2: 2) was connected to the mAP lite wireless network (subnet 88.0 / 24).
Thus, when establishing a connection between PC1 and PC2, the wireless module is activated, and traffic goes between the local and external network (WLAN / LAN<=>WAN), i.e. there is traffic routing (routing).


When exchanging TCP packets, the maximum speed averaged 93-94 Mbit / s (both PCs in the same room), the processor load averaged 30%. As you can see, the processor margin is quite large.


When exchanging UDP packets, the speed reached an average of 115 Mbps, which, however, is not surprising since this protocol has features, and the wireless network supports a channel speed of 300 Mbps. For the third test, the mAP lite and the PC connected to it were separated by a certain distance, to be more precise, by 8-9 meters. In addition, there were 3 walls between them: the first was made of bricks, the second was 1 brick, and the third was made of plaster.


Obstacles and hindrances are a problem for all access points without exception. Overall speed dropped to the level of 25-40 Mbps. When working with regular laptops, the speed will be lower, because for the test we used a powerful external USB adapter.
In the fourth test, both PCs were in the same room, but both were already connected to the mAP lite wireless network.


The average speed in this configuration is 44 Mbps. The speed will change if both PCs are out of sight of each other (in the settings wireless module it is recommended to enable the "RTS CTS" option).
Finally
Mikrotik engineers once again managed to present an interesting product. mAP lite has an affordable price and a good set of features. How to use it is up to you, because despite its size, this baby is equipped good processor and runs under RouterOS Level 4, which opens up extensive configuration options. We have already listed the list of possibilities above. Already now we can say that mAP lite is one of the best budget products of the company, on a par with hAP lite.