Virtual Private Network Technology- a generalized name for methods of switching between individual computers or other devices within another environment. It can be used with various means of cryptographic protection, thereby increasing the security of data transmission. Which is important in many cases, especially for the networks of all kinds of large companies and banks.
What is VPN
VPN stands for Virtual Private Network. In fact, this type of connection allows you to create a dedicated zone in an existing environment. The machines included in it can see printers, hard drives and other common equipment, which is quite convenient. At the same time, no one outsider can get into this allocated area.
Making a connection
In order to create and connect an environment of the type under consideration, you must have a minimum knowledge of the computer and the Windows operating system. To carry out this operation, you must perform the following steps in a strict order:


- large icons;
- small icons;
- categories;

After completing all the steps, you will need to configure the VPN taking into account all possible nuances. Each case has its own nuances. All of them must be taken into account. Most ISPs create step-by-step instructions specifically for interacting with their server.
VPN setup
Everything is completely individual, not only in relation to different operators, but also in different versions of the Microsoft Windows operating system. Since in each there were various kinds of changes regarding the input of certain parameters.
Video: Networking in an Organization
Windows XP
For the normal functioning of the Virtual Private Network in the Windows XP operating system, you must follow the steps in a strict order:
- press the "Start" button, select "Control Panel";

- an area called "New Connection Wizard" will open, you must select the item called "Connect to the network at the workplace";

Photo: Choice of "Connect to the network at the workplace"
- in the window that opens, select the second item from the top, it is designated as "Connecting to a virtual private network";

Photo: checkbox "Connect to a virtual private network"
- the window that appears next allows you to write a name for the future environment - you can enter anything in it, it can be the name of a server, provider, or any random word, phrase;

- after the completion of the operations in the previous window, you must register the server with which the operation will be carried out (you can enter the IP address or do it somehow differently);

- when the wizard completes, you can create a shortcut.

Often, for normal communication, you need to pay attention to various additional options.
This can be done by performing in a strict order of actions:

In each case, everything is purely individual, there is a direct dependence on a specific server or Internet provider.
Windows 8
In order to figure out how to create an environment of this type in the Windows 8 operating system, you need to perform just a few clicks. This process is automated as much as possible.
It is necessary to perform it in this way:
- by opening an empty Desktop, find the status icon and right-click on it;

- in the context menu that opens, select "Network and Sharing Center";

Photo: Choosing a Network and Sharing Center
- then select the icon labeled "Create a new connection or network";

Photo: "Create a new connection or network" icon
- we decide on the method of communication, for work you need to click on "Use my Internet connection";

Photo: point of using my internet connection
- after completing the previous step and clicking on the button next, you will need to enter the Internet address and the name of the destination, as well as mark other options related to credentials, using smart cards.

After completing all of the above steps, you need to decide on the various options related to the functioning of the environment.
This requires:

The setting of all parameters is purely individual in each case.
Windows 7
Setting up the connection in question in the 7th version operating system from Microsoft Windows is quite simple. Any user can handle it, even with the smallest experience of interacting with a PC.
After the connection has already been created, the configuration is done as follows:
- open the list by left-clicking on the monitor icon in the lower right corner of the screen - a window will open in which there will be a button called "Connection";

- click on it in order to open activate the tabs through which you can access the properties;

- The window that opens further makes it possible to carry out comprehensive settings, there are the following tabs:

Usually, painstaking adjustment of each parameter is required for normal operation, otherwise the connection will not be established at all, or problems will constantly arise during use.
How to set up a VPN on Android
To operate a device running Android OS with Virtual Private Network, you must perform the following simple steps in strict order:

After completing all of the above steps, you can get to work.
Technology and properties
It is possible to determine why a compound of the type under consideration is needed only knowing its features and properties. First of all, it should be remembered that this type of communication implies various kinds of delays in the processing of traffic.
They are present due to the following reasons:
- installation of communication is required;
- data encryption or decryption is required;
- adding new headers to packages.

For the rest, the differences from other methods and protocols of work are insignificant. There are only global differences in technology.
It has the following features and:
- no dial-up connection required (no modems required);
- no dedicated lines needed.
To work in a secure environment of any type, you only need to have an Internet connection and special programs at both ends of the line that are capable of encrypting and decrypting protected data.
The operation of the Virtual Private Network implies the use of tunneling (encapsulation). This method of transferring data enables the sent packet of information to easily reach the final destination where de-encapsulation takes place.
Classification
The compound of the type under consideration has a rather ramified classification system.
The Virtual Private Network is divided according to the type of protection of the environment:

Also, the Virtual Private Network is often classified according to the way of implementation.
There are the following varieties:
- software solution (specialized software is used);
- integrated solution (a whole complex of software and hardware is used).
Protocols
Virtual networks of this type can be implemented using the following protocols:
- TCP / IP;
- AppleTalk.
Most networks today are designed using TCP / IP.
What is a VPN for in the first place? Its main purpose is to protect information from strangers. That is why it is often used for communication between various government agencies, as well as in other situations when the issue of data protection comes first.
Virtual Private Networks are private remote networks, encrypted in special ways, with foreign servers. They provide high speed connection. They are used by internet surfers to log in and visit blocked sites anonymously. Let's look at how to set up a VPN on Windows through different programs. There is such a possibility, even if it is not officially supported by the provider.
What is VPN?
To configure it correctly, you need to understand the features and principles of the service. A VPN connection is a local area network that connects multiple computers. The principle of operation is based on a router that provides IP to all connected PCs.
So, it becomes almost impossible to determine the IP from which the user goes online, and it turns out to bypass most blocking programs. This is due to encrypted traffic packets, the keys for which are only available to the server, from where requests are sent in the specified directions.
How to use on different Windows OS?
First you need to connect to the VPN server. This can be a home or remote PC. Providers supporting such a service issue logins and passwords to their subscribers. In this case, the setup process is extremely simple. It is enough to fill in a few cells with the correct information.
Windows 7
This version is the most common. The question of how to set up a VPN on Windows 7 is of interest to many. This is done through the control panel:
- Above, change the images to "large icons".
- Find "Network Control Center" - "New Connection Settings" - "Workplace Connection".
- Two methods are offered - via direct dialing or the global network. We need the latter - it will allow you to learn more about VPN.
- Server data required. The myip site will help to determine the IP. Specify any location - network performance does not depend on this information.
- Write down the login and password provided by the provider. When using your own server, the information is set independently. Then you need to put "remember the password", save.
Detailed and step-by-step video instruction!
The connection will now appear among the available ones. If there are several accounts on the computer, you will need additional adjustment through the control center. On the left, you need to select "change adapter parameters" to display a list of all available connections. Click "file" then "new incoming connection".
If there are several accounts, the system will offer to select a user. Once done, click "add". Then you need a login, a name (any name will do), a password, confirm the actions.
Now it remains:
- Choose a connection option - via the Internet.
- Configure protocol - ТСР \ IP
- Click "properties", allow access to callers, set the IP. If this is not done automatically, write down the random output 192.168.200.1 to 192.168.200.100.
- Confirm the action, click "allow access".
These are the main steps of the procedure, which can be guided by other versions of the OS.
The process is very simple and is carried out through the control panel. After clicking the "Connection Wizard", select your virtual private network and follow the instructions. If your provider works with VPN, the name must correspond to the fixed contract. Name your network home, work, like a PC.
Windows 8
Version 8 is automated, so the instructions on how to set up a VPN on Windows 8 are simple:
- At the bottom, find the corresponding icon that looks like a monitor.
- Find "network control center" - "create and configure a connection" where the network settings are changed.
- Confirm the direct connection of the PC to the Internet.
- Specify the name of the working environment by changing the options. The values entered are the same as for other OS versions.
The process completed successfully.
For those who find it difficult, watch the video tutorial.
Windows 10
Here the procedure is different. It combines autotuning with user-specified parameters. It is enough to know the login, password, server address. The tenth version ensures the stable operation of this service through providers that do not work with VPN. You need to download the appropriate program. It will be accepted and adapted by the OS.
Further actions:
- Start - parameters - network and internet. Select VPN from the list that appears on the left.
- Click + to add a new connection. Enter the parameters in the window that appears. They will be provided by the administrator or provider. Specify the supplier, VPN type, login information.
- Save changes, return to the network management menu, click "change parameters". Select connection properties by pressing the right mouse button.
- Select the line IP version 4, then properties.
- Leave the general settings as default, click "advanced". Remove the "use default gateway" market. Please confirm.
A special icon will appear on the panel. Activation takes a few seconds, it takes place without entering a username-password.
Windows Vista
How to set up a VPN on Windows Vista? Through the start, enter the "Network and Sharing Center", then "Establish a connection or network." Further interests "connect to the workplace" - "use my connection". They will offer to install or postpone. Click the second option. Write down your login information.
To select a VPN, it remains to enter the network connection management. You can also create a shortcut there.
VPN services
Many providers do not provide such a service, striving to control the location of subscribers and save the transmitted information. Therefore, utilities that make it possible to use a VPN service based on an existing connection are very popular. They involve changing the IP address with the transfer of data over an encrypted channel. Such services help to successfully bypass blockages by providing access to closed services. The utility can be installed on any OS, PC or smartphone.

There are many programs, among which it is worth highlighting a few recognized as the best:
- ZenMate;
- ZenVPN;
- Spotflux.
ZenMate is a handy extension for Chrome, Opera, Firefox browsers. This is a convenient service that is provided free of charge or for a fee. The speed depends on the selected service package. Expansion pleases:
- stable connection;
- long test period;
- a wide range of countries;
- auto-tuning of parameters with the possibility of manual adjustment;
- using one subscription for different devices.
Hide.Me is the preferred option for advanced internet users. It can be fine-tuned manually. There is limited and unlimited traffic. When choosing unlim, 5 simultaneous connections are allocated - this solution will be appreciated by companies. This software is convenient:
- emergency disconnect option;
- free mode;
- enhanced support for encryption protocols.
Newbies will love Hotspot Shield. It is a highly customizable option that installs and downloads automatically. It maintains a stable, long-term connection, blocks ads for free. Encryption is offered via the HTTPS protocol, so the protection of personal data is ensured. Bypasses all restrictions set by the provider.

ZenVPN is perfect for those who prefer privacy when using the Internet. This utility is relatively free - only 250 MB per day is provided, if you need more, you will have to buy a special package.
Spotflux offers a secure internet connection. By choosing this software, you don't have to worry about security even while using Wi-Fi. An additional plus is the compression of packet traffic, which allows you to save it if there are limits.
More and more cafes, hotels and other public places are acquiring their own Wi-Fi networks. But by using unsecured traffic, device owners compromise the security of their own data. Therefore, the relevance of private networks is also increasing. To be on the safe side, you can create a VPN connection. Read about what it is and how to configure it correctly in Windows 7 in our article.
What is a VPN connection and why you need it
This technology means a secure network built on top of an unsecured network. The VPN client, using the public network, connects to the VPN server through special protocols. The server accepts the request, verifies the identity of the client, and then transmits the data. This is provided by means of cryptography.
VPN capabilities allow you to use it for the following purposes:
- Hide your real IP and become anonymous.
- Download a file from a network that restricts access to the IP addresses of the user's country (if you use the IP address of a country that has access to this network.
- Encryption of transmitted data.
How to set up a connection?
- Through "Start" open "Control Panel", then start "Network and Sharing Center".
Select the "Network and Sharing Center" area
- Follow the link "Setting up a new connection or network".
To create a new connection or network, you need to click on the corresponding line in the list
- Click "Connect to workplace".
Select "Connect to the workplace"
- Select "Use my internet connection (VPN)".
Select "Use my Internet Connection (VPN)"
- In the "Internet address" field, enter the address of your VPN server.
- To find it out, you need to run the Run tool (Win + R) and enter cmd.
You need to enter cmd in the line and press "Enter"
- Then write the ipconfig command, run it and find the line "Default gateway", which contains the required address.
You need the address that is in the line "Default gateway"
- Now you need to insert the address and tick the box "Do not connect now ..." and click "Next".
Enter the received address in the field, put a tick in front of the item "Do not connect now ..."
- Enter the login and password provided by the provider and click "Create".
Enter username and password
- Close a window.
- Open Network and Sharing Center again and click Change adapter settings.
- The VPN connection icon appeared here. To make a connection, you need to right-click on the icon and click "Connect". To disable - also right-click on the icon and click "Disable".
There is a VPN connection icon here, through which you can connect or disconnect
- In the window that opens, you need to enter your username and password and connect.
Enter your username and password (if necessary) and click "Connect"
Video: Create and Configure a VPN
Possible errors and solutions to problems
400 Bad Request
- Disable a firewall or other program that affects security and network activity.
- Update the version of the browser you are using or use a different one.
- Delete everything that the browser writes to disk: settings, certificates, saved files, etc.
611, 612
- Restart your computer and check if the local network is working. If this does not solve the problem, then call the technical assistance service.
- Close some programs to improve system performance.
629
Check firewall settings. As a last resort, you can disable it, but this is undesirable, as the level of security will decrease.
630
Reinstall the network adapter driver.
650
- Check if "Local Area Connection" is working.
- There is a problem with the network card or network cable.
738
- Perhaps the username and password were stolen by hackers.
- The session "hung up". After a few minutes, try to connect again.
752
- The local firewall is incorrectly configured.
- Access attributes changed (international phone number instead of VPN server address).
789
Open the VPN connection settings, go to the "Network" tab and select "Automatic" or "Point-to-Point Tunneling Protocol (PPTP)" from the available VPN types. Then reconnect.
800
The cable, router or router may be damaged. If they are ok, then you need to check the following:
- LAN connection properties. Perhaps they got lost or were removed. You need to open the properties of the VPN connection, select "Internet Protocol Version 4 (TCP / IPv4)" and open its properties. Then check the correctness of the parameters: IP address, subnet mask, default gateway. As a rule, they are specified in the provider's Internet connection agreement. Alternatively, you can check the box next to Obtain an IP address automatically and Obtain DNS server address automatically.
- If a router or router is used, then the "Default gateway" field is 192.168.0.1 (192.168.0.1). Read more about this in the instructions for the router. If you know for sure that the access point has a default gateway of 192.168.0.1 or 192.168.1.1, then the IP addresses are in the range from 192.168.0.100 (192.168.1.100) and above.
- Conflict of IP addresses (there is a yellow exclamation mark on the monitor icon in the tray). This means that there is a computer on the local network with the same IP address. If there is no router, but there is a conflict, then the IP address is not the one specified in the contract with the provider. In this case, you need to change the IP address.
- There may be a problem with the subnet mask or DNS server. They must be specified in the contract. In cases where a router is used, DNS is often the same as the default gateway.
- The network card is turned off or burned out. To check the device, you need to click "Start", select the "Run" tool and enter mmc devmgmt.msc in the line. In the window that opens, click on "Network adapters". If it is disabled (crossed out), then you need to start it. If the card does not turn on, it means that it has burned out or came out of the slot (the second option is possible only if the card is not built into the motherboard). If the card works, then turn it off and start again. As a last resort, you can remove the network card from the configuration and click on the "Update hardware configuration" icon. The system will find the network card and install it.
- Invalid VPN server address. It must be indicated in the instructions. If there is no such information, then you need to contact the technical service. If the Internet works without a VPN connection, then go to the provider's website and find the address of the VPN server. It can be either alphabetic (vpn.lan) or in the form of an IP address. To view the address of the VPN server, you need to open the properties of the VPN connection.
- There is no money on the personal account.
Regardless of the error, if you cannot fix it yourself, you will have to contact the technical support service.
How do I enable automatic launch?
- In order for the connection to start automatically, you need to go to "Control Panel" - "Network and Internet" - "Network Connections".
Find VPN in the control panel
- We find the VPN, open the properties, then go to the "Options" tab and uncheck the "Show connection progress", "Prompt for username, password" and "Enable Windows logon domain" checkboxes.
- Then you need to open the Windows Task Scheduler. Go to "Control Panel" - "System and Security" - "Administrative Tools" - "Task Scheduler". Or you can go through the registry: Win + R, enter the line taskschd.msc.
Opening the task scheduler
- In the menu, select "Action", then "Create a simple task".

In this article we will look at how you can organize your own VPN server on Windows 7 without using third-party software.
Let me remind you that VPN (Virtual Private Network) it is a technology used to access secure networks over the public Internet. VPN allows you to ensure the protection of information and data transmitted over a public network by encrypting them. Thus, an attacker will not be able to gain access to data transmitted within a VPN session, even if he gains access to packets transmitted over the network. To decrypt traffic, he needs to have a special key, or try to decrypt the session using a brute force brute force. In addition, it is a cheap solution for building an enterprise network over WAN channels, without the need to rent a dedicated expensive communication channel.
Why might you need to organize a VPN server on Windows 7? The most common option is the need to organize remote access to a Windows 7 computer at home or in a small office (SOHO) when, for example, on a business trip, visiting, in general, not at the workplace.
It should be noted that a VPN server on Windows 7 has a number of features and limitations:
- You must clearly understand and accept all the potential risks associated with a VPN connection.
- Only one user connection is possible at a time and it is legally impossible to organize simultaneous VPN access to a computer with Win 7 for several users at once.
- VPN access can only be granted to local user accounts, and integration with Active Directory is not possible
- To set up a VPN server on a Win 7 machine, you must have administrator rights
- If you connect to the Internet through a router, you need to have access to it, and you need to be able to configure rules for organizing port forwarding to allow incoming VPN connections (the actual setup procedure may differ significantly depending on the router model)
This step-by-step guide will help you organize your own VPN server on Windows 7 without using third-party products and expensive corporate solutions.
Open the panel NetworkConnections(Network connections), typing "network connection" in the search bar of the start menu, select the item "View network connections".

Then hold down the button Alt, click on the menu File and select the item New incoming connection (New incoming connection), which will launch the wizard for creating connections to the computer.

In the wizard window that appears, specify the user who will be allowed to connect to this Windows 7 computer via VPN.

Then specify the type of user connection (via the Internet or via a modem), in this case select “Thought the Internet”.

Then specify the types of network protocols that will be used to service the incoming VPN connection. At least TCP / IPv4 must be selected.

Click the Properties button and specify the IP address that will be assigned to the connecting computer (the available range can be set manually, or you can specify that the IP address will be given by the DHCP server).
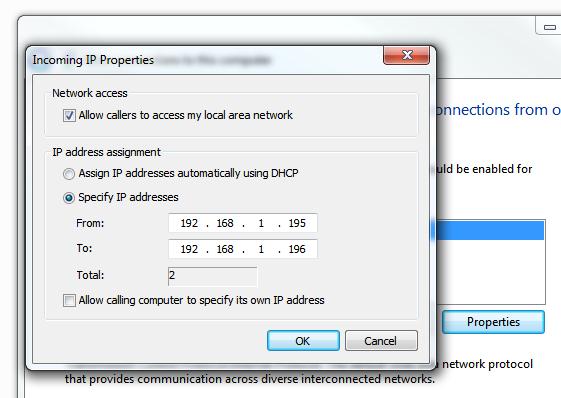
After you press the button Allowaccess, Windows 7 will automatically configure the VPN server and a window will appear with the name of the computer that will be used to connect.

That's all the VPN server is configured, and a new connection named Incoming connections will appear in the network connections window.

There are a few more nuances when organizing a home VPN server on Windows 7.
Configuring firewalls
There may be firewalls between your Windows 7 computer and the Internet, and in order for them to pass the incoming VPN connection, you will have to configure them. Setting up various devices is very specific and cannot be described within the framework of one article, but the main thing to understand the rule is to open the PPTP VPN port with the number 1723 and set up forward (forwarding) connections to the Windows 7 machine on which the VPN server is running.
Remember to check your Windows built-in firewall settings. Open the Advanced Settings control panel in Windows Firewall, go to the Inbound Rules section and check that the “Routing and Remote Access (PPTP-In)” rule is enabled. This rule allows to accept incoming connections on port 1723

Port forwarding
Below I have posted a screenshot showing the organization of port forwarding on my NetGear router. In the figure, you can see that all external connections on port 1723 are redirected to the Windows 7 machine (whose address is static).

VPN connection setup
To connect to a VPN server with Windows 7, a VPN connection must be configured on the connecting client machine
To do this, set the following parameters for the new VPN connection:
- Right click on the VPN connection and select Properties .
- In the tab Security in field TypeofVPN(VPN type) select option Point to Point Tunneling Protocol (PPTP) and in the section Data encryption choose Maximum strength encryption (disconnect if server declines) .
- Click on OK to save the settings

The use of VPNs has become an integral part of working with the Internet these days. Various technologies and specifications of virtual private networks are used both by huge international corporations and individual users. Some providers even provide internet services based on VPN servers. One way or another, connecting to existing VPNs or setting up your own VPNs is not difficult, but very necessary. Everything connected with it is clearly seen on the example of the Windows 7 system.
What is VPN connection
VPN (abbreviated in English for "virtual private network") is the common name for several technologies that allow you to create network connections on top of existing ones. VPNs are often used in closed corporations to restrict access to the corporate network. Thus, an internal network is created on the basis of an existing external network (most often - the Internet).
A simplified diagram of an icon symbolizing a VPN connection
Thus, data exchange is carried out using Internet technologies, while the corporate network (VPN) has closed access only for employees. At the same time, employees can be located in different parts of the world. Access is "closed" through cryptographic technologies such as encryption, authentication, and / or public key infrastructure.
A generalized VPN structure is shown in the figure below.
 The diagram shows, using lines and icons, what a VPN structure usually looks like.
So, two regional offices, the main office, as well as individual employees are connected to a common network. At the same time, communication between them is carried out through Internet technologies, and information security tools allow you to restrict the access of unauthorized users or completely close it.
For an individual user, VPN technologies can be useful for personal purposes as well. For example, if you connect to a remote VPN server, you can bypass the geographic restrictions of some web resources. That is, pretend that you are in another country. In addition, the location of the user is hidden in the same way. These actions are not limited by law, but access to some sites for such networks is closed.
In addition to the examples above, VPN is now used by some providers to group users into groups. This allows multiple computers to be connected to the same IP address. Thus, savings are made on the lease of Internet addresses, which means that the cost of connection services falls. In this case, the data transmitted by users remains encrypted.
How to connect and configure VPN services on Windows 7
Setting up a VPN connection on Windows 7 is pretty simple. You don't need any additional software. Just follow the instructions.
- First of all, go to the "Network and Sharing Center": open "Start" and select "Control Panel". In the open window you will see a button to enter the "Center ...". Select "Set up a new connection ...".
 In the Network and Sharing Center, click "Set up a new connection or network"
 - Select "Connect to a workplace" from the list. This paragraph contains the configuration of the VPN connection.
 Select "Connect to a workplace" from the list of network connection options
 - The program will ask: "How to connect?" In our case, you need to choose the first option. Then click Next. By the way, in this window you can view Microsoft data on VPN (click on the link at the bottom of the screen).
 When the system asks how to connect, select "Use my Internet connection (VPN)"
 - You will see a window for filling out the connection data. In the line "Internet address" you must specify a link to the VPN server. You can find it out from your provider and / or administrator. You can enter any "Destination Name". In addition, you need to check the box next to "Do not connect now ...". When you're done, click Next.
 Enter the required VPN connection information: internet address, destination name. You can get them from the provider
 - Go to the "Network" tab. Here, uncheck the box "Internet Protocol version 6 ..." to increase the data transfer speed, because, most likely, it is not used on your VPN server (unless otherwise stated). Now click once on "Internet Protocol Version 4 ..." and select its "Properties".
 Click on "Properties" with the cursor on "Internet Protocol Version 4 ..."
 - In the window that opens, select "More ..." You should not change the DNS server addresses here, as we will set them further according to your VPN.
 Click on "More ..." to go to additional. menu
 - In all previously opened windows, click "OK". The VPN connection is ready to use! You can run it from the "Desktop" if you created a shortcut earlier.

Now you need to enter your username and password to connect to the VPN network. If you are not sure of their correctness, contact your administrator (provider). In addition, for the convenience of accessing the VPN server, you can specify its domain. If you are just setting up an Internet connection to an ISP, leave this field blank. Now click the "Create" button.  Enter your username and password in the appropriate fields when connecting to the workplace
A message indicating that the connection is ready appears. Just click Close.
 Close the VPN Ready message window
In the previously opened window "Center ..." click on "Change adapter settings".
 In the Network Center, click on "Change adapter settings"
A window will open in front of you, which contains data on the available connections. The newly created connection is named as the Destination Name you entered earlier. Click on it with the right mouse button. If you want, you can create a shortcut to this connection on your desktop. This will make it easier to access the network. Then select Properties: Before you can start using the VPN, you need to change a few things.
 Create a connection shortcut if you like and then go into its properties
Now be careful. In the small "Properties" window of your connection, switch to the "Security" tab. Choose the type of VPN network that depends on the specifics of it. Contact your administrator or provider for this information. For example, if you want to connect to some remote server, the connection type is usually "PPTP". But this is just an example. Be sure to check the correctness of your choice.
 Select the appropriate VPN type; if you do not know it, contact your ISP or administrator
Please note that on the same tab there is a drop-down list "Data encryption". You can choose an item that suits you personally. But this does not guarantee uninterrupted operation of the connection. Such data should also be checked with the administrator.
In the "Additional TCP / IP Settings" window on the "IP Settings" tab, uncheck the "Use default gateway on remote network" box. If you do not do this, your internet traffic will go through the VPN server, which will slow down your data transfer rate.  Uncheck "Use default gateway on remote network" to increase connection speed
If you're just connecting to a remote server, go to the DNS tab. In the "DNS-connection suffix" column, enter the suffix provided by the administrator. Thus, you do not have to enter it every time to go to a specific site.
Video: How to Install and Connect to VPN in Windows 7
Possible connection problems
There are a number of errors that may cause the VPN connection to fail or not work properly. But before we move on to their description, let's get acquainted with the most common problem: when you turn on the VPN, the Internet connection is lost.
What to do if Internet connection is lost after launch
This problem is relevant in the event that you are connecting to a certain server, and not to the provider. It doesn't matter how you are connected to the Internet (cord, Wi-Fi, another VPN), the connection is lost for the same reason. Moreover, it is quite simple to restore it.

As we indicated above, enabling this item can slow down the speed of the Internet connection, since the traffic will pass through the VPN server. If the connection is completely lost, then the gateway for remote connections is closed on the server. After unchecking the checkbox, the Internet will work again.
VPN connection problems and solutions
Errors when trying to auto-connect to a VPN connection are numbered with a three-digit number - an error code. This code appears in a separate window, as shown in the screenshot.
 VPN connection error window; in this case, error 807 popped up
Here are the ways to fix the most common mistakes.
400 Bad Request
This error means that the request from your computer contains some data incorrectly.
- Try turning off any additional networking software.
- Refresh your browser and reset its settings.
Error 624

Error 691
This error can have many reasons, but they are all somewhat similar. So, it appears if you did not pay for the services to the provider, entered the wrong username or password, incorrectly specified any VPN connection settings, or the connection has already been established. One way or another, check all the entered data in the connection properties or simply create it anew, as we did above.
Error 800
This error indicates a problem with the VPN server itself. Perhaps it receives too many requests that it does not have time to process, or there is a load directly on your virtual network segment. In this case, you can only report the problem to the server provider / administrator and wait for a solution from their side.
 Error 800 means the VPN server is overloaded
Error 650
When this error occurs, you need to check the health of your equipment: network card and cable. For this, it is better to call the master. Before doing this, enter the "Properties: Internet Protocol version 4 ..." (see the item "What to do if the Internet connection is lost after turning on the VPN?") And set the radio button to the "Obtain an IP address automatically" box.
 Enable automatic IP selection
Thus, the server itself will provide you with an IP address from the list of available ones with each new connection.
Error 735
If error 735 appears, the VPN connection is not configured correctly. Most likely, a specific IP address is specified. Set it to automatic selection, as in the case of error 650.
Error 789
In this case, you need to enter the properties of the VPN connection and go to the "Security" tab (we have already described how to do this earlier). Select "Automatic" from the "VPN Type" drop-down list. This will fix the problem.
 Set automatic VPN type selection to check network health
Other errors
In addition to the above, there are many other local errors. If you are an advanced user, sometimes you can solve them yourself (for example, open some ports in the firewall for the server to work), but most often your ISP or server administrator should be responsible for solving them. The only thing you can do is go through all the points we have proposed and check that the VPN connection is configured correctly. If the connection worked before, but now it is gone, the problem is definitely on the server side.
How to turn off automatic VPN connection
Sometimes, you may need to disconnect your VPN connection temporarily. For example, to connect to a different network or to test the ability to reconnect. To do this, go to the "Control Panel" from the "Start" menu. Open the list of settings "Network and Internet" -> "Network Control Center ...". Click on "Change adapter settings" on the left. Your connection will be displayed in the window. Right-click on it and select Disable.
 To disable VPN, select the corresponding item of the context menu
In addition, once disconnected, you will be able to completely remove the VPN connection. This is necessary if you configured it incorrectly or if you no longer need it. Just click "Delete" in the same context menu.
Create and mask your own connection
In this section, we will talk about the possibilities of masking a VPN connection for a regular user. This may be needed in different cases. For example, if you want to create your own small server to control your home computer from a workstation, which would be as protected as possible from outsiders. Or you need to mask your IP address through a remote VPN server in order to access internet sites and shops in other countries.
How to create a VPN with an OpenVPN client
If you want to create a personal small VPN network or connect to a geographically distant server, you will need OpenVPN software and configuration files from your ISP. These files should be selected according to your purposes. Please note that the VPN provider may not have anything to do with your ISP. VPN services are paid.
- Download the OpenVPN installer from the developer's site. After downloading, run the installer (all actions on the computer must be carried out on behalf of the administrator) and click Next.
A program downloaded from other sites may turn out to be a fake or even a dangerous virus.
 Click "Next" at the beginning of the OpenVPN installation
 - Read the user agreement and click I Agree.
 Click the I agree button after reading the documentation
A list of installed components will appear in the installer window. Without changing anything in it, click Next.
 Without changing anything in the list of installed components, click Next
Specify the desired path to the OpenVPN program and click Install to start the installation.
 Select the desired path to the program and click Install
When installing the program, Windows will ask for permission to install the driver, since OpenVPN creates a virtual device. Just click "Install" in the window that appears.
 Install the virtual device driver, OpenVPN won't work without it
After the installation is complete, click Next and then Finish.  After the installation is complete, click Next, then Finish
Now you need to copy the files provided by your VPN provider to a special folder of the OpenVPN program. Follow the path [...] OpenVPN \ config (here "[...]" is the path to the program you selected during installation), right-click and click on "Paste".
 Paste the provider files into the config folder
Go to the Start menu and find OpenVPN under All Programs. Right click on the OpenVPN GUI file and select Properties.
 Enter OpenVPN GUI Properties
Switch to the "Compatibility" tab and make sure that the checkbox next to "Run this program as administrator" is checked. Otherwise, it will not work.
 Make sure the OpenVPN GUI program will run as administrator
After clicking OK, launch the OpenVPN GUI from the Start Menu. The program icon will appear in the notification area on the taskbar. Right click on it and select Connect.
 Right click on the program icon and click Connect to start
Your VPN connection is ready to use!
Video: detailed configuration of OpenVPN for advanced users
Masking a VPN connection with Obfsproxy
So, the VPN connection is ready to use. Now let's move on to masking it directly. Obfsproxy is the best tool to help you with this task.
The steps involved in installing Obfsproxy require basic knowledge of programming and administration.
This program is based on Linux systems for multi-level encryption of transmitted data. The complete cryptographic algorithms are, of course, kept secret, however, Obfsproxy has proven itself well among both advanced administrators and casual users. Therefore, its use guarantees complete isolation and protection of information transmitted over the VPN network.
As we said, Obfsproxy is developed on Linux. Therefore, to use it in the Windows 7 environment, you need a Python compiler. You can download it from the official website of the Python Software Foundation. The recommended version is 2.7.13.
 Install Python on your computer
In addition, you need a Visual C ++ compiler for Python. You can download it on the Microsoft website. It is called something like this: Microsoft Visual C ++ Compiler for Python 2.7. Note that the compiler version (2.7) must match the Python version (2.7.13). Install the program to any folder on the C: \ drive.
 Install Microsoft Visual C ++ Compiler for Python 2.7
 Install OpenSSL Light v1.0.2d
Then the matter is small. Run Command Prompt as administrator: in the Start menu, type cmd in the search bar, right-click and select Run as administrator.  Run Command Prompt as Administrator
Enter the following commands in the command prompt window in the sequence shown (after entering each command, press Enter):
 Run OpenVPN as administrator
It is necessary to execute the first and fourth commands from the list before each launch of OpenVPN. In this case, you do not need to close the command line, otherwise obfsproxy will not work.
Your VPN connection is now secure and disguised!
As you can see, VPN is not that difficult to work with. Any user with minimal knowledge can not only connect to the existing network, but even create their own. In addition, cryptographic protection of personal data, it turns out, is also available to everyone. The main thing is to be vigilant when connecting to the traffic of foreign servers. After all, any actions performed by their administrators will be governed by the laws of the country in which the server is located.