Installing an operating system from a flash drive is the most convenient way. Create bootable media using one of several utilities, then connect it to your computer / laptop and start the installation process. You can always keep a removable device with an ISO image of Windows 8 at hand and not be afraid of an urgent reinstallation of the OS. Let's figure out how to install Windows 8 from a USB flash drive to a PC or laptop.
Before installing the OS on your computer, you need to prepare all the components, namely the bootable USB flash drive and BIOS / UEFI. To record the operating system distribution, you need a drive with at least 8GB of memory (for the full version of Windows 8), as well as a special program (you can use Microsoft's Media Creation Tool or a third-party utility). After a simple BIOS setup, just connect the USB flash drive to USB and start the installation.
For Windows 8 to work correctly on a laptop or computer, the following configuration is required:
- processor with a minimum frequency of 1 GHz;
- 1 / 2GB of RAM for 32/64-bit OS versions, respectively;
- 16 / 20GB of free hard drive space for 32/64-bit OS;
- graphics accelerator with support for DirectX9 and higher.
Now let's figure out the preparation and installation process in the form of step-by-step instructions.
Media Creation Tool
An official utility from the developers will help you download and burn a full version of Windows 8 in 32 or 64 bits. The program is downloaded for free from the link when you click on the "Download tool" button. After that, follow the steps described:
- Run exe.

- On the first screen, select your preferred language, operating system release and architecture. Then click "Next".

- Now select the first item to automatically write the downloaded installer to your USB device.

- Select the connected USB flash drive from the list and click "Next".

- Agree to delete all files.

- It remains to wait until Windows 8 finishes loading and writing to the drive. On the screen, you will see the approximate time until the end of the process. When the completion reaches 100%, close the program with the "Finish" button.

We use third-party recording programs
What if you have already downloaded the ISO image yourself via torrent or from another site? In this case, the utility for creating bootable disks will help. Let's look at the procedure using UltraISO and Rufus as examples.
The Ultra ISO application can be downloaded and installed at the link http://ultraiso-ezb.ru/. After installation, run the program and follow the instructions:
- In the window that appears, click "Trial period".

- In the program window, click on "File" - "Open".

- Select the downloaded image and click "Open".

- Now go to the "Boot" menu - "Burn Hard Disk Image".

- Select the drive (1) and click "Burn" to start the process.

- In the window that opens, click "Yes", agreeing to format the flash drive.

- Wait for the end of the recording.

Instead of UltraISO, you can burn bootable media through Rufus. Download the utility from the link https://rufus-usb.ru.uptodown.com/windows. The software does not require installation - just run the downloaded file and follow the steps:
- Select the connected USB flash drive (1), set the parameters from the screenshot (2).

- Enter the name of the drive and start recording with the "Start" button.

- We confirm the deletion of all data.

- Wait until the end of the recording process and close the program.

Now you know how to capture a Windows 8 image without using the official Microsoft program. Let's start configuring the BIOS.
Boot priority setting
Consider the case of setting via BIOS with a standard menu and via UEFI with mouse support. In the first option, you need:
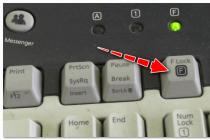
- Launch the BIOS menu at computer startup. A separate key is responsible for this. It is different for all manufacturers of BIOS and motherboards. For example, on ASUS or Acer, the settings are opened by pressing Del or F2. On a Samsung laptop (for example, Samsung RV 513), the entrance is carried out with the F10 key, etc. You can find out the button you need on the home screen when you turn on your PC.

- Now open the "Boot" section. Navigation through the menu is carried out by arrows on the keyboard.

- In the Boot tab select Boot Device Priority and press Enter.

- Then open "1 st Boot Device" and put "Removable Dev." (removable media) or the port where the flash drive is connected.

- Press F10 to save changes and exit.
If you are using a new PC or netbook / laptop, then it may have UEFI installed with a graphical interface and mouse support. Also use the prompt on the home screen to enter the menu. For Lenovo laptops, you need to press the F2 key or the Fn + F2 combination. HP devices use De l, F10, F11, or F12. In the menu you need:
- Open Boot Menu using F8 or a separate button on the screen.

- In the boot menu, select the port with the connected USB flash drive. The name of the drive must be preceded by a UEFI signature.

- After that, the PC will automatically reboot. To install the OS, you must complete this procedure once. Then the download priority will be set by default.
Installation steps
So, after the settings in the BIOS, let's proceed with the installation:
- First, select the language options and click "Next".

- Now choose "Install".

- Enter the license key or skip this step (you can activate the OS after installation).

- Select the required assembly from the list.

- Check the next screen and click Next.

- Click on "Custom".

- Now you need to start creating a system partition on your hard drive. You can create a new one (1) or format an existing one (2).

- When creating, specify the desired size and click "Apply". When allocating space for the system partition, be guided by the OS weight specified in the requirements, and add 20-25GB for additional programs / drivers.

- Next, the copying of Windows files and installation will begin. Typically, the process takes up to 30 minutes when installed on the HDD.

The computer may restart during the installation process. After completing the procedure, carry out the initial settings (you can skip them and come back later). Now you can enjoy the new and fresh Windows 8!
Conclusion
There is nothing complicated about recording the Windows 8 installer and installation. Download the image, write it to a USB flash drive using one of the described programs and run the installation on your computer. You can create bootable media through the Media Creation Tool if you don't want to search for the finished ISO on third-party sites and torrent trackers.
Video
If you have any problems or questions regarding the Windows 8 installation procedure, check out the attached video. It provides visual instructions on this topic.
Several years ago, after a long wait, Windows 8 was released. Reactions have varied with the radically redesigned look of windows. Regardless of your personal opinion, everyone can agree that Microsoft's new OS will dominate for years to come. Windows 8 has received a huge amount of attention, the company has pushed to the sidelines a lot of features that are only now starting to be implemented in Windows 10. One such innovation is Windows To Go (WTG).
What is Windows To Go?
Windows To Go lets you install a fully functional Windows 10/8 environment. An operating system installed on an external hard drive or USB flash drive, similar to the previously created Live CDs. Bootable USB flash drive Windows To Go, makes a portable system similar to Linux, which is designed to run from USB drives or flash drives. With WIndows To Go, you can run your system on any computer, anywhere in the world.
This feature is primarily targeted at corporate clients with the idea that a corporate environment can be taken anywhere. WTG provides a secure environment full of software when an employee works remotely or from a shared computer. Because Windows To Go was designed with this special use in mind, Microsoft does not officially support the use of non-enterprise versions of Windows in the WTG environment. As they say, it does not support and this does not mean that it is impossible.
There are several ways to install any version of Windows 10/8 into a USB flash drive. You just need to know what is reported there, what are the restrictions. Some of the limitations include no BitLocker protection, no store access, and the inability to boot BIOS and UEFI computers.
Differences between Windows To Go and a typical Windows installation
Windows To Go is designed to do any job, just like regular versions of Windows. Microsoft has disabled a number of features:
- Internal drives work offline (not connected to the network) so that data is not accidentally exposed.
- The Trusted Platform Module (TPM) is not used. This is because the TPM is tied to a specific computer, and Windows To Go drives are designed to move between computers.
- Hibernation is disabled by default to make it easier to move between computers.
- Windows Recovery Environment is not available. If you need to recover your Windows To Go drive, Microsoft will prompt you to overwrite it with a new one.
- Updating or rebooting Windows Workspace for Go is not supported. Factory reset for computers does not apply when WTG starts.
- Windows 8 or Windows 8.1 WTG drives cannot be upgraded to Windows 10, and Windows 10 WTG drives cannot be upgraded to future versions of Windows 10. Therefore, the drive must be formatted for newer versions.
In addition, Windows to Go discs can be loaded onto multiple computers. Therefore, when the WTG disk boots up first, it detects all the hardware on the host computer. It will then install any required drivers, which may require multiple reboots. Subsequently, when Windows to Go USB boots on this host computer, it will be able to identify this computer and automatically load the correct drivers.
Computer requirement
Windows to Go will run on hardware that has been certified for use with Windows 7 or later. If you want to be sure before you start using, here are some of the characteristics:
- It should be able to boot from USB.
- Minimum 1 GHz processor.
- At least 2 GB of RAM.
- Make sure the architecture of the Windows image is compatible with the processor. This means that you will not be able to run 64-bit Windows to upgrade to a 32-bit processor.
- Windows to go from a Windows RT computer is not supported.
- Windows to go to Mac is not supported.
USB flash drive for Windows to go
In theory, any USB 2.0 or 3.0 drive with 16GB of storage will work with Windows for Go, but:
- At the same time, USB 3.0 will work twice as fast, which will speed up file copying and performance.
- It is better to use a flash drive of at least 32 GB to store more files and information.
- Avoid cheap USB drives due to the high number of read / write cycles during normal Windows operation.
- Microsoft revealed some USB drives certified by WTG, in case you are curious.
How to create a Windows To Go USB stick with any version of Windows
1 way... There are several ways to customize the windows environment. When downloading programs from sites, do not be alarmed, sites are in English, and downloaded programs are in Russian. Let's take a look at some of them. You must have a USB flash drive, the very image of Windows 10 or Windows 8. Download the application AOMEI Partition Assistant and install it on your computer. Insert your USB stick or external drive into your computer. Run the downloaded program and follow these steps:
- Click on Windows To Go Creator.
- Click on Browse to select the windows iso image.
- Click again Browse and specify the path to your windows 10 Pro image on a computer or another version of Windows.
Good afternoon. I've written quite a lot about portable programs, and why I eventually switched to them. Of course, not all, but still a lot of programs I have in this version. However, you can move on and create a portable version of Windows and boot from under it, from your hard drive (or in my case, from a USB flash drive), work in a convenient environment for you. I was asked about Windows to Go, but this function turned out to be only for, and I have a Pro license, and until someone gives me an older sister, I will not be able to write an article about this function. So today we will consider a simpler option.
So, what we need:
- image, preferably Windows 8 or 8.1 (download from any torrent, MSDN image);
- an external hard drive (preferably, as it is faster than most flash drives) or a USB flash drive. You can, of course, use USB2.0, but I strongly recommend that you buy USB3.0, since your comfort depends on the speed of work (I show an example on a SanDisk Extreme 32Gb flash card, it is defined as a hard drive and has excellent speed indicators (200MB / sec));
- the program is a small program WinToUSB.
1) Download and install WinToUSB. After installation, we launch and see the simplest program window:
2) Select the ISO file of the installer of the system that we want to see on our USB drive. A selection of the edition of the system you want to install appears. Select and click Next:

3) In the drop-down list, select the device for recording and specify the partitions for the boot and system sectors. To do this, first one section with a size of 350MB for the system partition (you do not need to set a letter for it), and then the second one for installing the operating system on the entire remaining space.

4) After clicking the Next button, the process of installing the operating system on a USB drive will start:

5) When finished, press the "Home" button. We reboot the computer with the choice of USB disk as the boot device.
In our life, there are situations when working on a PC running your own OS is vital. In particular, if you do not want to leave traces of your work, even in temporary files. That's why Microsoft invented Windows To Go mode in its Windows 8 operating system. When using this mode of operation, Windows 8 will be installed directly on the USB flash drive. This means that the computer will boot directly from the USB stick.
It should be borne in mind that a bootable flash card cannot be loaded when connected via a USB hub, but only directly to a computer's USB port. The system requirements for a Windows To Go PC are exactly the same as those for Windows 8. Accordingly, a computer that can run Windows 8 and Windows 7 will do the job. Despite the fact that, according to Microsoft experts, only certified USB flash drives are suitable for working with Windows To Go, in my opinion, any others will do. The main thing is that the volume should be at least 20 Gb, although I managed to work with 16.
It should be noted that the first boot from a USB flash drive will take much longer than the subsequent ones from the same PC, because the necessary drivers will be loaded. Subsequent downloads will use the already installed drivers.
At the same time, it should be understood that some of the standard features of Windows 8 will not be available to you:
- After booting in Windows To Go mode, your built-in hard drive will be inaccessible as it will be in an offline state.
- If you are using BitLocker encryption, please note that the Trusted Platform Module (TPM) is not used.
- Hibernation is disabled by default.
- Windows Recovery Environment is not available
Please note that by default, in the "wizard" mode, creating a USB flash drive for Windows To Go mode is available only in the Windows 8 Enterprise version.
Create Windows 8 To Go using a wizard
What you need to create Windows To Go:
- USB flash drive (portable USB drive, USB hard drive) with a volume of at least 32 gigabytes. USB 3.0 devices are recommended for best performance
- Windows 8 Enterprise installed on a computer
- Windows 8 Enterprise installation image or disk.
After that, select the medium on which you will install the OS. In our case, this is Kingston DataTraveler Workspace 32 Gb USB 3.0
Fig. 1 Kingston DataTraveler Workspace 32 Gb
Technical specifications Kingston DataTraveler Workspace 32 Gb
- Capacity: 32GB
- Speed:
- Maximum sequential read / write speeds: 250 / 250MB / s
- Average 4KB Random Read / Write: 3750/9800 IOPS
Installation
To install using the wizard, click Win+W in the line enter to go or windows to and launch the Windows To Go app.

Figure 2 Launching the Windows To Go Wizard
Mount your Windows 8 Enterprise image or insert the disc into your DVD drive. If for some reason the install.wim file cannot be found automatically, specify the path manually.
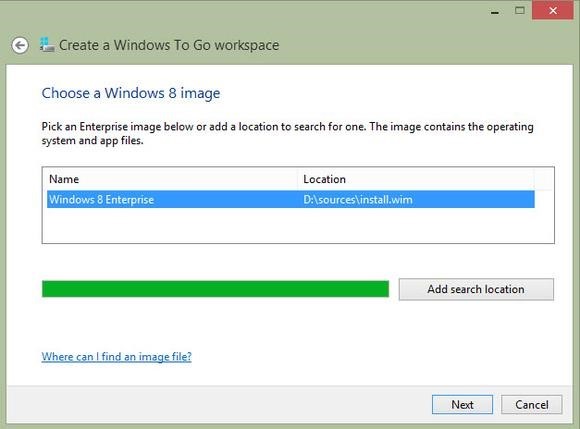
Rice. 3 Specify the path to install.wim
If you do not have Windows 8 Enterprise, you can create a USB flash drive with Windows To Go on a computer running Windows 8 Professional.
Create Windows 8 To Go on a Windows 8 Professional computer
Creating Windows 8 To Go requires creating a dedicated partition on your USB drive. For this you can use the utility diskpart.
- Start a command prompt window with administrator rights.
- Make sure your USB device is connected.
- In the command prompt window, type diskpart.
- Then type list disk and you will see your connected usb device.
- Type in the command line select disk #, where # - corresponds to the number of your USB disk and press Enter. DO NOT MIX THE DEVICE!
- Remove partitions from the selected USB device by typing clean and press Enter.
- Then create a partition on your USB drive by typing at the command line create partition primary.
- Format the section format fs = ntfs quick.
- Make the selected section active, type active and press Enter.
- Dial exit and exit diskpart.
- Close the command prompt window.

Rice. 4 DiskPart
For further work we need the Windows Automated Installation Kit (AIK) for Windows® 7
- Double click the Windows 8 ISO file to mount it in Windows 8.
- Copy \ sources \ install.wim to the same folder where you copied Imagex.exe from the WAIK package.
- Check which letter your USB drive is.
- Run the following command from the folder that contains Imagex.exe and install.wim:
imagex.exe / apply install.wim 1 d: \(Replace letter d to the letter that corresponds to
your USB drive.
- After the image is deployed to your USB drive, you must make it bootable. To do this, launch a command prompt window with administrator rights and type the following command: bcdboot.exe d: \ windows / s d: / f ALL(Replace letter d with the letter corresponding to your USB drive).
- You are now ready to use your new Windows To Go USB device.
As you can see, everything is quite simple.
WinToUSB
It is worth noting that not all users have Windows 8 Enterprise, which allows you to install Windows 8 on a USB flash drive. However, in addition to the above method, there is a special free WinToUSB software that allows you to do the same job. This is how it works.
What do you need for this?
- Windows 8 installation disk or iso file of such disk. Why Windows 8? Yes, because Windows 7 is not portable and may have driver or activation issues if you use it on different PCs.
- USB flash drive or memory stick. It is desirable for USB 3.0 (it will work faster), however, it will work only under Windows 8, since additional drivers are needed for Windows 7 in this case.
- WinToUSB. This is a simple program that will make the installation process easier for you.
Download WinToUSB.
Install this software (you need administrator rights to install).

Fig. 5 Installing WinToUSB
At the end of the installation, you will be prompted to choose which OS you want to install, select the ISO file and USB-drive.

Fig. 6 Selecting the installed OS
After that, you have to select the system and boot partitions of your USB drive.

Rice. 7 Select the boot and system partitions of your USB drive
It is worth considering that these sections may overlap.
After a short deployment of the system, you can boot from the external drive. Your OS is ready to go.
Windows To Go PC Performance
Typically, the main question that is always asked before using Windows To Go is the speed of running Windows To Go.
As I said, when creating this article, I used a Kingston DataTraveler Workspace 32 Gb USB 3.0 device and a Lenovo T530 laptop.
The results, frankly, surprised me.
In fig. 8 shows the result of the performance test when booting from the hard disk.
 Rice. 8 Performance with built-in hard drive

Rice. 9 USB 3.0 Boot Performance
As you can see, you can see that the hard drive performance is even better when booting from USB 3.0.
Conclusion
What can you say? If you use the recommended USB 3.0 hardware (in our case, Kingston DataTraveler Workspace 32 Gb USB 3.0, you can use any other recommended hardware), then the performance of the laptop does not decrease.
V. F. Bezmaly
MVP Consumer Security
Microsoft Security Trusted Advisor