Greetings, dear readers.
It is already rare to find laptops in use that do not have the ability to connect to the network via wireless communication. In most cases, it is enough to simply indicate the required connection in the system, and everything is registered independently. But sometimes, for various reasons, this does not happen. Therefore, today I want to share how to set up WiFi on a Windows 7 laptop, as well as the main points related to this issue.
In most cases, a plastic disk is supplied with the computer, which contains all the necessary programs, including drivers. The latter are installed simply - insert the portable memory into the appropriate slot, the auto-launch of the application will appear on the monitor, in which you need to set the full location of all the necessary software.
But sometimes such a disk may not exist - you should not be upset. Go to the official website of the developers, be it Samsung or Asus, and download the packages you need. This can be done through another device as well.
If the device came to you without drivers, it is better to carry out manual installation in a specific order. So, first you need to install the motherboard, and only after that everything else, including the module for the wireless network. To update the components, you must restart your computer.
Turning on( )
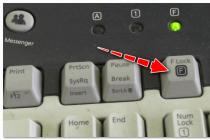
After reinstalling all the necessary software, it is worth starting the Wi-Fi adapter. This is done right on the laptop keyboard. To do this, press the button on which the antenna and the waves emanating from it are drawn. Often, to start, it works only in combination with the " FN».
After that, the system will automatically start searching for available networks and display a list of those found. We select the required line and “ Connect". We specify the password and that's it. Now you can use the network without any problems.
Step-by-step instruction( )
Often, when several computers with different versions of operating systems are connected to each other, it is necessary to manually set some settings.
We go to " Start" and "". At the same time, in some versions of Windows 10, the desired menu can be found through the search.

Then we go to "".

We are interested in "".

Find a wireless connection and click " Connect / Disconnect».
Enter the security key.
Now press RMB on the connection. We are interested in the string "".

On the tab “ Net"Find the protocol" TCP / IP V4". Press "".

In Windows XP, like all other versions of operating systems from Microsoft, you will see several lines in which users need to specify series of numbers.
So, in order to connect the computer and the access point, you must enter the numbers opposite the IP address " 192.168.1.2 ”, Where the latter is different for each network element.
In the next line we write “ 192.168.1.1 ».
DNS addresses can be obtained directly from your service provider.

Click " Apply" and " OK».
Everything should start working right away.
If suddenly for some reason the situation does not change, it is worth returning the tick “ Receiving in automatic mode».
Sharing the Internet from a laptop( )
There are several ways to create a full-fledged access point from an ordinary computer without a router. But we will only consider the simplest one - using third-party software. Let's turn to.

To distribute the Internet, you just need to install the application, launch it and enter a few simple settings. Everyone can figure it out.
However, it is worth noting that for proper operation, the device must be connected via a cable. After all, the program is not able to simultaneously receive a signal and give it right there.
It is worth noting that there is also a way to do this using the command line, but it is long and not entirely convenient. This means that we will not consider it.
Signal problems( )
Some users may encounter a situation where the device cannot find the signal. First, it is worth testing the system on other hardware. It can be a tablet, smartphone, or even a laptop. If the situation is exactly the same, you need to contact the access point. Perhaps it is located in a place that does not allow waves to pass through well.
An important factor is the other electrical elements that are located in the distribution area. And this does not depend on the provider, be it Rostelecom or Byfly.
Often, the settings of the device itself may also be set incorrectly for receiving the Internet from the provider. Suitable ones are found directly with the service provider or in the corresponding documentation that comes with the equipment.
Many providers even provide a video that explains everything in detail.
I hope this article will help you fully enjoy using the Internet.
I welcome everyone! Today I will tell you how to set up wifi on a laptop. Setting up wi-fi on a laptop is not a difficult task. The first thing to know is if your device supports this feature. Modern laptops are already equipped with a wi-fi module, but some manufacturers still produce devices without wi-fi support, but these are mostly cheap models.
If your laptop is not equipped with a wi-fi module, you need to get a special adapter. To understand if there is wi-fi on a laptop, it is enough to carefully examine the case of the device. Usually, manufacturers stick a sticker under the keyboard or at the bottom of the case, which indicates the presence of wi-fi.
 In addition, the wi-fi symbol is also located on the keyboard function button, which is responsible for turning on the module. The button should be used in conjunction with the Fn key.
Turning on wi-fi on a laptop

- If it's an Acer brand, then the keys are Fn and F3. You will see a connection manager appear, where you will need to turn on wi-fi or Bluetooth.

- On Asus devices the buttons are Fn and F2. A connection icon will appear, there you need to select wi-fi or Bluetooth.

- Toshiba branded notebooks require pressing the Fn and F8 keys. Further actions are similar.

- For Samsung the keyboard shortcut would be: Fn and F12.
To determine the key for turning on wi-fi, the icon in the form of an antenna will help you. If pressing the buttons does not turn on wi-fi, then there may be several reasons for this:
- incorrect operation of the operating system;
- driver problem or conflicts;
- viruses, about that.
The problem is usually solved by reinstalling the drivers or.
What if the laptop doesn't have a wi-fi module?
Connecting to a wi-fi access point is possible using a special adapter; its cost varies from 15 to 30 dollars. You can easily find such an adapter in any computer store. In terms of external dimensions, the device can be compared to a flash drive. The device is used in the same way, just plug it into a USB port.
Lack of external adapter- high probability of breakage if handled roughly. This also happens because the part protruding from the laptop remains unprotected. Therefore, the built-in wi-fi module installed in the service center will not cause problems. Although this solution will be more expensive, you will feel more comfortable working.
In order to turn on an external wi-fi adapter, you need to press a special button located on the case.

Checking the correct installation of the drivers
If your drivers are installed incorrectly, then even the access point may not respond to a lit indicator and wi-fi will not work. First of all, in this case, you need to check the performance of the network card. Right-click on My Computer and go to Properties.
Next, go to "Equipment" -> " Device Manager". You will notice the entire list of devices that are installed on the laptop. We need to find the section " Network adapters“, And there we are looking for“ Wireless ”, wi-fi or Wireless. If you see a yellow triangle with an exclamation mark next to a module, then be prepared for whatever is needed.

Download drivers from the Internet or use the disk that comes with the laptop. Installation of drivers is standard and not much different from installing any program. Such a scenario is possible that wi-fi will not work immediately, but only after several installations. For the adapter to work well and easily detect wireless networks, you must set it to automatically obtain an IP address.
How to set up WIFI on a laptop and how to enable automatic obtaining of IP addresses in Windows Xp.
So we almost sorted out the question of how to set up wifi on a laptop. But now we need to enable automatic obtaining of an ip address. For this:
We open " Control Panel“, We put the classic view.


We make the transition to " Network connections“, Right-click on the required connection, select“ Properties ”. The components will open there, we are interested in the TCP / IP protocol, click again on Properties.

In the window that opens, we set the automatic receipt of the Ip-address, as well as the receipt by the automatic DNS, click OK.

Configuring Automatic Obtaining IP Address for Windows7
We need to open the control panel, go to " Network and Sharing Center«.
In the column on the left we make the choice “ Change adapter settings«.
A window will open, there you need to select the required network and click on it with the right mouse button, select "Properties". There we choose to automatically obtain an ip-address and DNS. Click OK. For Windows 8, similar steps are taken.
Connecting to an access point.
You will notice a list of available networks. If you have your own access point, then the adapter will certainly find it. The adapter is able to find nearby networks that may belong to your neighbors. You can choose any network that does not have a lock icon. This means that the owner of the network does not mind someone using his access point. If you have your own network, then click on it, in the window that appears, enter your username and.
Moreover, there is another option for connecting to the internet. If any establishment nearby has wi-fi, then perhaps the owner will provide you with a password and you will be able to connect to the network if your adapter will finish this distance.
After the network is selected, you must click "Connect". After that, enter the password twice and see the signal and connection speed.
After the wi-fi connection is completed, we will see the corresponding icon in the tray.
We open the browser, a page of the service provider appears in front of us. Click on the "Login" button, and we get to the page specified as the home page in the browser properties. If the connection is often dropped, then the laptop is probably placed in a place where the signal from the wireless network is weak. In this case, you can drag the laptop closer to the access point.
On a note! I recently wrote a lot of useful articles and I want you to read them too, namely, what it is. But for gamers, I wrote in games or.
From Uv. Evgeny Kryzhanovsky
Hey! Let's figure it out today with the inclusion of Wi-Fi on laptops that run on Windows 7. For some reason, many people ask such questions. But as a rule, Wi-Fi on a laptop is turned on by default. That is, if the driver is installed, then you can immediately connect to Wi-Fi networks. There is no need to make special settings, and it is not necessary to turn on Wi-Fi on a laptop in a special way. No, there are, of course, different cases and problems when you cannot connect to Wi-Fi without dancing with a tambourine. Now we will understand everything in detail.
If you are faced with the problem of turning on Wi-Fi, then the status of your Internet connection will most likely be as follows:

If the network icon is simply crossed out with a red cross, then there are no Wi-Fi networks available for connection within the radius.
Before moving on to any instructions, let's figure out what turning on Wi-Fi on a laptop and turning on Wi-Fi on Windows 7 (in the operating system itself), these are two different things. Therefore, I will divide the article into these two points. This will make it much clearer and easier to understand this issue. What is our main goal? That's right, connect to a Wi-Fi network. You can do it! Follow the instructions.
Before moving on to any settings and bothering yourself with unnecessary information, try connecting your laptop to a Wi-Fi network right now. For this instruction:. Perhaps you already have everything included, configured, and you will connect without problems.
If something does not work out, then see this article to the end, or possible connection problems that I described in the article at the link above.
Turn on Wi-Fi on a laptop: with a keyboard shortcut, or a switch on the case
Almost every laptop: Asus, HP, Acer, Lenovo, Del, etc., has either a dedicated switch or keyboard shortcut that turns Wi-Fi off and on. To be honest, I don't know about other laptops, but on my Asus, pressing the FN + F2 key combination turns off all wireless modules. The pop-up window says "all wireless device on". Which means all wireless interfaces are on or off. At the same time, Wi-Fi does not disappear.
These keys, or switches, should only be checked in extreme cases, when nothing else helps. And manage wireless connections from under Windows. Since the combination of special keys does not always work, or they work, but not as they should.
On the same Asus laptop, to turn off or turn on Wi-Fi, you need to press the key combination FN + F2.

On laptops DEL, this is the key combination Fn + F2, or Fn + F12. On the HP- Fn + F12. Lenovo- Fn + F5 (or, look for a dedicated switch on the laptop case)... If you have Samsung, then these are the keys Fn + F12, or Fn + F9. And on Acer- Fn + F3.
As I already wrote, a special switch can also be used to turn on Wi-Fi. Take a look at the case of your laptop. And the key that is used in combination with Fn usually has an antenna painted on it.
It is better not to touch these keys at all. As I wrote above, they do not always work adequately. And there is little sense from them. Everything is smooth, in most cases, pressing the keys simply tells the system to turn off the Wi-Fi adapter.
Turning on Wi-Fi in Windows 7
Let's now figure out how to manage the wireless adapter in the operating system itself. Let's start with the most important. And most importantly, it is an installed, correctly working Wi-Fi driver (Wireless adapter). If there is no driver, then no matter how hard we try, we will not be able to turn on Wi-Fi. But first things first.
First, let's check if we have the adapter enabled. To do this, right-click on the internet connection icon (in the lower right corner), and select Network and Sharing Center... On the left, select Change adapter settings.

If near the connection "Wireless network connection" written "Disabled" then right-click on it and select Turn on.

After these steps, the status of the Internet connection should change. And if there are Wi-Fi networks available for connection within the radius, then they will be displayed in the list, which can be opened by clicking on the icon itself. You will be able to select the desired network and connect to it.
If you do not have a "Wireless Network Connection" connection, then most likely you do not have the driver for the Wi-Fi adapter installed. Install the driver and everything should work.
How to check if the Wi-Fi adapter is working in the device manager?
You can also go to Device Manager and see if there is a wireless network adapter and how it works. To open the device manager, do this: go to Start, then Control Panel... Selecting a section Hardware and Sound... In the tab Devices and Printers click on Device Manager.

In the manager, open the tab Network adapters... The Wi-Fi adapter has something like this name: "Atheros AR9485WB-EG Wireless Network Adapter"... You can navigate by word Wireless... You should have something like this:

If you see an arrow-shaped icon next to the driver, then right-click on the adapter itself and select Engage.

If there is no adapter at all in the device manager (usually there is only one network card driver), then you need to install the driver. Again, you can watch the article.
Here are all the Wi-Fi settings in Windows 7.
After you nevertheless connect to the wireless network, another surprise may await you - the Error "Without access to the Internet" I wrote about the solution to this problem in a separate,.
Wi-Fi is a wireless data transmission technology. Wi-Fi is by far the most popular and most used internet connection. Access points are installed in shopping centers and cafes, thanks to which you can get free Internet on a wireless basis. But often it is necessary to create a similar network at home or in the office. Let's talk about how to set up WiFi on a laptop.
Installing drivers
Before setting up WiFi distribution on a laptop, you need to install the necessary drivers for the Wi-Fi adapter. To check their availability, you need:
- go to the "Start" menu -> "Control Panel" -> "Hardware and Sound" -> "Device Manager".
- go to the "Network adapters" section. This section should contain two items: Wi-Fi and Ethernet. If the name of one of them contains the word "Wireless" (wireless local area network), then it is a Wi-Fi adapter. If there is no information about it, then there are no drivers. You need to install them from the disk that comes with your laptop.
- drivers can also be downloaded from the official website of the laptop manufacturer. When doing so, enter the model name and download the required PC program. Otherwise, without drivers, Wi-Fi will not work.
- after installing the drivers, you need to restart the laptop.
How to set up Wi-Fi on a laptop
To set up Wi-Fi on a laptop, follow these steps:
- Go to "Start" -> "Control Panel" -> "Network and Internet" -> "Network Connections" -> "Wireless Network Connection" and select "Enable".
- In the "Manage wireless adapters" menu, select the "Add" command and press the "Create a profile manually" button.
- Fill in the required information, including the name of the wireless network and password. This information must be reliable and match the parameters of the access point to which you want to connect your laptop.
- Specify the security type (WPA, WEP) and select the encryption code (TKIP, AES).
- Check the box next to “Connect automatically” and “Connect even if SSID is not broadcasting”.
- We save all the parameters and close the settings menu.
- Go to the list of network connections and right-click on the wireless adapter icon and select "Connect".
- Select the access point to which you want to connect and click on the "Connect" button.
How to turn on Wi-Fi on a laptop
- In most modern models, the Wi-Fi module is already built-in. You can learn more about how to set up a Wi-Fi connection on a laptop from our article:.
- Find the Wi-Fi logo on the function keys (F1-F12). To connect the Wi-Fi module, you must simultaneously press the Fn button and one of the function keys, which is designed to turn on Wi-Fi.
- To enable the wireless network on a laptop, you must use a special key combination. Let's take a look at the main keyboard shortcuts that are often used in laptops from different manufacturers:
- Asus - Fn + F2;
- Acer - Fn + F3;
- Lenovo - Fn + F5;
- LG - Fn + F6;
- Toshiba - Fn + F8;
- Samsung - Fn + F9 (F12);
- Dell - Fn + F12 (F2);
- HP - FN + F12.
- If you use the combination of these keys correctly, the indicator with the Wi-Fi image will light up on the laptop case. Thus, each model has its own special key combination. To find out the functionality of the F1-F12 keys, you need to look at the user manual. It comes with your laptop. If there is no Fn button on the laptop panel, then there is a switch or a separate button to turn on Wi-Fi.
- The operating system usually detects available Wi-Fi networks by itself, provides information about them and prompts you to connect. Select a network from the list provided and use the setup wizard to go through several steps to connect to a wireless network.
- The wireless network can be protected with a special code. When connecting, you will often be prompted for the SSID (unique name for your wireless network). If you do not know the code, then you will not get access to the network. Try to connect to other networks that may be public. You can also purchase a billable network access card with the SSID.
Now you know how to set up WiFi through a laptop, and you can use wireless communication.
In this article, we will take a closer look at the process of connecting a laptop or computer on Windows 7 to the Internet via Wi-Fi. I think that the article will be useful to many, since the first time you connect to Wi-Fi, there are always a lot of questions. As a rule, they are associated with installing the necessary drivers, enabling a wireless adapter on a laptop, etc. More on this later.
The laptop is generally a great thing. I don't really understand the people who buy desktop computers now. Except for serious games. Well, you must admit that it is much more convenient with a laptop. If you want a big screen, you can connect it to a monitor or TV. It is quiet and you can take it with you if necessary. And yet, all modern (and not so) laptops have a built-in Wi-Fi module. A receiver that allows you to connect your laptop to the Internet via a wireless Wi-Fi network. In the case of a desktop computer, you will need to buy.
All you need is to buy and install (if you don't have it yet), it will share wifi that you connect your laptop to. You can connect your computer to a free Wi-Fi network in cafes, shops, etc. Or, to your neighbor's unsecured network 🙂 It's much more convenient than laying a network cable. If for an ordinary stationary computer this is still normal, then for a laptop it is no longer the same. And it is not convenient to move around the house all the time with this wire.
It is not difficult to connect a laptop to the Internet, but provided that the Wi-Fi driver is installed. Many people have a lot of problems precisely because of the driver. If you simply did not install the driver on your Wi-Fi receiver, or you yourself installed Windows and did not install it, then you will not be able to connect to Wi-Fi. But, perhaps you already have everything installed and configured, therefore, first, let's look at the process of a normal connection to a wireless network. If you do not learn, there will be no wireless connection, etc., then read the article to the end, we will consider possible problems.
We connect the laptop to Wi-Fi
Let's first look at the connection process without any settings and checks there. Why complicate things, maybe you already have everything set up. If all is well, your laptop sees a wireless network and is ready to connect, then the Internet connection icon in the notification bar will look like this:
Connection status that looks like the network layer with an asterisk (as in the picture above) indicates that the laptop sees available networks and is ready to connect to them. Click on this icon, then select the Wi-Fi network to which we need to connect and press the button Connection... In Windows 10, the process for connecting to Wi-Fi is slightly different. If necessary, detailed instructions.

If the network is protected by a password, a window will appear in which you need to specify the password and confirm the connection by clicking the button Ok.

That's it, your laptop should be connected to the Wi-Fi network. The connection status will be like this:
![]()
You can use the internet.
If you see the connection status, it looks like this:
![]() This means that everything is most likely configured on your laptop, but the laptop simply does not see the networks available for connection. Perhaps there is simply no coverage in this place. If you are connecting to your network, then check if the router is turned on. If enabled, then.
This means that everything is most likely configured on your laptop, but the laptop simply does not see the networks available for connection. Perhaps there is simply no coverage in this place. If you are connecting to your network, then check if the router is turned on. If enabled, then.
I wrote about the solution to this problem in a separate article:.
This is how the connection will go when you have the driver installed on the Wi-Fi adapter and the adapter itself is turned on. But very often the adapter on the laptop is turned off, or no one has installed the driver on it at all. In such cases, many questions arise. Now we will analyze in detail both cases, due to which you may have problems connecting your laptop to a wireless network.
Turn on the "Wireless Network Connection" on the laptop
If your wireless connection is disabled, or the driver for Wi-Fi is not installed, then the connection status will look like this:
![]()
This means that there is no way to connect to the Internet via Wi-Fi, and there is no connection via a network cable. As I wrote above, this happens due to a disabled adapter, or due to the lack of a driver. Let's first check if your "Wireless Network Connection" is turned off. This, of course, is unlikely, unless you turned it off yourself, but you need to check it.
Click on the internet connection icon, and select Network and Sharing Center.

Then we choose Change adapter settings.

We look at the adapter "Wireless network connection", if it is disabled, then right-click on it and select Turn on.

After that, the connection status "There are available connections" should appear (if there is a Wi-Fi network in the radius).
Turning on wireless connections with the buttons on the laptop
It seems to me that now manufacturers do not install separate buttons to turn on the Wi-Fi adapter. But, if you are having problems connecting to Wi-Fi, then charmingly check if there is a dedicated button to disable / enable wireless connections on your laptop. I know for sure that Toshiba loved to make such switches.
Now, on laptops, a keyboard shortcut is used to disable / enable the wireless network. As a rule, different manufacturers have different keys. But usually it is Fn + F2... So on Asus laptops. You can see for yourself that there should be a network icon on the key that is pressed in conjunction with Fn. Something like this:

True, my combination of these buttons is responsible for turning off Bluetooth. It doesn't seem to react to Wi-Fi. But, you may be different. It is definitely worth checking.
If there is no "Wireless Network Connection" adapter at all in the adapter management window, but there is definitely Wi-Fi on your computer / laptop, then this means that the driver is not installed on the Wi-Fi adapter.
Now we will check everything and try to solve this problem.
Checking and installing the driver on Wi-Fi
I have not yet seen a case that after installing Windows 7, the system itself installed the driver on the Wi-Fi adapter. Windows 8 is much better at this. Windows 10 often installs the necessary drivers by itself. So, after installing Windows, in order to use Wi-Fi, you need to install a driver specifically for your laptop, or adapter (very often, adapters from different manufacturers are installed in the same laptop model. It is because of this that you can see several drivers on Wi-Fi, on the manufacturer's website).
We go to the device manager.

In the device manager, open the tab Network adapters, and we are looking for a driver for Wi-Fi. I have it called Atheros AR9485WB-EG Wireless Network Adapter, it is installed. You should also have something like Wireless Network Adapter.

If you do not have a wireless connection, then most likely you will not find an adapter either. You need to install the driver, then Wi-Fi will work. And yet, if the driver is not installed on the Wireless Network Adapter, then in the device manager there will be at least one unknown device with a yellow exclamation mark. It looks something like this:

This is most likely the same Wireless adapter with which the laptop does not know how to work.
Driver Installation
All you need to do is download the correct driver and install it. It is best to download the driver from the official website of the manufacturer of your laptop / adapter, and for your laptop model (or adapter). Best of all, search through Google for the official website of your laptop, for example Asus, then use the website search, indicating the model of your laptop. Most likely, your computer's page will be found, open it and look for downloads of utilities and drivers there. Find the Wireless driver and download it for the operating system you need.
Most likely, the driver will be in the archive. To install, run the .exe file from the archive. For example, an archive with a driver for my laptop:

After installing the driver, restart the laptop and try to connect to the wireless network, according to the instructions. I wrote in more detail about installing the driver in the article about.
If some points from the article remained incomprehensible to you, or you still did not manage to connect your computer to Wi-Fi, then write about it in the comments, we will try to solve your problem.