Quite often, a computer or laptop is associated precisely with errors and malfunctions in the hard drive. In this article, we will figure out how to check the health hard disk using Windows tools and specially designed programs.
Checking for errors by standard means
This method is equally effective for Windows Xp, Vista, 7, 8 and 10. You need:

If the notification "Windows cannot check the drive that is currently in use" appears, you should click "Check Schedule".
So, now we do a reboot, and when the system boots, a performance test will run through the BIOS and fix media errors. Its duration can be from 2-3 minutes to an hour, depending on the characteristics of the hard drive and its capacity.
Checking the hard disk for errors via the command line
To start the scan, you must complete the following steps: go to "Start / All Programs / Accessories / Command Line". Right-click and click "Run as Administrator".

In the window that appears, execute the command "chkdsk disk_partition: check_parameters". It should be borne in mind that this way works exclusively with drives that have been formatted in FAT32 or NTFS.
An example of a command is "chkdsk C: / F / R". Its essence is as follows:
- Section C will be checked for errors;
- Found problems will be automatically corrected (parameter F is responsible for this);
- Bad sectors will be checked and information restored (parameter R);
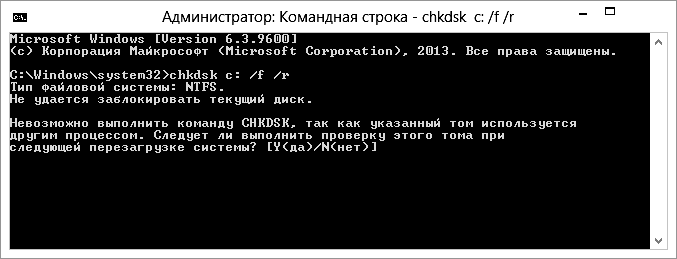
If you want to diagnose the drive that the system is currently using, you will see a special notification. You will be prompted to perform a check the next time you boot your computer. To agree with this, press Y, to refuse - N. Following the results of the check, information about the checked data, the number of bad sectors and the errors found will become available to you.
To obtain full list parameters, run chkdsk with a question mark as a parameter. But if you need a routine check for errors and sectors, then the above information will be enough for you.

It happens that the errors found during scanning are not always possible to immediately fix, it is likely that this is due to the program running at that time. In this situation, an offline scan of the drive will be required: it is disconnected from work, diagnostics are carried out, and then it is connected back. To do this you need to enter in command line"Chkdsk C: / f / offlinescanandfix" (C: - disk partition). If it is not possible to disable it, then the check will be performed at the next reboot.

If necessary, after checking, you have the opportunity to study the check log. For this you need:
- Go to Windows Logs / Applications;
- Right-click on Application / Search;
- Search for the word Chkdsk;

Program check
Of course, the above method is not always effective. Therefore, we will look at a number of programs like Victoria. They will allow you to conduct the most thorough analysis of the state of the hard drive on a computer or laptop.
Victoria

Utility for diagnostics and testing of the hard drive. It will help you not only find problems in its work, but also fix them.
The program has a number of advantages and useful functions:
- Reads the hard drive's passport and provides detailed information;
- 5 diagnostic modes;
- Eliminates crashes;
- Displays unstable areas;
- Hides defects;
- Evaluates the performance of the media.
It is one of the best to date. It is able to solve problems with bad sectors and quickly bring any type of hard drive to a working state.
HDD Regenerator

One of the most effective programs for assessing the health and troubleshooting drives. It makes it possible to get information on the account current state SMART of the selected device and full control over it.
Among the main features are:
- Simple and intuitive interface;
- Full safety;
- NTFS and FAT support;
- Pre-scan mode;
HDD monitoring in real time;
That is, with the help of the regenerator, you can test the hard drive as efficiently as possible.
TestDisk
Designed to determine the status and test drives. In addition to simple diagnostics, it also detects bad sectors and fixes any errors found. Its main functions include:
- Perform analysis current state hard drive;
- Search for bad sectors;
- Recovering deleted partitions;
- Fix MFT;
Checking external hard drives;
In addition, the utility has a number of other functions related to recovering deleted files.
Hitachi Drive Fitness Test

An excellent program designed to find and fix problems with drives. It is universal, as it can diagnose any drives. With its help, you can very quickly find out the current position of the hard drive, as well as get additional information about it.
Includes:
- Fast but thorough check;
- Support for all components;
- Monitoring;
- Data statistics;
This utility is suitable for all devices and can be used even on a netbook.
Seagate Seatools for Windows

Used to check and test the health of the hard drive. She finds any problems and failures.
- The utility is able to fix:
- Equipment incompatibility;
- Violations file system HDD;
- Errors of installed drivers;
- Viruses and malware that infect the file system;
In addition, it provides complete information about the media and all related metrics. As the developers say, this utility incredibly effective at self-fixing minor problems, errors, SSD and HDD, and is able to fully restore their performance.
So now you have complete information how to determine if a hard drive is working properly, and how to independently solve problems associated with it. Choose the most suitable or the option you like and go for it!
Video: checking hard with regular means
Diagnostics and elimination of errors on the hard disk
3 (60%) 2 vote (s)Computer using the standard check disk (chkdsk) program included in Microsoft operating systems.
I do not know how it is at work or at home, but for our IT department, work is added immediately after a sudden blackout on one of the floors of our organization. I remember once an electrician changed the outlet and, not at all embarrassing, turned off all the automation in the stairwell, and this is about fifty computers in one wing of the floor, two 50 port switches and wireless wifi access point in the wiring closet :)
And closer to winter, such things, alas, happen more and more often (people begin to abuse heaters of all kinds and power). Operating systems do not like such manipulations with power supply very much, and far from all users' computers are equipped.
The following usually happens. After the next such massive blackout, there are always one or two computers on which after the resumption of power supply. At an arbitrary stage of loading, the operating system goes into a cyclic "reboot" (reboots) and our intervention is urgently required :)
In such cases, as a rule, it is necessary to scan the hard disk of the computer with the "check disk" program, which checks the integrity of the OS file system and tries to eliminate the errors and inconsistencies found.
Let's first see how you can check your hard drive using the Windows GUI?
To do this, right-click on the icon desired disk and in the menu that opens, select the "properties" item. In the window that appears, go to the "Service" tab.
And there we press the button "Perform check".

We have two checkboxes under the heading "Disk check options":
- automatically correct system errors
- check and repair bad sectors
We can select any of them (or both) and press the "Start" button.
This graphical interface launches the standard "check disk" utility to check the hard disk using the "chkdsk" command. Moreover, if there is only the first checkbox installed, the program checks the hard disk in three stages, and if the second is present, it adds two more levels of verification to these.
After completing all (three or five) stages of the verification, the program will inform us about the successful completion of the procedure and (for Windows 7) will offer to familiarize ourselves with its results. By clicking the arrow next to "Show details", we can see a list of all the checks that the utility has made.

Graphics, windows, buttons ... it's all great, but let's dive a little deeper with you and see how you can check your hard drive using the command line " cmd»?
Note: we discussed working with the command interpreter cmd in one of the.
There is a task - to check the hard disk of the computer, which has stopped loading (as a rule, after a sudden power outage) and restore operability operating system.
What do I do in such cases? I remove the drive from the "victim" and connect it as an additional one to my computer. I press the "Start" button (for Windows XP - execute) and in the appeared field I enter cmd.
Note: a similar procedure can be carried out on the same (damaged) computer, booting from some kind of recovery disk like "Live CD", but for me personally, it is more convenient. I, to the heap, carry out general prophylaxis of the "patient" and test the drive for availability. They also like to appear after such "surprises".
Now I propose to type the following in the command line: chkdsk /?
Construction " /? "Will allow us to view all available arguments (keys) that we can apply along with the main command chkdsk.

As you can see, the explanation for each "key" is given in Russian, so it will not be difficult to figure it out. Additional arguments are entered through the sign " / "(Right slash). But now let's try to check the hard drive with the chkdsk command.
Take a close look at the screenshot below:

The construction “ chkdsk d: / f / r»What does it mean? Check (chkdsk) drive d (d :) by applying to the command sequentially keys " f" and " r"(You can see what they do in the previous screenshot). Below you can see the completed stages of this check and the number of the remaining ones (stage 1 of 5, stage 2 of 5, etc.), as well as the percentage of completion of the current one.
Interestingly, executing the chkdsk command with the attribute / f starts the check in three stages, completely similar to the one that occurs after selecting the first checkbox in the graphical interface:

Adding a "key" / r identical to putting the second checkbox in the screenshot above (check and repair bad sectors). In fact, the same utility is launched to check the hard drive. It's just that it is more convenient for someone to use graphical windows and a mouse, while others use the command line.
The check window at boot and before the start of the operating system is slightly different, but the essence remains the same:

The above indicates which logical drive now it is checking what type of file system contains and below - the verification steps we are already familiar with. For Windows 7, this information is shown against a black background.
So, back to our console. A complete report on the program's operation may look like this:

The point marked in red is paramount here: the number of kilobytes in the bad sectors. If there is "0" here, then everything is fine :)
Let's take a quick look at what exactly does each of the hard drive test steps do?
The first pass checks the files. During this phase, CHKDSK checks the record information for each file in the main table MFT.
Note: MFT - Master File Table, which contains information about all files and their attributes located on a volume with the NTFS file system. Approximately 12% of the disk space is reserved for it.
The first stage is checking each file for internal consistency (ex: the same data sector is marked as belonging simultaneously to two different files)
During the second stage, the indexes are checked. What it is? These are the directories of the file system, it checks whether the record segment for each directory and file is contained in the main file table, and also the date of the file modification time and their size. The CHKDSK command checks to see if there are any lost (empty) files or have an incorrect record of their location in the MFT.
Further (at the third stage) of the hard disk check, the security descriptors are analyzed. They contain information about the owner of files (directories), about access rights to them at the file system level. Audit information for user datasets is verified.
If the fourth stage of checking the hard disk is involved, then it includes the search for bad sectors (bad blocks). If one is found, then the program automatically adds information about it to the MFT table and no longer writes to it and the sector is excluded from the file table.
The fifth step is to check the free disk space. There is nothing special to comment on :)
This way we can check our hard drive for the correctness of all the metadata it contains.
The term "metadata" in this case means "information about the data." Metadata ensures the integrity of the file system, and also contains information about all its files and directories. It contains information about the clusters that make up each file, which clusters are free and which are occupied, contain bad sectors, etc.
And now - the harsh reality! :) Unfortunately, it so happens that the metadata structure is so corrupted that using the command chkdsk not only does not help, but can further complicate the situation of restoring the operability of the operating system.
On the other hand, there were times when my inner instinct prompted me to check the hard drive using this tool and I got the result I needed. So try it and decide for yourself whether to use this recovery tool or not?
The screenshot below is a photo of one of the longest validation cycles in my practice. The utility worked for more than two hours, while the following picture was constantly displayed on the monitor:

But by the blinking LED indicator hard disk on the front, it was clear that there was an active exchange of data with the drive, so I waited hard and still waited for the complete completion of this process. After rebooting, Windows was restored!
The CHKDSK command actually does a lot of checks and can fix a wide variety of errors found in the file system and in individual files. For example, you can have such "scary" inscriptions during a disk scan:

Another example from practice:

And now the team makes corrections to the file system of the hard drive itself.

In all cases, the final scan result is positive. Do not neglect this "repair" option provided by the developer himself! Sometimes disks with a damaged file system (when the disk cannot even be accessed and its file system is displayed as RAW in its properties) "miraculously" come back to life only after using this command.
One day it may turn out that a PC or laptop refused to start the Windows operating system or "froze" during a responsible and urgent work. Hard disk errors when running Windows is not the last reason for computer failure. However, any problem can be corrected if you know what the cause is.
The crux of the disk problem
Whether it is a traditional "hard drive" or a newfangled SSD-drive - critical error on it appears anywhere. Disk error - physically or programmatically damaged sectors, infection of the Windows system with viruses, failures in PC components (from parts of the drive itself to components motherboard computer). The user's task is to figure out what caused the errors on the disk.
How to fix hard drive problems detected by Windows
Hard drive problems are unspecified errors on it that are not signed with a numeric code (for example, error 11). First of all, the medium from which it is proposed to copy valuable data is indicated.
Windows system warns that your data could be seriously damaged
Action plan:
- Urgent copying of important files to another drive: flash drives, disks, memory cards, placing some of these files on the "cloud" Internet services.
- Checking the disk for bad sectors.
- Antivirus scanning.
- Checking the CMOS / BIOS settings in the computer.
- PC maintenance: checking the integrity of the loops, visual inspection of PC components and cleaning them.
- If faults are found that could not be eliminated on their own, the delivery of the PC or laptop for repair.
The last two points will not be considered - this is the task of the specialists of computer service centers.
Backing up files in Windows 7
Please do the following.
- Click "Start" and in the search bar of the main Windows menu enter the word "backup". Start the Backup and Restore application.
 Click on the first suggested option - this is the backup wizard
 - Start configuring your backup program. Click Configure backup».
 Start setting up your backup
 - Select the disk or its partition where the backups will be created. The best fit exactly external drives and a flash drive or memory card of large volume (from ten gigabytes).
 Select a different, healthy and scratch disk
 - Click on "Provide choice for Windows". However, if you have clearly decided what you need in the first place, choose an independent option.
 If you give the system a choice, Windows will copy the contents of all user default folders
 - Please select system folders user files and / or the contents of the copied disks - except for the disk on which the copy will be created.
 Select everything you want to copy except the destination drive
 - Windows will ask for confirmation and display the categories of files to be backed up.
 After that, the system will ask you to double-check the parameters and start copying
To recover files from backup do the following:

The process will start. After finishing copying, check if everything has been restored.
 Click the link that appears to view a list of files and folders from the previous copy
 Check disk using Windows 7 command line
Disk check identifies logically or physically problem sectors of the hard disk or SSD-drive, which is the main one in the computer. Do the following:

If you still don't trust standard tools disk check - use the Victoria program. The Victoria version for Windows is almost similar to the DOS version - except for one thing: after downloading it, you can immediately run it to check the disk under control of more working system Windows without resorting to other drives, including removable ones.
Also get a new disk in case the old one is out of date.
Check your PC for viruses
Boot viruses corrupt the boot record and the NTFS file table (5), which Windows 7 works with. Because of this, valuable data "flies" that is not easy to recover special utilities as well as the system itself.
As an example, the Dr. Web CureIt, allowing you to quickly check HDD for the presence of malicious code.

The application takes up over 100 MB - due to the extensive anti-virus database of all times. After two days of operation, this database is considered obsolete - viruses appear almost hourly.
If an error appears when starting Windows
The computer refuses to boot from the hard drive, reporting a read error system files Windows.
 To try to fix the hard disk read error, press Ctrl + Alt + Del to restart
 A professional way to fix such an error is a third-party disk check utility with bootable media Windows or another operating system (if there is a version of this utility for it).
Checking the disk with built-in tools hides some details, although its use is not useless.
What makes no sense to do:
- restore Windows to an earlier date;
- start automatic recovery;
- launch safe mode Windows.
BIOS setup for booting a PC from a USB flash drive or external drive
Change the boot priority of the PC from different disks in the BIOS. Do the following (for example, the Award BIOS version is taken).
- When you turn on the computer after the manufacturer's logo appears (or immediately below it), a prompt for entering the BIOS will appear - press this key.
 Press the key indicated at the end of the list of devices checked when the PC is turned on
 - After entering BIOS Setup select "Onboard Peripherals".
 Select Integrated Peripherals to enter Parts Management
 - Check if the USB port controller is active.
 USB Controller Enabled means that the USB controller is enabled
 - If USB support is enabled, exit this submenu with the Esc key. If disabled, enable USB support with the Page Up \ Down keys (below are the values of all BIOS settings control keys), then exit by pressing Esc.
- From the main BIOS menu, select Advanced BIOS settings».
 Go to advanced BIOS settings to control PC boot from different types carriers
 - Enter the hard drive priority menu and turn on the USB flash drive as the first boot disk.
 To configure the system, the boot order from the media must be changed
 - Use the "+" or "Page UP / Down" key to designate the USB flash drive as the first boot device.
 The first place in the download should be a USB flash drive
 - Exit this submenu by pressing Esc and set USB storage as the first device to start.
 Set the USB-HDD parameter in the First Boot Device section (First boot from a USB drive)
 - Exit all submenus to the main BIOS menu and press F10 to save the settings.
 When the BIOS prompt to save the settings appears, press Y and Enter
 - Give the command "Y" - "Enter", the computer will restart.
Now, when restarting the PC, it will first of all poll the ports for the presence of a flash drive or removable hard disk (HDD / SSD) - and only then try to start Windows from the built-in disk.
Checking a hard drive from a USB flash drive running the Victoria program
For example, we took a ready-made flash drive with Victoria under DOS and a laptop with a faulty disk. Please do the following.
- Insert the USB stick and restart your PC. Should come out boot menu with Victoria.
 In the window that appears, select Victoria
 - Victoria app has to offer different versions- select the version for laptops.
 In the Victoria for Notebook section, select the second item
 - If you would like to familiarize yourself with Victoria's functionality, read the key help by pressing F1.
 First, clarify how to launch different functions of the Victoria program by pressing F1
 - To exit help, press the X key or any other key that is not listed.
 To exit Help, press X and go to Check Disk
 - From the main menu, press F2 to display disc information. If this did not happen, press the P key to select the IDE interface channel on which the disk is "sitting". All modern PCs are equipped with SATA hard drives.
 In the window that appears, select Ext. PCI ATA / SATA and press Enter
 - After selecting the channel type, enter its number, for example, 1. If there are no other hard drives, the following numbers will be empty, there is no point in entering them.
 Busy channels in the program are immediately visible - enter the channel number of your disk and press Enter
 - Wait for Victoria to detect the drive on channel 1.
 A message about successful channel identification will be displayed at the bottom.
 - If your disk turned out to be based on IDE - return to the interface selection submenu and select one of the options Primary / Secondary Master / Slave - check on the disk itself in what position it is located switch. IDE is obsolete - modern SATA-based drives do not require switching. The Primary Master mode is taken as an example.
 Select the mode with the cursor keys and confirm the selection with the Enter key.
 - The disc details will appear at the bottom. Press F2 to display information.
 Channel port number attached to disc data
 - The initialization (passport data) of the disk shows that its recognition by the Victoria application is over.
 After the disk is fully initialized, you can start checking it
 - Press F4 - the disk scan menu will appear. Here LBA is a disk sector (512 bytes). Multiply the number of LBA sectors by 512, divide by 1024 3 - we get the size in gigabytes. The size of the scanned disk area in Victoria for DOS should not exceed 1024 GB. If the size is more than 1 TB, calculate the start (Start LBA) and end (EndLBA) and scan the disk in several stages.
 Make sure the disk size does not exceed 1 TB
 - Press the spacebar and enter an integer in gigabytes or percent - this will determine the location of the last sector in the scanned area. The starting point for scanning is also variable - similarly calculate the size in gigabytes. Press Enter when finished.
 Enter the last gigabyte that will end the scanned area of the disk
 - The size of the scanned disk zone will be recalculated to the number of LBA sectors. Go to linear reading. Do not change this reading algorithm to another (random and "floating" reads will take longer and wear out the already old disk more).
 Select the linear mode of scanning the disk by the program
 - Go to the next item and select "BB (Bad Blocks) Advanced Remap". The options are selected with the cursor left / right keys or the space bar.
 Select the BB Advanced Remap option - it uses sectors from the spare area
 - Do not rush to set the "Erase 256 sect." ("Erasing 256 adjacent sectors") - 128 KB of data on the disk will be erased in place of one problem sector. In this case, the size of the destroyed information will be multiplied by the number of "broken" sectors - depending on the proximity of each of these sectors to each other throughout the scanned area of the disk. Try other sector recovery options first! Press "Enter" to start scanning.
That's it, the process has started, the Victoria application will notify about the end with the sound of a "beeper" in the computer. When bad sectors are found, "remapping" (sector reassignment) will be performed automatically.
 Replacing bad sectors with Victoria is one of the valid ways to temporarily fix a hard disk
 The forecast of the further work of the disk can be estimated according to the SMART monitoring data. Press F9. The status will be indicated at the top. If it is “Good”, there is still a reserve for replacing bad sectors. The status has changed - the disk will be replaced with a new one. If it is not possible to replace the disk, try to programmatically trim it, excluding bad sectors from the trimmed area (they often go close to each other, many of them in a row), but this is for those who like difficulties.
 The Good status indicates that the disk is in good condition.
 Other ways to check the disk
There are several options:
- using other applications written to a USB flash drive in a similar way (DOS bootloader);
- scandisk.exe utility launched via DOS using the appropriate commands;
- command Windows string XP running from LiveCD / DVD;
- connecting the problem drive to another computer via a free loop.
Video: checking and cropping the "broken" space
Error 11 while writing or unpacking data
Error 11 has nothing to do with bad sectors on the disk. 90% of this is a software problem. It occurs when installing unverified programs that have sources for installation, which the developers have collected with some omissions. The message is generated by the system library unarc.dll, which is responsible for unpacking content for any installed program and is a component of the Windows Installer service.
 Error code 11 can be replaced by any code from 1 to 10
 Some users, not understanding the problem with the source of the installed program, update or replace this file (it "lies" in the C: \ Windows \ System32 directory) with any version of it from the Internet. As a result Windows system may report that some files have been replaced with unknown versions, and ask you to insert an installation DVD or flash drive to restore them.
The solutions to the problem are as follows:
- try not to allow Russian names of files and folders in the installed applications. For example, instead of the \ Truckers-2 folder, when installing the Truckers-2 game, the \ Rig & Roll folder is created. If, after all, the name of the directory is written in Cyrillic, it means that the game is from a dubious source, download the licensed one (it doesn't matter if the version is cracked, as long as there is a file structure like the licensed source code);
- there is not enough disk space (in any of its partitions) for the program being installed. Clean the disk from unnecessary programs, documents and other content;
- error unpacking archives downloaded from the Internet. Install several archivers (for example, WinRar, WinZip, 7zip and several others);
- disable your antivirus and windows firewall- sometimes they become an obstacle, especially if an application or game requires a crack (activator with a selection of a key).
Other hard disk errors
They can be:
- 3f1 (a bug inherent in HP notebooks);
- 300 (no boot record found);
- 3f0 (no bootable disk);
- 301 (error of SMART diagnostics of disk status), etc.
Video: checking partition C: and flash drives for errors in Windows 7/8/10
Recovering your PC or laptop from disk failures is no problem if you act wisely and consistently. May you be lucky!
Windows malfunctions, an emergency shutdown of the computer's power, experiments with software for managing disk space, the consequences of viruses - these and other problems can lead to automatic start the standard Windows utility Chkdsk, designed to fix errors in the file system of hard drives. Incorrectly terminated work of the operating system with files leads to the appearance of errors in the file system, and sometimes to its damage altogether.
In case of emergency, the Chkdsk utility automatically turns on before running Windows, scans disk partitions and fixes errors. However, the fact that there are problems with the file system may not make itself felt in any way during normal use of the computer and only show up when trying to manage disk space. So, for example, trying to reduce the disk partition with regular Windows tools, we may receive such a notification: “It is possible that the volume selected for compression is damaged. Use Chkdsk to troubleshoot and then try shrinking the volume again. "

In this case, the disc check does not start automatically. How to start Chkdsk manually in Windows 7, 8.1 and 10? How can I use Chkdsk to fix disk errors if this particular problem is causing the operating system to fail to boot?
Inside Windows utility Chkdsk can be launched in several ways.
1. Launching Chkdsk using the Windows GUI
To run Chkdsk, in the system explorer on drive C, right-click and open "Properties".

In the window of the opened properties of the disk partition, go to the "Service" tab, and in it click the "Check" button (or "Run check" for Windows 7).

In versions of Windows 8.1 and 10, if everything is in order with the file system of the disk, in the window that appears next, we will see a notification that verification is not required. But if you want to check the disk using the Chkdsk utility, you can start by clicking "Check Disk".

If the system suspects the existence of file system errors, this window will contain a button for starting a disk check and repair.

For Chkdsk to work with respect to the C drive, you must restart your computer. You can do this immediately or postpone the start of the scan until the next reboot.

After restarting the computer, we will be able to observe the work of Chkdsk.

In Windows 7, the launch of Chkdsk is slightly different: to the pre-installed automatic error correction option, you can add another possible option - check and repair bad sectors of the hard disk. When activating this option, it is worth considering that in this case, the work of Chkdsk may take longer.

As with Windows 8.1 and 10, in version 7 system disk C cannot be verified under a running operating system. To start the scan, you need to restart your computer. Click "Schedule disk check".


When checking a non-system partition of a disk, if it is used by some programs, the situation is simpler than with the system partition. In the window with a notification that the disk is currently in use, you just need to click the "Disconnect" button to, accordingly, disable this section for the duration of the check.
2. Launching Chkdsk from the command line
To start Chkdsk using the command line, first, respectively, run the latter.
In the command line, enter a command of the type:
In this command, instead of drive C, each time we substitute the letter of the desired partition on which verification is required. If Chkdsk needs to check the system C partition, as with the graphical interface, a computer restart will be required. After a message appears in the command line about the impossibility of locking the specified drive, you need to enter "Y", then restart the computer.

In addition to the / f parameter, which is responsible for fixing disk errors, Chkdsk can be run with the / r parameter, which is designed to find bad sectors and recover data. As a result of Chkdsk's work with this parameter, hard disk clusters with unreadable sectors will be listed as damaged (bad blocks) with the transfer of their functions to a new cluster. Therefore, it is recommended to run Chkdsk with the / r parameter only when the usual error correction - running the utility with the / f parameter - did not bring the desired results. Using the example of the same drive C, the command will look like this:
3. Running Chkdsk on non-bootable Windows
If Windows freezes at a certain stage of the boot, one of the possible reasons this problem is a file system error. In this case, you need to start Chkdsk by booting from the rescue media. As such, you can use a regular installation media with Windows versions 7, 8.1 or 10. With its help, we will run the Chkdsk utility inside the command line. At the very first stage of starting the system installation process, press the command line launch keys - Shift + F10.

In the command line that opens, before running the Chkdsk command, you need to specify what letters are used to define the disk partitions. It's easy to do with notepad. Run it with the command:
Click the notepad menu "File", then - "Open".

In the explorer that opens, we remember the new designations of the disks. As a rule, in Windows 8.1 and 10, the partition of the C drive (as it is inside a working operating system) is listed as D, since the letter C is given to the first technical section of the system. And all other sections are offset by one letter of the alphabet.

Having decided on the letters of the disk partitions, close the notebook, then, returning to the command line, enter a command of this type:


As with working with Chkdsk inside Windows, you must first try to fix disk errors by running the utility with the / f parameter. And only if the problem is not solved, only then we run the command with the / r parameter, as indicated in the previous paragraph of the article.
For cases of inability to boot Windows, you can pre-burn an emergency Live-disc with a selection of various tools to restore the operating system. These include, for example, WinPE-based AdminPE. Its image for burning to a disk or USB flash drive can be downloaded from the official website of the Adminpe.Ru project. With AdminPE, you can start a command prompt and enter the Chkdsk startup commands discussed above. But in this Live-disk, the Chkdsk utility has its own interface and is launched using a script. The shortcut for launching the utility is placed directly on the desktop.

In the drop-down list for checking the disk, select the desired disk partition. Next, activate the checkboxes for recovering damaged sectors and forcibly disconnecting the partition (volume). Launches the check.


The AdminPE toolkit includes a number of other utilities for working with hard drives as well as well-known Hard programs Disk Sentinel and Victoria.
Windows malfunctions, an emergency shutdown of the computer's power, experiments with disk space management software, the consequences of viruses - these and other problems can lead to the automatic launch of the standard Windows utility Chkdsk, designed to fix errors in the file system of hard drives. Incorrectly terminated work of the operating system with files leads to the appearance of errors in the file system, and sometimes to its damage altogether. In case of emergency, the Chkdsk utility automatically turns on before Windows starts, scans disk partitions and fixes errors. However, the fact that there are problems with the file system may not make itself felt in any way during normal use of the computer and only show up when trying to manage disk space. So, for example, trying to shrink a disk partition regular means Windows, we may receive the following notification: “It is possible that the volume selected for compression is damaged. Use Chkdsk to troubleshoot and then try shrinking the volume again. "
In this case, the disc check does not start automatically. How to start Chkdsk manually in Windows 7, 8.1 and 10? How can I use Chkdsk to fix disk errors if this particular problem is causing the operating system to fail to boot?
Inside Windows, the Chkdsk utility can be run in several ways.
1. Launching Chkdsk using the Windows GUI
To run Chkdsk, in the system explorer on drive C, right-click and open "Properties".

In the window of the opened properties of the disk partition, go to the "Service" tab, and in it click the "Check" button (or "Run check" for Windows 7).

In versions of Windows 8.1 and 10, if everything is in order with the file system of the disk, in the window that appears next, we will see a notification that verification is not required. But if you want to check the disk using the Chkdsk utility, you can start by clicking "Check Disk".

If the system suspects the existence of file system errors, this window will contain a button for starting a disk check and repair.

For Chkdsk to work with respect to the C drive, you must restart your computer. You can do this immediately or postpone the start of the scan until the next reboot.

After restarting the computer, we will be able to observe the work of Chkdsk.

In Windows 7, the launch of Chkdsk is slightly different: to the pre-installed automatic error correction option, you can add another possible option - check and repair bad sectors of the hard disk. When activating this option, it is worth considering that in this case, the work of Chkdsk may take longer.

As with Windows 8.1 and 10, in version 7, the system C drive cannot be checked under a running operating system. To start the scan, you need to restart your computer. Click "Schedule disk check".


When checking a non-system partition of a disk, if it is used by some programs, the situation is simpler than with the system partition. In the window with a notification that the disk is currently in use, you just need to click the "Disconnect" button to, accordingly, disable this section for the duration of the check.
2. Launching Chkdsk from the command line
To start Chkdsk using the command line, first, respectively, run the latter.
In the command line, enter a command of the type:
In this command, instead of drive C, each time we substitute the letter of the desired partition on which verification is required. If Chkdsk needs to check the system C partition, as with the graphical interface, a computer restart will be required. After a message appears in the command line about the impossibility of locking the specified drive, you need to enter "Y", then restart the computer.

In addition to the / f parameter, which is responsible for fixing disk errors, Chkdsk can be run with the / r parameter, which is designed to find bad sectors and recover data. As a result of Chkdsk's work with this parameter, hard disk clusters with unreadable sectors will be listed as damaged (bad blocks) with the transfer of their functions to a new cluster. Therefore, it is recommended to run Chkdsk with the / r parameter only when the usual error correction - running the utility with the / f parameter - did not bring the desired results. Using the example of the same drive C, the command will look like this:
3. Running Chkdsk on non-bootable Windows
If Windows freezes at a certain stage of the boot, one of the possible causes of this problem is file system errors. In this case, you need to start Chkdsk by booting from the rescue media. As such, you can use a regular installation media with versions of Windows 7, 8.1 or 10. With it, we run the Chkdsk utility inside the command line. At the first stage of starting the system installation process, press the command line launch keys - Shift + F10.

In the command line that opens, before running the Chkdsk command, you need to specify what letters are used to define the disk partitions. It's easy to do with notepad. Run it with the command:
Click the notepad menu "File", then - "Open".

In the explorer that opens, we remember the new designations of the disks. As a rule, in Windows 8.1 and 10, the partition of the C drive (as it is inside a working operating system) is listed as D, since the letter C is given to the first technical section of the system. And all other sections are offset by one letter of the alphabet.

Having decided on the letters of the disk partitions, close the notebook, then, returning to the command line, enter a command of this type:


As with working with Chkdsk inside Windows, you must first try to fix disk errors by running the utility with the / f parameter. And only if the problem is not solved, only then we run the command with the / r parameter, as indicated in the previous paragraph of the article.
For cases of inability to boot Windows, you can pre-burn an emergency Live-disc with a selection of various tools to restore the operating system. These include, for example, WinPE-based AdminPE. Its image for burning to a disk or USB flash drive can be downloaded from the official website of the Adminpe.Ru project. With AdminPE, you can start a command prompt and enter the Chkdsk startup commands discussed above. But in this Live-disk, the Chkdsk utility has its own interface and is launched using a script. The shortcut for launching the utility is placed directly on the desktop.

In the drop-down list for checking the disk, select the desired disk partition. Next, activate the checkboxes for recovering damaged sectors and forcibly disconnecting the partition (volume). Launches the check.


The AdminPE toolkit includes a number of other utilities for working with hard drives, as well as the well-known Hard Disk Sentinel and Victoria programs.
Have a great day!