The user profile in Windows 7 is located on the system drive by default. This arrangement is not convenient for further use of the system. After all, when reinstalling, restoring or rolling back the system to a restore point, some of the documents and files may be partially lost, or all of them will disappear if they are not copied in time. Also, when transferring user profiles, free space remains on the system disk, which is directly used by the system for its intended purpose.
Let's log into the system under an account with administrator rights, and we will transfer the user profile to another account. Since Windows 7 will not allow you to transfer the account of the current user.
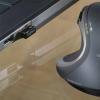
After logging in with an account with administrator rights, open: "Local Disk C: Users", in this folder we see a list of several user groups, select the desired user to transfer to disk "D:". Before transferring on disk "D:" create a folder "Users", open it and copy the user folder there. (I have this Windows 7 folder). (Fig. 1).

After copying, go to the properties of these folders, select the "Security" tab and begin to compare the properties of the folder located on the disk "D: Users" and "C: Users". When comparing the properties of both folders, we see a difference in the "Groups and Users" section. (Fig. 2).

From the properties we see that in the new folder we need to delete two users Authenticated Users, Users (Windows7-testUsers) and add a new user " seven (Windows7-testseven)" . When trying to delete a user "Verified" the system gives us an error:
Cannot delete "Authenticated" because this object inherits permissions from its ancestor. To remove Authenticated Users, you must prevent this object from inheriting permissions. Turn off the permission inheritance option and try to uninstall Authenticated Users again.
Click "OK". (Fig. 3).

To further change, we need to disable the inheritance that comes from the root drive "D" and applies to all folders and files located in this drive.
So click the button below "Additionally", a window appears , press the button "Change Permissions"(Fig. 4).

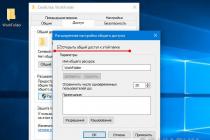
In the new window that appears "Advanced security settings for Windows 7" uncheck "Add permissions inherited from parent objects" , a window immediately appears with a choice of actions: “Add, Delete, Cancel”, select “Add”, then “Apply” and “OK” (Fig. 5).

Now let's try to delete users. Click "Change", select the user with the mouse and click the button "Delete". (Fig. 6).

Now let's add the user "seven". click "Add", in the next window "Additionally". (Fig. 7).

In the next window, click the button "Search". (Fig. 8).

Choose " seven" and click "OK". (Fig. 9).

Again, click "OK", "OK", "Apply" and "OK". 🙂
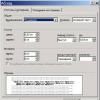
Now let's check the similarity of the settings of both folders. In the tabs, click the "Advanced" button and compare the permission elements. The permissions on the “seven” account did not match, on the “C:” drive - full access, and on the “D:” drive - read and execute, so you need to fix it. Click the button "Change permissions ...". (Fig. 10).

In the new window, click "Change", and in the next window check the box "Full access". Click "OK" then "Apply". (Fig. 11).

We continue to compare folders. There was a mismatch "Current owner:". (Fig. 12).

We change it to: "system" (by pressing the "change" button using the search and adding the account to the list).
Now let's make some changes in the registry.
In the search box, type "regedit", open the registry editor and go to the branch:
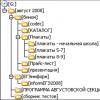
"HKEY_LOCAL_MACHINE SOFTWARE Microsoft Windows NT CurrentVersion ProfileList"
and select a branch according to the security identifier (account profile). I have C:UsersWindows 7(Fig. 13).

Change the path in the configuration of this file from " C:UsersWindows 7" on the " D:UsersWindows 7". (Fig. 14).

We reboot the system, log in as the user whose account was changed and check. We go along the way "D:UsersWindow 7Desktop" and create a file, it should immediately appear on the desktop. (Fig. 15).

Do you often have to create new user accounts, but don't want to spend time setting up each one? Customize one account to suit your needs, and then use it as a template for new accounts on your computer.
1. Log in with an administrative level account. Create a new account in the Control Panel in the User Accounts window.
2. Log out and log in again, io already with a new account.
3. Set up an account as you wish. Some Explorer settings that may be useful in this situation are discussed in Chapter 2.
4. When finished, log out and log back in with a normal administrative account.
5. If not already done, in the Folder Options window in the Control Panel, enable the display of hidden files and folders in Windows Explorer. More on this in chapter 2.
6. Then open the System window in the Control Panel and click on the Advanced system settings link on the left side.
7. On the Advanced tab, in the User Profiles section, click the Settings link.
8. Select the user account you just created and configured and click Copy (Copy To).
9. In the Copy Profile (Copy To) window, click Browse, select the C:\Users\Default User folder, and click OK.
10. Click OK, then Yes to start copying. The contents of the Default User folder will be deleted, and instead, Windows will record the settings for the new account.
The new settings can now be used as a template when creating user accounts. The temporary account created in step 1 is no longer needed and can be deleted.
Default profile setting
Template for new accounts
Do you often have to create new user accounts, but don't want to spend time setting up each one? Customize one account to suit your needs, and then use it as a template for new accounts on your computer.
- Log in with an administrative level account. Create a new account in the Control Panel in the User Accounts window.
- Log out and log back in with a new account.
- Set up your account the way you want. Some Explorer settings that may be useful in this situation are discussed in Chapter 2.
- When you're done, log out and log back in with your normal administrative account.
- If not already done, in the Folder Options window in the Control Panel, enable the display of hidden files and folders in Windows Explorer. More on this in chapter 2.
- Then open the System window in the Control Panel and in its left part click on the link Advanced system settings.
- On the Advanced tab, in the User Profiles section, click the Settings link.
- Select the newly created and configured user account and click Copy (Copy To).
- In the Copy Profile (Copy To) window, click Browse, select the C:\Users\Default User folder, and click OK.
- Click OK, then Yes to start copying. The contents of the Default User folder will be deleted, and instead, Windows will record the settings for the new account.
The new settings can now be used as a template when creating user accounts. The temporary account created in step 1 is no longer needed and can be deleted.