Any person who buys a camera and starts taking photographs goes through several stages of development. First, the amateur photographer examines his camera, gets used to it, takes pictures using the built-in modes, and then switches completely to an intelligent one. manual mode, where the creative abilities of a person and the capabilities of a camera are revealed. During this period, the camera, as a rule, sets the settings that save the image in Further, gaining experience, gradually overcomes the first stages of professionalism (we will not describe all the characteristics of this stage) and, undoubtedly, begins to notice that photography is an endless field for creativity that using a camera you can literally "write" the history of time, marking the moments.
Such an interesting topic as HDR photography(hdr technology). What is it and why, having once tried to shoot in order to create for HDR photography, photographers more and more often resort to this method.
HDR photography- this is a combination of photographs with different exposure (or shutter speed) taken at the same time, preferably with the same camera, into one picture. To put it even more simply, HDR photography is something in between the addition of an overexposed image, with a normal exposure and a dark photo. HDR photography is a photo with a higher dynamic range, which makes the photo attractive to the observer. As a result, you can get a photo that is striking in its realism and something incredible, since all the shadows are clearly visible in the photo, it is contrasting, all shades and colors are drawn. If in a regular photo you cannot see shadows in dark areas, and the sky looks like a solid white-gray or blue background, thencreating HDRYou get a picture on which you can see literally everything, any shade. And the sky, even if it is without clouds, inHDR photosit will still contain shades of different saturation, which will delight not only the photographer, but also those who just see such a photo.
In order to take pictures suitable for HDR, you do not need to have (although it is desirable, but this will come later, when you understand the whole process of how to photograph and whether you need it), there are enough ordinary and more advanced models that can be purchased practically in any electronics store. In addition to the camera is essential. Again, in the first stages, the simplest is quite suitable, you do not need to chase professional equipment. A tripod is necessary in order to take several shots from one point, in order to combine them into one in the future. And if you shoot for HDR without a tripod, it can be difficult to combine photos (although, if you own Photoshop or another image editor, this problem can be partially solved).
The easiest way create shots for HDR next: you need to select the exposure settings in the camera menu, set it to the extreme value - to take a picture, to the zero position - to take a picture, to the extreme right position - to take a picture. The number of photos can be more (not only the extreme-middle-extreme positions of the exposure setting are possible, but also intermediate ones).
After taking the pictures, there are several ways: use graphic editors to create HDR, which is not very easy and not always clear for a beginner, but can be applied special programs, which automatically combine the resulting images into one, allow the user to make some adjustments to align the photo, edit color, saturation, etc., and then view the finished result and save it.

Some cameras have a function that allows you to take several pictures at once with different exposures (bracketing), which is incredibly practical and convenient, quite simple and understandable.
Here are some programs that photographers use to create HDR photos:
- easyHDR,
- Photomatix,
- Lightroom,
- HDR Efex Pro,
- Dynamic Photo HDR and others.
Sometimes, with the help of these programs you can make a pseudo hdr, i.e. load not a group of pictures into the editor, but just one and start editing it. By the way, if your camera supports
5798 Improving skill 0
High dynamic range shooting ( High Dynamic Range, HDR) has become very popular in modern amateur as well as professional photography. At the same time, a considerable amount of criticism, and sometimes categorical rejection of everything from the same photographers, fell on the "head" of HDR photography. It's time to figure out why there are so many extreme opinions about this modern technology. This is what we will devote to our next photo school lesson site, in which we will consider various points of view on this technology.
Opinion 1. HDR photos don't look realistic
A lot of controversy arises precisely because of the unrealism of the resulting HDR picture. But try to unscrew all the sliders of the graphic editor to the maximum at HDR creation photographs - it is not surprising that it will be distorted beyond recognition. It is such frankly terrible shots that in their bulk fill the search results in search engine if you ask for "HDR", check for yourself.
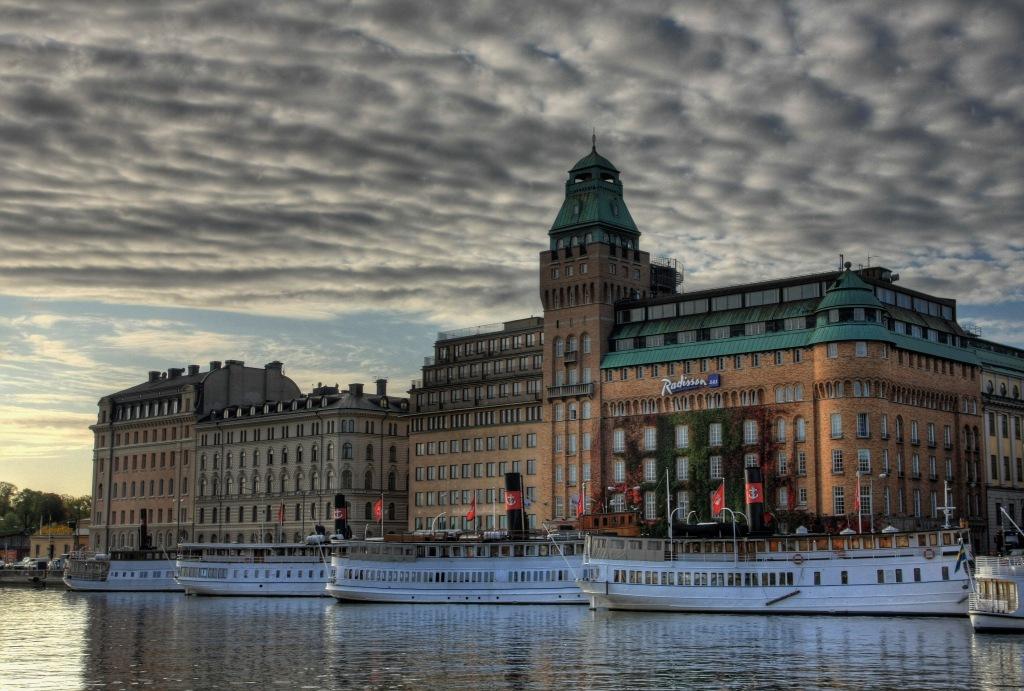
A good HDR photography is the right balance between raw stock and over-the-top photoshop. The combination of the correct exposure values in different parts of the photo gives a realistic effect to this evening landscape:
Opinion 2. HDR is a digital spoof
Some photographers believe that such processing of photographs unacceptably distorts the truth that it is a fake. Photojournalists really can't do that. But if you specialize in landscape or architecture photography, then HDR, on the contrary, will be useful to you, because you are doing art, and not showing the original frames of "real scenes". I was convinced of this myself by performing HDR processing of images from my trip to Bukovina.

Marina Lositskaya
You might be surprised, but some semblance of HDR has been around since the days of film photography. Many hours spent in a "dark room", when it was possible to overexpose or underexpose the frame you need, or even part of the frame - is this not processing? The only difference is that film has a much higher dynamic range than a digital sensor.
Opinion 3. Everything looks better in HDR
There are people out there who use HDR for just about any shot. There are others who avoid this technology altogether. If you're shooting anything that has colorful texture and depth, then creating an HDR photo is worth it.

But try to avoid this processing when shooting people, animals, stuffed animals ...
Opinion 4. HDR is bad, everyone hates it
Well, first of all, not all, at least one - I don't think so. :) And secondly - a huge number of photos on request "HDR", which I mentioned a little above, suggests otherwise. Interestingly, many will not even notice the presence of high-quality HDR processing.

By the way, this photo was processed by increasing dynamic range for background only. You have not forgotten that you cannot "touch" people? :)
Opinion 5. HDR creation forces you to constantly wear a tripod
Due to the fact that the technical requirement of such processing is photographing the same frames from the same shooting point, then a tripod really does not hurt you.

But you may not believe it, but there are photographers who do not use a tripod at all to take such photos. Modern cameras have such features as exposure bracketing, high speed shooting, which, in general, will allow you to reduce the weight of your photo luggage. And some graphic editors will allow you to get an HDR photo from one frame.
Opinion 6. Ready-made HDR presets are better than manual processing
In fact, your photo editor's presets are often terrible. Although, in addition to the ready-made presets, you can apply blending of exposures of several frames, this is much better.
Take a look at these original footage:

This is what creates graphics editor"in the machine":

Perhaps it makes no sense to comment on the result in detail - the sky is all in artifacts, dark clouds. Perhaps the building turned out to be quite good. Let's apply back mixing:

To summarize: only with our hands did we manage to assemble a decent image from the raw material.
Opinion 7. Automated HDR programs will do all the work for us
Usually, to create HDR photos, amateur photographers do not spend more time than is necessary to press the desired button with the corresponding inscription. A real-life example will help debunk this myth. The author took several shots of a picturesque sunrise in the mountains. Here is one of them:

Due to the fact that the scene has a bright backlight, there are almost no details on closer shots and in the shadows. It doesn't matter if you're shooting with a phone or the latest full-frame DSLR, the result will be about the same. In this case, it is necessary to expand the dynamic range, which means that HDR comes into play.

At first glance, the image turned out to be just right. But you should take some time to adjust the photo to the perfect result after converting to HDR. Working out the smallest details, curves and levels, mixing into the original layer and back, in general, now meet the result:

conclusions
How do you now understand that to HDR, as well as to others modern technologies, do not be prejudiced - love or hate. The tools are given to use them in time and in the right place. And you have to learn how to use them correctly. Therefore, I recommend that you study this technology better, how it works in your camera, how you can process photos in the editor and try to use it wisely.
All you need is photographic!
material prepared
Rodion Danilov
Owners latest models smartphones have probably seen that they have an HDR (High Dynamic Range) photo app. ). More experienced users know what HDR is, but not everyone understands how and in what cases this function is best used. In the "How To" section, we'll try to clear up some of the confusion and show you how to get the most out of HDR when shooting on a mobile phone.
As you know, the human eye can see a much higher dynamic range of a scene than any camera, let alone a cell phone camera. We can equally well distinguish small details of a dark building against the background of a bright sky and, for example, an airplane flying high above it. But we all know what happens if you take a photo of a building with your phone: it turns out to be too dark with very poorly distinguishable details.

Photo with exposure across the sky
Of course, we could try to fix this problem by setting the exposure on the building itself, highlighting the area with it on the screen. With this approach, the décor of the building is visible well, but the sky in the photo has turned into an overexposed, blurred white spot.

Photos from the exposition of the building
Our goal is to unite best performance two photos, creating one image in which both the building and the clouds would look great. This is exactly what it offers HDR technology... Photos taken with HDR are essentially multiple combined shots taken at different exposures.
Default iPhone app for taking photos has a built-in HDR-functionality. You can enable HDR by clicking on the option button in the "camera". When HDR is on, the iPhone will automatically take HDR photos. Please note that this takes longer than normal shooting.
However, the built-in iPhone application gives a rather "weak" result, and you can take much better pictures using special programs.
 Photo captured with Pro HDR on iPhone 5
![]() Photo taken with the default app on iPhone 5
Photo taken with the default app on iPhone 5
One of the most popular and user-friendly HDR photography apps is Pro HDR.(for iOS - 66 rubles; for Android - 61.75 rubles). However, there are also free versions with limited functionality.
The Pro HDR app offers two modes: automatic and manual. If you choose Auto, the application analyzes the scene, takes a frame with a dark exposure (with detailed highlights, but less detail in the shadows) and a light exposure (with detailed areas in the shadows, but weak detail in bright areas), and blends the two images.
Some photos may not look natural enough. To give your shot realism, use the five sliders in the simple and intuitive settings panel. They allow you to adjust brightness, contrast, saturation, warmth, and hue. Auto mode quite suitable for most situations; manual mode is necessary only when shooting the most contrasting scenes.
Settings panel interface in Pro HDR

Please note that HDR photos do not always look better than those taken in standard mode. Try to keep both HDR and “normal” shots so that you can choose the best ones later.
Using HDR mode is inappropriate when shooting in motion. Due to the fact that HDR combines multiple exposures of the same scene; and if these very scenes change, you end up with the most unpredictable result. Try to shoot leaning against something stable or using a tripod.

HDR photo captured in motion
The desire of smartphone manufacturers to make their products more attractive to buyers has led to the fact that now it is quite difficult to find a device that does not have a built-in digital camera... Tens of megapixels, sophisticated image processing algorithms, automatic setting range ... It would seem that it is enough to select the desired frame and press the button, and the automatics will do the rest. Unfortunately, this is only partly true. So, for example, an attempt to shoot a building against a bright blue sky will lead to an overall excessive darkening, since in this case the most bright element, relative to which the rest of the parameters are set. If you interfere with the algorithms and manually specify the exposure, then the result can be a building with acceptable brightness in the image, but a white spot instead of the sky. To overcome this, a special HDR mode, implemented in almost every modern digital camera, including models in smartphones. Having learned how to work with it, you can be sure that the quality of the images will be perfect. This abbreviation stands for Dynamic Range Expansion. Thus, to the question: "in the cell phone?" you can answer like this: "This is a special function of frame processing, designed to improve the pictures by combining one final of several intermediate ones." Overall enough interesting opportunity with which every owner modern smartphone I just have to familiarize myself.
What is HDR in a phone camera
Actually the principle of work this regime pretty simple. HDR shooting assumes that the camera takes not one, but several frames at a time, while focusing on objects with different light levels.  Then the central processor selects images with averaged values and combines them into one, which is offered to the user. Thanks to the use of this simple method, you can forget about too bright and insufficiently bright objects in one frame - everything is in balance. Because this decision completely software, then to use it, you just need to install an application that has a similar shooting mode. Note that not all cameras pre-installed in the basic firmware of smartphones have this feature.
Nuances of use
At the same time, it is important to understand that HDR mode is still not a panacea. Even using it, the owner does not become a professional photographer. The main problem is as follows: since the final image is formed from several intermediate ones, the apparatus itself and objects in the frame must be motionless. 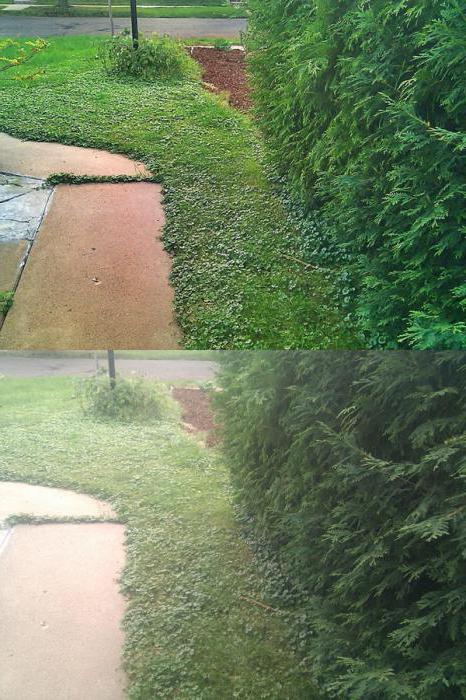 Otherwise, an unpleasant HDR effect may appear, in which everything in the picture looks blurry, doubles, etc. When using this mode, it is recommended to use a tripod.
The next thing to keep in mind is that in some cases, getting a picture with average brightness is inappropriate. For example, silhouettes in the twilight, as conceived by the photographer, should remain the same vague shadows, and not people in gray raincoats. HDR shooting does not allow for this.
Finally, the brightness and contrast of pictures taken in this mode are generally slightly lower than in pictures taken in the usual way. Sometimes this turns out to be very critical.
HDR Pro
Within the framework of the article, it is useless to try to describe all existing programs for smartphones in which the shooting mode with an extended range is implemented, since there are dozens of them. 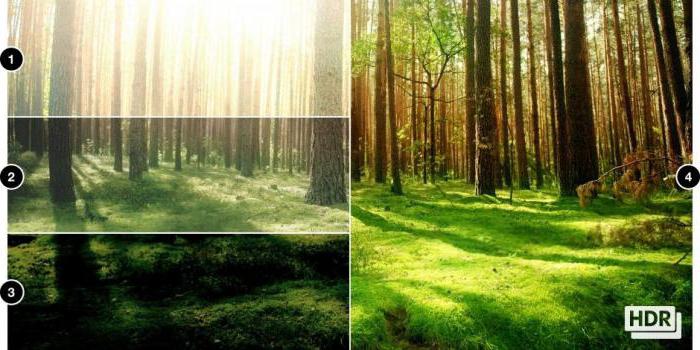 Here are just a few. One of the most famous programs in this group is HDR Pro Camera. Despite the fact that the release of new versions has been discontinued (the latest - 2.35), the reviews about this application are the most flattering. An additional plus is the guaranteed performance even on the outdated "Android 2.2", which for some may be a decisive factor. Once launched, the user has the option to select automatic or manual mode. In the second case, using the sliders on the screen, you can pre-adjust the brightness, contrast, color temperature with which the pictures will be taken. The program is distributed on a paid basis, but the cost is very democratic - less than 60 rubles.
SNAP camera
Perhaps everyone who set himself the task of choosing good program for photography, came across a solution from developer Marginz Software. Snap Cam is a well-deserved popularity among many, which is explained by several factors. Among them are support and timely release of new versions; some features are unique; the program has incorporated almost everything that may interest both a professional and a novice photographer. In particular, it is when working with it that it is easiest to understand what HDR is in a phone camera. To activate the mode after installation and launch, you must select HDR by rotating the graphic settings wheel (version 7.х.х). It remains to take a picture. By default, three frames with different exposures will be saved, among which you can choose the best one. The function of saving intermediate images, if it is not needed, is deactivated in the settings - section HDR. In this case, the entire shooting process takes place completely automatically, except, of course, pressing a button. Those who like to play around with the settings may be interested in focusing between intermediate frames, as well as milliseconds of delay. The program allows adjusting clarity, brightness, image resolution, cropping, etc. It is assumed that you purchase a license. 
Basic functionality
The demand for HDR mode has led to the fact that more and more smartphone manufacturers began to include in their OS a camera application that is natively capable of capturing high dynamic range shots. True, when using stock (basic) solutions, there is no need to talk about the abundance of any additional settings. For example, in the popular build of CyanogenMod, clicking on the three dots of the menu opens a window where you can enable or disable the use of HDR mode. Parallel operation of this function and the flash is not possible. It should be noted that very often an inexpensive one in the usual mode allows you to get better quality photos than a more expensive one with a low-quality sensor.
"Open camera"
That's right - Open Camera - is the name of an application that also deserves the closest attention from photography lovers. There are no less settings in it than in the above Snap. True, to activate the HDR mode, a beginner has to study all the items in the settings. In fact, the "magic button" can be accessed by clicking on the dot icon in the top on-screen menu. Among the items on the "Scene" list is HDR. The quality of the final image is excellent, but the processing speed is one of the slowest among similar solutions. Perhaps, in models of smartphones with powerful processors, this delay is leveled. To understand what HDR is in a phone camera, it is recommended in practice to choose different modes shooting and comparing the result.
A large, if not a huge number of photos are processed using HDR technology. The web is literally replete with such processing examples.
First, let's understand what HDR is and why this technology was created. HDR - High Dynamic Range loosely translated as "high dynamic range" is an attempt to translate the huge variation in brightness in the real world into what is visible on the monitor (photographs). A typical example of such a scatter in a landscape is a coniferous forest against a bright blue sky. As a rule, in such cases, we get one thing in the photo - either a forest that is too dark or a bleached sky. We will not further understand the terminology, possibilities and other tricks, the Internet is full of information on this topic and it will not be difficult to find it.
Let's go back to the beginning - you took a photo, looked at it on the monitor and the quality of details in light and dark areas on it did not satisfy you. If you shot in JPEG, then you will have a lot less tools for correction and they will not be as effective if you have the original in RAW format. Here it becomes possible to make a so-called "pseudo-HDR" image. In the future, for brevity, this post will use HDR instead of pseudo-HDR. For lovers of precise terminology, I will say that I will not consider working with real HDR obtained from several images taken with an exposure shift, I will probably touch on this topic in the future. Let's return to our frame shot in RAW - since we have a format that allows you to change the exposure within certain limits, you can also get photos with an exposure shift from it.
For example, such:
![]()
Let's use the well-known program Photomatix (site http://www.hdrsoft.com) to create HDR images. It makes no sense to tell how to work with the program, the program is intuitive, in our case it is enough just to point it to several of our files with different exposures obtained from one RAW image.
After processing in Photomatix, we get something like the following:

These examples are deliberately poorly done and disfigured for clarity. In order to make it clearer for you what and how is spoiled, first I will try to point to typical mistakes in HDR creation. Take Trey Ratcliff's book “Top 10 common HDR mistakes” as a guide.
Since this book has not been translated into Russian or I simply could not find a translation (the original is English) and the translation of my terms, the accuracy and clarity of the translation may not be sufficient, therefore, to increase clarity, I will give examples in the form of fragments from the received pictures.
Common mistakes when creating HDR
1. A lot of color- everything seems to be simple here, just look at the rear lights of the cars. This is due to the peculiarities of our vision, simply speaking, the eyes get tired when looking at very saturated colors. This, by the way, has long been noticed even by TV manufacturers, almost all models have an opportunity to choose a “soft” mode in addition to a rich image. Do you think this is from the kindness of the manufacturer?
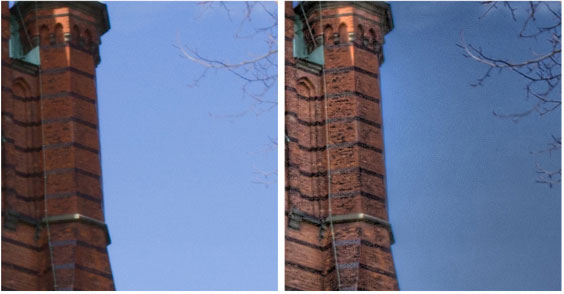
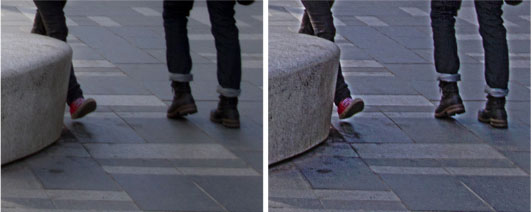
2. Local glow- White fringing or brightening appears around tree silhouettes and other contrasting objects. In this case, the sky on the border with the tower is highlighted:
and here light edging appears around the legs (this is from another photo):
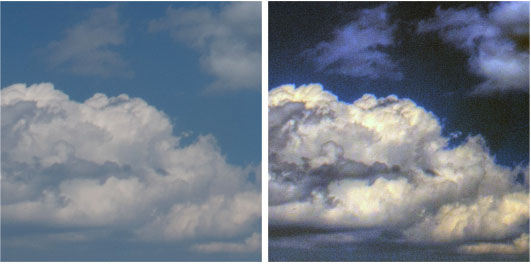
3. Dark fragments clouds on a sunny day - this processing feature makes the clouds very unnatural, and in addition, such a black color in the sky becomes a holding point for the eye. Hopefully this is not your goal - to make the viewer look only at black spots in the sky:

4. "Dirty" white:

Or a completely ugly version of changing the white color in the overexposed area:

Also, this defect is strongly manifested in the form of an unnaturally gray color of clouds and clouds on a cloudy day.
5. Glow areas of blue sky(but not necessarily the sky) caused by the presence of a highly reflective object nearby, in this case the upper-right edge of the cloud:

It can also lead to the appearance of yellowish spots on such objects (this is from another photo):
The rest of the tips have less to do with landscape photography, but if curiosity prevails, here is a link to the author's site http://www.stuckincustoms.com/. I would like to note that Trey Ratcliff's works are not the works of a beginner, they are interesting, they are worth seeing and his opinion can be trusted.
We select the source material
Now you can look through your work and look with a critical eye if there is anything like it among them.
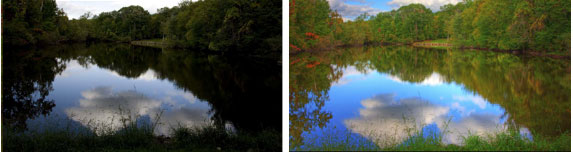
Unfortunately, the woes of HDR creations don't end there, next important point in processing lies in the fact that, even observing all such rules and adding a range to the sky and shadows at the same time, most often the result is an almost flat "lifeless" picture.

Speaking of the landscape, there is one more peculiarity - in addition to the similar loss of volume in the resulting picture, there is a very unnatural change in the green color of foliage, grass, in short, all vegetation. And this becomes more pronounced the more of this vegetation in the frame (by the way, one of the missed tips of the aforementioned Trey Ratcliff - never shoot jungle or dense forest in HDR).

Speaking about the unnaturalness of such a color change, I cannot refrain from one more example:
The author is so pleased with the change he made to the real world that he even invites everyone to his one-day HDR courses! Without a doubt, such shooting conditions may require the use of an increase in the brightness range, but the solution clearly should not be the same as in the example given.
The widespread opinion that if I shot it unsuccessfully, then the RAW image will save, in the future I will extract the missing from it by processing, it does not always work. There are many examples of this, especially when, moreover, the errors listed at the beginning of this note are clearly visible. It happens much less often that a shot taken in a hurry can be processed to a more or less acceptable result.
This picture was taken during an excursion, there was no time to linger at all. But since the format of the only frame was in RAW, I wanted to see if something could be drawn out of such a picture.
After processing in Photomatix and adding a couple of filters in Photoshop, we got the following:
![]()
The result, of course, is also worthless, but it is definitely more interesting than the source. But now the photo can be thrown into the trash can with a sense of accomplishment.
If you've read this far, you probably expect that after looking at the mistakes in detail, there will be wonderful tips on how to turn your photo into something very correct and beautiful using HDR. But here I will rather disappoint you - in most cases a bad photo is bad and will remain, there is no recipe for turning it into a masterpiece. But there is an opportunity to reflect on how to increase the chances of a successful result even when shooting difficult scenes in terms of lighting.
How to determine the dynamic range of a photo
The question arises, is there any way that even any beginner can understand the border between the usual brightness spread available for transmission by your camera, or are you already in the range available only for HDR? There is such a method and it is quite simple - switch exposure metering to partial or spot, set, for example, aperture priority, a fixed ISO value and see what the shutter speed will be for the darkest and lightest areas - for example, the setting sun (be careful with the sun! - read the instructions) and a dark bush in the foreground. Suppose you get two of these, 1/1000 of a second for the sun and 1 second for a bush. Then just bend your fingers, counting how many steps between these values. The transition from 1 second to 1/2 is one, from 1/2 to 1/4 is two, from 1/4 to 1/8 is three, and so on up to 1/1000. We get ten curled fingers or, in common terms, ten stops or exposure steps. For a number of reasons, it is difficult to name here a clear figure for determining the desired threshold, in my opinion, you can think about the need to use HDR, if the figure obtained is more than 7-8 stops, we got ten - almost certainly necessary.
If you already have a little idea of the possibilities of this technology, you will most likely come to the conclusion that the use of HDR is most justified in cases where the dynamic range is really large due to the special shooting conditions.
First of all, such special conditions should include a night cityscape, sunsets and sunrises with backlighting and a dark foreground, shooting indoors with a desire not to lose sight of the window or in a room where there is a ban on the use of flash (for example, in a church or in the museum), just an interior photo and the like. In this case, the use of HDR can give very interesting results, and in some cases it is generally the only chance to get a decent result.
As an example, I will cite the work of Sergei Stepanenko "Field lamps" (http://stepbystep-hdr.livejournal.com/140120.html)

It's not hard to imagine this photograph taken in one frame in JPEG with brightness metering across the entire frame.
Thus, I'm trying to smoothly lead you to the idea that there is some choice for the landscape photographer. In the first option, you shoot what you see and hope for further processing that will correct errors due to the HDR capabilities. In the second option, you see that the situation will not allow you to get a satisfactory result with the usual means and shoot several frames with different exposures precisely because you cannot do without HDR in this case.
How to shoot a landscape in HDR
Here the question expands a little - you shoot a landscape and at the same time admit the possibility of further processing your photo. What recommendations can there be? Especially for a beginner "landscape painter"?
I will step a little away from the main topic and quote Scott Kelby, the author of very interesting books, in particular "Digital Photography" (volume 1, chapter 4):
“Landscape photographers can only shoot twice a day ... at sunrise and sunset. If this is not a problem for you, then it's time to reveal another important secret: ... you should always use a tripod. Every day. Constantly. In landscape photography, there are no photographs taken without a tripod ... One morning you will surely see an amateur next to you, taking the same pictures as you, but without a tripod ... Want to save a lost soul? Silently grab a tripod and bang it on the head. "
If you take this advice and always use a tripod, then the following steps when shooting a landscape can be considered quite simple. You have decided on the composition and now you can take several photos with different exposure levels, focusing on the lightest and darkest areas, and the presence of a tripod increases the possibility of expanding the exposure bracket to almost any values. This moment cannot be overemphasized when you are shooting sunrises, sunsets or the city at night. It is especially worth noting here that many beginners simply do not understand that, for example, a beautiful photograph of a night city with colorful lights and elaborate details in the shadows can be obtained only in HDR and they try to repeat the result they saw, shooting "handheld", and even in JPEG from it. 8-bit color. I will not start a discussion about comparing RAW and JPEG here, I will just note that in our case we are just going to process the received frames in HDR, and for subsequent processing, the 8-bit depth may just be insufficient. I will only explain the difference using an example that is not entirely accurate for our case, showing the differences between 8-bit color and 16-bit color:

After processing in HDR, you run the risk of getting an enhancement of such gradient transitions.
Thus, you took several pictures with a tripod, did not forget about the exposure spread and saved everything in the format most suitable for your purposes.
In the future, you can choose the best frame for the transfer of light and dark areas of the scene, and if necessary, create a "pseudo" or even a full HDR image... I'll make a reservation that even if you don't have a tripod, you can try to shoot handheld in burst mode with exposure bracketing (all this, of course, if your camera has such functions). Naturally, success is more likely in the wide-angle range of the lens.
Chances of getting high-quality (I do not specifically say "good") landscape photography as a result of such actions, they really increase. And then, sitting at the computer, it remains only to decide, guided by your own taste, whether to use HDR in each specific case. The main thing is to understand well that you have a powerful and interesting tool in your hands for creating a beautiful and natural looking photo.
conclusions
Now I will try to draw conclusions from all of the above:
1. HDR application required in special lighting conditions and it is better to spend time getting a special series for a conceived scene than to torment a separate frame in the editor, trying to get what was missed during shooting, all the more trying to get something that is not actually in this frame - here I mean, first of all, an insufficient brightness range.
2. Carefully look at the result, carried away by processing, it is easy to lose something interesting that was originally present in the picture. Try to avoid the common mistakes listed at the beginning of the note, unless there are special considerations.
3. Compare the resulting image with the original. Maybe it shouldn't have been processed at all?


