The desire of smartphone manufacturers to make their products more attractive to buyers has led to the fact that it is now quite difficult to find a device that would not have a built-in digital camera. Dozens of megapixels, complex image processing algorithms, auto tuning range ... It would seem that it is enough to select the desired frame and press the button, and the automation will do the rest. Unfortunately, this is only partly true. So, for example, an attempt to shoot a building against a bright blue sky will lead to an overall excessive darkening, since in this case the most bright element, relative to which other parameters are set. If you intervene in the work of the algorithms and manually specify the exposure, then the result may be a building with acceptable brightness in the picture, but a white spot instead of the sky. To overcome this, there is a special HDR mode implemented in almost every modern digital camera, including models in smartphones. Having learned to work with it, you can be sure that the quality of the pictures will be perfect. This abbreviation stands for extension dynamic range. Thus, to the question: “in the phone’s camera?” you can answer like this: "This is a special frame processing function designed to improve images by combining one final from several intermediate ones." Generally enough interesting opportunity with which each owner modern smartphone just have to check it out.
We select the source material
Since you will be blending five shots of the same scene together, these shots should be as close as possible. A good remote trigger tripod can help you maintain perfect alignment between all exposures in your series. A good professional or prospective camera body - you don't need the most expensive professional camera on the market, but you will need a camera that shoots full frame with a sensor that adapts well to low light situations. Wide Angle Lens - The biggest difference between professional and non-professional real estate photography is often the lens. Wide angle lenses of 18mm or below will let you capture the entire room in a frame. This makes the room look larger than with a less wide lens like 24mm or 35mm. A good and solid tripod is an absolute must when shooting brackets. . When you have an image bracket, you can do a lot of things that you can't do with just one frame.
What is HDR in a phone camera
In fact, the working principle this mode pretty simple. HDR shooting assumes that the camera takes not one, but several frames at once, while focusing on objects with different levels of illumination.  Then the central processor selects images with average values and combines them into one, which is offered to the user. Thanks to the use of this simple method, you can forget about too bright and not enough light objects in one frame - everything is in balance. Because this decision completely software, then to use it, you just need to install an application that has a similar shooting mode. Note that not all cameras pre-installed in the basic firmware of smartphones have this feature.
Another thing that becomes possible is masking the darker effect on the blended image to get a better window. If you want a really great window, try taking an extra shot exposed for viewing with the flash pointed directly at the windows to make blending easier.
The human eye is capable of capturing and processing a wide range of light levels at any given moment. This allows us to look at a world filled with bright spots and shadows and see an unusual amount of detail at the same time. Compared to our eyes' vacuuming ability to suck in light, most cameras can only capture a narrow range of brightness.
Nuances of use
At the same time, it is important to understand that the HDR mode is still not a panacea. Even by using it, the owner does not become a professional photographer. The main problem is this: since the final image is formed from several intermediate ones, the apparatus itself and the objects in the frame must be motionless. 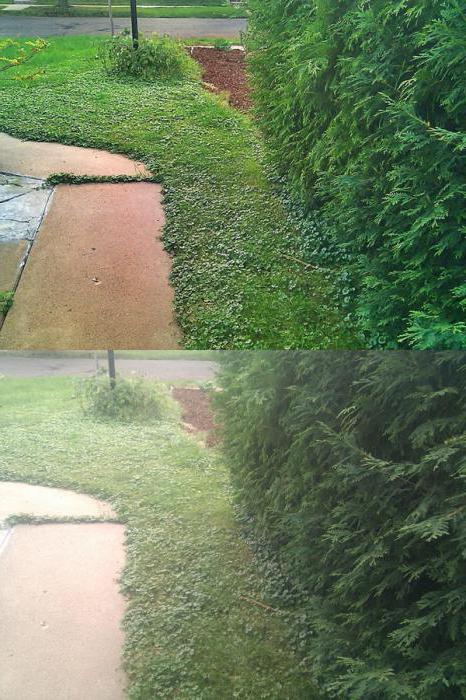 Otherwise, an unpleasant HDR effect may occur, in which everything in the picture looks blurry, doubles, etc. When working with this mode, it is recommended to use a tripod.
High dynamic range photography is a method of increasing the range of light shown in a picture to create vibrant, bursting pages of photographs that exhibit a distinct, often exaggerated level of realism. These photographs are usually created by combining at least three photographs of the same scene taken at different exposure settings.
The first step is to choose a theme. And if it's cloudy, you can create dramatic, ominous images of cumulus clouds. Advertising - Continue reading below. Depending on how fast your computer is, the rendering process can take up to two minutes. And when it's done, you'll probably be less impressed with the result, which will look gloomy and dark. To turn a photo into a more usable format, you'll need to go through a process called tone mapping that brings that data to the fore.
The next feature to consider is that in some cases taking a picture with an average brightness is inappropriate. For example, silhouettes in the twilight, according to the photographer's intention, should remain the same indefinite shadows, and not people in gray raincoats. HDR shooting does not allow for this.
And finally, the brightness and contrast of pictures taken in this mode are generally slightly lower than in photographs taken in the usual way. Sometimes this is very critical.
What other settings should I use?
In fact, you could just save this photo and call it a day. You should now see a new window called Tone Mapping Settings. Playing with them will add life to your painting. Have fun pulling them in every direction and watching your image transform from a realistic image to a surreal landscape. As you know, photography is not about capturing a scene, but about capturing the light in a scene. Now digital cameras can capture a certain range of light, so sometimes you look at a scene and then photograph it only to have certain areas blown out and completely white, or parts dark and completely black.
HDR Pro
Within the framework of the article it is useless to try to describe everything existing programs for smartphones that have an extended range shooting mode, as there are dozens of them. 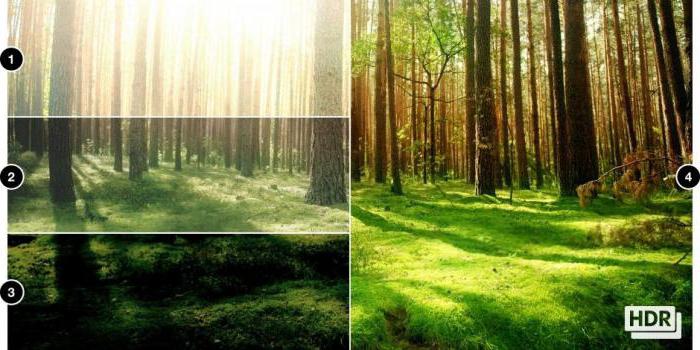 Let's point out just a few. One of the most famous programs in this group is HDR Pro Camera. Despite the fact that the release of new versions is discontinued (the latest is 2.35), the reviews about this application are the most flattering. An additional plus is guaranteed performance even on the outdated Android 2.2, which for some may be a decisive factor. After launch, the user has the option to select automatic or manual mode. In the second case, you can use the sliders on the screen to pre-adjust the brightness, contrast, color temperature with which pictures will be taken. The program is distributed on a paid basis, but the cost is very democratic - less than 60 rubles.
Are there ways to avoid this?
Your eye sees a wider range of light than a digital camera. This way you don't create a "fake" image, you create an image that shows a wider range of light that you can naturally see. Now it is also important to change the exposure by changing the shutter speed and not the aperture.
What's more, when you're shooting these images, you need the camera to be stable and on. You will need nice colorful clouds and a nice range of light. Just drag and drop them into the program. Soon the processed combination of all images will be displayed on the screen and you will get sidebar on the right side.
SNAP Camera
Perhaps everyone who asked himself the task of choosing good program for photography, came across a solution from the developer Marginz Software. Snap Cam enjoys well-deserved popularity among many, which is explained by several factors. Among them are support and timely release of new versions; some features are unique; the program has absorbed almost everything that may be of interest to both professional and novice photographers. In particular, it is when working with it that it is easiest to understand what HDR is in a phone camera. To activate the mode after installation and launch, you need to select HDR by rotating the graphic settings wheel (version 7.x.x). It remains to take a picture. By default, three frames with different exposures will be saved, among which you can choose the best one. The function of saving intermediate shots, if it is not needed, is deactivated in the settings - the HDR section. In this case, the entire shooting process takes place completely automatically, except, of course, pressing the button. Fans of "playing around" with the settings may be interested in focusing between intermediate frames, as well as milliseconds of delay. The program allows you to adjust the clarity, brightness, image resolution, cropping, etc. A license is required. 
The first stop is playing with the levels. On the right side, you will see three options in the automatic section. Highlights control the brightest part of the image. Thus, if you think the light part of the photos should be brighter, move the bar to the left and vice versa to darken them. Shadows refer to the darkest part of an image. Again, play with this lever until you get it where you want it. Finally, the saturation lever will scratch the color.
Devices built specifically for HDR
Once you're happy with how the image is exposed, click below. And here we have it, the final image. The sky is more dramatic and colorful, and the city skyline is much brighter. Now obviously you can see that the original image is fine too.
Basic functionality
Demand HDR mode led to the fact that more and more smartphone manufacturers began to include in their Operating Systems a camera app that comes with the ability to take high dynamic range shots. True, when using stock (basic) solutions, there is no need to talk about the abundance of any additional settings. For example, in the popular build of CyanogenMod, clicking on the three dots of the menu opens a window where you can enable or disable the use of HDR mode. Parallel operation of this function and the flash is not possible. It is worth noting that very often an inexpensive one shooting in normal mode allows you to get better photos than a more expensive one, but with a low-quality matrix.
It really depends on your personal taste. Typically, a photographer will take at least three exposures; one properly exposed, one overexposed and one underexposed. They are then combined in post-production software, which highlights certain elements each to create one final image. The advantage of this method is that it provides a much greater "dynamic range" of light and color than a single exposure. The overall goal is to make the image as close as possible to what the human eye sees; our eyes are fantastically equipped to process a huge range of light and are thus capable of bringing out extreme lights and darks in the same scene.
"Open camera"
That's right - Open Camera - is the name of an application that also deserves the closest attention from photo lovers. There are no less settings in it than in the above Snap. True, to activate the HDR mode, a beginner has to study all the items in the settings. In fact, the "magic button" can be accessed by pressing the dot icon in the top on-screen menu. Among the items in the "Scene" list is HDR. The quality of the final image is excellent, but the processing speed is one of the slowest among similar solutions. Perhaps, in smartphone models with productive processors, this delay is leveled. To understand what HDR is in a phone camera, it is recommended to choose in practice various modes shooting and compare the result.
Camera sensors - even high performance sensors with high level dollars simply can't replicate that dynamic range, so we're often left with either underexposed shadows or blown out highlights, and are forced to select one part of the image for proper exposure.
A new range of options available and the ability to create truly great images. Instead, it's meant to be a set of tips and tricks to help you improve your photos and make the best use of the high dynamic range tools at your disposal.
Almost every camera owner sooner or later asks the question: why, when shooting a landscape, as a result, in the pictures the beautiful blue sky turns into an inexpressive white spot, and in those photographs where the sky turned out the way we wanted, the foreground is completely invisible, it turned into the dark lane. There is a way to get an image that captures both the background and the foreground in detail. This will be discussed in this article.
What is HDR mode
This encourages us to create a few of ours. But how do we do it? 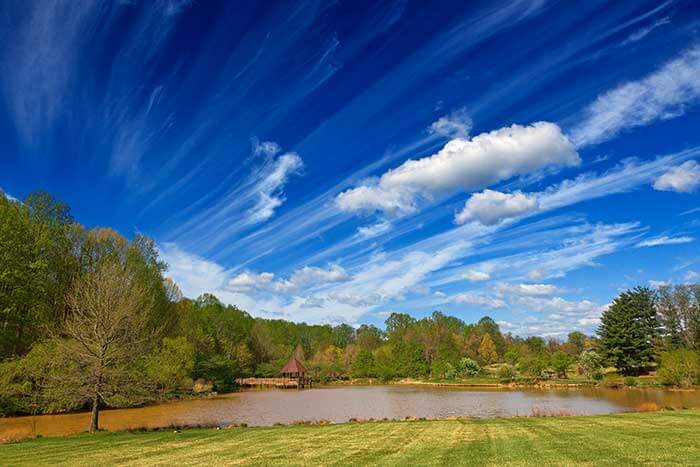
Camera lens tripod. 
Capturing a single image and then creating different components from it can overcome a lot of problems, such as image blur and compositional differences.
Why?
So, first let's try to figure out why such things happen at all.Let's do a little experiment. Let's put the camera in aperture priority mode and point it at the sky in sunny weather. Let's look at the shutter speed shown by our camera. My Canon EOS 500D shows a value hovering around 1/2000 of a second. Now let's measure the required exposure on the darkest part of our future frame. For example, a person's clothes or just a dark part of the room. We get a value of approximately ½ second. The difference between these values in lighting corresponds to the dynamic range of the motif. It is usually calculated in exposure steps. In this case, it is equal to 10 steps (one step corresponds to a change in exposure by a factor of two, in our case this is a change in exposure time from 1/2000 to 1/2 second).
Let's say the camera is capable of registering 4096 gradations of brightness. Everything that is brighter will be just white, without details. Anything darker is just black. And here you have a bright sky and shadows in the bushes in the frame. Everything at once does not fit into 4096 gradations: either the light areas are “knocked out”, or the shadows “fall through”. The camera sensor cannot adapt to the light. It has a fixed dynamic range. For most digital cameras, this range is 9 stops. Black and white film has a dynamic range of approximately 11 stops. The human eye can adapt to changing lighting up to 24 exposure steps. Therefore, we are able to distinguish details both in the light sky and in the dark folds of clothing, while the camera is not.
Post-Processing: Major Fixes
Making an image is very easy. 
This neat little program allows you to tweak some basic issues such as white balance adjustment, lens profile correction, clarity and exposure. If you took off individual images with the exposure set, you can skip this step.
Here we adjust the exposure compensation and create some images. Name them so that you can easily identify what is. This is advanced software and automatically determines how much compensation has been used. But it is still useful to tell him how many exposure compensation values have accumulated. This will be good enough that you can understand how different the original and these new composite images are. No matter what you do, try to keep your sanity with everything so that the end result looks natural.
What is HDR?
HDR ( High Dynamic Range) - translated from English as a high dynamic range. As a result, we will get an image with a high dynamic range. This method of creating an image uses information from several shots taken at different exposures, which clearly show the details of both the light and dark parts of the photo. That is, you need to take at least three shots: on one, the entire dynamic range is given under the light, on the second - under the shadows, and on the third - something in between. HDR is an image in which all ranges are combined. There will be 12 bits of brightness in the shadows, the same number in the highlights and in the middle. In total, 36 different brightness levels.How to get HDR photo?
Now let's move from theory to practice. To create an HDR image, you need to take several shots with different exposures, capturing details in both the dark and light parts of the motif. In this case, the exposure should be changed using the shutter speed, since in the future the images will be combined, and the depth of field should not change.So, to create pictures from which our HDR will be created in the future - photos will be needed:
a) a digital camera with the ability to change shutter speed;
b) tripod;
A tripod is not required, you can use a stack of books, or just put the camera on any rigid object. It is advisable not to shoot handheld.
How to shoot those cherished three shots? There are two ways. Let's consider each of them separately.
The scientific aspect is to take pictures in square brackets at different exposures and combine them into one. The artistic aspect is a wide range of effects from natural to extreme and dramatic. Photography has become an important part of human life a long time ago. Today, every two minutes, people take as many photographs as were taken during the entire 19th century! The word "Photography" is translated from Greek as a drawing with light.
This means we use the power of lighting to create great shots and share them with others. Dynamic range is the amount of light and dark that a camera can capture and display. The more detailed the photo, the more impressive the effect it provides.
The first way is to trust automation. We take three photos using automatic bracketing, if your camera has such a function. If it is missing, use the second method.
The second way is to do everything manually.
Set the camera to aperture priority mode and select the desired aperture value.
Set the metering mode to the minimum area that the camera allows. Spot or partial metering is optimal, but as a last resort, a center-weighted method is also suitable for most motifs.
Let's measure the exposure on the darkest and brightest areas. To do this, the area of interest to us must be in the center of the frame. We remember these values.
Let's mount the camera on a tripod, switch to manual mode, set the same aperture value at which we took measurements, and take pictures, raising the shutter speed from the smallest value to the largest (or vice versa) with a difference of one or two steps when shooting in JPG format or two or three stops when shooting in RAW.
High dynamic range in photography means that more light and darkness are captured according to what a person can perceive with their eyes. Digital cameras have sensors that can capture a lot of detail, but their range is much lower than what we see with our own eyes.
With so many people taking photos today, it's hard to stand out in the crowd. Make high dynamic range photos part of your workflow and get ready for amazing results. Digital camera can take pictures of objects that reflect or emit light through temporary exposure. These images are low dynamic range photos because the amount of light an average camera can capture is low.
You can limit yourself to three shots (then the shutter speed step will be more than 2-3 steps). On the darkest photo, the histogram should not reach the right border a little, and on the lightest one - to the left border.
It is advisable to set the sensitivity when shooting for HDR to the minimum value in order to avoid noise.
For example, I'll use the first method, and simply capture the view from my window:
I got three pictures:
Shot with standard exposure

A photo with reduced exposure. The photo is dominated by shadows.
Photo with increased exposure. The sky has turned into a white spot.
By the way, it is best if all the pictures are taken in RAW format. If your camera is unable to take pictures in this format, JPG will do. Insofar as RAW format Capable of capturing a much larger range than other formats
How to get one from three images?
This can be done using both Photoshop and other programs, such as Photomatix, which I will use.Step 1
Select HDR -> Generate (Ctrl+G) from the menu. In the window that opens, click the Browse button. In the dialog box, select all three of our photos. Click OK.
Step 2
In the window that appears, just in case, check the box “Align source images” (align the source frames) - even when shooting from a tripod, the frames may have differences. Click OK.
Step 3
We got a 32-bit image in HDR format, which contains all exposure information for all photos. It can be saved at this stage. It doesn't look very good. This is because the monitor is not able to fully display it. So let's move on to step 4.
Step 4
In order for the monitor to display our picture, it will have to be converted to JPG. To do this, select HDR-> Tone mapping from the menu. There you can experiment, you can leave everything as it is, select 8-bit in the output depth. Save the resulting JPG image.
Result. The sky is picturesque. You can see the reflections of the trees in the puddles.
I used Photomatix Pro 2.4. It is worth noting that different versions programs may produce slightly different results.
This technique is indispensable when shooting landscapes, and can also be useful when shooting reflections in water.