HDR photos amaze with their saturation, clarity and special atmosphere, regardless of the scene. They are more like paintings and amaze viewers with their depth.
But despite the fact that these photos can be seen quite often today, not everyone fully understands what HDR is - special processing or shooting features?
In this article you will find all necessary information about these unusual photos and you will be able to create similar masterpieces yourself.
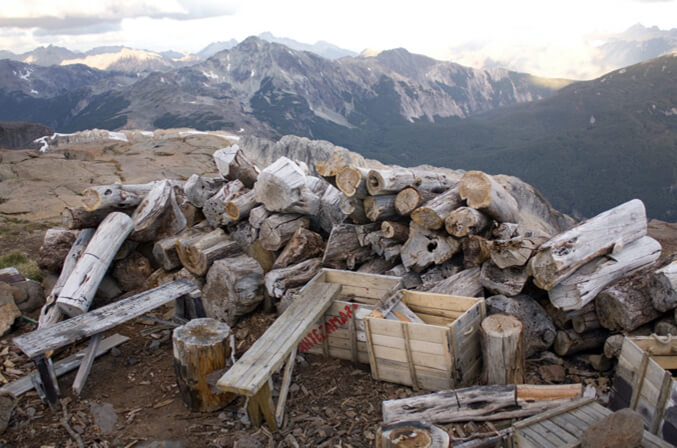
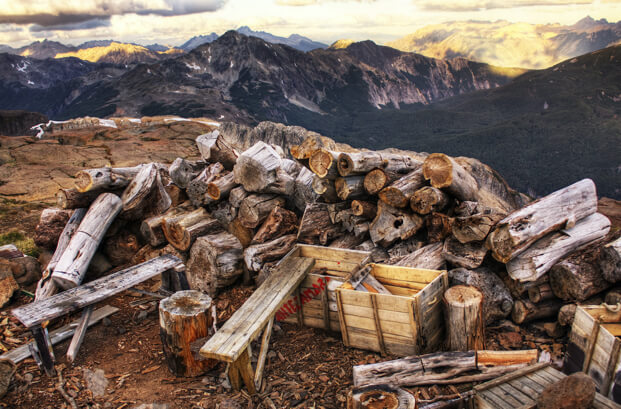
Also with this picture, we can add some extra drawing with the help of the Contrast sliders and Micro Contrast. That's why we set it to 15 and 30. Feel free to use the sliders! With just a few clicks, a balanced image can be restored at any time.
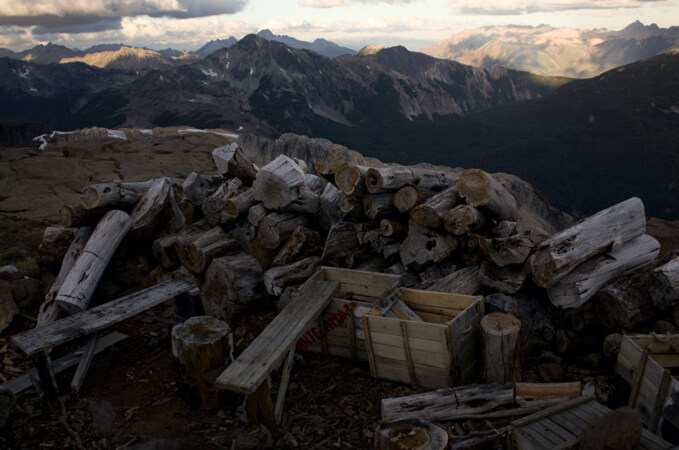
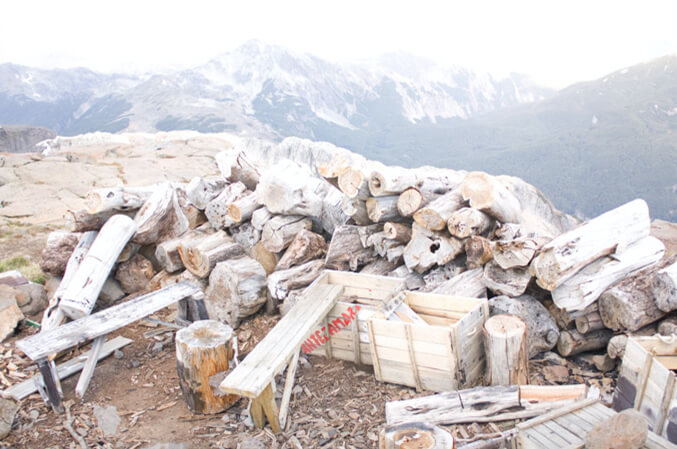
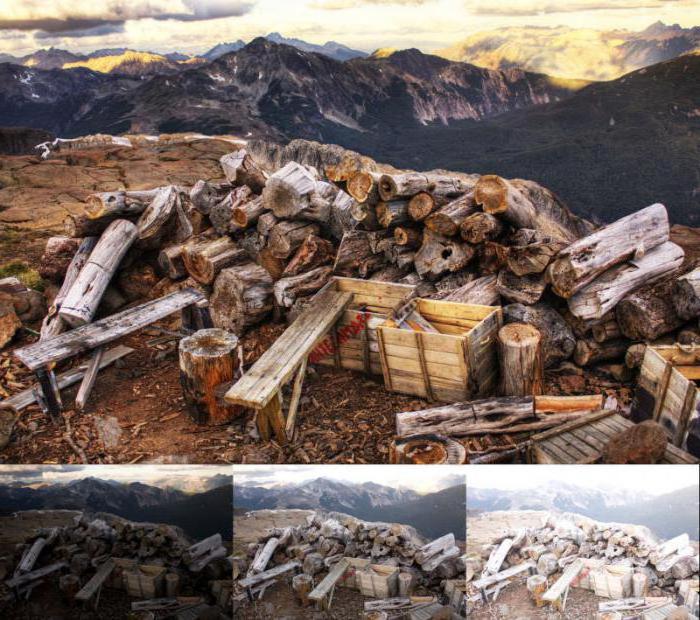
Dark and bright sample image
In this example, we're changing our picture and are now photographing a landscape that was taken in bad weather. Our goal is to emphasize the presence of underexposed skies and gray clouds while lightening the landscape to bring out details. However, the special atmosphere of this record should be preserved.
About HDR in an accessible language
The term HDR stands for High Dynamic Range. The higher it is, the more you can capture in the photo. At high level both light and dark areas will be displayed equally in the picture.
Human vision is able to instantly recognize an image with a difference of 10 to 14 levels of brightness (exposure) and, "adapted", up to 24 steps. For example, leaving a room with bright lighting at night on the street, it takes a short period of time to see the stars in the sky - this is approximately these 24 steps.
One way would be to use at least two photos for processing - one that highlights the sky and one that highlights the mountains perfectly. Follow the steps below to fix this image and get the most dynamic range without getting too many results.
Photo effects and filters for beginners
We start our image editing by setting the slider to -70: the sky and clouds are now much more detailed and presented. Photomontage photos sketches of stylized effect frames and fields. . With just a few clicks, even beginners can make big changes and transform familiar images. Very fast normal shots become absolute moments like you've never seen before. It doesn't matter if it's a portrait, landscape, night shot or a captured subject. With just a few clicks, your photos and photographs glow in a different light.
In ordinary life, in the absence of any special conditions and many light sources, the difference in the brightness of objects in the surrounding world does not exceed 14-15 steps. But, alas, both film and digital cameras cannot capture everything at once, which is why some photos show “overexposure”, while others have dark spots. And even if it turned out to photograph objects with a difference of at least 11 steps, alas, it is quite difficult to reproduce them both on photographic paper and on monitors.
Each effect can be placed above the photo by simply selecting it and deselecting it. So you can quickly and efficiently edit your shots without doing anything wrong. In addition to applying photo effects easily and automatically, you can dive deeper into image editing and customize your images to suit your wishes. At manual setting you have no restrictions. Give your photos a personal touch and take a look.
Photo effects at the highest level
Our suggested photo effects will take your photos to the next level. Thus, you have no restrictions and you can find the right software for your photo effects. You have a variety of effects available, including.
Create the perfect prints, posters and prints
After editing, you can print your image or photo as you like to use as a postcard, poster, or regular print. Thus, you can create your own photobooks and share them with friends and family.The low dynamic range is especially noticeable when photographing buildings in overcast weather: the sky turns out to be bright and saturated, and the building itself is darkened. But photographs of people on a sunny day against the background of building facades come out flawless due to the fact that both people and the background have approximately the same brightness.
Alas, it is almost impossible to correct this difference in a photo editor, since information in black or overexposed areas is lost. Even if you highlight individual elements with special brushes, then at some point noise will become noticeable in the photo. The same applies to darkening objects with overexposure.
Gone are the days when only professional photographers with complex software solutions could edit your photos. With simple steps, you can adjust the image, skip the effect, and finally set the beautiful setting. 
Regular photos often have a problem, namely when there are very bright and very dark areas at the same time. The first photo was taken with a short exposure time. Thus the bright areas are shown in great detail, so the sky and top of the top are on the right.
HDR photos are those that show all the objects in the photo in the same way. In the days of film cameras, this technology was almost impossible, but photographers tried in every possible way to get closer to the high dynamic range. To do this, they used special filters that "leveled" the exposure, and special film development techniques. It took a lot of time, but when digital cameras appeared, this process was accelerated.
If you take portraits when the sun is too bright, you can lighten areas that are too dark. 
- When you photograph landscapes.
- When the sky represents most of the subject.
- When the photographed objects do not move.
- When the backlight is too strong.
Since professional photographers have learned what HDR is, they have been striving to improve dynamic range photo, and now such an image can be created even in the absence of a special apparatus.
How to capture all the details with a small difference in brightness?
If you are not going to shoot sunset, mountains, and people at the same time, but just want to “smooth out” the difference a little, then the RAW format will help. These are "raw" photos without any effects, but with minimal loss data. From them it is already possible to create pictures on which there will be HDR effect.
It sounds really great on paper, but it only happens when you actually understand what a great shooter on the back is. The latter tracks an object when you tap it on the screen, so you don't have to reorient moving objects. By the way, this feature is available not only on the main camera, but also on the front of the suicide shooter!
For this to work, multiple images are taken at different exposure times and superimposed on top of each other. Maybe I need to explain that I like to take pictures with my smartphone, but take a few random shots, like at parties.
Files of this format will take up much more memory on the device, but will allow you to correct blackouts and highlights in a special converter or photo editor.
And if you still need grandiose and high-quality HDR photos?
Even if the photo editor on your computer has the cherished “HDR” button, you should know that this is just a filter that will “smooth out” the difference between light and dark areas in the photo a little and, most likely, will increase the contrast and brightness of the colors.
Not only does the app launch quickly, it also focuses, and finally, the camera fires so quickly that you can hardly miss a topic. Our destination was the bridge near the studio. The idea was to photograph with clouds if possible, with accents through the sun and the pillars of the bridge structure in the foreground.
Start with an overexposed image and then gradually change the exposure time so that less and less light can be captured and accordingly the results get darker and darker until you finally get underexposed image. Photographers will clap their hands above their heads because usually post-processing has to be as careful as in the photo itself. After this lesson or lesson he returned to the city from this really beautiful place outside of Las Vegas.
If you carefully read the information above and figured out what HDR is, then you will immediately notice the difference between a processed image and a photo taken using a special technology.
To deal with the "maximum range", if a wonderful way to achieve amazing results.
To capture the terrain in HDR, you need to take 3-5 shots in a row, and then “overlay” them in a photo editor.
By the way, if you haven't been there yet, you can't even get an idea of how small Las Vegas really is. In half an hour you will at best find yourself in a small suburb, otherwise in the desert. Of course, we brought our tripods and smartphones with us, and while it got darker in Vegas, we tried some light painting at the end of the day.
This has led to different logos and templates. Also, Eric and Rich had great teachers who ended up serving us homemade beer in their amazing studio, and Lars also rode Eric's Tesla. Let us know in the comments what role photography plays for you on smartphones and whether you are currently using very significant abilities, or rather, rather on "real" camera sets.
It is necessary to take several frames of LDR (Low Dynamic Range, low dynamic range), setting different exposures. This parameter must be changed manually, by 2 divisions, which is equal to one step of brightness.
After that, one frame is superimposed on another, and the most suitable areas in terms of brightness are “chosen” from each. After the final processing, the finished photo will display all the details of the composition as much as possible.
Cool effect, but how do you get it?
It is created by overlaying several photographs. With a wide dynamic range, both balanced brightness and increased contrast can be achieved. They are collected by the camera app to photography. It is based on a wide range of color values across all photographs.
With your smartphone, you are usually limited preinstalled applications for cameras. With such applications, you can, for example, add more than three photos, thereby achieving even higher dynamics and creating a higher contrast image. Do you prefer to shoot heavy artillery? Here are two options.

In fact, you need 3 frames in order to make the most clear photo, but if there are a lot of details, then 5 shots can be taken.
If you want to capture not a landscape, but a specific object in a general view, then in addition to the exposure, you must manually change the focus.
Why do we need HDR photos?
Photographers who strive to create the perfect frame, HDR technology allows you to take unique and deep photos. All the details are visible on them and the light is evenly distributed.
However, the more professional way is to lay hands on yourself and manually edit the exposure series with special programs. The corresponding program combines all the photographs taken. Subsequently, the images can be processed further in a "tone mapping" process and matched with each other. This extra step is necessary because the color depth of stitched photos is initially too high for regular monitors.
In tone mapping mode, color values can be customized and exported so that they are also displayed. Author: Nils Waldmann. Anyone who has ever shot a video with their smartphone or camera knows the problem: the video image is somehow not as alive as the situation being experienced - details are lost.
Also, this technology allows you to capture the landscape and panorama as clearly as possible, especially in cloudy weather.
And, of course, HDR photos allow the photographer to create the perfect frame for further artistic processing.
When should high dynamic range not be used?
Even though such shots look great, it is not appropriate to use this technology in all cases. The reason is not in any special "stylistic" rules: just in some cases the photo will not come out.
High dynamic range means high contrast dynamic range and is not new technology as such. For this purpose, the camera takes a normally exposed image that is initially indistinguishable from a normal photograph. For this purpose, an overexposed image and an underexposed image of the same subject are recorded. The result is a very detailed shot that also shows subtleties in the very bright and very dark areas of the photo with high contrast.
This extra information is taken from the taller and underexposed photo and included in the "regular" photo. An example is following pictures. Building details vary considerably. What does not necessarily require a special camera or a special display device when shooting is much more difficult to achieve in the video field.
- Too bright pictures with a lot of colors. In such cases, the HDR effect will make the photo darker and not so "juicy".
- Objects in dynamics. If, for example, a cyclist is riding in the frame at the time when you are taking pictures, then in any case it will come out blurry and fuzzy, and spots will appear on the photo.
- If there are a lot of natural shadows in the photo, then when “gluing” they will either “stand out” too much, or vice versa, they will lose their depth.

It must be the right standard
Such cameras have been available for some time. So it's not the number of pixels that is used to make the image sharper, but it does ensure that more of the image's details end up reaching the consumer. They will be briefly presented below. It should be noted that the whole matter is still relatively young and therefore bound to change.
Sellers may use the appropriate logo. Which of the standards finally prevails remains to be seen. However, all this is in its infancy. But you can help us too. If we are satisfied, then follow us on our social channels.
Devices built specifically for HDR
Dedicated cameras that "can do HDR" were created in the early 2000s. Their SuperCCD SR matrix made it possible to increase the dynamic range by 2 times due to the greater number of photosensitive elements.
After 2 years, a camera was released that is capable of taking a series of shots with a difference in brightness of already 17 steps. The same principle is used Sony cameras NEX-5 and NEX-3, which have HDR mode. The device takes several frames in a row and combines them to create the largest range.
The latest "breakthrough" that created the ability to use the HDR mode without special efforts, became a special regime in iPhone camera 5. However, owners of other smartphones, both on iOS and Android, also have the opportunity to “play” with photos in special programs available in the respective markets. So, HDR function is now available for almost all smartphones and tablets.
Maximum quality video
Those who know what HDR is and want to prove themselves in this technology have probably been looking for special devices that can “automatically” capture the desired frames.
However, it is worth noting that a camera that takes pictures only in HDR does not exist. Usually, devices either have a special mode, or simply expand the capabilities of the matrix. It is the latter feature that Sony HDR has - camcorders that are designed to create video of the highest quality.
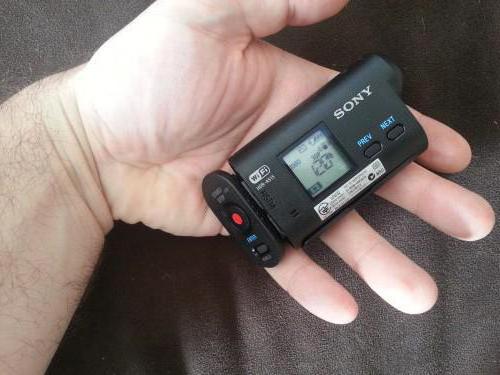
With ClearVid CMOS sensor, x.v.Colour technology and dynamic range optimizer, this device is able to capture photos and videos in maximum detail, without highlights and dark areas. However, it is worth mentioning the fact that in order to enjoy full color reproduction, you need to view photos and videos on the High Definition screen. Therefore, alas, this is not an HDR camcorder, but a good device for high-speed sports.
Inexpensive models of this line are really good budget options for action cameras, however (according to buyers), the more expensive models are inferior in quality to other devices in this price category.
And finally
The main task of HDR is to create an image that is as uniform as possible in terms of exposure. But since the matrices of most modern cameras have dynamic range limitations, the “gluing” option remains the most popular.
Here it is necessary to remember the so-called halo, which is often associated only with this type of photograph. It appears because small details are quite difficult to “cut out” from a bright background, and a small part of them remains in the picture. Therefore, if your main goal is to create the clearest image that looks natural, then you should only shoot large objects.
It is also better to check the finished shots on different screens. Modern monitors with improved color reproduction often render HDR photos too saturated and bright, such that they hurt the eye. Therefore, if you yourself are engaged in “gluing” photos, then it is better to “not hold out” with brightness than to go too far.
Any person who acquires a camera and begins to engage in photography goes through several stages of formation. First, the amateur photographer learns his camera, gets used to it, takes pictures using the built-in modes, and then switches completely to intelligent manual mode, where the creative abilities of a person and the capabilities of a camera are revealed. During this period, as a rule, the camera is set to settings that save the image in Further, gaining experience, gradually overcomes the first stages of professionalism (we will not describe all the characteristics of this stage) and, undoubtedly, begins to notice that photography is an unlimited field for creativity. that using a camera you can literally “write” the history of time, marking moments.
The photographer does not pass by such an interesting topic as HDR photography(hdr technology). What is it and why, having once tried to shoot in order to create an HDR photograph, photo artists are increasingly resorting to this method.
HDR photography- this is a combination of photographs with different exposures (or shutter speeds), taken at the same time, preferably with the same camera, into one shot. To put it even more simply, HDR photography is a cross between an overexposed shot with a normal exposure and a dark photo. HDR photography is a photo with a higher dynamic range, which makes the photo attractive to the viewer. As a result, you can get a photo that is striking in its realism and something incredible, since all the shadows are clearly visible in the photo, it is contrasting, all shades and colors are drawn. If a normal photo does not show shadows in dark areas, and the sky looks like a solid white-gray or blue background, thencreating HDR, You get a picture in which you can see literally everything, any shade. And the sky, even if it is without clouds,HDR photosnevertheless, it will contain shades of different saturation, which will please not only the photographer, but also those who simply see such a photo.
In order to take pictures suitable for HDR, you do not need to possess (although it is desirable, but this will come later, when you understand the whole process, how to take pictures and whether you need it), both ordinary and more advanced models are enough, which can be purchased almost in any electronics store. In addition to the camera is essential. Again, at the first stages, the simplest one is quite suitable, there is no need to chase professional equipment. A tripod is needed in order to shoot several frames from one point, in order to combine them into one in the future. And if you shoot for HDR without a tripod, it can be difficult to combine photos (although if you own Photoshop or another graphics editor, this problem can be partially solved).
The easiest way create pictures for HDR next: you need to select the exposure settings in the camera menu, set it to the extreme value - to take a picture, to the zero position - to take a picture, to the extreme right position - to take a picture. The number of photos may be more (not only the extreme-middle-extreme exposure settings are possible, but also intermediate ones).
After the pictures are taken, there are several ways: use graphic editors for HDR creation, which is not very easy and not always clear for a beginner, but you can apply special programs, which automatically merge the received images into one, allow the user to make some settings for photo alignment, color editing, saturation, etc., and then view the finished result and save it.

Some cameras have a function that allows you to immediately take several pictures with different exposures (bracketing), which is incredibly practical and convenient, quite simple and understandable.
Here are some programs that photographers use to create HDR photos:
- easy HDR,
- Photomatix,
- lightroom,
- HDR Effect Pro,
- Dynamic Photo HDR and others.
Sometimes, with the help of these programs, you can make a pseudo hdr, i.e. load into the editor not a group of images, but just one and start editing it. By the way, if your camera supports