If you've been photographing for a year or two, you've probably heard of HDR (which stands for High dynamic Range) photos. You've seen them digested by excessive post-processing HDR photo that pop up on numerous photo sites. For some photographers, the process seems to be important to overdo it as much as possible in the processing of their images and after a while it seems that this is the only result they are trying to achieve. Do a search with using google when you ask "bad HDR", you can see what I mean. Photos have ghosting, colors are surreal, they look like metal, there is no contrast, in short, the photos are terribly dirty.
With a lot of experience, you can get images with enhanced tonal dynamics that are even better than programs that create these images almost automatically. But for this you really need a lot of experience and an "artist's eye". Images taken on the beach often require this correction as well. We will now describe step by step the procedure for softening the contrasts.
In the editor, click File at the top of the menu. In both methods, the photographer's eye plays a big role. For he decides how much darker or lighter the image is, and how to collect shots of different exposures. A lot of people are probably considering buying, so let me discuss some of the more important changes in latest version this program and think about whether it is worth it.
When I first filmed HDR photography, I fell into this trap too. Many photographers have gotten the same results, wanting to tell them that HDR is not a useful technique, or even useless. This perception is partly correct. HDR in the hands of those who can't use this technique effectively can lead to weird photos, however, HDR done right can help you get incredible results. To see good examples HDR taken correctly, visit the website http://www.hdrspotting.com/site/editorpicks and take a look at the editorial selection of works. There are some striking images in there. The colors are amazing, the contrast is perfect, the details in the shadows and highlights are well worked out. This is how HDR should be.
Perhaps this only introduces unnecessary confusion in people who change from more old version? It is about starting a program, as well as working with many files and working with large files. The zoom effect is smooth and pleasing to the eye. Previously, the most frequently used program panel was the Navigator.
And here it is difficult to explicitly choose "yes" or "no". In my opinion - a revelation, and it is not at all exaggerated. This is, of course, a new settings panel, thanks to which we can now create new adjustment layers on which we apply effects for photography, like improving brightness, contrast, colors, saturation, etc. - these layers have easily accessible properties, can be edited many times, most importantly - non-invasively for the original picture, which is calmly waiting for a separate layer.
It should be the best combination of properly exposed bright scene details and shadows, and the photographs should look as realistic as possible.
Try to make your HDR images as realistic as possible
So how can you achieve this you may ask, then read on to find out.
This is why the Masks panel is a very valuable novelty for me, which allows you to easily change the mask settings, which, most importantly, has settings that greatly simplify the selection based on masks. Saturation boosts work in almost every shot, especially when it comes to its background.
However, in the case of photographs of people, using a higher saturation value unfortunately meant that our models looked like they were trapped in a tan. Do these changes deserve a new number? A lot has changed, starting with the interface, improving the functionality of some tools, adding even more.
What is HDR?
As I said earlier, HDR stands for High Dynamic Range. Your camera's sensor has the ability to capture light, color. The degree to which the camera can do this is called dynamic range... In particular, if your camera can capture a lot of shadow detail as well as highlights in a single frame, then it has a high dynamic range. Over the past few years, digital sensors have become much better at capturing a wider range of illumination. This is a huge benefit for photographers and of course HDR photography as well. This means that we can get more detailed information from each photo, as a result, the HDR photo will be much more detailed.
This is definitely worth changing. It's actually a bit of a fake because the final image has a normal tonal range, but it looks impressive. Thanks to this, there is no burning or insufficient lighting, you can see details in light and dark places of the picture due to their loss in irrelevant places. The effect is very picturesque and often unrealistic. However, the target photograph has no increased tonal range at all.
Well, unless we do it entirely by hand. If the scene is not very contrasty and you can capture one image with details in highlights and shadows, then this will be sufficient in most cases. Of course, forget about the quality of a few photos. It has no compression, contains much more detail, has more bits per channel, and can be easily called up with different exposure values.
How do I shoot HDR?
HDR image creation includes 3 different and independent processes. I will describe each of them in detail in order, they are as follows:
Let's start by getting the photo first. Photography is part of this process. It's pretty straightforward. Set up your camera the way you normally would. Make sure you compose your shot well, get ready to shoot.
He won't add details, but the changes will be less disruptive. Create a selection based on the brightness of the photo and create a layer that matches the curves. Duplicate the adjustment layer and invert the mask. Now one will be used to dim bright areas and the other to lighten dark areas. Reduce the tonal range of the masks by at least 50% so that individual adjustment layers do not affect the overall image. It is best to move the left slider at least up to the value.
The exact values depend on the type of photo and the effect we want to achieve. Therefore, it is advisable to experiment. You should definitely reduce the tonal range as much as you have the empty space on the histogram. If you want to achieve a more interesting, albeit less realistic effect, adjust each channel yourself. Don't worry if the photo comes out badly. The beam size depends on the size of the photo. Of course, this is all "in the eye", so do not adhere to these recommendations rigidly.
The difference between HDR and regular photography is that with HDR you will be taking three to five photos of the same scene using exposure bracketing. The reason you need so many photos is that you will mix these photos together using a special software product for HDR creation.
My recommendation is to use Photomatix Pro for HDR creation. This is a program that has been known for many years, has really good features editing. This is perhaps the most widely used software when it comes to HDR. Photoshop also has HDR function but not as sophisticated as the Photomatix Pro in my opinion. Don't get me wrong, I'm a huge fan of Photoshop, it's an incredible tool, I'm sure Photoshop will have new features that will be competitive over time, but for now, I'm still using Photomatix.
The blur must be repeated several times. If the effect is still too strong, reduce the opacity of the layers to an acceptable level. Then add additional adjustment layers and copy the masks accordingly. If the image is still too contrasted, you can repeat the above with a different tonal range adjustment, for example to extract detail from the darkest areas. Finally, by hand with a soft brush, paint the masks in the desired location.
One of the interesting features of this program are the so-called stocks or, in short, ready-made effects that you can use in your work. With actions, we do not have to repeat the sequence of actions every time to achieve a certain effect - it is enough to perform the corresponding actions once, and then save them as an action.
Step # 1 - Capture the image
Below I have listed the steps that I follow when I intend to do HDR photography... They are not rigid rules, they are not immutable, I just follow them. You have to find what works best for you and allows you to get the best results, this same method helped me get my best results, so you can try it. Once used, you can change it as you need.
Thanks to this, working with the program becomes much more pleasant, and the program itself is constantly gaining functionality. Especially for you, we have collected 10 of the most interesting free promotions, which, in our opinion, will help you during the processing of photos and, of course, give them an interesting look.
With this action, you can easily add an amazing vintage effect to your portrait photos. This effect will undoubtedly make photos more interesting, and the photographed characters will have an unusual appearance... This is another very interesting event that offers an extremely popular high key effect among photographers. This effect is ideal when we want to emphasize the delicacy of a photographed person or object. With this action, you can easily present a high key effect to your photos and give them a unique look.
1. Use a tripod Is a good idea to mount the camera on a tripod to HDR shooting especially if you are shooting in low light conditions. I did some HDR shots handheld, but only in bright conditions. A tripod will also help you get the right composition.
2. Set the camera to manual mode "M".
The action, thanks to which you can make illustrations, turns into three-dimensional fields in just a few clicks. An effect that is especially beneficial for people involved in online sales. The action offers a very well-prepared teeth whitening effect, extremely useful when processing photographs in which the photographed people are the main subject of the frame. This effect is often the main image processing step used by professional photographers. The goal is to show the best side of the photographed character.
3. ISO settings It's also a good idea to keep your ISO settings at 100 or lower if your camera's capabilities are available. This way you don't add unnecessary noise to your photos. The HDR process allows you to capture a wide dynamic range of light and color in a photographic scene. Using high ISO settings is fine when you're trying to capture low-light scenes in one shot, but for HDR you should set the ISO as low as possible.
Similar to the whitening effect of teeth, this action is also the main weapon of professionals who want to get the natural look of their photographed people. To use this action, remember to use basic tools layers and masks to choose certain elements images that we will process. Applying actions to the entire photo may result in degraded details.
This is a set of 11 actions that will quickly make a lot of interesting changes to your photos. Of course, these actions will be appreciated by those involved in wedding photography which often process a large number of photographs. The set includes a skin tone enhancement action, four black and white transform actions, a contrast action, and five introductory actions. different versions soft filter.
4. Install the diaphragm somewhere between f / 8 and f / 11, don't change aperture between shots.
5. Adjust shutter speed so that you expose the scene exactly correctly, according to your camera's light metering.
6. Take one shot with these settings
7. Change the exposure by 1-2 stops(depending on the scene) and take another photo, adjusting the shutter speed.
To download the action, you need to register for free. If we want our photo to look like an old photo from a year, then this action is perfect for this task. By changing color and contrast, you can quickly make a photo look like a different era.
Workspace in your own way. The app has a predefined space called "Photography", but nothing prevents you from creating your own working environment with an individually created set of keyboard shortcuts and the arrangement of menu buttons. Ready workspaces automatically save your recent changes, but you can always restore the original, previously saved panel layout.
8. Do it twice in both directions. from the original image. You will get five shots with different exposures.
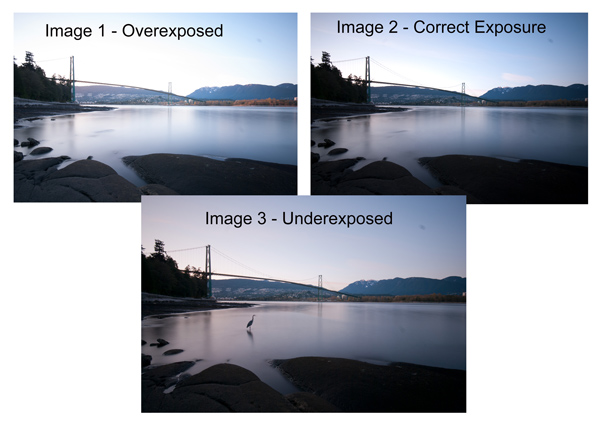
Below are three photos that I used to create an HDR photo using the steps above. You can see that the colors as well as the exposures do not look equally good in all the shots.
This is a very convenient option that allows you to instantly call up the shape of the workspace, in which photos are edited quickly and conveniently. Even easier correction of facial blemishes The new version of the program has one more tool that greatly facilitates the digital image of facial models. The Spot Correction Brush quickly removes smudges, smudges and dirt from images. In addition, the tool ensures that the correction pixels are correct in terms of texture, lighting and shading, so it now takes only a few seconds to remove wrinkles or moles from the subject's face.
Some photographers use five shots for their HDR photos, some use seven or even up to nine. I've found that three to five shots seem to give the best results for most scenes. I tried sometimes to experiment with a lot of pictures, but I was not happy with the results. Colors appear "dirty", unclear after processing. If necessary, you can shoot seven images to see how it will look.
We'll find in it not only a set of settings that will allow you to get photos from realistic surrealistic looks, but also a whole set of sliders that will allow you to influence the way details are displayed in light and shadow, as well as improve contrast and exposure. The module also has a special option that allows you to automatically remove "ghosts" if some element is moved in the photos the source that we are merging.
When you decide to work differently, you can always use the raw image that comes straight from the camera. Virtual copies - many versions of the same photo are finished differently. it the best solution than copying the original files multiple times, as it saves disk space. The program supports capturing a panoramic field of view with an amazing level of detail.
After you have finished shooting, download the images to your computer. It is important NOT to edit photos before blending them as HDR photos. Some of the images may look overexposed or underexposed, this is normal, in fact, they should look like that. The software will handle these issues, so don't worry about the photos coming out of the camera badly, they have to be processed first and then the magic begins.
Also improved local editing - the program allows you to accurately determine which parts of the image will be covered with gradient or radial filters. The filter mask can be edited with a brush - add and remove filter effects.
Management of photographic collections. When you have thousands of photos on your disk, finding the photos you want to view is very easy with this program. You can also search for photos by attributes you've previously given them: a 1-5 star rating, a flag for the most important photos, or colored labels - very handy ways to keep your library organized. New feature- search and face recognition in pictures. You can search for family members or friends in a few moments - even without using metadata.
![]()
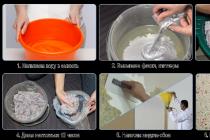
Click on - “Load Bracketed Photos”
Step # 2 - HDR Processing
I will be explaining the Photomatix software with this article. I tried to create HDR with each new version Photoshop, but I'm still happy with the results I get from the Photomatix Pro. You can download a trial version of Photomatix from the authors site. It is fully functional, the only thing that trial version puts watermarks on the photo. It's okay to try it, you see what the software can do, then if you think it's worth it, you can buy it.
So, this is how you upload your photos with Photomatix Pro.
1... Open Photomatix Pro(or if you install it as a Lightroom plugin, select
your
bracketed
images
, right click, select “
editin”
PhototixPro)
2. Click on ”
LoadBracketedPhotos”
, and then click on the "Browse" button, select the captured photos, (you can also drag and drop them into the program field)
3. Click OK after the photos appear in the program window
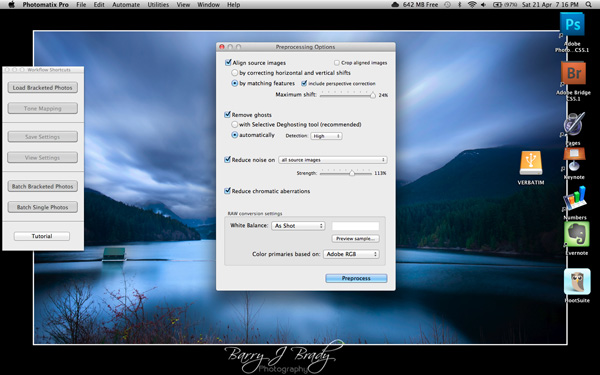
Select the options shown on the screen above
Pre-processing options are available. Set the settings values as shown in the screenshot above. Then click Preprocess and Photomatix Pro will start converting the photo's tonemap to a composite 32-bit image. This process is usually quite fast, from 30 seconds to a minute. When finished, click on the Tone Mapping button.
Use the “Remove ghosts” function if you have people or moving objects in your photo. If you don't have this, then you don't need to use this feature.
HDR Editing Screen
On this screen, you can select a variety of settings that will allow you to create general changes in the photo. There are no absolute rules. Each setting makes minor or major changes to the photo, and the combination of these changes provides many options. generated HDR Photo.
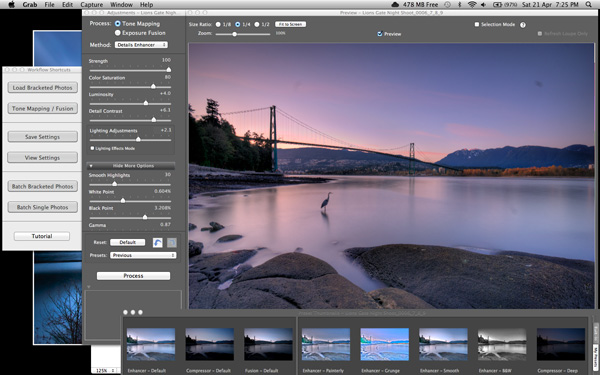
At the bottom of the screen, you will see various “routines” (or presets) that you can use as a starting point for your image editing process. I try to avoid using them as they tend to make the processing very redundant. Let's try better using the functions on the left side of the photo editor window.
Below are the details of each function on the left side of the screen, as well as what each one does. One of better ways see what the function does is to move the slider to the left, then to the right while watching how it affects your photo, but here are the details:
General settings
- Strength- affects the degree to which contrast as well as detail will be enhanced in the picture. A value of 100 gives the maximum degree of improvement. For a more natural effect, move the slider to the left. The default is 70.
- ColorSaturation- controls the saturation of RGB color channels. The higher the saturation, the more intense the color. Move the slider to the right or left to change the setting. A value of zero produces a black and white image. The value affects each color channel equally. The default is 46.
- Luminosity- controls the compression of the tonal range, which has the effect of adjusting the global luminance level. Move the slider to the right to increase local detail as well as brightness in the image. Move it to the left to make the resulting photo more "natural" looking. The default is zero.
- DetailContrast- adjusts the amount of contrast applied to the details of the photo. Move the slider to the right to increase the contrast of details and give more clarity to the photo. Note that increasing the contrast also has a darkening effect. Move the slider to the left to decrease the contrast of details as well as the brightness of the image.
- LightingAdjustments- affects the overall 'look' by controlling the degree at which the image looks natural or surreal. When Lighting Effects is unchecked, move the slider to the right to make the image look more natural and to the left to make it look more "scenic" or "surreal". Use this with care as it can have unpredictable effects on your image.
- LightingEffectsMode- checkbox allows you to switch between two modes for customization LightingAdjustments where each mode produces slightly different results.
Extra options
- SmoothHighlights- reduces the improvement in contrast of primary color spots. The slider value sets how many of the main color spots will be changed. This control is useful for preventing white highlights from causing blue skies to turn dark blue-gray. It is also useful for reducing ghosting around objects against a bright background. The default is zero.
- WhitePointandBlackPoint- These sliders control both the minimum and maximum tone mapping values of the photo. Moving the sliders to the right increases the overall contrast. Moving them to the left decreases the contrast value. Slider White point sets the value for the maximum tone mapping. Slider Black point sets the value for the minimum tone mapping of the photo.
- Gamma- Adjusts the mid-tone of the image as a result of tone mapping, making photos brighter or darker. The default is 1.0.
- Temperature- Adjusts the color temperature of the tone mapping of the photo relative to the temperature of the original HDR image. Move the slider to the right for warmer, more yellow-orange-looking colors. Move the slider to the left for a colder, bluer color. Zero (default) retains the original color temperature original photo HDR.
Advanced options
- Micro— smoothing- Smooths out the correction of local details. As a result of this, for example, noise appearing in the sky is reduced, the image becomes "clearer". Default value: 2. Important Note: The Loupe will not display micro-smoothing results correctly if the enlarged area is homogeneous. If you want to see the results of micro-smoothing on a homogeneous area, for example, in the sky, with 100% magnification, you will need to select such an area in which, in addition to the sky, there is another object.
- SaturationHighlights- adjusts the color saturation of the primary color spots in relation to the color saturation set using the color saturation slider. Values higher than zero increase the saturation of the highlights in the photo. Values below zero decrease it. The default is zero.
- SaturationShadows- adjusts the color saturation of the shadow relative to the color saturation set using the color saturation slider. Values higher than zero will increase the color saturation of the dark parts of the photo. A value below zero will decrease it. The default is zero.
- Shadows smoothness- reduces shadow contrast correction. The slider value sets how much of the shadow areas are processed. The default is zero.
- ShadowsClipping- the value of the slider determines how much of the shadow areas are cropped. This control can be useful to cut out noise in the dark area of a photograph taken under low light conditions. The default is zero.
Once this part of the process is complete, it's time to transfer the photo to Photoshop. Save the photo after processing with Photomatix Pro and then reopen it with Photoshop.
Step # 3 Editing Images in Photoshop
This is a very simple workflow. It will aim to enhance the brightness and tonality of your photos. These methods are described in detail here.
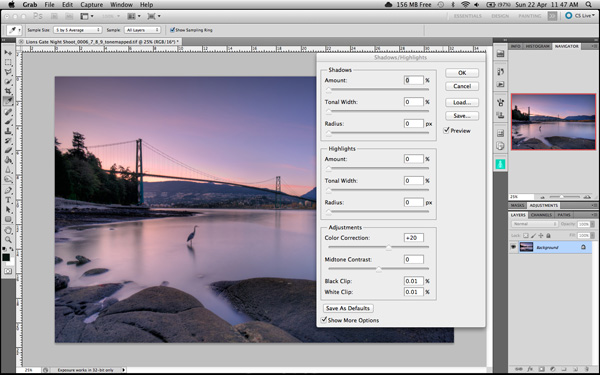
Shadows and Highlights
Photoshop has a feature called shadows and highlights... Use this tool to highlight details in the shadows of an image. Use it carefully, if you overdo it with changing the shadows, some unsightly deterioration in the quality of the photo or "noise" may appear. This function is not convenient for adjusting highlights, so use it for shadows only. This tool is located in Photoshop along the following path: Image> Adjusments>Shadows and Highlights... The Amount, Tonal Width, Radius controls should all be aligned close to each other for the adjustment to look realistic.
Highlights and shadows in Photoshop
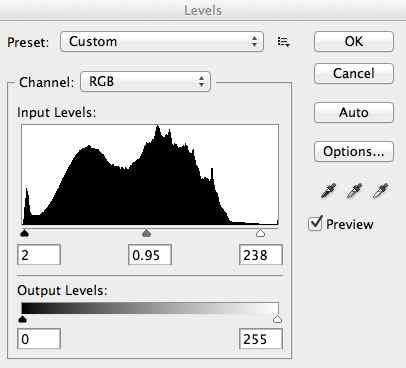
Levels
The Levels feature in Photoshop is for adjusting the lighting in an image. This means that if your image is a little dark, you can adjust the exposure a little to see more detail in the photo. The Levels function displays a graph of a histogram. Move the sliders to move them to the edge of the histogram. This ensures that the image has good information about highlights as well as shadows.
Levels in Photoshop
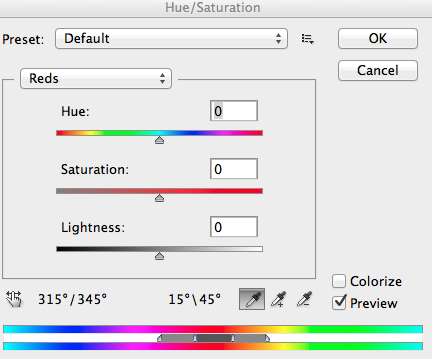
Hue and Saturation
Once the exposure as well as the lighting have been adjusted looks correct, you can start adjusting the color of the photo. The tool we'll be using for this will be the Hue and Saturation tool. An important tip here is not to adjust the main channel, but to adjust each channel separately. To do this, click on the top dropdown menu button, which is set as the main channel by default. A dropdown menu will appear and each color channel will be available for selection.
Move the Saturation slider to the left to desaturate (remove color) or to the right to saturate. This way you will have better control above the color in the image.
Hue and Saturation in Photoshop
Lighten and darken
These functions are used for local adjustments. Using a brush, you can make certain areas of the image darker and other areas of the image lighter. This is useful for adding extra accents to your shot. There is also a sponge function, which is a saturation tool that can saturate the colors of a specific part of an image.
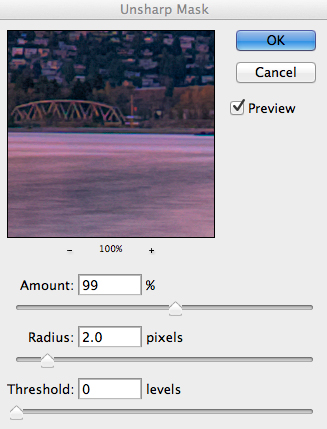
Sharpening
Almost every shot we get from a digital camera requires a little sharpening. The simplest as well as the fastest tool to use is the tool Unsharp Mask, it works efficiently.
Unsharp Mask tool in Photoshop
Unsharp Mask has three separate sliders: Amount, Radius, and Threshold. Typically, you can keep Amounts somewhere between 80 and 120%, the Radius can be set between 1.0 and 3.0 pixels, and the Threshold is usually zero. Adjust the sharpness of the image according to the requirements of each photo, beware of degrading the quality of the photo by excessive sharpening. You will easily notice if the sharpness is increased by the appearance of "halos" along the contrasting edges of image details. Our task is to sharpen the photo, but not to make it too sharp, and also not to lose the quality of the picture.
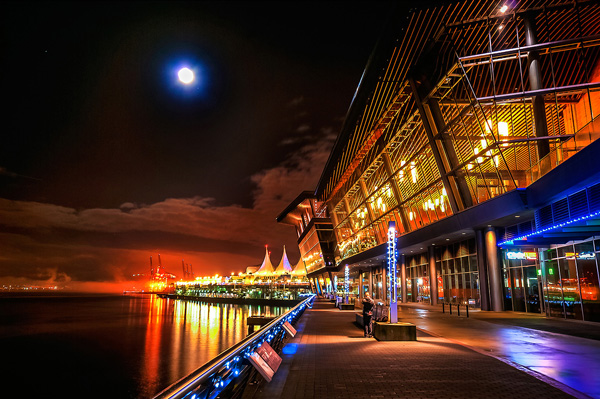
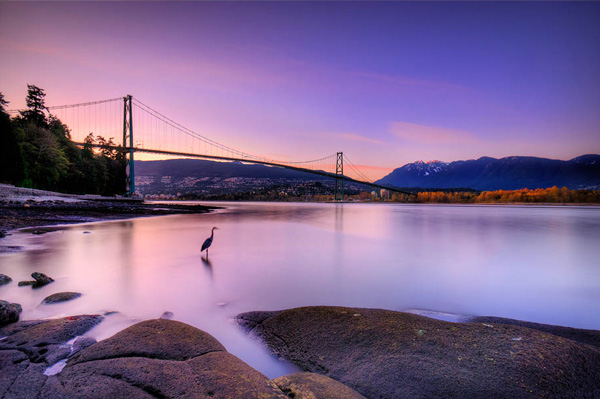
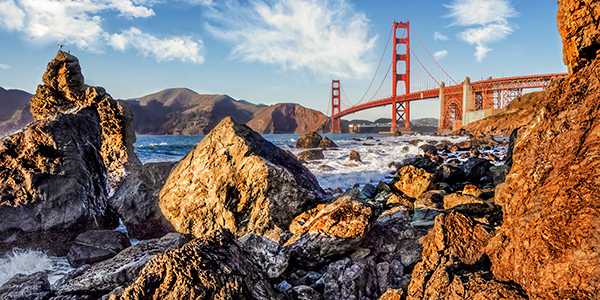
Lions Gate Bridge Vancouver - HDR image
Written down from wordsBarryJBrady
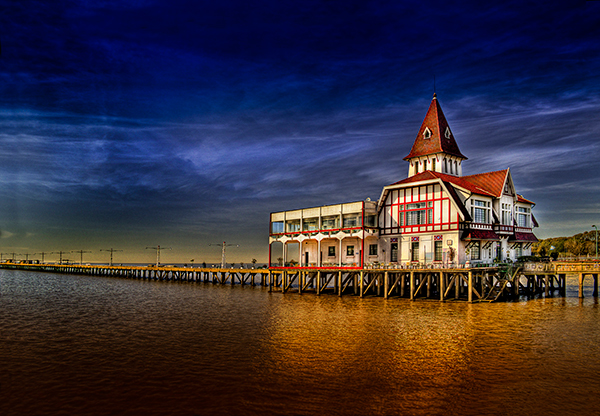
Below are a few for you HDR images as a guideline for improvement.
More and more people ask me how I get such HDR photos and why I have such a strange "algorithm" of processing. I decided to make a separate topic in which I will try to answer these questions.
1. Theory
What is HDR and why is it needed?
HDR - High Dynamic Range, or in Russian Wide Dynamic Coverage. Dynamic range measured in " exposure steps" (EV). An exposure shift of 1 EV means that the amount of light hitting the film or digital matrix is changed by 2 times. For example, if the shooting parameters calculated by the camera are equal to 1/50 sec (shutter speed) and f / 8 (aperture), then exposure compensation +1 eV will result in shooting at 1/25 sec and f / 8 in aperture priority mode or 1/50 sec. and f / 5.6 in shutter priority mode.
Very often I see photos with knocked out highlights and dropped shadows and almost always the authors of these photos claim that " so it was". The problem is that the dynamic range ( DD) of the human eye (the ability to see simultaneously details both in highlights and shadows) is (for different people in different ways) about 20 steps, which significantly exceeds the DD of sensors of digital cameras.
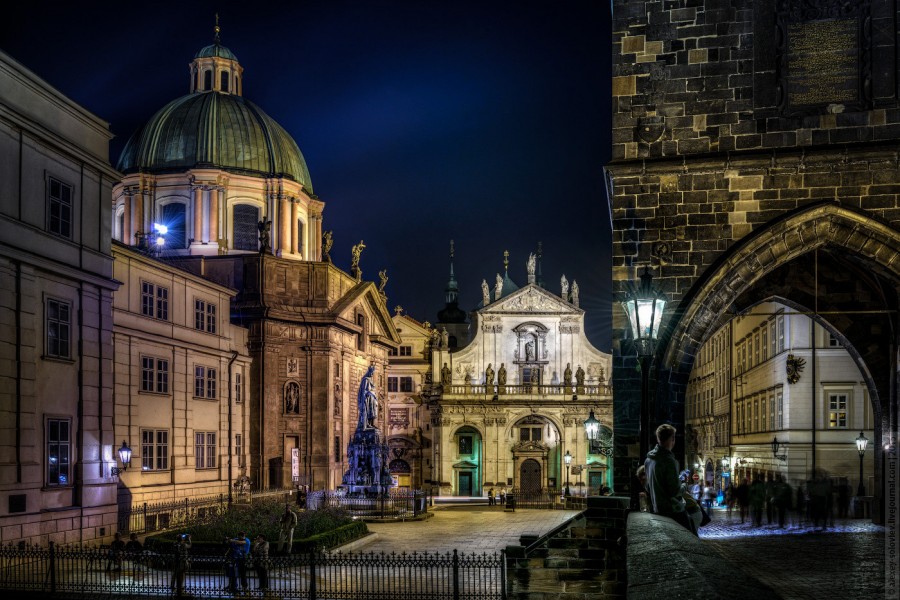
Sadly, but DD y Canon"s is a little behind Nikon"O. In principle, it is not" fatal "if you shoot several frames for HDR, which is usually done. But, having a camera with a wide DD, you can get a fairly high-quality pseudo-HDR from one frame and at least a couple of my last shots from Prague can serve as a confirmation of this.

Why do you need HDR? Then, so that the photo would be the same as the shot scene was seen by the eyes of the photographer, i.e. details were visible both in the lightest areas and in the darkest ones.
HDR "a has both fans and opponents ... some people like these photos, but some do not. In my opinion, high-quality HDR looks gorgeous! The undoubted master in this area is Trey ratcliff... By the way, from birth he is blind in one eye, but this does not bother him in any way!
HDR or not HDR - that is the question! If the scene being shot has a lot of contrast in highlights and shadows, then it makes sense to take several photos with different exposures for the HDR assembly. An example would be a city at night or abandoned buildings. If the dynamic range of the scene is not large, then HDR may be superfluous.
2. Practice
What is needed to create an HDR photo? Find an interesting spot and grab a tripod if handheld photography is difficult due to long shutter speeds. Many digital cameras can shoot the so-called Exposure Bracketing, which will allow you to shoot a series of shots with different shutter speeds, the first (depending on the camera settings) of which will be very dark, the middle will be normal and the last will be very light.
I read somewhere that for HDR image assembly programs it is desirable to have, say, 5 bracketing frames in one stop increments, rather than 3 frames, but in 2 stops. Since the exposure step on my D800 is 1EV, I usually shoot 5 bracketing frames.
For those who shoot on Nikon it might be interesting to watch a video on how to set up a camera that will shoot the entire bracketing series by itself with just one press of the shutter button. This trick is indispensable when shooting at long exposures at night - even if you shoot from a tripod, the constant pressure of your finger on the shutter release button at exposures of 20-30 seconds can lead to a slight shift / shake of the camera and a ruined frame.
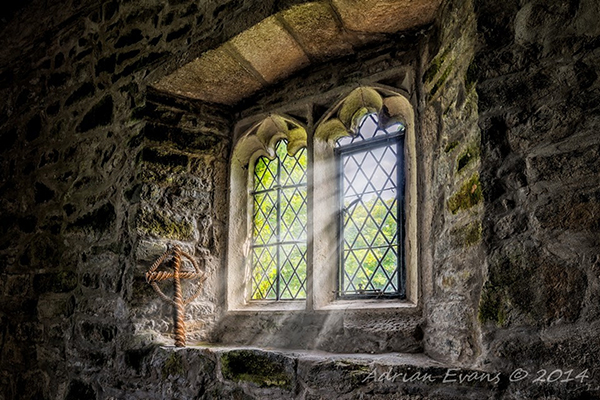
If the spread between light and shadow is large, then sometimes I shoot 9 frames in order to "capture" as much as possible useful information like in the next two photos.
3. Processing
For those who speak English, I would like to advise you to read the book, I have read a lot of interesting things in it. Concerning " Which build program should you use?"- I think many will agree that Photomatix Pro is the best. Photomatics can work independently or be a plugin for LightRoom"a and Aperture... A big plus of this program is the ability to use presets, of which there are a sufficient number in the open spaces Of the Internet.
I will try to describe my processing process step by step.
1) All RAW "s (if someone else shoots in JPEG" ah - drop this business and switch to RAW "s) I import into LightRoom;
2) and setting the same White Balance on all frames (sometimes there is a slight BB discrepancy);
3) Sometimes on some frames I move the Highlights & Shadows;
4) I send all frames to Fotomatiks. 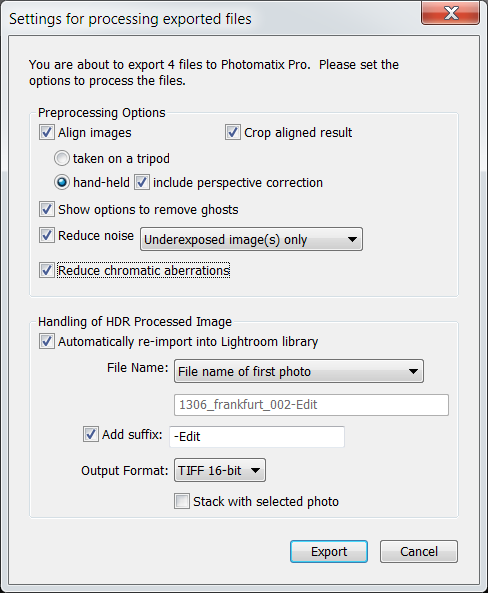
If HDR was made from several frames and there are moving objects, I control how well Photomatics "suppressed ghosts" (Ghost removal). There is an opportunity to manually indicate "problematic" areas and usually Photomatics "crushes ghosts" very well.
5) There I get a result that suits me, I save it. LightRoom automatically "catches" the result, which is almost immediately "sent" to Photoshop;
6) In Photoshop I clean various "garbage", correct geometry;
7) I use it very often Nik Color Efex Pro -> Tonal Contrast and Darken & lighten center;
8) I often apply noise reduction to the sky Nik Dfine;
9) Save and return to LightRoom;
10) "Adjustment brushes"in LightRoom" e are very powerful local correction tools. Therefore, almost always the final fine-tuning of the frame takes place in LightRoom "e using adjustment brushes in different modes(darkening, lightening, Highlights, Shadows, Clarity (both plus and minus), Sharpness and Noise). It's much easier for me to work with them than with adjustment layers and masks in Photoshop.
11) I export the result (usually 1400pix in width), look at it and periodically find some flaws, return to LightRoom or Photoshop, fix them, export again, look and ... and often this process "I look-see-finish "can drag on for a long time, until everything suits me.
12) Very often I wait until the next day and very often the next day I finish something.
Well, this is my process of processing photos ;-)
4. Videos
This section will be of interest to those who are "friends" with English and those who want to "deepen" their knowledge of HDR. I highly recommend watching all the videos.
Happy HDR experiments to everyone !!!