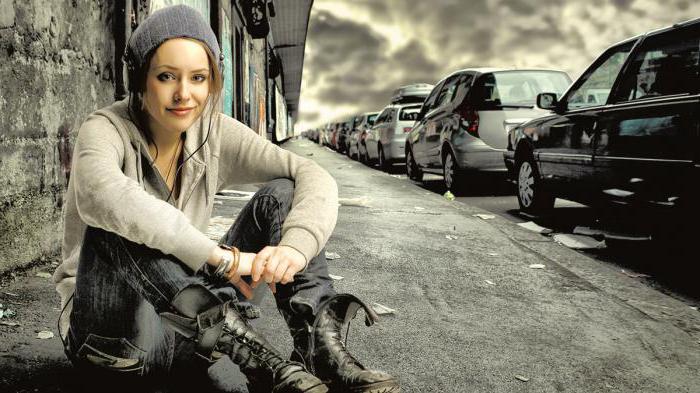
For some, the first pictures with a digital camera were taken seven years ago, for others - last week. Almost all of us asked ourselves the question: why often in the pictures the blue sky turns into a solid white background, and in those photographs where the sky was still not overexposed, all the objects in the foreground merge into a dark spot.
To understand why this is happening, let's do a little experiment. Let's put the camera in aperture priority (AV) and point it at the sky in sunny weather. Let's assume that the camera showed the required shutter speed of 1/2000 second. Now let's measure the necessary exposure on the darkest part of the motive, for example, the clothes of the person in front of you. We get 1/2 second. This difference in illumination corresponds approximately to the so-called dynamic range of the motif. It is customary to calculate it in exposure stops, and in this case it is equal to 10 stops. Recall that one stop corresponds to a two-fold change in exposure. In our case, this is a change in the exposure time from 1/2000 to 1/2 second.
Human eyes can adapt to changes in lighting up to 24 stops of exposure, so we are able to discern details in both bright skies and dark clothing. But the camera sensor cannot adjust to light. She has a fixed dynamic range, that is, the difference in illumination between the brightest part of the motif, which she can fix without turning it into a white overexposed spot, and the darkest part in which the recorded information is not covered by noise. The dynamic range of the matrix of most digital cameras is approximately 9 stops of exposure, which is much less than the ability of the human eye to capture information, and the ability of black and white film with its dynamic range up to 11 stops.
With these limitations of digital photography, it gives us the ability to manipulate pictures on a computer. Therefore, it would be quite natural to take several frames with different exposures, combining them into one, which would give us the opportunity to significantly expand the dynamic range of the image. One such method is to work with layers in Photoshop and will be described later. About the second way - HDR creation- will be discussed now.
Under HDR, or to be more precise, HDRI ( High Dynamic Range Image), imply an image with a dynamic range greater than conventional images. Where HDR begins is a topic of much debate. In some sources, 13.3 stops of exposure are called the border, in others - 9 stops, which are also placed in a regular 8-bit JPG file.
From a technical point of view, HDR can be defined as a file in which pixel brightness is not stored in integer form, but in floating point format. For HDRI, the most commonly used 32-bit formats are Radiance (.hdr) or OpenEXR (.exr). Since conventional monitors cannot display all brightness values in a 32-bit file, HDRIs need to be converted to 8- or 16-bit images. This process is called tone mapping.
In terms of what HDR is not, it's worth mentioning that 8-bit photos cannot be made HDR, even if processed in special programs such as Photomatix. Also, the image obtained from a single RAW file with highlights and highlights darkened will be just a photo converted from RAW, not HDR.
2. Shooting for HDR
To create an HDR image, you need to take several shots at different exposures, capturing details in both dark and light parts of the motif. As you know, you can change the exposure different ways, but in the case of HDR, this should be done by changing the shutter speed.
The surest way to shoot for HDR looks like this:
- First, let's set the Aperture Priority (AV) mode on the camera and select the desired aperture value.
- Let's set the exposure metering mode to the minimum area that the camera allows. Spot or partial metering will be optimal, but as a last resort, a centrally weighted method is also suitable for most motives.
- Let's measure the exposure in the darkest and lightest areas. For this, the area of interest to us must be in the center of the frame. We remember these values.
- Install the camera on a tripod, go to manual mode(M), set the same aperture value at which the measurements were made, and take pictures, raising the shutter speed from the lowest value to the highest value (or vice versa) with a difference of one to two stops when shooting in JPG format, or two to three stops when shooting shooting in RAW.
If space on your memory card is important, you can limit the number of shots by checking the histogram. In the darkest photo, the histogram should be slightly below the right border, and in the lightest one - to the left. It is even better if the histogram starts in the middle of the scale in the photo with the maximum exposure. Then we can be sure that the resulting HDR will not have noise in the dark areas if we want to lighten them.
In situations where a tripod is not available or cannot be used, AEB (Exposure Bracketing) in combination with continuous shooting mode can help. Setting the exposure bracket to +/– two stops is usually sufficient to produce high quality HDRs. In this case, it is best to use matrix metering. If possible, it is best to lean against a wall or pillar to reduce the difference in frames caused by movement.
It is advisable to set the sensitivity when shooting for HDR to the minimum value, since most HDR programs do not cope very well with noise. If high sensitivity values cannot be avoided for some reason, it is better to use Photoshop, since this program does a very good job of removing noise in HDR.
3. HDR in action
Let's consider how to create an HDRI and make tonal mapping using the example of Photoshop and Photomatix - programs most often used for this purpose.
3.1. HDR creation and tonal mapping in Photoshop
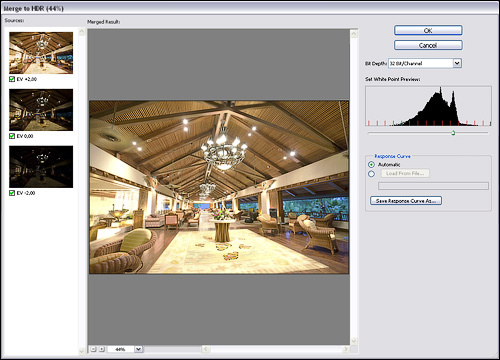
You can create HDR in Photoshop from JPG, TIF, or RAW files. To do this, either select the files via the File-Automate-Merge to HDR menu, or use the Add Open Files option if the photos are already open. If shooting was carried out handheld, then you can check the Attempt to Automatically Align Source Images option. Just keep in mind that image alignment takes a lot of time in Photoshop, up to 45 minutes for HDR from three RAW files. If the program cannot find EXIF data, it will ask you to enter it manually.
After the calculations, the HDRI preview window will appear. Since conventional monitors are not designed for viewing 32-bit images, only part of the entire light range of this image will be visible. On the right is a histogram of the resulting HDRI. By moving the slider, you can change the gamma of the image and view parts of the photo with different illumination. Leave the Bit Depth at 32 and click OK.
Now you can convert HDR to regular image. For a start, it is better to convert to 16 bits in order to reduce possible losses during further processing. To do this, select Image-Mode-16 Bits / Channel. A window will appear with four options at the top. For most cases, only the last Local Adaptation option is of interest. Besides the curve, which works like simple Photoshop curves, there are two options in this dialog box: Radius and Threshold. While the curve is responsible for changing the global contrast, these two parameters determine the local contrast, the contrast of detail.
Radius determines how many pixels are considered “local” areas when contrast is changed. Too low values make the image flat, too high can lead to light halos, especially with high values of the second parameter, Threshold.
Threshold determines how pronounced the local contrast will be.

Now it remains to work with the curve. In order to find out where the light value of an image area lies on the curve, you should, as in ordinary curves, move the cursor over this area of the image. As a last resort, you can make several images with different tone mapping parameters, then combine them with different modes overlap or hide parts of layers with masks. Before clicking OK, it is better to save the settings on the curve so that later if necessary, change them or use for images captured under the same conditions.
You can ask all questions about creating HDR images in the section "Questions to an expert". The next page is an overview of the main programs for creating HDR.
3.2. HDR and Tone Mapping in Photomatix
Let's create an HDR file from several photos. To do this, you can select photos via HDR-Generate-Browse, or open the required images, select the HDR-Generate menu and check Use Opened Images. The second option does not work for RAW files, as Photomatix automatically creates a pseudo-HDRI from them. If Photomatix cannot find EXIF data, it will try to approximate it. Most often, the result is not bad at all, but at this stage you can correct the exposure data. As in Photoshop, it is better to enter the correct data here.
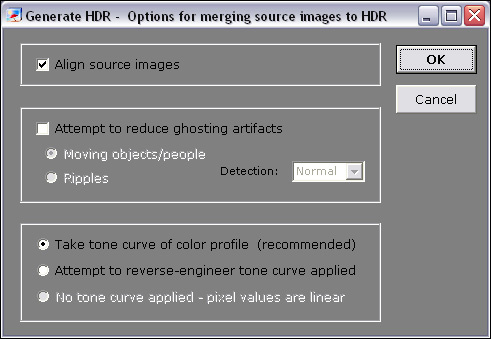
After the files are selected, the following window will appear. There you can select various options for creating HDR. If there is a possibility that the position of the camera was slightly changed during shooting, then you can check Align Source Images. Photomatix will try to minimize the differences in images associated with moving objects when the Attempt to Reduce Ghosting Artifacts option is selected. If these objects belong to the foreground, for example, they are people or swinging branches, then it is better to select Moving Objects / People, select High from the Detection menu. The wave correction option, in my experience, is best left unchecked; without it, the results are usually better. In the Tonal Response Curve settings, it is better to leave the Take Tone Curve Of Color Profile at the bottom.
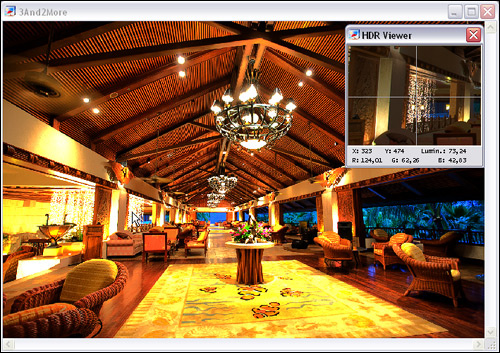
After the calculations are finished, the image can be rotated using Utilities-Rotate-Clockwise / Counterclockwise. Conventional monitors cannot display the full dynamic range of the generated HDR image, but portions of it can be viewed using the HDR Viewer window. Via View-Default Options-HDR it is possible to configure whether this window will appear or not. HDR Viewer can also be invoked with the Ctrl + V key combination.
Now you can start converting HDR into a view accessible to normal monitors. Select HDR-Tone Mapping (Ctrl + T). A window will appear with various settings on which the final photo will depend, how realistic or surreal it will be. In the Method field, select Details Enhancer. Another method, Tone Compressor, can produce quite good and realistic results, but offers fewer control options for tone mapping.
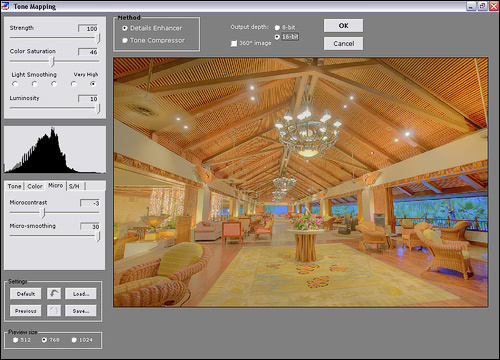
Let's take a look at what the different tone mapping settings mean.
Strength- controls the influence of other parameters on the final result.
Color saturation- color saturation of the resulting image.
Light smoothing- is responsible for the smoothness of light transitions. It is she who is to blame for the halos that are inherent in many HDR photos. It is better to set this value to the maximum.
Luminosity- determines the overall light level of the photo. Raising this parameter brightens shadows, distributing light values more evenly across the histogram, but at the same time brings out noise in the shadows.
Micro Contrast- defines light contrast in details.
Micro Smoothing- reduces the local contrast of details, the influence of the previous parameter. Too high values make the photo flat, with weak local light values; decreasing this parameter increases noise and dark gray spots may appear in areas of moderate illumination.
White / Black Clip- defines the value after / to which information in light / dark tones is cut off.
Output Depth- for images that you are still going to process in a graphics editor, it is better to set to 16 bits.
Some pretty useful options were added in version 2.5: Color Temperature- Shifts the color temperature of the image in relation to the original HDRI.
Saturation Highlights / Shadows- change the saturation of dark / light tones. These options work with the original HDR image, with the dark / light tones of the real motif, so they are not analogous to Color Balance or Selective Color in Photoshop.
Highlights / Shadows Smoothing- control the change in contrast in dark and light colors.
Shadows clipping- darkens dark areas, which usually contain a lot of noise in HDR.
Usually the local contrast of the resulting photo is lower than the one in the preview. This is due to the fact that the tonal mapping is calculated taking into account the sizes of the areas of local and global contrasts, which are different depending on the size of the image. The difference between the final result and the preview will be the greater, the greater the difference between the image itself and its copy in the preview window.
In this case, or if for some other reason the result does not suit you, you can return to the HDR file with the HDR-Undo Tone Mapping option.
4. Exposure Blending
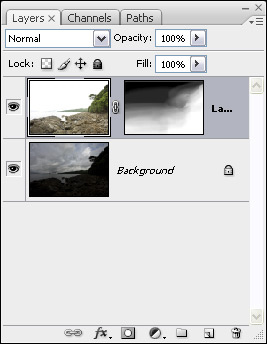
Besides creating HDR, there is another way to increase the dynamic range of your photos. This method works for any number of photos taken with a tripod, but for the sake of simplicity, we will limit ourselves to two shots. In Photoshop, both photos are copied into one file as layers, and a mask is added to the top one.
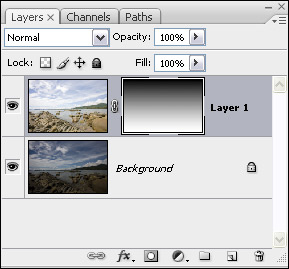
In the simplest cases, when the light and dark parts of the image are separated by a straight line of the horizon, it is enough to paint over the mask with a gradient from white to black, imitating the gray gradient filter known from analog photography. If you hold Shift while creating a vertical gradient, you get a smooth horizontal transition.
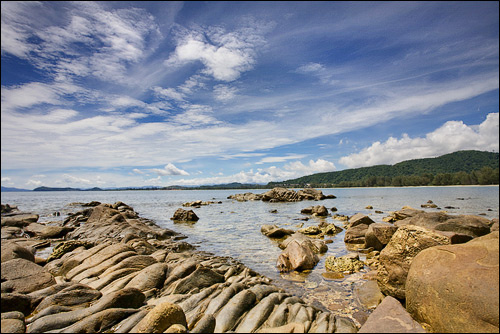
Much more often such simple methods You can't do without: the dark and light parts of the photo are separated by an uneven border or are scattered throughout the photo. In this case, the mask will have to be tailored to the specific case. To do this, place a layer with a darker photo on top and add a mask to it. First, let's make a rough sketch of the brightness distribution on the mask. This can be done in several ways.
First way:
- Select a more contrasting layer and copy it (Ctrl + C).
- In the list of channels of the upper layer, select the mask.
- Copy (Ctrl + V).
For the second method, the top layer should not have a mask at first.
- Select the most contrasting channel among the RGB channels of the more contrasting layer.
- We select it by clicking with the mouse while holding down Ctrl.
- Add a mask to the top layer. It will be automatically filled with information from the selected channel.
After creating a preset mask, its contrast can be increased with curves, or you can make a mask consisting only of black and white colors using the Filter-Sketch -Stamp filter. True, it only works in 8-bit mode. Most often, after that, you need to carefully touch up the mask with brushes, changing the opacity, size and blur of the edges of the brush.
Several methods of combining exposures, which sometimes give very good results, are also offered by Photomatix. To do this, open the photos and select one of the methods in the Combine menu. The best results are given by H & S-Auto and H & S-Adjust. In the second case, the Blending Point value can be used to set from which photos it is preferable to take information. The higher the value, the more the effect of lighter pictures will have on the result. With the Radius parameter, you can control the accuracy of overlapping exposures.
5. Subsequent processing
HDR images after tone mapping usually need to be processed to add contrast and color adjustments. In addition, images obtained with Photomatix, at some settings, have one feature: the shadows in them are lighter than in the lightest of the original images, and the light areas are darker than in the darkest. To make the image again close to reality, you should open it in Photoshop, copy the lightest of original photos in Darken mode and darkest in Lighten mode. It is possible that you will need to add masks to these images and erase any parts with a brush with soft edges and a transparency of 10-30%.
Some HDR software can distort colors and color saturation in tone mapping. In most cases, this problem can be corrected in Photoshop: copy the original images as layers onto the resulting image. HDR image and change the overlay mode to Color or Saturation, thus returning the natural colors. In places of overexposure and shadows, colors should be used, respectively, from under- and overexposed sources.
6. Alternative programs for working with HDR
This article covered Photoshop and Photomatix in detail, but besides them, there are other programs that allow you to create HDR and do tonal mapping. It also makes sense to pay attention to these alternative programs.
EasyHDR- a program with a convenient, intuitive interface and a large number of options. More flexible than Photoshop, tone mapping results look more natural than Photomatix results.
Artizen HDR - graphics editor, in which working with HDR is not the main function. HDRI creation and tone mapping does pretty good quality.
Picturenaut - free program to work with HDR. Handles tonal mapping well, but with very high dynamic range it can be difficult to find the right settings.
Qtpfsgui- offers several algorithms that differ in parameters, results and calculation time. After tone mapping, the results are saved in different windows, which makes it possible to compare and select the optimal parameters.
Ulead PhotoImpact- a well-known graphic editor. The control of the tone mapping carriages is not very convenient, but the results are more or less satisfactory.
HDR View is a small HDRI viewer. Allows you to increase and decrease exposure, save the image at the selected exposure in bmp format.
HDR technology can help photographers overcome the limitations of the dynamic range of a digital camera sensor. Some programs also allow you to create images that look more like surreal paintings than photographs. When it makes sense to expand the dynamic range of a photo, how realistic the final photo will be - everyone decides for himself. Working with HDR gives us this wonderful choice.
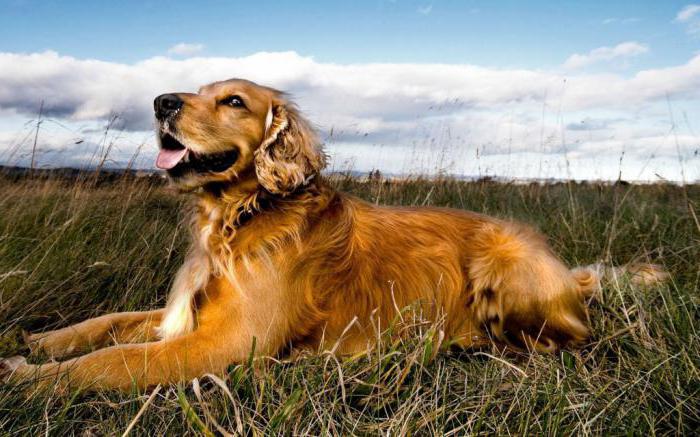
HDR photos are striking in their richness, clarity and special atmosphere, regardless of the scene. They are more like painting and amaze viewers with their depth.
But despite the fact that these photos can be found quite often today, not everyone fully understands what HDR is - special processing or shooting features?
In this article you will find all necessary information about these unusual photos and you can create similar masterpieces yourself.
About HDR in accessible language
HDR stands for High Dynamic Range. The higher it is, the more you can capture in the photo. At high level both light and dark areas will be displayed in the image in the same way.
Human vision is able to instantly recognize an image with a difference of 10 to 14 steps of brightness (exposure) and, "adapting" - up to 24 steps. For example, leaving a room with bright lighting at night to the street, it takes a short period of time to see the stars in the sky - these are approximately these 24 steps.
In ordinary life, in the absence of any special conditions and many light sources, the difference in the brightness of objects in the surrounding world does not exceed 14-15 steps. But, alas, both film and digital cameras cannot capture everything at once, which is why “overexposure” appears in some photographs, and dark spots in others. And even if it turned out to photograph objects with a difference of at least 11 stops, alas, it is quite difficult to reproduce them both on photographic paper and on monitors.
Low dynamic range is especially noticeable when photographing buildings in cloudy weather: the sky is bright and saturated, and the building itself is darkened. But photographs of people on a sunny day against the background of the facades of buildings come out flawless due to the fact that both people and the background have approximately the same brightness.
Alas, it is almost impossible to correct this difference in the photo editor, since the information in the black or overexposed areas is lost. Even if you highlight individual elements with special brushes, at some point in the photo you will notice noise. The same applies to darkening objects with overexposure.
HDR photos are those that display all the objects in the photo in the same way. In the days of film cameras, this technology was practically impracticable, but photographers tried in every possible way to get closer to high dynamic range. To do this, we used special filters that “equalized” the exposure, and special film development techniques. It took a long time, but when digital cameras appeared, the process was accelerated.
Ever since professional photographers learned what HDR is, they began to strive in every possible way to increase the dynamic range of a photo, and now such an image can be created even in the absence of a special apparatus.
How to capture all the details with a small difference in brightness?
If you are not going to shoot the sunset, mountains, and people at the same time, but just want to "smooth out" the difference a little, then the RAW format will help. These are "raw" photos without any effects, but with minimal loss data. You can already create pictures from them, which will HDR effect.
Files of this format will take up much more memory on the device, but will allow you to correct blackouts and overexposures in a special converter or photo editor.
But what if you still need grandiose and high-quality HDR photos?
Even if the photo editor on your computer has the coveted "HDR" button, be aware that this is just a filter that will slightly "smooth out" the difference between light and dark areas in the photo and, most likely, increase the contrast and brightness of colors.
If you carefully read the information above and figured out what HDR is, then you will immediately notice the difference between a processed image and a photo shot using a special technology.
To cope with the "maximum range", if a wonderful way with which you can achieve amazing results.
To shoot a terrain in HDR, you need to take 3-5 shots in a row, and then "overlay" them in a photo editor.
It is necessary to take several LDR (Low Dynamic Range) frames with different exposures. It is necessary to change this parameter manually, by 2 divisions, which is equal to one brightness level.
After that, one frame is superimposed on another, and the most suitable areas in terms of brightness are “selected” from each frame. After final processing, the finished photo will display all the details of the composition as much as possible.

In fact, you need 3 frames in order to take the sharpest possible photo, but if there are a lot of details, then you can take 5 pictures.
If you want to shoot not the landscape, but a specific subject in the general plan, then in addition to the exposure, you must also manually change the focus.
Why do you need HDR photos?
For photographers who aim to create the perfect shot, HDR technology allows you to take unique and deep photos. All the details are visible on them and the light is evenly distributed.
Also, this technology allows you to capture the landscape and panorama as clearly as possible, especially in cloudy weather.
And, of course, HDR photography allows the photographer to create the perfect shot for further artistic processing.
When shouldn't you use high dynamic range?
Despite the fact that such shots look just great, it is not always appropriate to use this technology. The reason is not in any special "stylistic" rules: it is just that in some cases the photo will not come out.
- Pictures are too bright with too many colors. In such cases, the HDR effect will make the photo darker and not so "juicy".
- Objects in dynamics. If at the time when you take pictures, for example, a cyclist is riding in the frame, then in any case he will come out blurry and indistinct, and spots will appear on the photo.
- If the photo contains a lot of natural shadows, then when "gluing" they will either "stand out" too much, or vice versa - they will lose their depth.

Devices built specifically for HDR
Special cameras that "can in HDR" were created in the early 2000s. Their SuperCCD SR sensor has doubled the dynamic range by using more light-sensitive elements.
After 2 years, a camera was released, which is capable of taking a series of images with a difference in brightness already in 17 stops. The same principle is used Sony cameras NEX-5 and NEX-3, which include HDR mode... The device takes several shots in a row and combines them itself to create the greatest range.
The latest breakthrough that has created the ability to use HDR mode without special efforts, became a special regime in iPhone camera 5. However, owners of other smartphones, both on iOS and Android, also have the opportunity to “play” with photos in special programs available in the respective markets. So, the HDR function is now available for almost all smartphones and tablets.
Highest quality video
Those who know what HDR is, and want to prove themselves in this technology, probably were looking for special devices that are able to "automatically" take the necessary frames.
However, it's worth noting that there is no camera that only shoots in HDR. Usually, devices either have a special mode, or simply expanded the capabilities of the matrix. It is the latter feature that Sony HDR has - camcorders that are designed to create video of the highest quality.
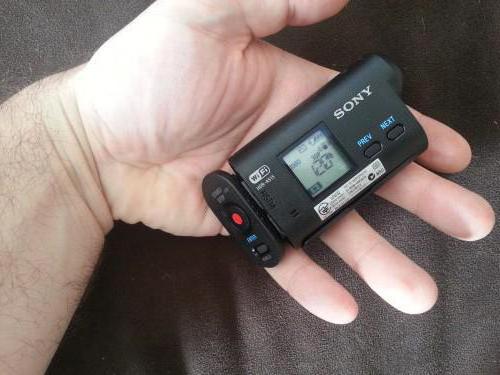
Using the ClearVid CMOS sensor, x.v.Colour technology and Dynamic Range Optimizer, this device is able to capture images and videos with maximum detail, without overexposure and dark areas. However, it is worth mentioning the fact that in order to enjoy full color reproduction, it is necessary to view photos and videos on a High Definition screen. Therefore, alas, this is not an HDR camcorder, but a good device for high-speed sports.
Inexpensive models of this line are really good budget options for action cameras, however (as buyers note), more expensive models are inferior in quality to other devices in this price category.
And finally
The main task of HDR is to create the most uniform image in terms of exposure. But since the matrices of most modern cameras have a limited dynamic range, the “gluing” option remains the most popular.
Here it is necessary to remember about the so-called halo, which is often associated only with this type of photograph. It appears because small details are difficult to “cut out” from a bright background, and a small part of them remains in the picture. Therefore, if your main goal is to create the sharpest possible image that looks natural, then you should only shoot large objects.
It is also better to check the finished pictures on different screens. Modern monitors with improved color reproduction often display HDR photos too saturated and too vibrant to sting the eyes. Therefore, if you yourself are engaged in "gluing" a photo, then it is better not to "hold out" with brightness than to go too far.
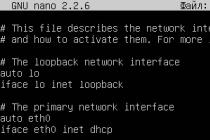
For HDR (High Dynamic Range) work, you must "shoot for HDR". (In other words. You must set the camera to exposure bracketing mode and capture the images that Photoshop will use to create the HDR image.) Here's how to set up Nikon and Canon cameras (two of the most popular DSLR brands) to shoot with three to five stops of bracketing, so all you have to do is press the shutter button and the camera does the rest.
When shooting for HDR, several photos of the same scene (with different shutter speeds) are taken. And since these images must be perfectly aligned with each other, a tripod should always be used. But Photoshop has an Auto-Align feature that works surprisingly well. So if you do not have a tripod or are in a situation where you cannot use one, you can try handheld shooting. When doing this, make sure there is enough light to high speed shutter ensured clear images.
When shooting each HDR photos it is necessary to change the exposure. But at the same time, you cannot change the aperture, since the depth of field will be different for different photographs. So instead, you need to change the shutter speed (in fact, the camera will do it itself). So, switch your camera to Aperture Priority Mode (A mode on Nikon cameras like the D300S, D700, D3S, and D3X, and Av mode on Canon cameras like 50D, 7D, 5D Mark II, 1D Mark IV, etc.) ... In Aperture Priority mode, select an aperture (such as f / 8 or f / 11 when shooting outdoors), and the camera will change the shutter speed by itself.
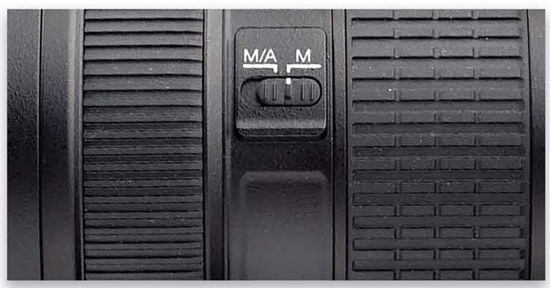
Next: frame the photo and focus on the scene you want to shoot. Immediately after that, switch the lens to manual focus. This ensures that when taking multiple photos, the camera does not accidentally change focus. Again, this is exactly how sharpness is ensured: do not focus manually - first use autofocus in the same way as always, but once the scene is in focus, simply turn off autofocus, and then do not touch the lens.
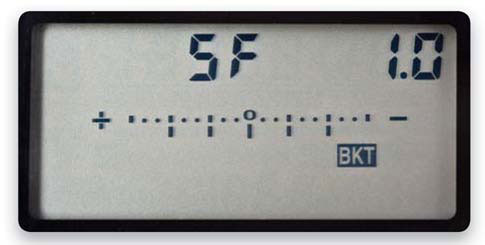
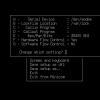
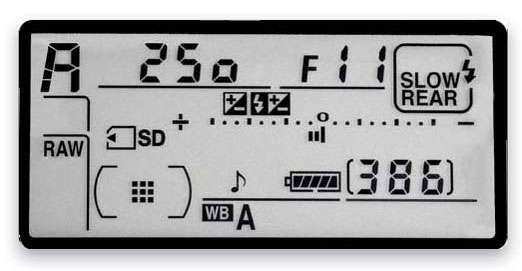
Now let's set up the camera to take photos using bracketing, which forces the camera to take pictures with a normal exposure and then take additional photos that are exposed brighter and darker. The minimum number of exposures that can be used for HDR is three, but for HDR images I usually take five photos using bracketing (although some shoot as many as nine). So, with five shots, I take one shot with normal exposure, then two darker shots (one with 1 stop of underexposure and one with 2 stops of underexposure), and two lighter ones (one with 1 stop of overexposure and one with 2 stops of overexposure. ). Here's how to set up your camera to shoot with bracketing (we'll use the Nikon D300S as an example). To shoot with bracketing on the Nikon D300S, press the Fn (function) button on the front of the camera, below the lens. Then use the main dial to select the number of bracketing exposures (the panel at the top of the camera shows the bracketing settings; choose 5F and you get five bracketed photos). Use the second dial (in front of the shutter release button) to set the bracketing value to 1 stop.

Now, switch your Nikon camera to continuous high-speed photography and then simply press-and-hold the shutter release button until all five bracketing photos have been taken. That's all.
TIP: Use a low ISO
HDR photographs tend to increase image noise. Therefore, try to use the lowest ISO you can set when shooting HDR (ISO 100 for most Canon cameras or ISO 200 for Nikon DSLRs).

Now about setting up Canon cameras. To enable bracketing shooting Canon cameras(such as the Canon 50D), press the Menu button, select the Shooting tab 2, then rotate the Quick Select dial to AEB (Auto Exposure Bracketing) and press the Set button. The point is centered on the scale. Now rotate the main dial to expand the exposure range up to 2 stops, then press the Set button again (this will set the selected settings) and then the Menu button to exit the menu system. Now set the camera to high-speed shooting mode with continuous translation frames. If you then press-and-hold the shutter button, the camera will automatically photograph all five photos using bracketing (once all five have been taken, the shutter button can be released). That's all.
Note: I shoot with a Nikon camera that only shoots in 1 stop bracketing increments. So I have to take five images using bracketing to have one underexposed at -2 stops and one overexposed at +2 stops. However, Canon DSLRs are shot using bracketing increments of up to 2 stops. Therefore, it is sufficient to photograph three images using bracketing. They contain enough depth to create HDR (in fact, a darker image is more important than a lighter one), and with only three photos, processing is much faster.
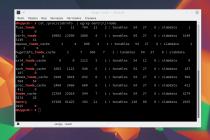
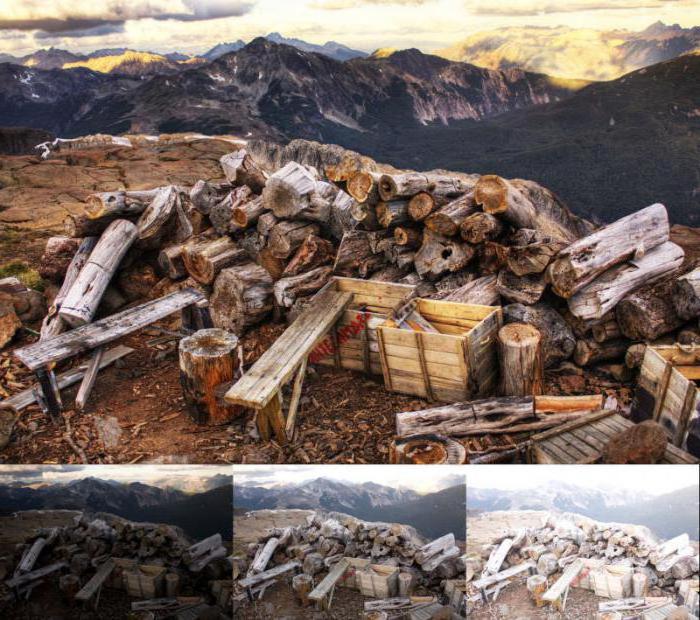
A large, if not a huge number of photos are processed using HDR technology. The web is literally replete with such processing examples.
First, let's understand what HDR is and why this technology was created. HDR - High Dynamic Range loosely translated as "high dynamic range" is an attempt to translate the huge variation in brightness in the real world into what is visible on the monitor (photographs). A typical example of such a scatter in a landscape is a coniferous forest against a bright blue sky. As a rule, in such cases, we get one thing in the photo - either a forest that is too dark or a bleached sky. We will not further understand the terminology, possibilities and other tricks, the Internet is full of information on this topic and it will not be difficult to find it.
Let's go back to the beginning - you took a photo, looked at it on the monitor and the quality of details in light and dark areas on it did not satisfy you. If you shot in JPEG, then you will have a lot less tools for correction and they will not be as effective if you have the original in RAW format. Here it becomes possible to make a so-called "pseudo-HDR" image. In the future, for brevity, this post will use HDR instead of pseudo-HDR. For lovers of precise terminology, I will say that I will not consider working with real HDR obtained from several images taken with an exposure shift, I will probably touch on this topic in the future. Let's return to our frame shot in RAW - since we have a format that allows you to change the exposure within certain limits, you can also get photos with an exposure shift from it.
For example, such:
![]()
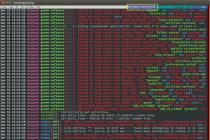
Let's use the well-known program Photomatix (site http://www.hdrsoft.com) to create HDR images. It makes no sense to tell how to work with the program, the program is intuitive, in our case it is enough just to point it to several of our files with different exposures obtained from one RAW image.
After processing in Photomatix, we get something like the following:

These examples are deliberately poorly done and disfigured for clarity. In order to make it clearer for you what and how is spoiled, first I will try to point to typical mistakes in HDR creation. Take Trey Ratcliff's book “Top 10 common HDR mistakes” as a guide.
Since this book has not been translated into Russian, or I simply could not find a translation (the original is English) and the translation of my terms, the accuracy and clarity of the translation may be insufficient, therefore, to increase clarity, I will give examples in the form of fragments from the received pictures.
Common mistakes when creating HDR
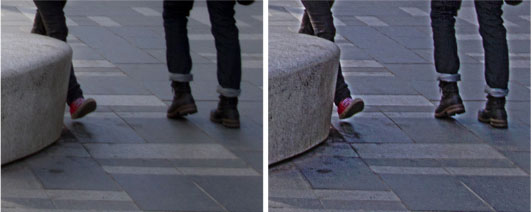
1. A lot of color- everything seems to be simple here, just look at the rear lights of the cars. This is due to the peculiarities of our vision, simply speaking, the eyes get tired when looking at very saturated colors. This, by the way, has long been noticed even by TV manufacturers, almost all models have an opportunity to choose a “soft” mode in addition to a rich image. Do you think this is from the kindness of the manufacturer?
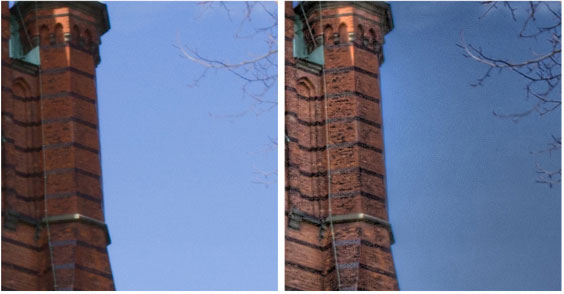
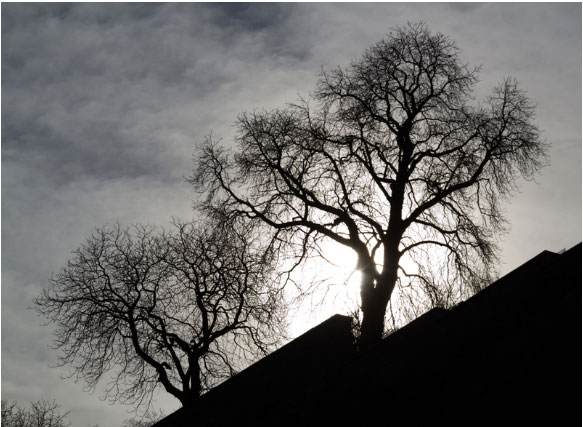
2. Local glow- White fringing or brightening appears around tree silhouettes and other contrasting objects. In this case, the sky on the border with the tower is highlighted:
and here light edging around the legs appears (this is from another photo):
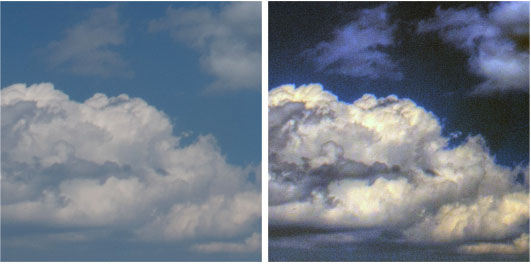
3. Dark fragments clouds on a sunny day - this processing feature makes the clouds very unnatural, and in addition, such a black color in the sky becomes a holding point for the eye. Hopefully this is not your goal - to make the viewer look only at black spots in the sky:

4. "Dirty" white:

Or a completely ugly version of changing the white color in the overexposed area:

Also, this defect is strongly manifested in the form of an unnatural gray color of clouds and clouds on a cloudy day.
5. Glow areas of blue sky(but not necessarily the sky) caused by the presence of a highly reflective object nearby, in this case the upper right edge of the cloud:

It can also lead to the appearance of yellowish spots on such objects (this is from another photo):
The rest of the tips have less to do with landscape photography, but if curiosity prevails, here is a link to the author's site http://www.stuckincustoms.com/. I would like to note that Trey Ratcliff's works are not the works of a beginner, they are interesting, they are worth seeing and his opinion can be trusted.
We select the source material
Now you can look through your work and look with a critical eye if there is anything like it among them.
Unfortunately, the woes of HDR creations don't end there, next important point in processing lies in the fact that, even observing all such rules and adding a range to the sky and shadows at the same time, most often the result is an almost flat "lifeless" picture.

Speaking of the landscape, there is one more feature - in addition to the similar loss of volume in the resulting picture, there is a very unnatural change in the green color of foliage, grass, in short, all vegetation. And this becomes more pronounced the more of this vegetation in the frame (by the way, one of the missed tips of the aforementioned Trey Ratcliff - never shoot jungle or dense forest in HDR).

Speaking about the unnaturalness of such a color change, I cannot refrain from one more example:
The author is so pleased with the change he made to the real world that he even invites everyone to his one-day HDR courses! Undoubtedly, such shooting conditions may require the use of an increase in the brightness range, but the solution clearly should not be the same as in the example given.
The widespread opinion that if I shot it unsuccessfully, then the RAW image will save, in the future I will extract the missing from it by processing, it does not always work. There are many examples of this, especially when, moreover, the errors listed at the beginning of this note are clearly visible. It happens much less often that a shot taken in a hurry can be processed to a more or less acceptable result.
This picture was taken during an excursion, there was no time to linger at all. But since the format of the only frame was in RAW, I wanted to see if something could be drawn out of such a picture.
After processing in Photomatix and adding a couple of filters in Photoshop, we got the following:
![]()
The result, of course, is also worthless, but it is definitely more interesting than the source. But now the photo can be thrown into the trash can with a sense of accomplishment.
If you've read this far, you probably expect that after looking at the mistakes in detail, there will be wonderful tips on how to turn your photo into something very correct and beautiful using HDR. But here I will rather disappoint you - a bad photo is bad in most cases and will remain, there is no recipe for turning it into a masterpiece. But there is an opportunity to reflect on how to increase the chances of a successful result even when shooting difficult scenes in terms of lighting.
How to determine the dynamic range of a photo
The question arises, is there any way that even any beginner can understand the border between the usual brightness spread available for transmission by your camera, or are you already in the range available only for HDR? There is such a method and it is quite simple - switch exposure metering to partial or spot, set, for example, aperture priority, a fixed ISO value and see what the shutter speed will be for the darkest and lightest areas - for example, the setting sun (be careful with the sun! - read the instructions) and a dark bush in the foreground. Suppose you get two of these, 1/1000 of a second for the sun and 1 second for a bush. Then just bend your fingers, counting how many steps between these values. The transition from 1 second to 1/2 is one, from 1/2 to 1/4 is two, from 1/4 to 1/8 is three, and so on up to 1/1000. We get ten curled fingers or, in common terms, ten stops or exposure steps. For a number of reasons, it is difficult to name here a clear figure for determining the desired threshold, in my opinion, you can think about the need to use HDR, if the figure obtained is more than 7-8 stops, we got ten - almost certainly necessary.
If you already have a little idea of the possibilities of this technology, then you will most likely come to the conclusion that the use of HDR is most justified in cases where the dynamic range is really large due to special shooting conditions.
First of all, such special conditions should include a night cityscape, sunsets and sunrises with backlight and a dark foreground, shooting indoors with the desire not to lose sight of the window or indoors where there is a ban on the use of flash (for example, in a church or in the museum), just an interior photo and the like. In this case, the use of HDR can give very interesting results, and in some cases it is generally the only chance to get a decent result.
As an example, I will cite the work of Sergei Stepanenko "Field lamps" (http://stepbystep-hdr.livejournal.com/140120.html)

It's not hard to imagine this photograph taken in one frame in JPEG with brightness metering across the entire frame.
Thus, I'm trying to smoothly lead you to the idea that there is some choice for a landscape photographer. In the first option, you shoot what you see and hope for further processing that will correct errors due to the HDR capabilities. In the second option, you see that the situation will not allow you to get a satisfactory result with the usual means and shoot several frames with different exposures precisely because you cannot do without HDR in this case.
How to shoot a landscape in HDR
Here the question expands a little - you shoot a landscape and at the same time admit the possibility of further processing of your photograph. What recommendations can there be? Especially for a beginner "landscape painter"?
I will step a little away from the main topic and quote Scott Kelby, the author of very interesting books, in particular "Digital Photography" (volume 1, chapter 4):
“Landscape photographers can only shoot twice a day ... at sunrise and sunset. If this is not a problem for you, then it's time to reveal another important secret: ... you should always use a tripod. Every day. Constantly. In landscape photography, there are no photographs taken without a tripod ... One morning you will surely see an amateur next to you, taking the same pictures as you, but without a tripod ... Want to save a lost soul? Silently grab a tripod and bang it on the head. "
If you take this advice and always use a tripod, then the following steps when shooting a landscape can be considered quite simple. You have decided on the composition and now you can take several photos with different exposure levels, focusing on the lightest and darkest areas, and the presence of a tripod increases the possibility of expanding the exposure bracket to almost any values. This moment cannot be overemphasized when you are shooting sunrises, sunsets or the city at night. It is especially worth noting here that many beginners simply do not understand that, for example, a beautiful photograph of a night city with colorful lights and elaborate details in the shadows can be obtained only in HDR and they try to repeat the result they saw, shooting "handheld", and even in JPEG from it. 8-bit color. I will not start a discussion about comparing RAW and JPEG here, I will just note that in our case we are just going to process the received frames in HDR, and for subsequent processing, the 8-bit depth may just turn out to be insufficient. I will only explain the difference using an example that is not entirely accurate for our case, showing the differences between 8-bit color and 16-bit color:

After processing in HDR, you run the risk of getting an enhancement of such gradient transitions.
Thus, you took several pictures with a tripod, did not forget about the exposure spread and saved everything in the format most suitable for your purposes.
In the future, you can choose the best frame for the transmission of light and dark areas of the scene, and if necessary, create a "pseudo" or even a full HDR image. I'll make a reservation that even if you don't have a tripod, you can try to shoot handheld in burst mode with exposure bracketing (all this, of course, if your camera has such functions). Naturally, success is more likely in the wide-angle range of the lens.
Chances of getting high-quality (I do not specifically say "good") landscape photography as a result of such actions, they really increase. And then, sitting at the computer, it remains only to decide, guided by your own taste, whether to use HDR in each specific case. The main thing is to understand well that you have a powerful and interesting tool in your hands for creating a beautiful and natural looking photo.
conclusions
Now I will try to draw conclusions from all of the above:
1. HDR application required in special lighting conditions and it is better to spend time getting a special series for a conceived scene than then tormenting a separate frame in the editor, trying to get what was missed during shooting, all the more trying to get something that is not actually in this frame - here I mean, first of all, an insufficient brightness range.
2. Carefully look at the result, carried away by processing, it is easy to lose something interesting that was originally present in the picture. Try to avoid the common mistakes listed at the beginning of the note, unless there are special considerations.
3. Compare the resulting image with the original. Maybe it shouldn't have been processed at all?
Almost every owner of a camera sooner or later asks the question: why, when shooting a landscape, as a result, a beautiful blue sky turns into an inexpressive white spot in the pictures, and in those photographs where the sky turned out the way we wanted, the foreground is completely invisible, it turned into a dark stripe. There is a way to get an image that captures both the background and the foreground in detail. This is the topic of this article.
Why?
So, first let's try to figure out why such things happen at all.Let's do a little experiment. Let's put the camera in aperture priority mode and point it at the sky in sunny weather. Let's look at the shutter speed that our camera showed. My Canon EOS 500D shows a value hovering around 1/2000 of a second. Now let's measure the required exposure on the darkest part of our future frame. For example, a person's clothing or just a dark part of the room. We get a value of approximately ½ second. The difference between these values in illumination corresponds to the dynamic range of the motif. It is usually calculated in exposure stops. In this case, it is equal to 10 steps (one step corresponds to a twofold change in exposure, in our case it is a change in exposure time from 1/2000 to 1/2 second).
Let's say the camera is capable of registering 4096 gradations of brightness. Anything brighter will be just white, without details. Anything darker is just black. And here you have in the frame a bright sky and shadows in the bushes. All at once in 4096 gradations does not fit: either the light areas "knock out", or the shadows "fall through". The camera sensor cannot adjust to light. It has a fixed dynamic range. Most digital cameras have a 9-stop range. Black and white film has approximately 11 stops of dynamic range. Human eyes can adapt to changes in lighting up to 24 stops of exposure. Therefore, we are able to distinguish between details in bright skies and in dark folds of clothing, while the camera is not.
What is HDR?
HDR (High Dynamic Range) - translated from English as high dynamic range. As a result, we will get a high dynamic range image. This method of creating an image uses information from several images taken at different exposures, in which the details of both light and dark parts of the photo are clearly visible. That is, it is necessary to take at least three frames: on one, the entire dynamic range is given under the light, on the other - under the shadows, and on the third - something in between. HDR is an image in which all ranges are combined. There will be 12 bits of brightness gradation in the shadows, the same amount in the light areas and in the middle. In total, 36 different brightness levels.How to get HDR photos?
Now let's move from theory to practice. To create an HDR image, you need to take several shots at different exposures, capturing details in both dark and light parts of the motif. In this case, you should change the exposure using the shutter speed, since in the future the images will be combined, and the depth of field should not change.So, to create images, from which our HDR will be created in the future, you will need photos:
a) digital camera with the ability to change the shutter speed;
b) a tripod;
A tripod is not required, you can use a stack of books, or just put the camera on any rigidly fixed object. It is advisable not to shoot handheld.
How to shoot those cherished three frames? There are two ways. Let's consider each of them separately.
The first way is to trust automation. Take three photos using automatic bracketing, if your camera has one. If it is absent, we use the second method.
The second way is to do everything manually.
Set the aperture priority mode on the camera and select the desired aperture value.
Let's set the exposure metering mode to the minimum area that the camera allows. Spot or partial metering will be optimal, but, as a last resort, a centrally weighted method is also suitable for most motives.
Let's measure the exposure in the darkest and lightest areas. For this, the area of interest to us must be in the center of the frame. We remember these values.
Install the camera on a tripod, switch to manual mode, set the same aperture value at which the measurements were made, and take pictures, raising the shutter speed from the lowest value to the highest (or vice versa) with a difference of one or two stops when shooting in JPG format or two to three stops when shooting in RAW.
You can limit yourself to three shots (then the shutter speed will be more than 2-3 stops). In the darkest photo, the histogram should be slightly below the right border, and in the lightest one - to the left.
It is advisable to set the sensitivity when shooting for HDR to the minimum value in order to avoid noise.
As an example, I will use the first method, and just simply remove the view from my window:
I got three shots:
Standard exposure shot

Photo with reduced exposure. The photo is dominated by shadows.
Photo with increased exposure. The sky turned into a white spot.
By the way, it is best if all images are shot in RAW format. If your camera does not know how to take pictures in this format, JPG will do. Since the RAW format is capable of capturing a much larger range than other formats
How to get one out of three images?
This can be done both by means of Photoshop and by means of other programs, for example Photomatix, which I will use.Step 1
In the menu, select HDR -> Generate (Ctrl + G). In the window that opens, click the Browse button. In the dialog box, select all three of our photos. Click OK.
Step 2
In the window that appears, just in case, put a checkmark “Align source images” - even when shooting from a tripod, the frames may have differences. Click OK.
Step 3
We got a 32-bit image in HDR format, which contains all the information on the exposure of all photographs. It can be saved at this stage. It doesn't look very good. This is because the monitor is not able to fully display it. So let's go to step 4.
Step 4
In order for the monitor to display our picture, it will have to be converted to JPG. To do this, select HDR-> Tone mapping from the menu. There you can experiment, you can leave everything as it is, select 8-bit in the output depth. Save the resulting JPG image.
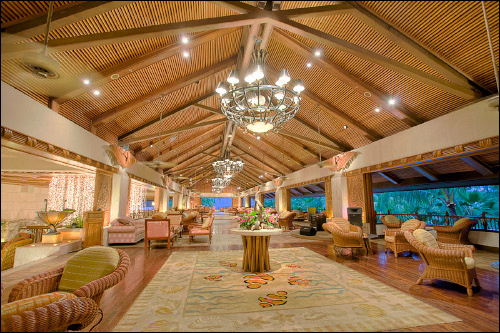
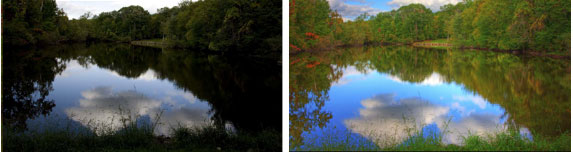
Result. The sky is picturesque. Reflections of trees in puddles are visible.
I used Photomatix Pro 2.4. It should be noted that different versions programs may produce slightly different results.
This technique is indispensable when shooting landscapes and can also be useful when capturing reflections in water.