How automatic focusing works in modern SLR cameras. But any type of focusing has several modes of operation. The photographer can choose from them the most suitable for a specific shooting situation. So what kind of autofocus modes are there? When should you use which one? Let's figure it out ...
Different sensitivity
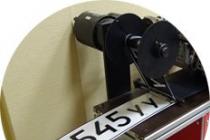
Examples of where the focal point might actually be. As mentioned earlier, the camera usually includes points with different focusing capabilities. The most accurate are midpoints, mostly a cross or double intersection points. At the edges, the points are then generally sensitive to only one direction or the other.
The sensitivity of some points can also be increased or decreased by using lenses with higher or lower transparency. So typical intersection points can get a second cross, and conversely, edge points suddenly don't work for inferior lenses.
How do I enable the desired auto focus mode on the camera?
Let's start simple: How do Nikon cameras switch focus modes?
- First, make sure auto focus is turned on at all. Check the switches on the lens and on the camera itself!
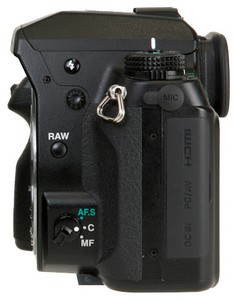
On the most simple models(eg Nikon D3300 and Nikon D5500) it is important to follow only the switch on the lens. It must be in the AF position.
Each stripe can focus on image structures that are perpendicular to it. For example, you shouldn't focus on a general fence with focus points that match the vertical bar but the horizontal one. Due to the manufacturing defects mentioned above, it can also happen that the camera is constantly sharpened too close or too far with certain lenses, even though it assumes that it is perfectly focused. Smaller defects can be corrected in some cases using menu settings, larger errors can only be eliminated in the service.

- Now that autofocus is on, let's select the desired mode.
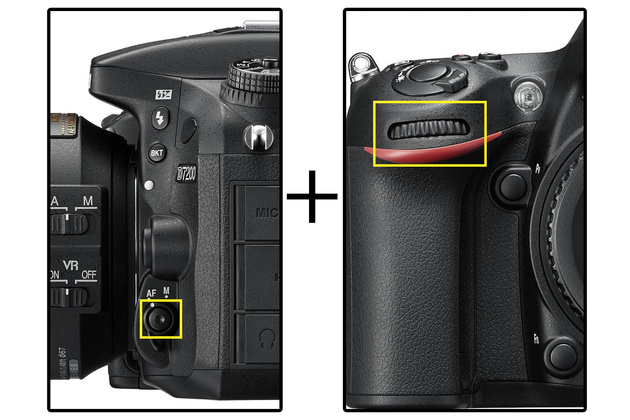
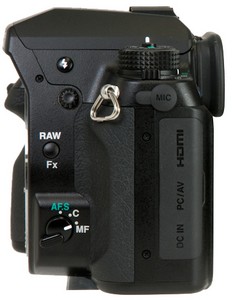
On advanced cameras of the Nikon D7200 level and higher, a special button is also provided to select autofocus modes. It is combined with the autofocus on / off lever. It is necessary, keeping it pressed, turn the rear camera control wheel. Although it looks complicated in words, in fact, this method of switching focusing modes is very efficient. The activated focusing mode will be displayed in the viewfinder and on the camera screens (depending on the model - on the top and main or only on the main one).
By default, the shutter button has two functions - focus and shutter. In many situations, however, it is beneficial to separate these functions - as professional photographers - from the two buttons. Trigger sharpening is then disabled using the appropriate menu setting.
Since both systems are equivalent, it is up to you to decide which one you want to use. To switch between the two main sharpening modes. The process takes a little longer to check again if the focus is as accurate as possible. The viewfinder will then display either the focus point that is focusing or a beep to signal the end of the focusing process. You can then change the composition and press the shutter button.
- Ready! You can now focus in the selected focus mode.
Single-frame autofocus. AF-S
Single-frame autofocus, or AF-S (Auto Focus Single), can be called the main, basic autofocus mode. This is usually the default. In this mode, focusing is as follows:
Pressing the shutter button halfway activates the autofocus system;
If you activate it, it sharpens continuously and therefore it is also capable of tracking a moving object. This mode prefers speed, so it doesn't need to guarantee fast focusing in low light. However, the focus is gradually corrected, and even if you move the camera, the mode can follow the photographed subject relatively easily. The main object is traced as it crosses the frame from all points that "insert" the object into each other.
This mode only has a small hook - unlike the previously described mode, the bright flash diode does not turn on in the dark. The third mode starts with precise focusing, as in a static scene. However, if it subsequently detects camera or object movement, it automatically switches to tracking mode and continues to run continuously. If you are not aiming for a fast sport, this mode is a good compromise between the two previous options.
The camera focuses at the point selected (by you or by the automatics), after which it informs the user about it using sound signal;
After that, the focus is locked in the specified position until the shutter button is pressed all the way (and the frame is taken) or simply released.
All the features of this mode follow from this simple algorithm.
Focus point selection
Usually you can select the desired specific focus point on the camera or activate all points. AF then selects a point that hits the next subject. The second option is usually slower, and there is a risk that the automatic selection differs from that set by the photographer's subject. Therefore, in order to be able to work more accurately, it is recommended to determine a specific point.
Even when photographing at weddings or other events. It depends on how quickly the scenes are photographed. Remember to manually switch from autofocus to manual focus if you don't have a fully functional manual lens. This will shut off the motor and you can focus manually safely. Otherwise, you risk either damage to the engine or transmission.
- AF-S is good for static subjects... Let's say you are shooting a landscape, still life, or a person posing for you. In this case, the focusing subject does not move anywhere. This means that you can focus on it once, and then calmly shoot or recompose the frame, keeping the shutter button half-pressed. An important nuance: after focusing is made and the camera has given a signal about it, you cannot change the distance between you and the object being filmed (approach or move away). This will cause the subject to be out of focus again. This is especially important when shooting portraits with high-aperture optics: there, a change in distance even by a couple of centimeters threatens that the model's face will be blurred. If, nevertheless, the distance was violated, it remains only to focus again.

But even in manual mode electronics can help you. In some cases, it will light up when focusing at the specified focus point. WITH electronic systems the viewfinder may show streaks or details may appear in areas with the highest contrast.
You will almost always find chapters or notes to help you understand some of the background processes. This is the only way you can achieve the best results in your system! Search correct setting default cameras on new camera can be a tricky process. Many terms are first time unknown, as well as tuning effects.
Nikon D810 / Nikon AF-S 50mm f / 1.4G Nikkor
AF-S is great for staged portraits. The main thing is to remember that after focusing, you cannot change the distance between you and the subject, so as not to lose focus. After focusing, don't waste time - shoot right away!
- AF-S is not suitable for shooting moving subjects... Since the focus is locked in a certain position after focusing, it cannot track fast-moving objects in the frame. But in our world there are quite a few of them. These are frolicking children, and animals, and athletes, and all kinds of transport: bicycles, cars ... It is extremely difficult to shoot moving objects in single-frame focusing mode: there will be a lot of focusing mistakes.

Basic camera settings
These settings can be applied to many system cameras and DSLRs. But please note that these settings are optimal for us. They may look different for your needs. For most cameras, the setup menu is divided into 6 sections. Some functions can be found in several setting areas or can be changed directly during recording.
Recording Menu User Menu Wireless Menu Menu Menu Play Menu Menu Menu. Points that are important for shooting can be found in the shooting menu. We would like to discuss in detail the points of this area below. However, we are limited to the most important parameters that are important to the basic approach. There are other, very exotic relationships that we will miss. It is otherwise outside the scope of a blog post and it will become a book. Likewise, we only select the settings for the photos.
Nikon D810 / Nikon AF-S 18-35mm f / 3.5-4.5G ED Nikkor
AF-S is great for shooting landscapes. It allows you to precisely select the desired focus point, after which the focus will not "run away" anywhere.
Continuous autofocus. AF-C
Focus tracking, or AF-C (Auto Focus Continuous), works differently. By pressing the shutter button halfway, you activate automatic focus. It will now "follow" the subject at the selected focus point until the picture is taken or the shutter button is released.
There are still some settings for videos, but we just don't have enough experience to write about qualified ones. In this menu, all settings are made in image and video format. Below we will only discuss the settings for taking photos. Here you can choose how big your shots are.
The displayed values are of course different for each camera, depending on the maximum number pixels. Most cameras offer photographs in varying proportions. However, sensors are almost always in format 3: if you choose a different format, this will be adapted to the sensor. This means that some areas of the sensor are not affected, or information is not stored there, they are lost.
Continuous autofocus is great for capturing fast moving subjects... Use it for shooting sports events, children's games, frolicking animals. There is a lot of different movement in the world - don't miss it! Wherein modern technologies 3D tracking and dynamic focus point selection allow the automatic selection of an appropriate AF point. A separate lesson will be devoted to how to work with zones and focus points.
This is also the sensor format. This means that the camera stores light information that the sensor records in a raw format. No fixes or changes have been made. As a result, the files are very large and must first be developed on a computer for photography. This is a significant additional effort, but well worth it.
In sequence mode, there are various options for setting what actually happens when you press the shutter button. If you only want to take one shot, start different time-delayed exposures at the same time, or take a series of continuous shots.
Continuous autofocus is not suitable for recomposing pictures after focusing. A favorite technique of some photographers is to focus on the center focus point, and then, with the focus locked, recompose the frame as you like. This technique is inconvenient to use in continuous autofocus mode, because focusing will be lost when the frame is recomposed. The only option is to rearrange the frame while holding the AF-L button, which requires a fair amount of finger dexterity.
Our shot: single shot - so it will take the shot behind the trigger. Multiple shots are taken as long as you pull the trigger. We never use the self-timer. The single and the series are more interesting. You can choose in the settings how many shots you want to take and how important the differences in exposure between images are. For a single burst, you must press the shutter button manually for each separate image series, series of series, one pull of the trigger, and the camera automatically generates the required number of images.

Nikon D600 / Nikon 80-200mm f / 2.8 ED AF-S Zoom-Nikkor
Capturing animals of any wildness is more convenient with AF-C focus mode. This way they will definitely not run out of focus at the moment of shooting!
AF-A mode
AF-A (Auto Focus Automatic) is available in amateur and advanced devices. (Nikon D750, Nikon D610, Nikon D7200, Nikon D5500, Nikon D3300). In this mode, the camera automatically determines which of the two autofocus modes (AF-S or AF-C) is appropriate in a given situation. AF-A mode is suitable for novice photographers: it allows you not to think about choosing an autofocus mode, the camera will make the choice for you.
The white balance series takes an image and stores it on the chip with different white balance values. The photo is taken and saved with 3 or 5 different exposure dates. We have never used both functions. And in this series, we prefer to use the above-described single or series. These settings are for internal flash or external flash supported by the camera.
Since there is at least one blog post when shooting photos with flash, we don't go into all the settings here. We never use internal flash. When we use it, it's fill flash - and that's how it's set up. No red-eye, no slow motion, no rear and, of course, no automatic flash.
Autofocus modes for Live View shooting
From a recent article on autofocus types, we know that focusing through the viewfinder and through the Live View screen uses completely different mechanisms. Focusing through the camera screen uses a type of autofocus called contrast AF. It has its own modes of operation.
The setting depends on the object. Here, the shutter button is pressed halfway and the camera maintains focus until it is released or until you release the shutter button. This is where you focus on the desired motive. As long as you hold down the shutter button, focus will remain on the desired subject, even if it is moving. The camera detects movement and adjusts focus automatically.
But we only do this in very few situations where the camera's autofocus does not work. This can occur in extremely dark conditions, but is very rare. Our attitude: flexible spot. Wide setting is automatic, where the camera chooses the focal points by itself. This is not what we want. We want to determine for ourselves which objects to focus on. The field is actually the same as the wide field, only it has the ability to select the area in the viewfinder where the automatic start... We use the middle very rarely, because usually the selection motive cannot be found in the middle of the image.
Single-frame autofocus AF-S
This mode is similar to the mode of the same name available when focusing through the camera's viewfinder. When you half-press the shutter button, the camera will focus at the selected point. After successful operation, focus is locked until a picture is taken or the shutter button is released.
Here you can quickly locate the focus point of an image using the cursor wheel on the camera. Our attitude: here we activate auto mode... If the camera is unable to focus on available light, the illuminator will automatically be activated. For example, when photographing in a church, he is quickly disturbed by others. Turn off the auxiliary light.
With exposure compensation, images may be overloaded and underexposed. Our attitude: no festivals. There is no “one” setting for exposure compensation. As with aperture or shutter speed, this setting depends on the current situation.
And here continuous autofocus AF-F works slightly differently than AF-C. Focusing is not performed when the shutter button is half-pressed, but when it is released. That is, constantly. Focus is locked when the shutter button is pressed halfway. This method allows you to constantly monitor the subject, not losing sight of it for a second.
At this point, you can set in which steps the aperture changes during adjustment. Here we have set a setting of 0, 3 to use all common aperture numbers and exposure times. Now this is deliberately quoted. In fact, you are changing the processing of light information on the camera's sensor. Therefore, the term photosensitivity, which still comes from analog time, is also not entirely wrong, and it explains what happens at the end of the process. Here again the meaning cannot be given as one correct.
We described this in a little more detail in the article about it. This value depends on the behavior of the sensor noise. For whatever reason the noise in the picture is annoying, you need to test each camera for you. We have set the following values for our cameras. In metering mode, you give a camera where the exposure of the subject is measured, with which the exposure values are set.
AF lock with AE-L / AF-L button
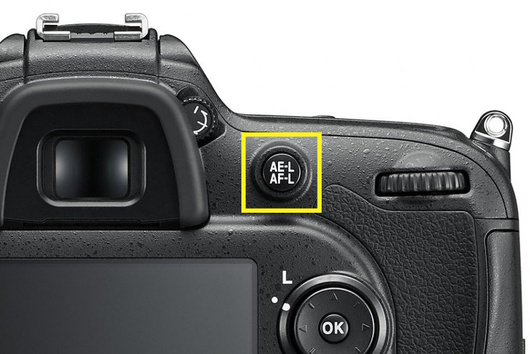
Nikon D7200 AE-L / AF-L button
We know that autofocus is locked in single-frame AF-S after focusing by holding the shutter button halfway down. But in AF-C mode, this does not happen, and autofocus "follows" the subject to the bitter end. However, in both modes, focus can be locked at the position in which it is currently located. AE-L / AF-L (Auto Exposure Lock / Auto Focus Lock) button is provided for this. Thus, by pressing this button, you will lock both focus and exposure parameters in the position in which they are located. However, in the camera settings, you can independently specify what to block with this button - both parameters, only exposure or only focus.
As you can see, there is a wide range of functions available for this button. In addition to AF lock or exposure, other parameters can be assigned to it.
So, we figured out the autofocus modes. But this is not enough to learn how to use the camera's autofocus system one hundred percent! One important question remains: how do you tell the camera which subject you want to focus on? In the next lessons, we will learn how to work with zones and focus points. Stay with us!
Knowing how to use manual or auto focus correctly is one of the keys to a photographer's success. Autofocus, of course, is able to help out a novice photographer in the vast majority of shooting situations. However, only proficiency in the various autofocus modes can provide accurate, fast focusing when shooting difficult photographic scenes. In addition, the use of different focusing modes greatly expands the photographer's creative possibilities.
Camera autofocus
In any digital camera, the focusing system is capable of doing all necessary work on focusing on the subject. And quite quickly and, as a rule, of high quality. But, nevertheless, autofocus tends to miss from time to time. As a result, the pictures are blurry.
Modern cameras are equipped with a huge number of focusing points - there can be more than fifty of them in SLR cameras. This number of sensors, of course, is very useful and demonstrates the advancedness of the camera, but in practice, nine points are enough. One of them is located in the center, several points are placed below and above, from the right and left edges. Plus, there may be a number of additional points that also provide the camera electronics necessary information... Namely, data on the distance to the closest subject.
Thus, the camera lens does not focus on the object as such, but at a certain distance. This leads to some errors in focusing, for example, when, when shooting a landscape, you need to focus on the subject in front, and at the same time, you would like the background to remain in focus.
It should be noted that in modern digital devices, mainly two focusing systems are used. The first one is contrasting. It can be seen in compact cameras as well as some DSLRs that use LiveView mode. The contrast autofocus module uses the camera matrix itself, providing information to the electronics for analyzing the resulting photographic image for changes in contrast. The objective lenses move in an arbitrary direction at the command of the processor. If the contrast of the picture has decreased, then the direction of movement will change in the opposite direction. If the contrast has increased, then the objective lenses will continue to move as well until the contrast begins to decrease. Focusing is carried out when the contrast is at its maximum. The main disadvantage of contrast focusing is considered to be rather low speed, although camera manufacturers have been seriously working on solving this problem in recent years. But the contrast module provides good focusing accuracy.
DSLRs mainly use phase detection autofocus. A special optical system is used here, which reflects part of the light flux directly onto the phase sensors. Focusing is provided only when the light beams strike the sensors at a certain distance from each other. If the distance is less than a certain distance, then the lens is focused closer than required, and vice versa. The phase system boasts high speed, which makes it very relevant when shooting dynamic subjects. At the same time, it differs in a certain complexity, in addition, it cannot be used in the classic LiveView mode.
However, in recent years, manufacturers of photographic equipment increasingly offer new, interesting solutions aimed at combining the advantages of the phase and contrast systems. This is how hybrid autofocus systems were born. The essence of such systems is that phase sensors promptly give an initial focusing, after which the focus is adjusted by analyzing the contrast of the picture.
Default digital camera uses all focus points, but the user has the ability to select one or more focus points. In this regard, the following options exist:
- Automatic selection
The built-in electronics select the best point here. When you simply do not have time to choose a suitable shooting point, you can use AutoSelect mode and the camera will make its own decision. Note, however, that the camera will try to focus on the closest object, or over the area with maximum contrast. And this is far from what you may need in this situation.
- Using one point
One focus point can be set in the settings. This is true, in particular, for shooting static subjects. In most cases, photographers choose the center point because it is the most light sensitive and most accurate. Accordingly, the sharpness of photos taken using the center point will be higher. The center point is great not only for situations where the subject is positioned exactly in the center of the frame. With it, you can focus on the subject, and then, having locked the focus, you can easily compose the frame as desired.
When shooting landscapes, you can also use the top focusing point if you want to focus on distant subjects rather than the foreground. As a result, objects in the distance will appear sharp in the photo, and objects closest to the camera will be slightly blurred.
- Diagonal and border points
In the course of portraits, when the model is located not strictly in the center, but slightly to the side, you can activate the focus points located on the diagonal. Then it remains only to focus on one of the model's eyes. If you want to get a picture with a blurred foreground, and distant objects at the edges of the image to be sharper, then you can set the points located on the left and right sides of the frame.
In general, if there are any problems with autofocus, do not be lazy and set the focus point manually according to your requirements.
Focus modes
There are several main modes of operation of the focusing system:
- Single focus (OS or AF-S)
Canon's single mode is called OneShot AF, Nikon's AutoFocusSingle. It works as follows: when the shutter button is pressed halfway, the camera focuses, the focus itself is locked (a signal sounds or a green confirmation light turns on), giving the photographer the opportunity to change the composition of the picture, and only after that the shutter is released. Single focus mode is suitable for photographing stationary subjects and static subjects such as landscapes.
If you do not release your finger from the shutter button, the focus will not change. Therefore, you can first focus on an arbitrary point, and then change the position of the camera and, accordingly, the composition of the frame. V this mode the device will not allow shooting if the lens is not focused. For example, if the subject begins to move, you will need to focus on the focus again, since the distance between it and the photographer will change, as a result of which the latter will leave the field of focus.
- Tracking autofocus (AS or AF-C)
 The tracking mode (Canon calls it AI Servo AF, Nikon calls it Continuous Servo AF) should be used when you need to shoot any dynamic scene. When you press the shutter button halfway, the built-in electronics determines the distance to the subject and begins to steadily follow the focus. As long as the photographer holds the shutter release button halfway down, the lens seems to be following all the movements of the subject. This keeps the subject in focus even if the distance between it and the camera changes or the composition itself changes. There is no focus lock here, the lenses constantly track the movement of the object.
This is an indispensable mode for shooting sports, wildlife, cars in motion, children who are having fun and constantly moving. However, it is necessary to use this mode in practice with caution, because if any other object suddenly appears in the frame between the subject of shooting and the camera, the device can focus on it, which will defocus the picture.
- Intermediate mode (AF-A or AI Focus AF)
There is also an intermediate focusing mode, in which the electronics independently decide whether to use single or continuous autofocus in a given situation. This is essentially an automatic focus mode, aimed more at the novice photography enthusiast. Here you are offered the opportunity to focus on a specific scene, and the camera will select the optimal focusing mode itself.
- Manual mode (M)
 Finally, the manual mode should be used when the camera's automation malfunctions for some reason. But this function is not of the camera, but of the optics. In this case, you will need to manually rotate the focusing ring on the lens to ensure optimal focusing. Of course, for novice photographers this can be very unusual and difficult, but for advanced users such manual focusing is a huge advantage. After all, in manual mode, autofocus is disabled, and the lens is focused exactly in accordance with how you rotate the focusing ring.
The main thing when using different modes autofocus operation is an ongoing practice. Skillful use of focusing modes will allow you to focus as quickly and accurately in the most difficult situations.