In the process of using the program, a person may encounter difficulties. This article will focus on just one of these situations in working with the Bandicam program. The fact is that an inexperienced user may have problems with Although this problem is small, it can lead many people to a dead end. So, how to set up a microphone in Bandicam?
Turning on the microphone
Sometimes the problem is that the user simply forgot to turn on the microphone in the program settings. The solution is, of course, very simple. For this:
- Open the program and go to the "Video" tab. It is located on the sidebar on the left.
- Next, find the "Settings" button, which is located in the "Record" column. Click on it.
- You will see a window with many tabs. We are interested in the "Sound" tab.
- Find the line "Sound recording" in the window and check the box next to it.
That's all there is to it. Now you know, in Bandicam. Well, we are moving on to deeper settings of the program.
Microphone setup
Now we will analyze how to use a microphone. This is a little more difficult to do than to enable, but for advanced users it will not create any special problems. Microphone setup consists of many aspects, since this is no longer a technical component, but rather, for each individual. It will depend on what you sacrifice for the sake of something else.
The microphone setup is as follows:
- in the choice of bitrate;
- in the choice of frequency;
- in choosing a recording device.
Before talking about how to set up a microphone in Bandicam, it is worth clarifying where all these settings are. In the same "Video" tab, in the "Format" column, find the "Settings" button and click on it. A window will appear in which all the above settings are located.
What indicators to choose
So, let's start in order. What bitrate to choose? Initially, it is worth telling, This value measures the speed of the information flow. If in simple terms, then it affects music like this: the higher the bitrate, the better the playback quality, the lower, the worse. However, there is no need to set too high an indicator, since, for example, the generally accepted value is 128 kbps, if this value increases, then you will not notice any significant difference.

As for the recording frequency, everything is simple here, set the maximum mark if you want the sound to be the best, but be aware that this indicator also directly depends on the recording quality of the microphone itself.
You can find recording devices in the already familiar "Recording" settings on the "Sound" tab. Select the microphone you want to use for recording from the drop-down list. By the way, it is precisely because users do not choose correctly here that questions arise: “Why in Bandicam?” And as you can see, the solution to the problem is quite simple.

Well, that's all, now you know how to set up a microphone in Bandicam for comfortable and correct video recording.
In the process of using the program, a person may encounter difficulties. This article will focus on just one of these situations in working with the Bandicam program. The fact is that an inexperienced user may have problems recording sound. Although this problem is small, it can lead many people to a dead end. So, how to set up a microphone in Bandicam?
Turning on the microphone
Sometimes the problem is that the user simply forgot to turn on the microphone in the program settings. The solution is, of course, very simple. For this:
- Open the program and go to the "Video" tab. It is located on the sidebar on the left.
- Next, find the "Settings" button, which is located in the "Record" column. Click on it.
- You will see a window with many tabs. We are interested in the "Sound" tab.
- Find the line "Sound recording" in the window and check the box next to it.
That's all there is to it. Now you know how to turn on the microphone in Bandicam. Well, we are moving on to deeper settings of the program.
Microphone setup
Now we will analyze how to set up a microphone in Bandicam. This is a little more difficult to do than to enable, but for advanced users it will not create any special problems. Microphone setup consists of many aspects, since this is no longer a technical component, but rather, for each individual. It will depend on what you sacrifice for the sake of something else.
The microphone setup is as follows:
- in the choice of bitrate;
- in the choice of frequency;
- in choosing a recording device.
Before talking about how to set up a microphone in Bandicam, it is worth clarifying where all these settings are. In the same "Video" tab, in the "Format" column, find the "Settings" button and click on it. A window will appear in which all the above settings are located.
What indicators to choose
So, let's start in order. What bitrate to choose? Initially, it is worth telling what a bitrate is. This value measures the speed of information flow. In simple words, it affects music like this: the higher the bitrate, the better the playback quality, the lower, the worse. However, there is no need to set too high an indicator, since, for example, for the MP3 format, the generally accepted value is 128 kbps, if this value increases, then you will not notice any significant difference.

As for the recording frequency, everything is simple here, set the maximum mark if you want the sound to be the best, but be aware that this indicator also directly depends on the recording quality of the microphone itself.
You can find recording devices in the already familiar "Recording" settings on the "Sound" tab. Select the microphone you want to use for recording from the drop-down list. By the way, it is precisely because users do not choose correctly here that questions arise: “Why does the microphone not work in Bandicam?” And as you can see, the solution to the problem is quite simple.

Well, that's all, now you know how to set up a microphone in Bandicam for comfortable and correct video recording.
fb.ru
How to turn on the microphone in Bandicam

A user who often records video from a computer screen may have a question about how to set up Bandicam so that they can hear me, because recording a webinar, lesson or online speech is not enough for just a video sequence devoid of the author’s speech and comments.
Bandicam software allows you to use your webcam, built-in or plug-in microphone to record speech and get more accurate and high-quality sound.
In this article, we will figure out how to enable and configure the microphone in Bandicam.
Download Bandicam
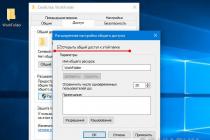
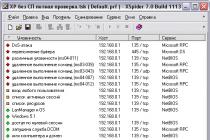
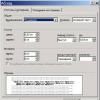
1. Before you start recording your video, go to the Bandicam settings as shown in the screenshot to set up the microphone.

2. On the “Sound” tab, select Win Sound (WASAPI) as the main device, in the additional device box - the available microphone. Check the box next to "Shared audio track with the main device."
Don't forget to activate "Sound Recording" at the top of the settings window.

3. If necessary, go to the microphone settings. On the "Record" tab, select our microphone and go to its properties.

4. On the "Levels" tab, you can set the volume for the microphone.

The popular Bandicam program allows you to create long videos from your desktop, in particular, to record the process computer game. The application allows you to capture the screen as a whole, as well as a separate part of it. But, like any other program, Bandicam requires proper configuration. Before starting work, you need to work on the quality of video, sound and image. The setup is pretty easy and won't take long.
Initial parameters
When you start the program, you will see a window in which you need to specify the following parameters:For high-quality recording of video and games, you need to adjust the sound and microphone.

Set up audio recording as follows:
- We open the item "Video";
- Finding a tab "Record";
- We open "Settings" and choose "Sound";
- near the line "Record sound" put a tick;
- Select the main sound source. Often this is a computer, so in the drop-down menu "Basic audio device» select the item "Win7 Sound (WASAPI)". The list should include operating system used on your computer. She should be chosen.
- Specify the second device in the dropdown menu "Additional Sound Device" in the event that you are going to supplement the video with your comments. In this case, you must select a microphone.
- Click on the button "Settings" next to this menu item to check the sound quality.
Remember that the file with the audio track will have more weight. If you want to create a file with a minimum weight, do not enable the "Record audio" option.
"Two-channel mixing" will help to reduce the size of the final file. To do this, check the box next to it before the end of the sound settings. If the sound on the entire computer is gone, then read this article: "?".
Image Adjustment
If you plan to take screenshots with the program, then you will also need to go to the "Image" menu. In it, you can configure the following settings:- select hotkey to create a screenshot or disable it;
- configure their automatic creation at certain intervals;
- remove the cursor from screenshots by checking the box next to "No cursor";
- choose an image format. The program offers the following formats: BMP, PNG, JPG.
Additional settings
We also suggest that you familiarize yourself with the additional settings of the program.First of all, it will be very convenient to set up hotkeys for recording management. This will help you quickly stop shooting or resume it. The default key is F12 . You can change it to another key in the "Video" menu item.
You can also remove the mouse cursor if necessary. To do this, all in the same "Video" menu, check the box next to "Without cursor". If, on the contrary, you need a cursor, you can customize the effects of its selection. This is quite convenient if you plan to record various training videos using the program. For this:
- Open the "Video" menu;
- Find the "Settings" button in the "Record" column and click it;
- In the menu that opens, find "Effects" and select the appropriate ones.
- Open the "Video" menu;
- Go to the "Record" tab;
- Open "Settings", tab - "Logo".
How to avoid mistakes while recording games?
Many users complain about errors when recording games through Bandicam. In order for neither the game nor the video to lag, you need to pay attention to the following settings:- Target . Here you need to choose meaning "DirectX/OpenGL Window". Note that this value is ideal for recording guides of any computer games;
- Best to choose frequency 30, it will minimize the likelihood of lags while programs are running. This parameter is quite enough to record high-quality video.
- Change the codec of the program in the "Video" menu . To do this, open the "Format" tab - the "Settings" item. Install codec "Motion JPEG" instead of the default value. By the way, don't forget.
Bandicam video setup for game recording
We invite you to familiarize yourself with short video, which simply and clearly describes the main points of setting video and audio parameters for high-quality recording of games from a computer.If there is often a problem with sound, then there is reason to think about.
Bandicam is designed to record video tutorials and games directly from your PC screen. It has a very simple interface and is set up quite quickly - in just a few minutes. The main settings that you need to pay attention to before starting recording are video and audio parameters, check the performance of the microphone.
In the process of using the program, a person may encounter difficulties. This article will focus on just one of these situations in working with the Bandicam program. The fact is that an inexperienced user may have problems with sound recording. Although this problem is small, it can lead many people to a dead end. So, how to set up a microphone in Bandicam?
Turning on the microphone
Sometimes the problem is that the user simply forgot to turn on the microphone in the program settings. The solution is, of course, very simple. For this:
- Open the program and go to the "Video" tab. It is located on sidebar left.
- Next, find the "Settings" button, which is located in the "Record" column. Click on it.
- You will see a window with many tabs. We are interested in the "Sound" tab.
- Find the line "Sound recording" in the window and check the box next to it.
That's all there is to it. Now you know, how to turn on the microphone in Bandicam. Well, we are moving on to deeper settings of the program.
Microphone setup
Now we will analyze how to set up a microphone in Bandicam. This is a little more difficult to do than to enable, but for advanced users it will not create any special problems. Microphone setup consists of many aspects, since this is no longer a technical component, but rather, for each individual. It will depend on what you sacrifice for the sake of something else.
The microphone setup is as follows:
- in the choice of bitrate;
- in the choice of frequency;
- in choosing a recording device.
Before talking about how to set up a microphone in Bandicam, it is worth clarifying where all these settings are. In the same "Video" tab, in the "Format" column, find the "Settings" button and click on it. A window will appear in which all the above settings are located.
What indicators to choose
So, let's start in order. What bitrate to choose? First of all, it is worth telling what is bitrate. This value measures the speed of information flow. In simple words, it affects music like this: the higher the bitrate, the better the playback quality, the lower, the worse. However, there is no need to set too high an indicator either, since, for example, for MP3 format the generally accepted value is 128 kbps, if this value increases, then you will not notice any significant difference.

As for the recording frequency, everything is simple here, set the maximum mark if you want the sound to be the best, but be aware that this indicator also directly depends on the recording quality of the microphone itself.
You can find recording devices in the already familiar "Recording" settings on the "Sound" tab. Select the microphone you want to use for recording from the drop-down list. By the way, it is precisely because users do not choose correctly here that questions arise: "Why microphone is not working in Bandicam? And as you can see, the solution to the problem is quite simple.

Well, that's all, now you know how to set up a microphone in Bandicam for comfortable and correct video recording.