Let's change the behavior of Ubuntu regarding the use of RAM and swap (swap partition). There is such a parameter vm.swappiness, which by default has a value of 60, and controls the percentage of free memory at which an active flush of pages to the swap partition will begin. In other words, when 100-60 = 40% of the occupied memory, Ubuntu will already start using the swap partition. If there is a lot of RAM in the computer, it is better to change the vm.swappiness parameter to 10 and thus tell Ubuntu not to use swap until the occupied RAM reaches 100-10 = 90%. Set the value to 10 instead of 60. In the console, enter the following command:
Echo 10> / proc / sys / vm / swappiness
Sysctl -w vm.swappiness = 10
To save your configuration after reboot, add the following line to the end of /etc/sysctl.conf:
Vm.swappiness = 10
To immediately apply the setting:
Sysctl -p
In addition, a few more parameters can be said.
The pseudo file vfs_cache_pressure stores a value - the level of memory allocated for the cache. Default value: 100. Increasing this parameter forces the kernel to actively unload unused memory pages from the cache, ie. the amount of RAM allocated for the cache will grow more slowly, which in turn will reduce the likelihood that the swap partition will be used. By decreasing this parameter, the kernel, on the contrary, will keep memory pages in the cache longer, including in swap. This makes sense with a small amount of RAM, for example, if we have 512 MB of memory, then the vfs_cache_pressure parameter can be set equal to 50. This will reduce the number of disk operations on the swap partition, so unused pages will be deleted less frequently, and further decreasing this parameter may result in out of memory.
If you want to speed up the system and you have enough RAM (2 GB or more), then change the system value, so: swappiness = 10, vfs_cache_pressure = 1000 (default 100), add the following line to the /etc/sysctl.conf file:
Vm.vfs_cache_pressure = 1000
or on the fly:
Sysctl -w vm.vfs_cache_pressure = 1000
Linux caching
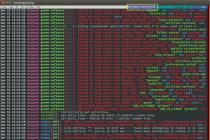
When writing data to disk (by any program) Linux caches this information in an area of memory called Page Cache. Information about this area of memory can be viewed using the free, vmstat, or top commands. Full information about this memory area can be found in the / proc / meminfo file. Below is an example of this file on a server with 4 GB of RAM:
MemTotal: 3950112 kB
MemFree: 622560 kB
Buffers: 78048 kB
Cached: 2901484 kB
SwapCached: 0 kB
Active: 3108012 kB
Inactive: 55296 kB
HighTotal: 0 kB
HighFree: 0 kB
LowTotal: 3950112 kB
LowFree: 622560 kB
SwapTotal: 4198272 kB
SwapFree: 4198244 kB
Dirty: 416 kB
Writeback: 0 kB
Mapped: 999852 kB
Slab: 57104 kB
Committed_AS: 3340368 kB
PageTables: 6672 kB
VmallocTotal: 536870911 kB
VmallocUsed: 35300 kB
VmallocChunk: 536835611 kB
HugePages_Total: 0
HugePages_Free: 0
Hugepagesize: 2048 kB
The Page Cache size is shown in the "Cached" parameter, in this example it is 2.9 GB. When pages are written to memory, the size of the "Dirty" parameter increases. When you start writing to disk, the "Writeback" parameter will increase until the write ends. It is difficult to see the "Writeback" parameter high because it only increases during polling when I / O operations are queued but not yet written to disk.
Linux usually writes data from the cache to disk using the pdflush process. At any time, from 2 to 8 pdflush threads are running on the system. In the file / proc / sys / vm / nr_pdflush_threads, you can see how many threads are currently active. Each time all existing pdflush threads are busy for at least 1 second. New threads try to write data to free queues of devices, so that for each active device there is 1 thread flushing data from the cache. Every time a second passes without any activity from the pdflush side, 1 thread is removed. On Linux, you can configure the minimum and maximum number of pdflush threads.
Setting up pdflush
Each pdflush stream is controlled by several options in / proc / sys / vm:
- / proc / sys / vm / dirty_writeback_centisecs (default 500): in hundredths of seconds. This parameter refers to how often pdflush resumes to write data to disk. By default, resumes 2 threads every 5 seconds.
Possibly undocumented behavior that thwarts attempts to reduce dirty_writeback_centisecs for more aggressive data caching by the pdflush process. For example, in early versions of the 2.6 Linux kernel in the mm / page-writeback.c file, the code included logic that described "if writing to disk takes longer than dirty_writeback_centisecs, then you need to set the interval to 1 second". This logic is only described in the kernel code, and its functionality depends on the Linux kernel version. Since this is not very good, therefore, you will be protected from decreasing this parameter. - code> / proc / sys / vm / dirty_expire_centiseconds (default 3000): in hundredths of seconds. This parameter specifies how long data can be in the cache, after which it must be written to disk. The default is very long: 30 seconds. This means that in normal operation, until enough data is written to the cache to call another pdflush method, Linux will not write data to disk that is in the cache for less than 30 seconds.
- / proc / sys / vm / dirty_background_ratio (default 10): The maximum percentage of RAM that the page cache can fill before writing data to disk. Some Linux kernel versions can set this parameter to 5%.
Most documentation describes this parameter as a percentage of total RAM, but according to Linux kernel sources, this is not the case. Looking at meminfo, dirty_background_ratio is calculated from MemFree + Cached - Mapped. Therefore, for our demo system, 10% is slightly less than 250MB, but not 400MB.
When does pdflush start recording?
In the default configuration, data written to disk remains in memory until:
If there are frequent writes on the server, then one day the dirty_background_ratio parameter will be reached, and you can see that all disk writes only go through this parameter without waiting for the dirty_expire_centiseconds parameter to expire.
Page writing process
/ Proc / sys / vm / dirty_ratio (default 40) is the maximum percentage of total RAM that can be allocated for page cache before pdflush writes data to disk.
Note: When writing to disk, all processes are blocked for writing, not only the one that filled the buffer for writing. This can cause one process to block all I / O operations on the system.
Linux Optimization Tips for Frequent Write Operations
Usually, when trying to increase the performance of the disk subsystem, they face the problem that Linux is buffering too much information at once. This is especially noticeable for operations that require file system synchronization using fsync calls. If during such a call there is a lot of data in the cache, then the system may "hang" until this call ends.
Another common problem occurs because too much needs to be written before writing to the physical disk, I / O operations occur more frequently than during normal operation.
- dirty_background_ratio: Basic configuration tool. Usually this parameter is decreased. If your goal is to reduce the amount of data stored in the cache, so that data will be written to disk gradually, and not all at once, then decreasing this parameter is the most effective way. The default value is most suitable for systems with a lot of RAM and slow disks.
- dirty_ratio: The second most important parameter to configure. If this parameter is significantly reduced, applications that must write to disk will all be blocked together.
- dirty_expire_centisecs: Try to decrease this parameter, but not too much. It allows you to reduce the time that pages are in the cache before writing to disk, but on the other hand, it will significantly reduce the average write speed to disk, which will be especially evident on systems with slow disks.
As a result, we get
In the /etc/sysctl.conf file, add:
Vm.dirty_background_ratio = 10 vm.dirty_ratio = 40
Then we synchronize the data of the cache and disk, clear the cache and save the parameters:
Sync; echo 3> / proc / sys / vm / drop_caches; sysctl -p
To reduce the number of finalizations of recording to disk, you need to adjust:
Vm.dirty_writeback_centisecs = 15000
Like any other operating system, Linux is very efficient with RAM. Available memory is freely distributed between processes, unused pages are dumped into the swap partition on the disk, and in case of memory overflow, a special mechanism built into the kernel is triggered, which analyzes all processes and destroys the culprit.
When any process writes data to disk, the kernel stores it in a separate cache. Very often this cache takes up a lot of space. In this article, we will look at how to free memory in Linux, or rather, how to clear the cache created by programs.
In every Linux distribution, three commands can be used to clear the linux memory cache. And we don't have to end any processes. These commands are:
Clearing the PageCache:
sync; echo 1> / proc / sys / vm / drop_caches
Cleaning inode and dentrie:
sync; echo 2> / proc / sys / vm / drop_caches
Cleaning inode and dentrie and PageCache:
sync; echo 3> / proc / sys / vm / drop_caches
Before running any of these commands, run:
This is because each command requires superuser rights to work. Now let's take a look at what happens when these commands are executed.
The sync utility forces the system to write all cached but not yet written data to disk. This is to free up as much memory as possible. By default, data is not deleted from the cache after being written to disk, this is necessary so that the program can read it faster when needed.
If we do not execute the sync command, we will also free up some space, but after executing it, the result will be better.
Separation symbol; tells the shell to wait for the first command to complete before executing another command. The last command echo 1> / proc / sys / vm / drop_caches writes the value 1 to the file / proc / sys / vm / drop_caches. This signals the kernel to clear the cache we have selected.
Linux cache types
Now let's take a look at the types of cache that allow you to clear these commands, as well as how it all works.
PageCache or the page cache is where the kernel stores all the data that you have written to or read from disk. This greatly speeds up the work of the system, since if the program needs the same data a second time, it will simply be taken from the RAM. But for this reason, this cache takes up the most space.
You can view the size of the page cache using the free utility. Here it is shown in the last column - cached:
Such a cache is the most efficient and safest to clean.
Inode and dentrie cache also refers to the file system. Only the data itself is not written to it, but the structure of the file system, the location of files and folders. When requesting the location of a file or the contents of a folder, the kernel generates special structures that contain all this information. On the next request, the structures will already be saved in memory. Each file system has its own inode cache and a shared dentrie cache.
This cache takes up very little memory. The data is presented in bytes, and as you can see, this is very small. You can view it with the command:
cat / proc / slabinfo | egrep dentry \ | inode

It is not recommended to clear it to free up linux memory, as little memory is consumed, and a new scan of the file system takes a relatively long time.
Do I need to clear the cache at all?
First, if a lot of memory is being used, you can clear the page cache, especially if it takes up a lot of memory. Secondly, you may need to clear the linux memory cache if you changed any settings of the file system or kernel, and now want to check how this affected the speed of read / write operations. In this case, you can clear all caches and do it without rebooting, which is very convenient.
The Linux operating system is designed in such a way that before accessing the disk, the disk cache will be scanned, and if there is the necessary data, the disk will not be accessed. If you clear the Linux cache, the operating system will run slightly slower as it has to look for data on the disk.
Automatic cache clearing
Let's take a look at how to automatically clear the memory cache every day at 2 am using the cron job scheduler.
First, let's create a bash script with the following content:
sudo vi /usr/local/bin/clearcache.sh
sync; echo 1> / proc / sys / vm / drop_caches
We will only clear the page cache, as it takes up the most. We will not touch other types, so as not to reduce system performance in vain.
sudo chmod 755 /usr/local/bin/clearcache.sh
It remains to add the task to the cron scheduler. To do this, run the command:
And in the opened editor add the line:
0 2 * * * /usr/local/bin/clearcache.sh
This script will now run every night and clean up memory so the server can run normally.
Adjusting the size of the memory cache
It is much more convenient not to clear the cache every time, but to set a limit, upon exceeding which the system itself will delete unnecessary pages. You cannot explicitly limit how many megabytes a system can use for cache. All available memory will be used as needed, but you can adjust the rate at which expired pages are removed from the cache.
The file / proc / sys / vm / vfs_cache_pressure is responsible for this. It contains a relative measure of how aggressively pages should be removed from the cache. By default, the parameter is set to 100. If you reduce it, the kernel will delete pages less often and this will lead to a very rapid increase in the cache. At zero, pages will not be deleted at all. If the value is greater than 100, the cache will grow more slowly and unused pages will be deleted immediately.
For example, let's make the minimum cache size:
echo 1000> / proc / sys / vm / vfs_cache_pressure
Do not forget that this will dramatically decrease your system's performance, because instead of a cache, data will be read from disk.
How to clear swap memory
Swap space is very easy to clean up. To do this, run:
swapoff -a && swapon -a
Keep in mind that when clearing the swap, all data will be moved back to RAM.
conclusions
That's all. You already know to clear linux cache and free memory. Do not forget that all the commands given in this article must be executed on behalf of the superuser, otherwise nothing will work. If you have any questions, ask in the comments!
Related entries:

Like any other operating system, Linux is very efficient with RAM. Available memory is freely distributed between processes, unused pages are dumped into the swap partition on the disk, and in case of memory overflow, a special mechanism built into the kernel is triggered, which analyzes all processes and destroys the culprit.
When any process writes data to disk, the kernel stores it in a separate cache. Very often this cache takes up a lot of space.
HOW TO RELEASE MEMORY IN LINUX
In every Linux distribution, three commands can be used to clear the linux memory cache. And we don't have to end any processes. These commands are:
Clearing the PageCache:
Sync; echo 1> / proc / sys / vm / drop_caches
Cleaning inode and dentrie:
Sync; echo 2> / proc / sys / vm / drop_caches
Cleaning inode and dentrie and PageCache:
Sync; echo 3> / proc / sys / vm / drop_caches
Before running any of these commands, run:
This is because each command requires superuser rights to work. Now let's take a look at what happens when these commands are executed.
The sync utility forces the system to write all cached but not yet written data to disk. This is to free up as much memory as possible. By default, data is not deleted from the cache after being written to disk, this is necessary so that the program can read it faster when needed.
If we do not execute the sync command, we will also free up some space, but after executing it, the result will be better.
Separation symbol; tells the shell to wait for the first command to complete before executing another command. The last command echo 1> / proc / sys / vm / drop_caches writes the value 1 to the file / proc / sys / vm / drop_caches. This signals the kernel to clear the cache we have selected.
TYPES OF CACHES IN LINUX
Now let's take a look at the types of cache that allow you to clear these commands, as well as how it all works.
PageCache or the page cache is where the kernel stores all the data that you have written to or read from disk. This greatly speeds up the work of the system, since if the program needs the same data a second time, it will simply be taken from the RAM. But for this reason, this cache takes up the most space.
You can view the size of the page cache using the free utility. Here it is shown in the last column - cached:
Such a cache is the most efficient and safest to clean.
Inode and dentrie cache also refers to the file system. Only the data itself is not written to it, but the structure of the file system, the location of files and folders. When requesting the location of a file or the contents of a folder, the kernel generates special structures that contain all this information. On the next request, the structures will already be saved in memory. Each file system has its own inode cache and a shared dentrie cache.
This cache takes up very little memory. The data is presented in bytes, and as you can see, this is very small. You can view it with the command:
Cat / proc / slabinfo | egrep dentry \ | inode

It is not recommended to clear it to free up linux memory, as little memory is consumed, and a new scan of the file system takes a relatively long time.
DO I NEED TO CLEAR THE CACHE AT ALL?
First, if a lot of memory is being used, you can clear the page cache, especially if it takes up a lot of memory. Secondly, you may need to clear the linux memory cache if you changed any settings of the file system or kernel, and now want to check how this affected the speed of read / write operations. In this case, you can clear all caches and do it without rebooting, which is very convenient.
The Linux operating system is designed in such a way that before accessing the disk, the disk cache will be scanned, and if there is the necessary data, the disk will not be accessed. If you clear the Linux cache, the operating system will run slightly slower as it has to look for data on the disk.
AUTOMATIC CACHE CLEANING
Let's take a look at how to automatically clear the memory cache every day at 2 a.m. using the cron job scheduler.
First, let's create a bash script with the following content:
Sudo vi /usr/local/bin/clearcache.sh
Sync; echo 1> / proc / sys / vm / drop_caches
We will only clear the page cache, as it takes up the most. We will not touch other types, so as not to reduce system performance in vain.
Sudo chmod 755 /usr/local/bin/clearcache.sh
It remains to add the task to the cron scheduler. To do this, run the command:
Sudo crontab -e
And in the opened editor add the line:
0 2 * * * /usr/local/bin/clearcache.sh
This script will now run every night and clean up memory so the server can run normally.
ADJUSTING THE SIZE OF THE MEMORY CACHE
It is much more convenient not to clear the cache every time, but to set a limit, upon exceeding which the system itself will delete unnecessary pages. You cannot explicitly limit how many megabytes a system can use for cache. All available memory will be used as needed, but you can adjust the rate at which expired pages are removed from the cache.
The file / proc / sys / vm / vfs_cache_pressure is responsible for this. It contains a relative measure of how aggressively pages should be removed from the cache. By default, the parameter is set to 100. If you reduce it, the kernel will delete pages less often and this will lead to a very rapid increase in the cache. At zero, pages will not be deleted at all. If the value is greater than 100, the cache will grow more slowly and unused pages will be deleted immediately.
For example, let's make the minimum cache size:
Echo 1000> / proc / sys / vm / vfs_cache_pressure
Do not forget that this will dramatically decrease your system's performance, because instead of a cache, data will be read from disk.
HOW TO CLEAR THE SWAP MEMORY
Swap space is very easy to clean up. To do this, run:
Swapoff -a && swapon -a
Keep in mind that when clearing the swap, all data will be moved back to RAM.
CONCLUSIONS
That's all. You already know to clear linux cache and free memory. All commands must be executed as superuser, otherwise nothing will work.
Recently, on one of the virtual servers, I encountered the problem of long writing to disk. And under this topic I found an interesting one, in which the issue of the functioning of caching write operations to disk in Linux is considered in detail. Today there will be a translation of this article.
Linux caching
When writing data to disk (by any program) Linux caches this information in an area of memory called Page Cache. Information about this area of memory can be viewed using the commands free, vmstat or top... Full information about this memory area can be found in the file / proc / meminfo... Below is an example of this file on a server with 4 GB of RAM:
MemTotal: 3950112 kB MemFree: 622560 kB Buffers: 78048 kB Cached: 2901484 kB SwapCached: 0 kB Active: 3108012 kB Inactive: 55296 kB HighTotal: 0 kB HighFree: 0 kB LowTotal: 3950112 kB LowBree: 622560 kBapFree kBapFree kB 4198244 kB Dirty: 416 kB Writeback: 0 kB Mapped: 999852 kB Slab: 57104 kB Committed_AS: 3340368 kB PageTables: 6672 kB VmallocTotal: 536870911 kB VmallocUsed: 35300 kB VmallocalChunkages: 536835611 kBugePages
The Page Cache size is shown in the "Cached" parameter, in this example it is 2.9 GB. When pages are written to memory, the size of the "Dirty" parameter increases. When you start directly writing to disk, the "Writeback" parameter will increase until the write ends. It is difficult to see the "Writeback" parameter high as it only increases during polling when I / O operations are queued but not yet written to disk.
Linux usually writes data from the cache to disk using a process pdflush... At any time, from 2 to 8 threads are running in the system pdflush... In file / proc / sys / vm / nr_pdflush_threads you can see how many currently active threads. Each time all existing pdflush threads are busy for at least 1 second. New threads try to write data to free queues of devices, so that for each active device there is 1 thread flushing data from the cache. Every time after a second without any activity from the side of pdflush, 1 thread is removed. On Linux, you can configure the minimum and maximum number of pdflush threads.
Setting up pdflush
Each pdflush stream is controlled by several parameters in / proc / sys / vm:
- / proc / sys / vm / dirty_writeback_centisecs(default 500): in hundredths of a second. This parameter refers to how often pdflush resumes to write data to disk. By default, resumes 2 threads every 5 seconds.
Possibly undocumented behavior that thwarts attempts to reduce dirty_writeback_centisecs for more aggressive data caching by the pdflush process. For example, in early versions of the 2.6 Linux kernel in the mm / page-writeback.c file, the code included logic that described "if writing to disk takes longer than dirty_writeback_centisecs, then you need to set the interval to 1 second". This logic is only described in the kernel code, and its functionality depends on the Linux kernel version. Since this is not very good, therefore, you will be protected from decreasing this parameter. - / proc / sys / vm / dirty_expire_centiseconds(default 3000): in hundredths of seconds. This parameter specifies how long data can be in the cache, after which it must be written to disk. The default is very long: 30 seconds. This means that in normal operation, unless enough data is written to the cache to call another pdflush method, Linux will not write data to disk that is less than 30 seconds in cache.
- / proc / sys / vm / dirty_background_ratio(default 10): The maximum percentage of RAM that the page cache can fill before writing data to disk. Some Linux kernel versions can set this parameter to 5%.
Most documentation describes this parameter as a percentage of total RAM, but according to Linux kernel sources, this is not the case. Looking at meminfo, the dirty_background_ratio parameter is calculated from the value MemFree + Cached - Mapped... Therefore, for our demo system, 10% is slightly less than 250MB, but not 400MB.
Total: When does pdflush start recording?
In the default configuration, data written to disk remains in memory until:
- they are in memory for more than 30 seconds;
- cached pages take up over 10% of working memory.
If there are frequent write operations on the server, then one day the dirty_background_ratio parameter will be reached, and you can see that all disk writes only go through this parameter without waiting for the dirty_expire_centiseconds parameter to expire.
Page writing process
Parameter / proc / sys / vm / dirty_ratio(default 40): The maximum percentage of total RAM that can be allocated for page cache before pdflush writes data to disk.
Note: During writing to disk, all processes are blocked for writing, not only the one that filled the buffer for writing. This can cause one process to block all I / O operations on the system. Spend this
Linux Optimization Tips for Frequent Write Operations
Usually, when trying to increase the performance of the disk subsystem, people encounter the problem that Linux is buffering too much information at once. This is especially difficult for operations that require file system synchronization using fsync calls. If during such a call there is a lot of data in the cache, then the system may "hang" until this call ends.
Another common problem occurs because too much needs to be written before writing to the physical disk, I / O operations occur more frequently than during normal operation. You will get longer periods of not writing to disk until the large cache is full, after which one of the pdflush triggers fires and the data is written at maximum speed.
dirty_background_ratio: Basic tuning tool, usually decrease this parameter. If your goal is to reduce the amount of data stored in the cache, so that data will be written to disk gradually, and not all at once, then decreasing this parameter is the most effective way. The default value is more acceptable for systems with a lot of RAM and slow disks.
dirty_ratio: The second most important parameter for tuning. If this parameter is significantly reduced, applications that need to write to disk will all be blocked together.
dirty_expire_centisecs: Try to decrease it, but not too much. Allows to reduce the time spent pages in the cache before writing to disk, but this will significantly reduce the average speed of writing to disk. it is less efficient. This will be especially true on systems with slow disks.
Instructions for setting parameters
In file /etc/sysctl.conf we introduce, for example:
Vm.dirty_background_ratio = 10 vm.dirty_ratio = 40
Then we synchronize the data of the cache and disk, clear the cache and save the parameters.
Sync; echo 3> / proc / sys / vm / drop_caches; sysctl -p
In Linux, almost all commands are without a graphical interface. When running on access servers, only the shell. So today we are going to show you the commands that can be used to check the memory usage on a Linux system. Memory includes RAM and swap.It is often important to check shared memory and process memory usage on servers, as well as unused resources. If you are running a web server, then the server must have enough memory to serve site visitors. If this does not happen, then the site will become very slow or even become inaccessible when there is a surge in traffic, simply because memory is not enough. The same as what happens on a desktop computer.
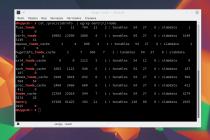
1. The free command
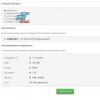
The free command is the simplest and easiest to use command to check memory usage on Linux. Here's a quick example
$ free -m total used free shared buffers cached Mem: 7976 6459 1517 0 865 2248 - / + buffers / cache: 3344 4631 Swap: 1951 0 1951
Option -m displays all data in megabytes. The total total amount of RAM is 7976 MB installed in the system, that is, 8 GB. Speaker used shows the amount of RAM that can be used on Linux, in our case it will be about 6.4 GB. The catch here is the columns cached and buffers... The second line says 4.6 GB is free. This is the free memory on the first line with the addition of buffers and the amount of cache memory.
Linux has a habit of caching to improve performance so that memory can be freed up and used as needed.
The last line is memory swap ( swap), which in this case is completely free.
2. / proc / meminfo
The next way to check memory usage is to read / proc / meminfo. Be aware that the / proc filesystem contains no real files. They are virtual files that contain dynamic information about the kernel and system.
$ cat / proc / meminfo MemTotal: 8167848 kB MemFree: 1409696 kB Buffers: 961452 kB Cached: 2347236 kB SwapCached: 0 kB Active: 3124752 kB Inactive: 2781308 kB Active (anon): 2603376 kB Inactive (anon): 309056 kB Active file): 521376 kB Inactive (file): 2472252 kB Unevictable: 5864 kB Mlocked: 5880 kB SwapTotal: 1998844 kB SwapFree: 1998844 kB Dirty: 7180 kB Writeback: 0 kB AnonPages: 2603272 kB Mapped: 788380 kB ShmeB: 3115 200,468 kB SReclaimable: 151,760 kB SUnreclaim: 48708 kB KernelStack: 6488 kB PageTables: 78592 kB NFS_Unstable: 0 kB Bounce: 0 kB WritebackTmp: 0 kB CommitLimit: 6082768 kB Committed_AS: 9397536 kB Vmal35loc38 kB HardwareCorrupted: 0 kB AnonHugePages: 0 kB HugePages_Total: 0 HugePages_Free: 0 HugePages_Rsvd: 0 HugePages_Surp: 0 Hugepagesize: 2048 kB DirectMap4k: 62464 kB DirectMap2M: 8316928 kB