Sometimes the chargers used by gadgets fail. There are people who are interested in trying everything for themselves. As a result, homemade phone chargers are born.
Reasons for creating a charger with your own hands
How do I charge my phone? This question does not bother many people, but only until they encounter problems that can lie in wait for everyone.
So why would we need to create a phone charger?
- Failure of the telephone battery - until the purchase of a new one.
- The ability to recharge your phone where there is no network.
- The ability to create a spare charger.
The simplest answer is how to make a portable phone charger from batteries.
We do portable charging
How to charge your phone if you have batteries, a compartment for them, for them or an old mobile phone and a USB extension cable?
Batteries must be AA type. In addition, a soldering iron and a tester must be available.
We take 4 batteries (preferably large capacity) and insert them into the compartment for them. We measure the voltage with a tester, it should be at least 5 volts. This is because modern phones can be charged from a 5V USB port.
From the USB extension cable, which is not a pity to use, we cut off the plug that connects to the computer. We study the pinout of the contacts, call the tester. We find + and -, we remove the rest of the wires with wire cutters and insulate.

We put a thermocambric on the wires and process it with a lighter to ensure a tight entrance. We make a fitting at the place where the plug is attached.
We will need to solder the wires to the metal rivets. For this purpose, soldering acid is used, which can be applied with a tin stick, after which we tin the rivets.
We solder the wires in accordance with their charge.
The connector must be glued to the body after degreasing or scraping off the connector and plastic with a knife.
Apply heated glue to the body and press down. We coat with glue around, closing open contacts. The remaining unnecessary wires are bitten off and covered with glue. If necessary, it can be masked with a marker.
We insert the batteries. They must be of the same capacity. Moreover, their total capacity should exceed that of a telephone battery.

Making a charging cable
After making the charging itself, the question "How to charge the phone?" not removable, since the cable still needs to be made.
Cut off the small connector of the USB cable, the length of the cable should be half a meter.
We cut the wires in the same way. + and - has already been identified, no need to repeat. We bite off the rest of the wires, after which we place them in a thermocambric, clean them, and tin.
Rechargeable batteries can be charged in different designated for them. In most cases, mobile phone chargers can also be used.
You can not complicate your life, but charge the batteries in appropriate chargers.

Checking the charging
We insert the charged batteries into the booster, to which we connect the USB cable on one side, and on the other side we connect it to the phone and check the charging.
After a while, the voltage on the booster may drop, so it is better to use batteries with a larger capacity.
Thus, we figured out how to charge the phone with our own hands.
Wireless charger
Extension cords can stop charging the phone, they can fray, the charging socket in the phone can become loose. All this necessitates wireless charging. How to make a wireless charger for your phone, we will consider below.
The principle of wireless charging is based on the fact that a coil is built into the charger, which creates a magnetic field, under the cover of the phone there is another coil that serves as a receiver. When the receiver is in the range of the conductor, electromagnetic pulses are activated. Through rectifiers and capacitors, there is an impact on the phone battery.
But before you make your choice in favor of wireless charging, you must take into account that it has a number of negative qualities:
- there is no reliable data on the effect on the human body;
- transmission of energy is ineffective;
- a full charge of the battery is restored in a longer period of time compared to wired charging;
- the working capacity of the battery may be reduced;
- If the package is incorrect, the battery may overheat, leading to premature wear.

Let's see how to make a wireless charger for your phone.
This requires several meters of thin copper wire. The conductor is wound into a coil with the number of turns equal to 15. The spiral is fixed with double-sided tape or glue to maintain its shape. We leave a few centimeters of wire for soldering. The connection to the charging socket is made using a capacitor and a pulse diode, which are attached to opposite ends.
The size of one turn on the conductor should be 1.5 cm.After twisting, the diameter of the resulting coil is 10 cm.
An even thinner copper wire, 30 turns, is used to form the transmitter. The circuit is closed by a capacitor and a transistor. We place this device into the area of the transmitting ring with the display up.
Finally
Thus, the question of how to charge your phone has several possible answers. Charging can be battery powered or wireless. In any case, a person who understands electricity should do it, otherwise you can run into problems.
V recent times became very popular portable chargers for mobile phones or otherwise they are called Power bank ... They are sold in many stores, and we can buy them without any problems, but I think many radio amateurs are much more interesting make your own portable charger for your mobile phone. This article will show you a simple scheme charger powered by AA batteries.
Almost all devices that recharge via USB computer such as mobile phones, MP3 players, cameras and much more can be charged from conventional AA 1.5 volt batteries, if desired, they can be replaced with rechargeable batteries.
Experimental model of portable charger with overvoltage protection:
The scheme according to which you need to assemble the charger:

Since the circuit uses discrete components, an overvoltage protection system has been included in the circuit in case any element fails. How the circuit works will be described below.

The main component of the circuit is chip 7805, which is a 5-volt voltage regulator with a maximum output current of 1.5 amperes. Therefore, this charger will give a maximum of 1.5 A to charge your mobile.
Let's make a small digression from the topic. Recently I encountered a problem, I needed to help my relatives from Germany to apply for a visa, the queues at the embassy turned out to be a couple of months ahead, and then I came across the site http://www.visardo.ru/ where the visa was made in just a week.
The zener diode in the circuit provides an output voltage of no more than 5.6 volts, and if the output voltage exceeds 5.6 volts, automatically protection will work disconnecting the power supply of the 7805 microcircuit.
For reliability, a 2A fuse can be installed in front of the microcircuit to be more sure that the charger will turn off when an overvoltage occurs.
Output 7805 is connected to USB type "mother" from which you will recharge your gadget. In this circuit, we used four AA batteries of 1.5V and 1.5A.
Well, yes, perhaps this charger will be larger than those sold in stores and it needs batteries, but as I said at the beginning, much it's more interesting to do something with your own hands than just buy.
One of the most important problems modern man having a smartphone is the constant discharge of the device's battery. Especially for such cases, portable chargers have been created that allow you to connect a gadget using USB cable and charge your smartphone using the battery built into the charger.
So, to make a portable charger, we need:
- Two krone accumulators (one of the accumulators can be used),
- Box (you can use a metal candy box),
- A switch that can be removed from an old cassette player or a broken children's toy
- And most importantly, a USB car charger, which can be purchased for about $ 2-3,
- And also the copper wires with which we will connect everything.

First of all, we need to make a removable stamp for the battery. If you have old toys or devices at home that use krone-type batteries, then ready-made brands can be removed from them. If there are no such toys or devices, then you can make the brand yourself. To do this, you need to remove the upper part of the crown battery, smear the flux on the metal contacts from the inside and solder copper wires to them. For fixing and insulation, you can use regular hot melt glue.

Brands are ready, they can be attached to the contacts of the second battery (wide contact to narrow, and narrow to wide).

The next thing we need to do is to disassemble the car charger, taking the board on which the USB connector is located. It remains only to collect all the components of our portable charger and connect everything through the switch.

When connecting the stamp to the battery, you can see which of the wires is positive, and which is negative, if you use multi-colored wires. If not, then you can mark a plus one for greater convenience and ease.
The center wire or spring on the car charger is always positive, and the wire on the side is always negative. So, we must connect the positive wire of our battery to the switch, and the negative wire directly to the charger board.

If the positive wire on the charger is made in the form of a spring, it can be replaced with a normal one for greater convenience.
After that, the two positive wires must be soldered to the two pins on the fork.

The device is almost ready. It remains to assemble it in a box, on which in the side you need to cut out two passages for the USB input and the switch.
On one of the amateur radio sites I saw a circuit for charging portable Ni-Mn and Ni-Cd batteries with an operating voltage of 1.2-1.4 V from a USB port. This device can charge portable rechargeable batteries with a current of approximately 100 mA. The scheme is simple. It will not be difficult to assemble it even for a novice radio amateur.
Of course, you can buy a ready-made charger. There are a great many of them on sale now and for every taste. But their price is unlikely to satisfy a novice radio amateur or someone who is able to make a charger with their own hands.
I decided to repeat this scheme, but make a charger to charge two batteries at once. The output current of USB 2.0 is 500 mA. So you can safely connect two batteries. The modified scheme looked like this.

I also wanted to be able to connect external source supply voltage of 5 V.
The circuit contains only eight radio components.

A minimum set of radio amateurs is required from the tool: a soldering iron, solder, flux, tester, tweezers, screwdrivers, a knife. Before soldering radio components, they must be checked for serviceability. For this we need a tester. It is very easy to check the resistors. We measure their resistance and compare with the nominal value. There are many articles on the Internet on how to check a diode and an LED.
For the case, I used a plastic case measuring 65 * 45 * 20 mm. The battery compartment was cut out of the "Tetris" children's toy.

I will tell you more about the alteration of the battery compartment. The fact is that initially
the pros and cons of the battery power terminals are opposite. But I needed two positive insulation terminals in the upper part of the compartment, and one common negative terminal at the bottom. To do this, I moved the lower positive terminal up, and cut the common negative terminal out of the tin, soldering the remaining springs.


I used soldering acid as a flux when soldering springs in compliance with all safety rules. The place of soldering must be rinsed in running water until complete removal acid traces. I soldered the wires from the terminals and passed them inside the case through the drilled holes.

The battery compartment was secured to the cover of the case with three small screws.
The board was cut out of the old modulator of the Dandy game console. Removed all unnecessary parts and PCB tracks. Left only the power socket. I used thick copper wire as new tracks. I drilled holes for ventilation in the bottom cover.

The finished board sat tightly in the case, so I did not fix it.

After installing all the radio components in their places, we check the correct installation and clean the board from the flux.
Now we will deal with the desoldering of the power cord and setting the charging current for each battery.
I used a USB cable from the old computer mouse and a piece of power cable with a Dandy plug.

Special attention should be paid to the power cord. In no case should you confuse "+" and "-". I have a "+" power plug connected to the center contact with a black wire with a white stripe. And the "-" power goes along the black (without stripe) wire to the outer contact of the plug. On the USB cable, "+" goes to the red wire and "-" to the black one. We solder a plus with a plus and a minus with a minus. We carefully insulate the soldering points. Next, we check the cord for a short circuit by connecting the tester in the resistance measurement mode to the plug terminals. The tester should show infinite resistance. Everything must be carefully double-checked, no matter what burn the USB port. If everything is fine, we connect our cable to the USB port and check the voltage at the plug. The tester should show 5 volts.

The last step in the setup is to set the charging current. To do this, we break the circuit of the diode VD1 and "+" of the battery. We connect the tester to the gap in the current measurement mode switched on to the limit of 200 mA. The plus of the tester is for the diode, and the minus for the battery.

We insert the battery into place, observing the polarity, and turn on the power. In this case, the LED should light up. It signals that the battery is connected. Further, by changing the resistance R1, we set the required charge current. In our case, it is approximately 100 mA. With a decrease in the resistance of the resistor R1, the charging current increases, and with an increase, it decreases.

We do the same for the second battery. After that, we twist our body and
the charger is ready to use.
Since different finger-type batteries have different
capacity, it will take different times to charge these batteries. Batteries
with a capacity of 1400 mAh with a voltage of 1.2 V will need to be charged with this
circuits for about 14 hours, and 700 mAh batteries only take 7 hours.
I have batteries with a capacity of 2700 mAh. But I didn't want to charge them for 27 hours from the USB port. Therefore, I made a power socket for an external 5 volt 1A power supply, which I had idle.

Here are some more photos of the finished device.


The stickers were painted with FrontDesigner 3.0. Then I printed it on laser printer... I cut it out with scissors, glued it with the front side on a thin adhesive tape 20 mm wide. I cut off the excess tape. I used a glue stick as glue, having previously lubricated both the sticker and the place where it is glued. How reliable it is, I don't know yet.
Now the pros and cons of this scheme.
The plus is that the circuit does not contain scarce and expensive parts and is literally assembled on the knee. It is also possible to power it from a USB port, which is important for novice radio amateurs. No need to puzzle over where to power the circuit. Despite the fact that the scheme is very simple, this way charging is used in many industrial chargers.
It is also possible, by slightly complicating the circuit, to implement switching of the charging current.

By selecting R1, R3 and R4, you can set the charging current for batteries of different capacities, thereby providing the recommended charging current for this battery, which is usually 0.1C (C-battery capacity).
Now the cons. The biggest is the lack of stabilization of the charging current. That is
Changing the input voltage will change the charging current. Also, if there is an error in the installation or short circuit of the circuit, there is a high probability of burning the USB port.
Home comfort
Sometimes the chargers used by gadgets fail. There are people who are interested in trying everything for themselves. As a result, homemade phone chargers are born.
We do portable charging
We take 4 batteries (preferably large capacity) and insert them into the compartment for them.
DIY wireless charger for your phone
We measure the voltage with a tester, it should be at least 5 volts. This is due to the fact that modern phones can be charged from the USB connector, in which the voltage is 5 V.


Related Videos
Making a charging cable

Checking the charging
Wireless charger

Finally
Home comfort
Technologies
Hobby
Hobby
Hobby
Hobby
Technologies
Business
home and family
home and family

This scheme offers:
2) Low consumption
Device diagram-

Transistors - were selected through experiments, so transistors with the lowest opening voltage were selected, this made it possible to create a circuit that starts working from a voltage of 0.55 volts! The output voltage remains stable even if the input voltage is raised to 1.5-2 volts. This function of the converter allows the use of 1.2 volt nickel batteries as a power source.
How to make a portable phone charger ??
This is the main reason for the creation of such a device, since factory field chargers cannot work from 1.2 volts, they need a 1.5 volt battery to work, and as we know they cannot work for a long time, periodic replacements are needed. Of course, you can use Duracell type batteries, but they are quite expensive. In the same device, you can use finger-type batteries, which can be charged.
600mA / h - 35 min
850mA / h - 45 min
1000mA / h - 1h
1500mA / h - 1.5h
2000mA / h - 2h
2200mA / h - 2h 15min
3000mA / h - about 3h
3300mA / - more than 3h 15 min

Program format board LAY
Home comfort
How do I charge my phone? Portable and wireless charging
Sometimes the chargers used by gadgets fail. There are people who are interested in trying everything for themselves.
DIY wireless charging
As a result, homemade phone chargers are born.
Reasons for creating a charger with your own hands
How do I charge my phone? This question does not bother many people, but only until they encounter problems that can lie in wait for everyone.
So why would we need to create a phone charger?
- Failure of the telephone battery - until the purchase of a new one.
- The ability to recharge your phone where there is no network.
- The ability to create a spare charger.
The simplest answer is how to make a portable phone charger from batteries.
We do portable charging
How to charge your phone if you have batteries, a compartment for them, a charger for them or an old mobile phone and a USB extension cable?
Batteries must be AA type. In addition, a soldering iron and a tester must be available.
We take 4 batteries (preferably large capacity) and insert them into the compartment for them. We measure the voltage with a tester, it should be at least 5 volts. This is due to the fact that modern phones can be charged from the USB connector, which has a voltage of 5 V.
From the USB extension cable, which is not a pity to use, we cut off the plug that connects to the computer. We study the pinout of the contacts, call the tester. We find + and -, we remove the rest of the wires with wire cutters and insulate.
We put a thermocambric on the wires and process it with a lighter to ensure a tight entrance. We make a fitting at the place where the plug is attached.
We will need to solder the wires to the metal rivets. For this purpose, soldering acid is used, which can be applied with a tin stick, after which we tin the rivets.
We solder the wires in accordance with their charge.
The connector must be glued to the body after degreasing or scraping off the connector and plastic with a knife.
Apply heated glue to the body and press down. We coat with glue around, closing open contacts. The remaining unnecessary wires are bitten off and covered with glue. If necessary, it can be masked with a marker.
We insert the batteries. They must be of the same capacity. Moreover, their total capacity should exceed that of a telephone battery.
Related Videos
Making a charging cable
After making the charging itself, the question "How to charge the phone?" not removable, since the cable still needs to be made.
Cut off the small connector of the USB cable, the length of the cable should be half a meter.
We cut the wires in the same way. + and - has already been identified, no need to repeat. We bite off the rest of the wires, after which we place them in a thermocambric, clean them, and tin.
Batteries can be charged in different chargers designed for them. In most cases, mobile phone chargers can also be used.
You can not complicate your life, but charge the batteries in appropriate chargers.
Checking the charging
We insert the charged batteries into the booster, to which we connect the USB cable on one side, and on the other side we connect it to the phone and check the charging.
After a while, the voltage on the booster may drop, so it is better to use batteries with a larger capacity.
Thus, we figured out how to charge the phone with our own hands.
Wireless charger
Extension cords can stop charging the phone, they can fray, the charging socket in the phone can become loose. All this necessitates wireless charging. How to make a wireless charger for your phone, we will consider below.
The principle of wireless charging is based on the fact that a coil is built into the charger, which creates a magnetic field, under the cover of the phone there is another coil that serves as a receiver. When the receiver is in the range of the conductor, electromagnetic pulses are activated. Through rectifiers and capacitors, there is an impact on the phone battery.
But before you make your choice in favor of wireless charging, you must take into account that it has a number of negative qualities:
- there is no reliable data on the effect on the human body;
- transmission of energy is ineffective;
- a full charge of the battery is restored in a longer period of time compared to wired charging;
- the working capacity of the battery may be reduced;
- If the package is incorrect, the battery may overheat, leading to premature wear.
Let's see how to make a wireless charger for your phone.
This requires several meters of thin copper wire. The conductor is wound into a coil with the number of turns equal to 15. The spiral is fixed with double-sided tape or glue to maintain its shape. We leave a few centimeters of wire for soldering. The connection to the charging socket is made using a capacitor and a pulse diode, which are attached to opposite ends.
The size of one turn on the conductor should be 1.5 cm.After twisting, the diameter of the resulting coil is 10 cm.
An even thinner copper wire, 30 turns, is used to form the transmitter. The circuit is closed by a capacitor and a transistor. We place this device in the area of the transmitting ring with the display upwards.
Finally
Thus, the question of how to charge your phone has several possible answers. Charging can be battery powered or wireless. In any case, a person who understands electricity should do it, otherwise you can run into problems.
Home comfort
How to make a phone stand? Convenient gadget from scrap materials
In our progressive times, it is difficult to meet a person who does not have a mobile phone. Even by sending a child to first grade, parents provide him with the necessary means of communication. We use modern mobs ...
Technologies
How to make a speaker for your phone - take your music with you
If you want to learn how to make a speaker for your phone with your own hands, then this guide is especially for you.
Hobby
How to make glasses for dolls quickly and beautifully
Recently, with the advent of amazing Monster High dolls on sale, most of the children who have such a toy are carried away creative process to come up with all sorts of things for a full-fledged game with a new object ...
Hobby
How to make a kitchen for Barbie and Monster High dolls?
Play dolls up to 35 centimeters tall are today one of the most popular toys for girls around the world. On sale you can find not only whole doll families for every taste and budget, but also various a ...
Hobby
How to make DIY phone cases
Mobile phones are not uncommon today, they are just a necessity. The modern world simply cannot exist without various devices that help to communicate at a distance. But whatever their technology ...
Hobby
How to make a phone case with your own hands: original ideas
It's hard to imagine, but some 10-15 years ago, a mobile phone in the hands aroused enthusiastic glances from others, because it was a real wonder. Today you will not surprise anyone with this useful device. However ...
Technologies
How to choose portable battery for phone. Portable chargers: prices and reviews
Along with increasing the functionality and performance of mobile phones, the requirements for batteries are also increasing. A typical battery is capable of providing operation of the device for 2-3 days, but if ...
Business
Quail food: composition, rate, recipe and price. How to make food for quails with your own hands?
For many, their own private farm has become a symbol of their own vegetables and fruits, which allow them to diversify their table with fresh and organic products. Some breed chickens, geese and ducks to ...
home and family
How to make toys for a parrot with your own hands: a review of ideas, master classes and recommendations
Everyone who has a parrot knows firsthand how restless and curious these motley birds are. That is why it is very important to come up with as many interesting activities for them as possible. If you don't, och ...
home and family
How to make a rabbit enclosure: detailed instructions, drawings and recommendations
Charging a mobile phone from a battery with your own hands
In one of the schemes reviewed on the Internet called charging a mobile phone from a finger battery, many drawbacks were given. And the proposed scheme, taking into account everything, is considered further, and appearance it is shown in this picture on the left.
This scheme offers:
1) High stability of work
2) Low consumption
3) High efficiency of the converter
4) Works in a wide range of input voltages
The output current of the circuit reaches 350mA! This allows you to charge your mobile phone like a standard charger.
Device diagram- charging from a finger-type battery:
The circuit uses a storage choke, which was taken from a digital car radio. The choke can be wound on a ring from energy saving lamps. They wind 15 turns with a wire of 0.3-0.6 mm, the wire must be stretched along the entire ring.
Transistors - were selected through experiments, so transistors with the lowest opening voltage were selected, this made it possible to create a circuit that starts working from a voltage of 0.55 volts! The output voltage remains stable even if the input voltage is raised to 1.5-2 volts. This function of the converter allows the use of 1.2 volt nickel batteries as a power source. This is the main reason for the creation of such a device, since factory field chargers cannot work from 1.2 volts, they need a 1.5 volt battery to work, and as we know they cannot work for a long time, periodic replacements are needed.
DIY portable USB phone charger
Of course, you can use Duracell type batteries, but they are quite expensive. In the same device, you can use finger-type batteries, which can be charged.
Charging time, depending on the capacity of the battery used, batteries are 1.2 volts.
600mA / h - 35 min
850mA / h - 45 min
1000mA / h - 1h
1500mA / h - 1.5h
2000mA / h - 2h
2200mA / h - 2h 15min
3000mA / h - about 3h
3300mA / - more than 3h 15 min
Zener diode - any for a voltage of 5 - 6 volts, if you are too lazy to buy, then you can evaporate from any impulse power supply unit, for example, a power supply unit from a DVD player. All other components can be found in the attic or bought; in general, the cost of manufacturing such a device does not exceed $ 2. As a result, you get an autonomous charger, the characteristics of which are many times better than similar factory devices.
Program format board LAY
I wonder what the Siemens charger (power supply) consists of and whether it is possible to repair it yourself in case of a breakdown.

First, the block needs to be disassembled. Judging by the seams on the case, this unit is not intended for disassembly, therefore, the thing is disposable and there is no need to pin high hopes in the event of a breakdown.

I had to literally raskurochit the case of the charger, it consists of two tightly glued parts.

Inside is a primitive board and a few details. Interestingly, the board is not soldered to the 220V plug, but is attached to it with a pair of pins. In rare cases, these contacts can oxidize and lose contact, and you think that the block has broken. But the thickness of the wires going to the mobile phone connector pleased me pleasantly, you don't often find a normal wire in disposable devices, usually it's so thin that it's scary to even touch it).
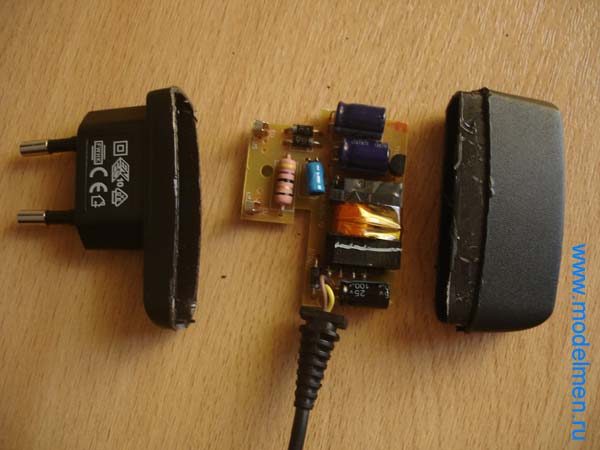
There were several details on the back of the board, the circuit turned out to be not so simple, but still it is not so complicated that it would not be possible to fix it yourself.

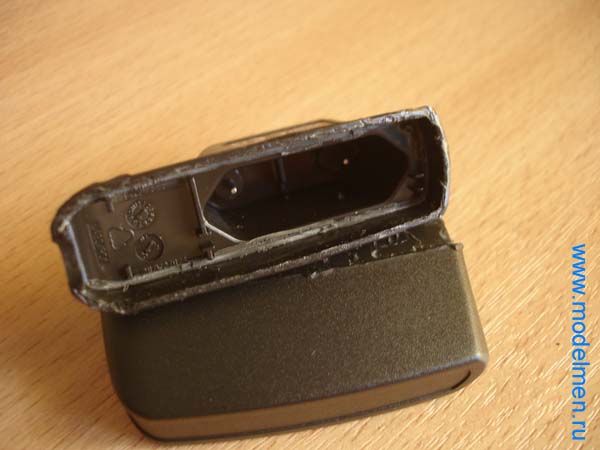
Below in the photo are the contacts of the inside of the case.
There is no step-down transformer in the charger circuit; an ordinary resistor plays its role. Then, as usual, a couple of rectifying diodes, a pair of capacitors for rectifying the current, then a choke and finally a zener diode with a capacitor complete the chain and output the reduced voltage to a wire with a connector to a mobile phone.

The connector has only two pins.

If such a charger breaks down, first of all, pay attention to the appearance of the parts, often only by appearance it is possible to determine which part is out of order.
How to make a phone charger
Inspect the throttle carefully, it has a very thin wire and it can simply burst. If you cannot identify anything by eye, and you yourself do not understand anything in electronics, ask those in the know to check the details with a tester. If the power supply cannot be repaired at all, then you can assemble your circuit much easier, and if you use a step-down transformer in the circuit, as is done in branded memory from mobile Nokia phones, then the problems with breakdowns will disappear for a long time. And finally, the easiest way to fix this charger is to buy a new one 🙂