It happens that the time comes when the print quality on inkjet printers leaves much to be desired, and all due to the fact that various defects appear on the paper that interfere with normal work... Firstly, you can start to notice the stripes, they can be narrow or wide, and monochromatic or multi-colored.
There are several reasons why the printer can issue such actions. But most frequent problem, it is customary to consider the wear of parts, it happens that the printing mechanism becomes dirty, we will deal with this in this article, starting in order.
Inkjet printer problems.
Reasons for stripe printing:
The main problems that arise when printing on an inkjet printer are as follows:
- Out of ink ink.
- Ink drying has occurred in the print head.
- The print head contains a lot of air.
- The loop is out of order, or in general the print head is in a faulty state.
Let's see how you can fix these problems.
Elimination of possible problems.
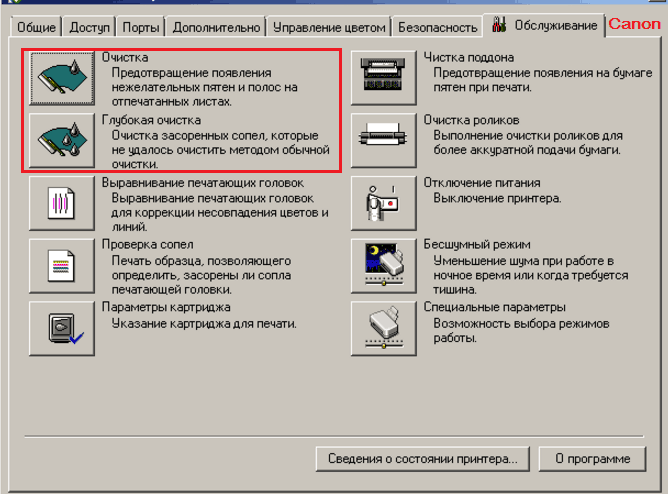
1) Checking the ink levels in the cartridge. This is a common problem, which is not so difficult to deal with. You need to run the official utility that comes on the disc when you buy the printer. Open the section titled "Service".

Run a check on the ink level in the cartridge.

Thus, the tab with the ink level of a printer such as HP, EPSON will look like.

When the ink has approached the zero mark, then you need to either refuel or get a new cartridge.
2) Cleaning the print head.
The printheads can be located either in the cartridge or on the device (printer) itself. If the head is located on the cartridge, then you can simply replace it, but if replacement is an inappropriate way out, then you can try to solve the difficulty that has arisen by the usual process of cleaning the head. This process can be done independently at home.
Shove into printer tray clear sheet paper, on the computer run the official application from the device, and select the tab with the name "Service". Perform two operations: "Cleaning the print head", "Checking the nozzles". Each printer has a different control panel interface, but it is quite easy to find the necessary items.


Having decided to carry out such an operation, it is recommended to do everything several times to achieve better effect... Dry ink can be removed using a chemical called "Mister Muscle".
If you use continuous ink supply (CISS), you do not need to sound the alarm right away, it is better to first check if the tubes are connected correctly and if they are not dirty.
Using the printer very rarely, it is recommended to turn it on for preventive maintenance at least once a week, thereby preventing the ink inside it from drying out. Usually, cleaning the printer's head really does help to deal with the lane printing problem.

3) You need to make sure that the print head is in working condition. It happens that after cleaning and doing other manipulations, the result is one, and it is very deplorable, in this case you accidentally need to check the operation of this print head.
It often happens that a minor breakdown occurs, leading to dire consequences. Problems often occur when the cartridge is not removed correctly from the device, and this leads to the formation of malfunctions in some parts of the parts.
It is quite easy to fix the problem with the print head if you have a printer from HP or Canon, and all because, as mentioned earlier, the print head is located inside the cartridge, and it is easy to replace.

Now, if a similar problem arose with an Epson printer, then things will be much worse, you will have to contact the service, because you cannot fix the problem on your own.
The laser printer began to print in stripes, what could be the malfunctions and the reasons for their occurrence?
It turned out that now, when laser printing, you can also often observe stripes, and the problems may lie in the following points:
Toner is low.
- The cartridge is leaking.
- The waste toner hopper is overfilled.
- The drum unit has been damaged and must be replaced.
- The metering blade has not been correctly installed.
- The magnetic shaft of the device has been hit by a foreign object or is in a malfunctioning state.
- The contact between the magnetic roller and the drum unit has been broken.
How to fix such problems. Suppose the streaks appear frequently, but in different places.

If the streaks appear constantly during printing, but their location changes, you should check the cartridge. First, we take it out of the device and check if it is securely closed. Provided that nothing comes out, you need to replace the cartridge with a new one, since there will be no more output.
The stripes are made up of small dots.

Often a similar problem can arise in such a case when the cartridge was refilled. It turned out that it often happens that the hopper, which collects paint waste, overflows, and for this reason, it needs to be cleaned, otherwise the consequences may not be good, because you have to buy a new cartridge or the entire device as a whole.
Poorly printed streaks on the document.

This problem occurs when the toner runs out, and even when a foreign object, such as a paper clip or a screw, enters the printer shaft.
Provided that a strip forms on the sheet, and it is located on both sides, then you need to think about the fact that:
The drum unit could be damaged, or some of its component parts were worn out. Everyone understands perfectly well that it is the drum unit that is responsible for many functions before the actual printing of the document. It turned out that with prolonged use, this drum is erased, and it needs to be replaced from time to time.
Horizontal stripes equidistant from each other.
This indicates that there is poor contact between the magnetic roller and the drum unit. Often this can be due to spilled toner, or due to an overfilled ink waste bin, and it also happens that a poor-quality refill of the cartridge can be the culprit of all problems. Having coped with this problem, a person can safely start printing the documents he needs in his work. The printer is used by many people in modern conditions, this device has become an indispensable part for every representative of society. Because of persistent problems with print quality, sometimes you want to give up everything, but now there is a way to solve all the problems that arise, just follow the instructions.
The strip is white, the strip is gray ... but what, the striped pattern looks good! I’m ready to agree if it only referred to a cat or a mattress, and not to a printed image: the stripes are definitely not “to his face” for him. Banding during printing is not a decoration, but a serious defect that needs to be eliminated, because it will not go away on its own.
Sooner or later, it begins to "strip". But this does not mean that it is over and it is time to save money for a new one. Very often the problem is solved in an elementary way. However, let's not get ahead of ourselves: I propose to first talk about the reasons why the printer prints in stripes, and then - about the methods of eliminating the defect.
If the inkjet printer prints stripes
Possible reasons
- One or more of the ink cartridges are low on ink.
- Due to prolonged non-use, ink has clotted inside the print head.
- Air has entered the print head.
- Air holes of cartridges or CISS are partially blocked.
- The ink plume of the CISS is pinched.
- The head or its loop is out of order.
- Encoder elements (tape, sensor) are dirty or damaged - the device that positions the printing system on a sheet of paper.
Algorithm for resolving the problem
First of all, make sure that the cartridges have ink. If their level has dropped below the minimum, the cartridges must be refilled or replaced.To determine how approximately full the ink tanks are, run your printer's management utility and select " Checking ink levels"(In English versions - Ink Levels).

Alternatively, find this option through the control panel on the printer itself. The result will be shown on the display of the device.
Just take a look at the colorant containers. Only after making sure that it is enough, proceed to further actions.
If you long time did not print, the problem most likely lies in the drying out of the head - clogging of the ink mass of individual nozzles (holes through which the ink comes out). There are models of printers for which a long time is 1-2 days, but for the bulk of devices this time is 1-3 weeks.
Modern printers and MFPs are able to clean the printhead holes on their own (using the driver or the device itself). The cleaning option is available through the proprietary utility or the printer control panel.
In the control and configuration program, it is called " Cleaning the cartridge»(Cleaning cartridge):

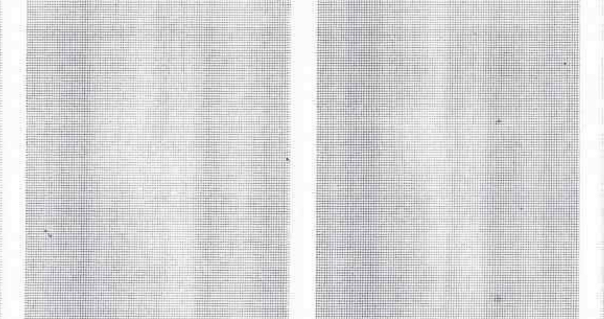
Epson - " Cleaning the print head"(Cleaning printhead). Beforehand, you can do a nozzle check. If they are clogged, you will see this in the print.

Canon calls the option simply - “ Cleaning"(Cleaning) and" Deep cleaning"(Deep cleaning).
The cleaning procedure can be repeated 2-3 times in a row. After about an hour or two, the device will be ready for use.
To free the nozzles (nozzles) from dried ink, most of the printers are equipped with a special pump, but the cheapest models do not have it. And the above method simply does not work for them. In such cases, brutal methods such as soaking and rinsing the head in a cleaning liquid or printing with a cleaning liquid poured into an inkwell help out. To apply the first method, the head must be removable (such as on Canon printers and older Epson) or built into the cartridge (as on HP and Lexmark).
The soaking procedure consists in immersing the head in a heated cleaning liquid and leaving it in it for 1-3 days. It is important to ensure that the solution does not dry out (it evaporates easily) and does not get on the contacts and electronic components devices so that they do not corrode. After softening the paint clots, they are carefully washed off by pouring liquid from a syringe.
Soaking and rinsing will reduce the life of the print head. As a rule, it does not withstand more than three such procedures, so it is advisable not to allow strong drying out. For prophylaxis, just turn on the printer once every 1-2 weeks (when turned on, the device cleans the nozzles by itself, preparing it for work). By the way, for the most budgetary (no-pump) models, just inclusion is not enough - you will have to print a test page on them every time.
It is especially important not to allow the head to dry out on Epson printers... For them, this part is inseparable from the apparatus and is very expensive. So much so that its failure is tantamount to failure of the entire printer. Repair in such cases is not economically feasible.
If you recently removed the cartridges, an air lock could be the cause of the streaking. Most often, it can be removed by cleaning the nozzles. programmatically(via utility). In refractory cases, pumping the system with a syringe helps.
The appearance of white unprinted stripes on paper, especially with displacement of image details, is sometimes the result of contamination of the encoder tape (a translucent film with markings located along the carriage). To solve the problem, simply open the printer cover and wipe the tape with a lint-free cloth dampened with a cleaning solution. After it dries, the device is ready for use.
This is how the encoder tape looks like:

The remaining cases (fortunately, there are not many of them) are hardware failures. Failure of print heads and their loops (Epson feed), sensors and encoder strips is solved by replacing the defective part.
If the laser or LED printer "strips"
Streaks on LED and laser prints can be caused by problems with the cartridge, thermal transfer system (stove), or the optical unit of the printer itself.Ink cartridge problems
- Toner is almost empty.
- Toner spills out of the bottle due to a loose seal.
- The waste bunker is overfilled.
- A foreign object has fallen into the cartridge.
- The photodrum is damaged or worn out - an element of the cartridge in the form of a cylinder, on which, under the influence of laser or LED illumination, the toner adheres and is already transferred from it to the paper.
- The drum cleaning blade (squeegee) is damaged.
- The magnetic roller is damaged or worn out - an element that charges toner particles, due to which the latter adhere to the illuminated areas of the drum.
- The magnetic roller is not making full contact with the drum unit.
- The toner metering blade is not properly attached to remove excess toner from the magnetic roller.
- The sealing elements of the drum and magnetic shaft are damaged.
- Defective joints, mechanical parts and other parts of the cartridge.
Dye adhesion problems on paper are usually caused by damage or wear to the heater and pressure rolls of the stove.
Problems with optics are often associated not with a defect, but with contamination of the latter by spilled toner or dust.
How to determine the cause of a malfunction from the print
Listed below are the most likely causes of the defects shown in the pictures. I found it impossible to take into account absolutely everything because of the design differences between printers of different brands and models.Vertical light (unprinted) stripe closer to the center of the sheet usually appears when toner is low. The less is left, the wider the band and the fainter the print. If there is enough toner, the defect could be caused by a malfunction in the toner supply system.
What to do: refill or replace the cartridge.

Stripes consist of dark (colored) dots scattered throughout the sheet. Appear in different places with each print... This happens after refilling the cartridge, when part of the toner spills out, or from an overflow of the waste buffer.
What to do: clean the cartridge, make sure it is sealed. Remove dirt from the buffer.

Stripes run along the sheet and have blurred edges... This also usually happens due to buffer overflows, as well as foreign objects entering the cartridge, damage or wear of the squeegee.
What to do: clean the cartridge, empty the buffer, replace the damaged unit.

A narrow, unprinted strip with clear edges along the sheet. Light stripes in the form of thin lines. Typically, toner does not land on a specific area of the sheet due to an obstacle. The culprit is usually a foreign body (paper clips, coins, crumbs, etc.) between the magnetic roller and the cleaning blade.
What to do: remove foreign body.
Fuzzy dark stripes stretch across the sheet. The most common reason for this is wear on the magnetic shaft.
What to do: replace the defective unit or the entire cartridge.

A dark stripe with repeating elements is located on one or both edges of the sheet. The problem arises from a defect in the surface of the drum, magnetic roller, or fusing rollers. You can identify the culprit in the following way: place a sheet of paper in the printer and send a print job. When it is halfway gripped, turn off the printer and remove the paper. If there are no streaks on the print, the problem is in the fusing system (fuser). If available, in a cartridge.
What to do: replace the defective unit.

Irregular stripes fill the entire sheet with the background. Possible reasons: The cartridge is filled with poor quality toner, the magnetic roller is not cleaned well, the optical system is dirty.
What to do: replace toner, clean cartridge, clean printer optics. Check the position of the dispensing blade.

Clear transverse stripes are equally spaced... Sources of the problem: disruption of the contact between the magnetic roller and the drum due to spilled toner, damage to the squeegee, overflow of the waste buffer.
What to do: clean the cartridge, make sure it is tight, empty the buffer, replace the faulty unit.

Frequent narrow transverse stripes usually occur due to contamination of the optical system.
What to do: clean optics.

Overlays and repetitions of a fragment of the print along the sheet are a typical malfunction of the primary charge roller - an element that ionizes the drum surface.
What to do: clean the roller contact, if it does not help, replace it.

I repeat once again that the list does not take into account the individual characteristics of printers of different brands. So, it makes sense for Xerox or Samsung owners to skip the advice to clean the waste buffer, since they do not have one, and happy owners of HP and Canon should start with this. It is also useful to visit the official website and forums where your model is discussed - there is often information about typical printing defects and methods of their elimination. In addition to this article, it will greatly facilitate your diagnosis and speed up the resolution of the problem.
Zebra leaf: why the printer prints in stripes and how to fix it updated: March 24, 2017 by the author: Johnny Mnemonic
Computer users may encounter a problem when streaks appear on printed sheets. In this article, we will answer the questions why the printer prints in stripes and what to do to fix this problem.
Let's take a look at the very essence of why the printer prints in stripes. First of all, the problem is with the ink or the print head. And depending on the nature of the defects, you can determine the root cause of the error.
The most common reasons
Let's take a look at the main reasons why a color laser printer prints in stripes and what to do in this case:
- Try checking the ink levels. In order to do this, in the device maintenance settings, run Checking ink / toner... If the level approaches a critical level, refill the toner.

Sometimes, when the device is idle for a long time without printing, it may need to be cleaned. What to do in this case? There is a "Cleaning" item in the device settings, which will allow you to clean up and solve the problem.

What problems do users face and how to solve them?
Let's analyze the most common situations associated with the appearance of defects in printing documents, and what to do with them:
- the most common problem is white streaks that get bigger when printed. This is the simplest and most "harmless" option - little toner. If you print more than once, toner runs out and a shortage of toner affects print quality.

Important! Someone advises to shake the cartridge vigorously so that the toner is evenly distributed throughout the shaft. This can allow you to print another 10-20 pages, but this should be done only in extreme cases, since the toner is already running out and subjecting the cartridge to such tests, you shorten its life. If streaking starts to appear during printing, it is best to refill with toner.
- Also, sometimes there is such a problem that after refilling the cartridge the printer prints in stripes, what should I do in this case? First you need to check if there is enough toner or, on the contrary, if there is an excess of toner or if the toner buffer is not full.
To solve this problem, clean the cartridge, remove excess toner from the buffer.
- When the printer prints with a black stripe along the edge (side) All owners of devices with such a malfunction want to know what to do with this problem. This situation occurs with frequent and prolonged printing. The cause of this malfunction is the deterioration of the drum unit. And simple cleaning won't help here.

The solution is to replace the drum unit or cartridge as a whole.
- Wide strip across the entire sheet or gray sheet occurs when the toner buffer is full. When the buffer is full, the excess can spill out during printing, so you should always clean it when refilling the cartridge. Also, such a problem can occur when a foreign object hits the metering blade - as a result of which more toner is supplied to the print than necessary.
Solution: clean the buffer, check the metering blade for foreign matter.
- Vertical stripes all over the sheet. If they appear every time in a new way, then most often this means a cartridge leak.

Solution: Check cartridge and seals for damage, cracks or gaps.
- It happens that the printer prints with spaces and horizontal stripes what to do in this case? Cause of black horizontal lines at the same distance from each other, there is the problem of the shaft and the drum, namely, the breakdown of contact between them.

Solution: From cleaning the waste buffer and refilling the cartridge, to replacing it. The specialist will be able to determine the cause of the error by the nature of the defects.
If these options did not help, then you can only help to answer the question why a Canon printer or any other brand prints in stripes. service center manufacturer - Canon, Epson, Samsung and others. Some problems can be identified only by getting acquainted with the contents of the device, for which you need to have the proper qualifications, so you will not be able to do anything yourself in such a situation.
Other reasons: cartridge, ink
Basically, all of the above problems were related to laser printers. Let us also analyze why inkjet printer prints in white stripes and what to do in this case.
The principle of operation of inkjet and laser printers is significantly different. At the moment, inkjet is significantly inferior to laser and CISS (Continuous Ink Supply System), in price, speed, resource and other characteristics. But not all users have changed their devices to more modern ones, some do not need it.
Common causes of defects for inkjet printer:

- Lack of ink
- The ink has dried
- The tightness of the cartridge is broken
- Malfunction of the print head
Solutions:
- First, you need to make sure that everything is in order with the cartridge - check the ink level, make sure it is intact.
- Check and clean the print head. In the printer settings go to the "Service" or "Service" tab and select "Cleaning the Print Head".
Have a great day!
Why does the printer print in stripes? Everyone puts his own meaning into this question: some have stripes always in one place, others have them chaotically, others have them red, fourth have black, fifth complain about white, etc. They can also be vertical or horizontal. Everyone has their own, so let's look at the main reasons in order.
If the stripes are always in different places
When the printer prints so that the stripes on each printed sheet are randomly, in different places, then the problem is 90% of the broken integrity / tightness of the cartridge. In other words, toner is scattered. It is easy to check it yourself (if you are not afraid to get dirty) take out the cartridge and start ... shaking it. Dirty? Bring it to the master, it is likely that the problem is easily solvable.
The black stripes are always in the same place.
I see two explanations for this.
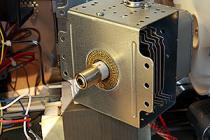
1. If the printer is old (3-5 years old), then it shaft could well become unusable, this is due to the usual obsolescence of technology.
2. Again, the shaft, but it could be deformed due to foreign objects: for example, paper clips, buttons, seeds, etc. After all, the material from which it is made is ordinary rubber, which, you see, cannot boast of great resistance. What would you imagine what it is - I give a screenshot:

Horizontal stripes.
We do a nozzle check, see what colors are stripes, calibrate the print head.
This will help the program Print head alignment
After installation, we make sure that there are no printing errors,
load A4 paper into the printer,
Click on the printer icon (in the taskbar) and select the appropriate. item "rint Head Alignment"
Vertical stripes.
If the result is the same as in the picture, try cleaning the DUZ.
 In epson, this is done programmatically, in the settings, the “service” tab, the cleaning function. 3-4 times is enough. Sometimes this is not enough, so get ready to work with your hands, or, which is easier, take the printer to the SC.
The stripes are located at the edges
It doesn't matter if it's on the left or right. This is due to the worn-out drum unit. The problem is solved by replacing it, it is also necessary to clean the cartridge.
General algorithm of actions
In case of any printing problems, first of all always check the printhead, if cleaning does not help (software), check the nozzles, clean them. If this did not work either, sin on the cartridge, or on the broken head, the latter is the saddest.
White streaks are visible when printed on the printer.
Most printer owners have experienced this. The reason is prosaic - the paint runs out.
V average one cartridge is enough for 1200-1400 pages.
If you need to print something extremely urgent, shaking the cartridge will help. Literally. But I do not recommend doing this often. the drum unit wears out faster.
Interesting on the blog:
Devices for printing documents, otherwise called printers, is a technique that is already installed in almost any home and in every office, educational institution. Any mechanism can work for a very long time and not break down, or it can show the first defects after some time.
The most common problem is stripe printing. Sometimes they turn a blind eye to such a problem if it does not interfere. educational process or document flow within the company. However, such a problem can create problems and must be dealt with. Only in different cases this is done individually.
This problem is not typical for printers of this type, but on equipment that is many years old, damage can occur, leading to the formation of streaks on the sheet. But there are other reasons that need to be dealt with in detail.
Reason 1: Ink level
If we talk about inkjet printers, then first, the ink level is checked. In general, this is the least expensive procedure both in time and financially. Moreover, you do not need to take out the cartridge, you just need to run a special utility, which should be bundled with the main device. Most often it is located on disk. Such a utility easily shows how much paint is left and whether this can lead to streaks on the sheet.
When the level is zero or close to it, you need to think about the time to change the cartridge. Refueling also helps, which is much cheaper, especially if you do it yourself.

It is worth noting that there are printers that have a continuous ink supply system installed. This is done most often by the user himself, so the utility from the manufacturer will not show anything at all. However, here you can just look at the flasks - they are absolutely transparent and allow you to understand if there is ink there. You should also check all tubing for damage or clogging.
Cause 2: Clogged printhead
From the title of the subtitle, one might think that this method involves disassembling the printer into its constituent elements, which cannot be done without professional skills. Yes and no. On the one hand, manufacturers of inkjet printers have foreseen this problem, since drying out of ink is a natural thing, and have created a utility that will help eliminate this. On the other hand, it simply may not help, and then you will have to disassemble the device.
So, the utility. Almost every manufacturer produces proprietary software that can clean the print head and nozzles - elements that get clogged due to infrequent use of the printer. And to prevent the user from manually cleaning them all the time, they created a hardware alternative that does the same job using ink from a cartridge.

It is not necessary to delve into the principle of operation. You just need to open software your printer and select one of the suggested procedures there. You can do both, it will not be superfluous.
It is worth noting that such a procedure has to be done quite often, and sometimes several times per approach. After it, the printer needs to stand without work for at least an hour. If nothing has changed, then it is best to resort to the help of professionals, since manual cleaning of such elements may end financial losses comparable to the cost of a new printer.
Reason 3: Garbage on the encoder tape and disc
The stripes can be either black or white. Moreover, if the second option is repeated with the same frequency, then you need to think about the fact that dust or other dirt has got on the encoder tape, which interferes with the correct operation of the printer.

Window cleaner is often used to clean it. This is justified by the fact that it contains alcohol, which removes various clogs. However, it will be extremely difficult for an inexperienced user to perform such a procedure. You cannot get these parts and you will have to work directly on all the electrical parts of the device, which is very dangerous for him. In other words, if all methods have been tried, but the problem remains and its nature is similar to that described above, then it is best to contact a specialized service.
On this review possible problems associated with the appearance of streaks at the inkjet printer is over.
Laser printer
Printing with stripes on laser printer- this is a problem that arises sooner or later on almost every such device. There are a lot of problems that cause this behavior of technology. You need to understand the main ones so that it is clear if it is possible to restore the printer.
Cause 1: Damaged drum surface
The drum is a very important element, and it is from it that the laser is reflected during the printing process. Damage to the roll itself is almost impossible, but its surface, which is sensitive to radiation, often wears out and certain problems begin with the appearance of black stripes at the edges of the printed sheet. They are always the same, which makes it easy to identify the defective place.

By the way, the width of the strips shows how depleted the layer of this drum is. Do not ignore such manifestations of a problem, because these are not just black stripes, but an increased load on the cartridge, which can result in more serious consequences.
This layer can be restored, and many services even do this. However, the effectiveness of such a procedure is not high enough to neglect the usual replacement of the element, which is recommended in this case.
Reason 2: Poor contact between magnetic roller and drum
Another similar stripes, which can often be found on printed sheets, indicate a specific breakdown. Only in this case are they horizontal, and the reason for their occurrence can be practically anything. For example, an overfilled waste bin or a poorly filled cartridge. All of them are easy to analyze in order to understand whether they could be a consequence of such a problem.

If toner is not involved in this problem, then it is necessary to check the wear of the drum and the shaft itself. With frequent printer use over the years, this is the most likely outcome. As mentioned earlier, it is completely unjustified to repair such elements.
Reason 3: Low toner
The simplest element of the printer to replace is the cartridge. And if there is no computer special utility, you will notice that toner is missing by the white streaks along the printed sheet. It would be more correct to say that there are some remnants of material in the cartridge, but this is not enough to print even one page with high quality.

The solution to such a problem lies on the surface - replacing the cartridge or refilling the toner. Unlike previous defects, this situation can be resolved on your own.
Reason 4: Leaky cartridge
Cartridge problems are not limited to just a lack of toner in it. Sometimes the leaf can be overflowing from various kinds of stripes that always appear in different places. What happens to the printer at this moment? Obviously, toner just spills out while the sheet is being printed.

Taking out the cartridge and checking its tightness is not difficult. If the place of the rash is noticed, then you need to check if there is a possibility of fixing the problem. Maybe it's just a gum, then no difficulties should arise - you just need to replace it. In the case of a more serious problem, it's time to look for a new cartridge.
Reason 5: Waste bin overflow
What if a strip is found on the sheet that appears in the same place? Check waste bin. A competent technician will be sure to clean it of the remaining toner when refilling the cartridge. However, users often do not know about such a tool, so they do not carry out the appropriate procedure.
The solution is simple - to inspect the waste bin and the integrity of the squeegee, which shakes off the toner into a special compartment. It is very simple and anyone can perform such a procedure at home.
On this, the consideration of all relevant methods of self-repair can be completed, since the main problems have been considered.