Working on HDR explains in detail:
Photo merge HDR images
HDR image processing
Working with the tones of the image.
Image 1. The final result of the Photoshop HDR image.
In picture 1 you can see the final result of all the work we have done.
To see the full-size version, read the article and the bottom of the page.
You should now have quite a lot of the final image visually. You may want to touch here and there to be completely satisfied. Clone the elements you don't want to be in my case, a plastic bag caught in the reeds and using my firing tool, just skim around the edges of the rocks a little.
When you are completely satisfied, you need to keep it. Save on your computer wherever you want. Once you've done that, go back to your layers palette one last time. In the layer settings select "Smooth Image". You can now save your final image in whatever format you want to use.
Combining photos into HDR images
Process HDR creation images in Photoshop is pretty simple:
We press Merge to HDR… on the menu ( File> Automate> Merge to HDR…)
Click on the Browse button and select the images with which we will work with you (at least two images). The photos themselves can be, for example, or in JPEG format or in RAW.
We press OK and Photoshop will combine the selected photos automatically. This operation may take some time. If you decide to combine photos with high resolution, for example raw photos. (In my humble experience, this can take ½-3 hours to Intel Core 2 Duo 1.8GHz combining 14-bit 12MP raw photos.)
Congratulations if you've done it here, there has been a lot of information so far and this final piece won't be any different. Today we are going to search for the beast. This is not like processing a regular photo. A single photo can take less than 30 seconds to edit if you get most of it right in the camera.
What you will need to track
It depends on the image, how difficult it is, what problems it has or not, and how quickly you are in the position. Unfortunately, this is just the nature of the beast. Just be aware that these files are for practice only and cannot be used for commercial use or financial gain. If you want to follow exactly, there are several programs you will need. You don't need to buy them today. Just go to the companies' websites and download trial version each software package.
As soon as the merge is complete, you will immediately see a preview window, as in Figure 2. On the left side in front of you are your original photographs, in the center you will see HDR photo graph, on the right side is a histogram. The red check marks in the histogram represent the EV steps. A normal digital camera is capable of capturing 6-8 EVS of dynamic range. My HDR photo covers dynamic range almost 10EVs (Fig. 2). Thus, the dynamic range of more than one frame can be captured. In my example, an HDR image is created from 9 frames with an interval of 1EV. Some might think that 9 exposure is too funny. It is true that a dynamic range of 10EVs can be captured, even with as little as two frames, and the result will be of poor quality. I don't know if the fusion algorithms are HDR programs, but presumably they take the best parts of the photo and / or some average .. the difference between pixels in different shots, and therefore the noise is effectively reduced if there are at least a few exposures. Thus, several photographs with short exposure intervals are better than several photographs with long exposure intervals (at least the noise problem disappears). My example is a photo without noise, even in the darkest areas.
(One might be surprised that the slider is below the histogram. We only need it to see the impact on the HDR image. All HDR images remain unchanged, even when using the slider.)
Postal processing - final frontier
This should give you plenty of time to chat with each of them and decide if you want to buy it or not. Communication is the hardest and most important part of high dynamic range photography. But in my opinion, this is closer than blowing up the sky and clipping the shadows. The first step is obviously choosing a set of brackets to process. This set of brackets is a random image from my archives that hasn't gotten to processing yet. The dialog box will display several basic pieces of information that need to be defined in order to display the image.
Saving HDR image
After clicking OK in the HDR utility, our image will open normally in Photoshop. This is the first thing that we must keep. Our HDR photo should be saved in PSD or OpenEXR format for example. Personally, the author uses the OpenEXR format because sometimes you have to work in third-party programs(for example Photomatix) supporting HDR images.
These presets are lame and should not be considered for use. Let's move on to the sliders from top to bottom and try to demystify each of them as much as possible while trying to avoid turning this tutorial into a new encyclopedia video. The algorithms given here will do everything in their power to create completely open image with a nice little "bell curve" bar graph. Merging backgrounds will result in more realistic images with much darker darker and lighter lights. For this image we will use tone mapping as it is the most commonly used setting. Color saturation is where it gets dangerous. Don't be happy about this slider, it will suffer from rich images that will make even your own mother cringe before bending her teeth and saying, "This looks great!" Luminosity - This can also be called "brightness". The further to the right you move it, the brighter the image becomes. Be careful not to make it too bright. Micro contrast. This slider works in conjunction with light. The further, the more contrast Images. If you move both sliders on the right track, they almost cancel each other out. The contrast is good, too much is bad. Anti-aliasing is the most dangerous of all sliders. This is where the super-surreal, psychedelic, halogen-like mess of images is produced. Use this to tweak your histogram in the view and get rid of any clipping on the right side. Black dot. The same, but with the shadows on the left side of the histogram. Moving the gamma slider to the left will make the image darker and more saturated. Moving to the right will make it horrible. Temperature. Use this to warm up or cool down the image. Saturation Key Features - Pretty straightforward, controls saturation in highlights. Keep it in the middle most of the time. Various settings. Use this section to make small adjustments to your image if it still doesn't look quite right. Possibly a later tutorial on merging? ... To be honest, it probably looked like Part 6.
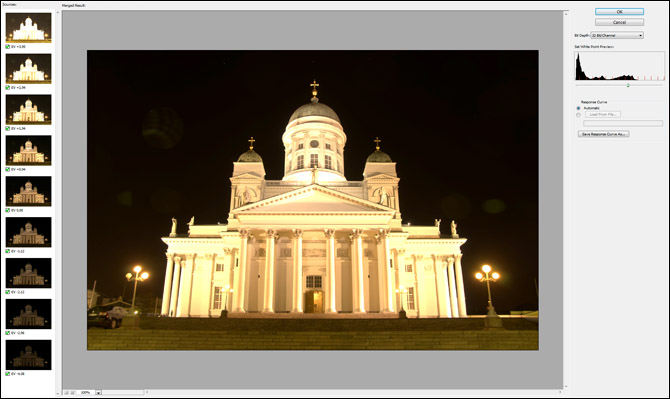
Image 2. Combine photos into HDR image.
Original HDR image in Photoshop
In Figure 3, you can see what the original HDR image looks like in Photoshop. Let's take a look at this image and see what else we are missing. There are several problems: yellow tint, perspective distortion, some barrel distortion, and distractions on the left side. My goal is to fix all these little things and create a high contrast and symmetrical photo and make the sky completely black.
Saturation too high
But who wants to wait much longer to get every step? There is simply no way to iterate over this information in a less verbose approach. The best way to fix these errors is to go to the original files. You don't have to bring them with you, just select them. When you process an image this way, there is no going back when you start merging layers together. So, for the original file you are currently masking, place a black mask over the image, pull out the brush while clicking, make sure you paint with white and start painting through the mask to reveal the layer below it.
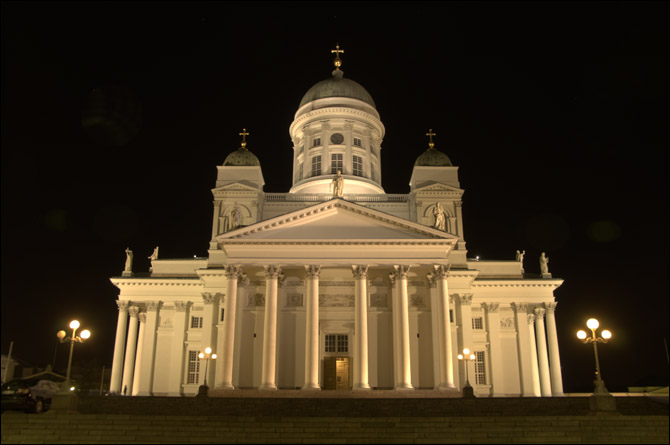
Image 3. Original HDR raw image in Photoshop
Basic cleaning
First, let's take a couple of steps to clean up and fix some issues. I adjusted the exposure slider (at the bottom of the HDR image) to about 4 EV. To see problem areas in the sky. My goal is to fully achieve the image when our sky is completely black. If you look at the image on the left (Figure 4), you will see some blurry spots in the image and some dots. I use the Clone Stamp tool and other clear background copying techniques to get rid of them (see picture on the left). After cleaning, some blemishes and imaginary reflections and glare disappeared from our sky, but the sky is still not black, we will deal with this later in the process of working with tones.
Masking allows you to select specific parts of a layer to display while hiding other parts of the same layer. If you place a white mask on top of a layer, everything on that layer will still appear, nothing will disappear. If you start painting on the layer mask with a black brush, every stroke you make will hide that part of the layer, revealing something below that layer. On the other hand, if you place a black mask over the image, you will cover the entire layer and fully reveal the layer below it. When you paint this black mask with a white brush, each stroke you make will reveal a layer with a mask above it. Good way to remember the disguise is this: Black hides while White reveals. It is a way of erasing parts of a layer without permanently erasing them. ... The top layer in this case is the original file with the best sky.
Image 4. Basic cleaning in Photoshop.
Perspective correction
Our next step is to correct the perspective. First, turn on the grid ( View> Show> Grid). Then use the perspective tool ( Edit> Transform> Perspective) to eliminate perspective distortion. After the correction, I unfortunately notice that we still have barrel distortions. The barrel distortion is somewhat more difficult to eliminate, but nevertheless it is also doable, it is enough to use the Warp tool ( Edit> Transform> Warp).
Automatic HDR shooting methods
Most of the time, this will be obvious when you have black or very dark clouds next to perfectly blue skies. In this case, it's a little trickier. There is little movement around the lines to the boat. There is also an unnatural color shift in the sky.
Subtle changes are what a great image can make or break, so don't be lazy here. In this case, it is not necessary to be an exact or exact mask. This mask also does not have to be super precise. Sometimes a halo adds a pleasant effect and a sense of movement towards the water. To do this, simply repeat the last step on the next layer. Note that some reds are darker than others. To change the opacity of the brush, just press the numeric key. With the brush selected, just press 5 for 50%, 9 for 90%, 2 for 20%, and so on.
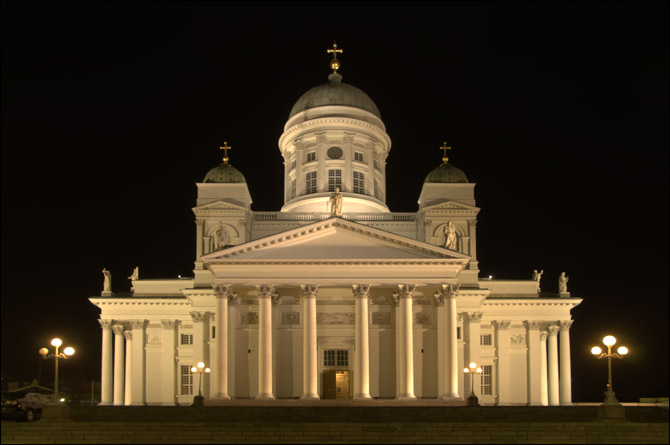
Image 5. Corrected perspective.
Removing unnecessary elements and creating symmetry
There are some elements in our photo that distract our attention, here they are in the lower left corner (image 5). Next, I will use the tool Clone stamp and other methods to clear them out of the corner. After I finished. We see that the photo is clearer, and the symmetry effect is stronger (Fig. 6).
If you want 56%, just press 5 and 6 very quickly. Now it's time to move on to the last layer, the original file for the boat. Well, not all images are the same. This image pulled more information from the original files than others. Therefore, for these masks there must be a background where the masks have black color. One of the last steps now is to remove dust spots and distractions from the image. For now, it's a good idea to go ahead and merge all the layers into one. This does not mean that we will lose the layers that we already have.
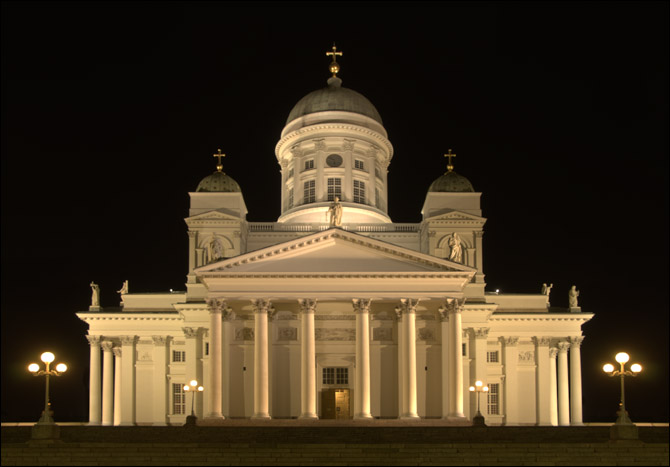
Image 6. Trifles and symmetry.
Removing yellow and red highlights
Now is the time to eliminate yellow / red highlights from HDR photography. Let's do this by applying Hue / Saturation in the hue and color settings of the image. I slightly reduced the saturation of the red and yellow colors (Fig. 7).
We are not merging the layers together. We create a new layer at the top with all the information from the layers we worked on. This will merge all the layers into one image at the top. Now we need to create a new blank layer to remove the spots. If you want to name the layer, name it “healing” or “spots” or something like that.
The All Layers swatch means that the brush will look at all the layers below to decide how it will hide the blur shown on the screen. Go ahead and combine the healing layer with the others so that Topaz has one image to work with. Now make sure the Combo Layer is selected at the top and get ready for some Topaz magic! This is where the image comes to life with detail, clarity and pop. It doesn't help much in a crazy look by adding some kind of butt to it. One thing you want to learn to avoid is to apply filters like this globally to the entire image.
![]()
Image 7. Yellow and red tones have been removed with the Hue / Saturation tool.
More Light and Less Light
In our photo, there are some very dark areas (top of the dome and stairs) and some very bright areas (bright stripes). I can tell right away that working on the correction of tones, at this stage, we will only worsen the picture. For example, in the process of adjusting the tone, working with a curve to darken the sky, we would ruin the domes, and the stairs. Likewise, when we started to light up the church, we would have spoiled the lights. The solution to this problem is to work with the brightness of individual areas, which we can do manually:
More light for the dome and stairs
change the exposure (+1.5) adjust the layer making the domes and stairs bright enough
fill the layer mask with black (to give an effect to the whole image)
Less light, softer than field
Make Exposure (-3) adjusting the layer so that the lights are softer.
Fill the mask with black (to give an effect to the whole image)
Go a little bit with a brush and white and create a mask, doing this to lighten the image (dome and stairs)
When there is too much detail and saturation throughout an image, viewers' eyes can become strained taking in so much. What you want to do is step back in some areas and use this texture and detail to guide the viewer's eyes to where you want them to go.
Place a white mask on top of the Topaz layer and paint the mask with black where the Topaz went overboard. One of the drawbacks of these filters is that they introduce a lot of noise into the resulting image. The sky is one of the most preliminary parts of the image to get noise, so I like to go up to the sky to see the noise. From there, simply select a noise filter that removes noise from the image.
In image 8, you can see how the image became after adjusting the exposure. The domes and staircases are lighter and the lights softer. Agree that our HDR photography became more beautiful. You can also do an exposure of +1.5 in dark areas without the fear of noise. (There is also a method of working with tones, in which initially we completely work in manual mode without affecting exposure settings, etc. However, in our example, we limited ourselves to minimal manual work.)
It is good practice to start low and work up to stronger filters. You want to get through with the smallest amount possible, because the higher you go, the more details you will lose. Any noise reduction filter will reduce detail to some extent, so you want to take care and remove the filter from certain parts of the image.
Noise reduction filters can be detrimental to things like text, distant objects, and closure details. When you're done here, that's pretty much it. There may be some small adjustments to be made here and there, but it doesn't really matter.
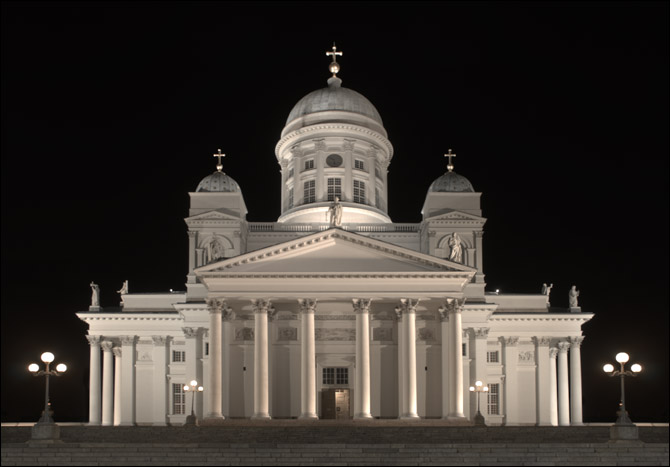
Image 8. The dome and staircase are lighter, and the lanterns are clearer and darker.
Working with tones
The image is now ready to work with tones. The author had to do many tone adjustments in Photoshop in order to achieve the best result. The reason for this is that when working on HDR photos, you can perform color correction without loss of information (due to the high dynamic range). I recommend doing all the color adjustments before working with tones, and also saving the images each time before you start working on tones.
In Photoshop, working with tones begins by converting an image to 8-bit or 16-bit:
Click on the menu: Image> Mode> 16 Bits / Channel... Then open the HDR conversion tool in Photoshop ( HDR Conversion tool).
There are four different methods of working with tones in Photoshop. I choose the method of adapting individual sections, as this is the only method that allows me to manually adjust the tone curves (click on the small arrow and adjust the tone curve).
In picture 9, you can see the HDR picture after working with the adaptation of individual areas.
Watch the full video here!
We've all seen it, but somehow we still come back to it. If you think there may be a slight offset between your frames, you can check the option to automatically align images. Then drag the Contrast slider to "50" and the Sharpness Kernel to 5 and increase the Vibration to "40".
We'll add a little orange to the highlights by setting the Hue to 40 and Saturation to 10 in the Highlight area and set the Hue to 340 and the Saturation to 10 in the Shading Separation area. Return to the Basic tab and reduce the overall exposure to -20.

Figure 9. adaptation of individual areas.
Partial Adaptation and Tone Curve
Take a look at photo 10. On the left, you see the default tone curve, which refers to image 9, and on the right, you can see the adjusted tone curve, the result of which you can see in image 11.
Wondering how to change the tone curve?
Well, let's take a look at the histogram in front of us. The steep peaks on the left are sky pixels, the middle peaks are church pixels. I want to achieve two things: a black sky and a nice and contrasting church. The curve in the right picture does just that. All pixels on the left side of the left panel are completely black. By moving the slider from right to left, we make the dark pixels lighter. The same adjustments can be made to a steep curve that equals high contrast.
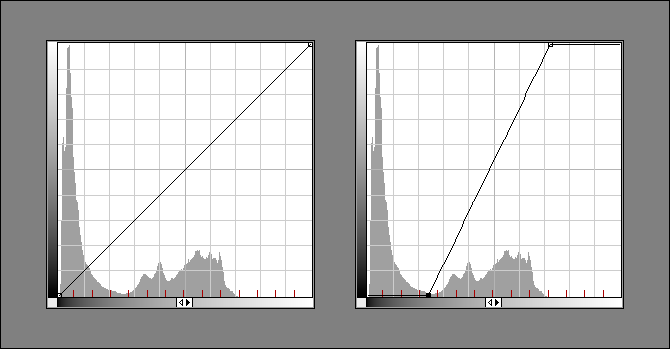
Image 10. Left: Initial position of the curve. Right: Tones adjusted for clear contrast.
In Figure 11, you can see the image after processing, but this is no longer an HDR image. This is only a 16-bit picture.
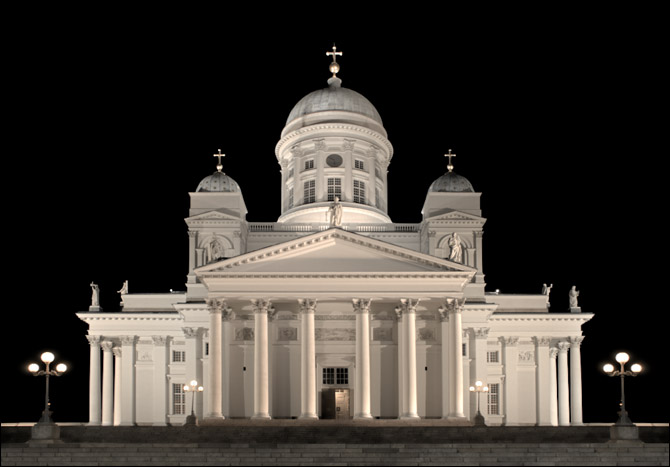
Image 11.16-bit image after conversion in Photoshop
Sharpness
Last but not least, we work with you with sharpness. Let's convert the image into a smart object and apply the Smart Sharpen filter to it. In the picture you can see 12 final processed photos.
Image 12.finished photo
This article is a translation of Mons
Original text: www.secondpicture.com/tutorials/photography/photoshop_hdr.html
More and more people ask me how I get such HDR photos and why I have such a strange "algorithm" of processing. I decided to make a separate topic in which I will try to answer these questions.
1. Theory
What is HDR and why is it needed?
HDR - High dynamic Range, or in Russian Wide Dynamic Coverage. Dynamic range measured in " exposure steps" (EV). An exposure shift of 1 EV means that the amount of light hitting the film or digital matrix is changed by 2 times. For example, if the shooting parameters calculated by the camera are equal to 1/50 sec (shutter speed) and f / 8 (aperture), then exposure compensation +1 eV will result in shooting at 1/25 sec and f / 8 in aperture priority mode or 1/50 sec. and f / 5.6 in shutter priority mode.
Very often I see photos with knocked out highlights and dropped shadows and almost always the authors of these photos claim that " so it was". The problem is that the dynamic range ( DD) of the human eye (the ability to see simultaneously details in both highlights and shadows) is (for different people in different ways) about 20 steps, which significantly exceeds the DD of sensors of digital cameras.
Sadly, but DD y Canon"s is a little behind Nikon"O. In principle, it is not" fatal "if you shoot several frames for HDR, which is usually done. But, having a camera with a wide DD, you can get a fairly high-quality pseudo-HDR from one frame and at least a couple of my last shots from Prague can serve as a confirmation of this.

Why do you need HDR? Then, so that the photo would be the same as the shot scene was seen by the eyes of the photographer, i.e. details were visible both in the lightest areas and in the darkest ones.
HDR "a has both fans and opponents ... some people like these photos, but some do not. In my opinion, high-quality HDR looks gorgeous! The undoubted master in this area is Trey ratcliff... By the way, from birth he is blind in one eye, but this does not bother him in any way!
HDR or not HDR - that is the question! If the scene being shot has a lot of contrast in highlights and shadows, then it makes sense to take several photos with different exposures for the HDR assembly. An example would be a city at night or abandoned buildings. If the dynamic range of the scene is not large, then HDR may be superfluous.
2. Practice
What is needed to create an HDR photo? Find an interesting spot and grab a tripod if handheld photography is difficult due to long shutter speeds. Many digital cameras can shoot the so-called Exposure Bracketing, which will allow you to shoot a series of frames with different shutter speeds, the first (depending on the camera settings) of which will be very dark, the middle will be normal and the last will be very light.
I read somewhere that for HDR image assembly programs it is desirable to have, say, 5 bracketing frames in one stop increments, rather than 3 frames, but in 2 stops. Since the exposure step on my D800 is 1EV, I usually shoot 5 bracketing frames.
For those who shoot on Nikon it might be interesting to watch a video on how to set up a camera that will shoot the entire bracketing series by itself with just one press of the shutter button. This trick is indispensable when shooting at long exposures at night - even if you shoot from a tripod, the constant pressure of your finger on the shutter release button at exposures of 20-30 seconds can lead to a slight shift / shake of the camera and a ruined frame.
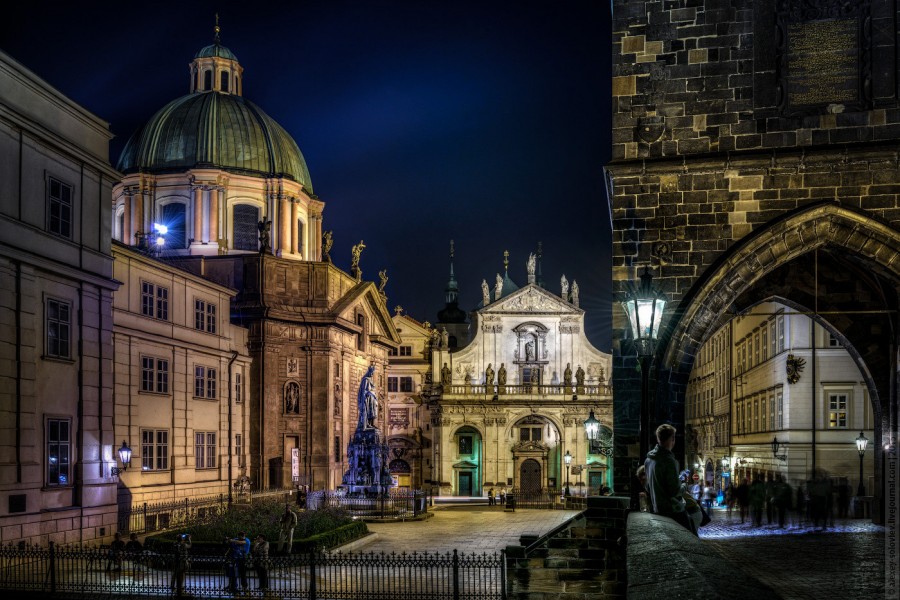
If the spread between light and shadow is large, then sometimes I shoot 9 frames in order to "capture" as much as possible useful information like in the next two photos.
3. Processing
For those who speak English, I would like to advise you to read the book, I have read a lot of interesting things in it. Concerning " Which build program should you use?"- I think many will agree that Photomatix Pro is the best. Photomatics can work independently or be a plugin for LightRoom"a and Aperture... A big plus of this program is the ability to use presets, of which there are a sufficient number in the open spaces Of the Internet.
I will try to describe my processing process step by step.
1) All RAW "s (if someone else shoots in JPEG" ah - drop this business and switch to RAW "s) I import into LightRoom;
2) and setting the same White Balance on all frames (sometimes there is a slight BB discrepancy);
3) Sometimes on some frames I move the Highlights & Shadows;
4) I send all frames to Fotomatiks. 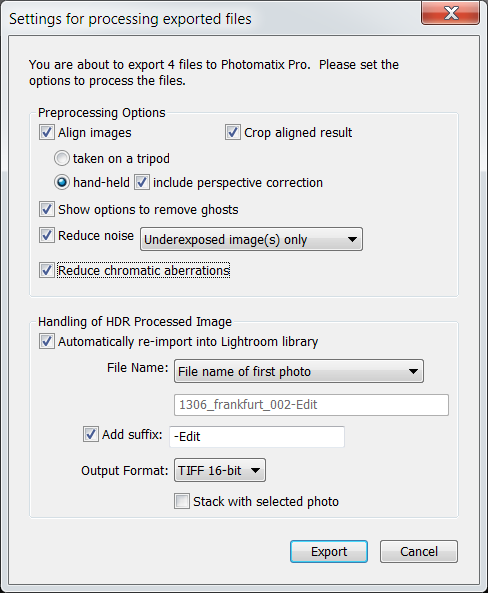
If HDR was made from several frames and there are moving objects, I control how well Photomatix "suppressed ghosts" (Ghost removal). There is an opportunity to manually indicate "problematic" areas and usually Photomatics "crushes ghosts" very well.
5) There I get a result that suits me, I save it. LightRoom automatically "catches" the result, which is almost immediately "sent" to Photoshop;
6) In Photoshop I clean various "garbage", correct geometry;
7) I use it very often Nik Color Efex Pro -> Tonal Contrast and Darken & lighten center;
8) I often apply noise reduction to the sky Nik Dfine;
9) Save and return to LightRoom;
10) "Adjustment brushes"in LightRoom" e are very powerful local correction tools. Therefore, almost always the final fine-tuning of the frame takes place in LightRoom "e using adjustment brushes in different modes(darkening, lightening, Highlights, Shadows, Clarity (both plus and minus), Sharpness and Noise). It's much easier for me to work with them than with adjustment layers and masks in Photoshop.
11) I export the resulting result (usually 1400pix in width), look at it and periodically find some flaws, return to LightRoom or Photoshop, fix them, export again, look and ... and often this process "I look-see-finish "can drag on for a long time, until everything suits me.
12) Very often I wait until the next day and very often the next day I finish something.
Well, this is my process of processing photos ;-)
4. Videos
This section will be of interest to those who are "friends" with English and those who want to "deepen" their knowledge of HDR. I highly recommend watching all the videos.
Happy HDR experiments to everyone !!!