In this article, I will show you how to change textures in the game using the TXD Workshop program.
So, first download this program: TXD Workshop.
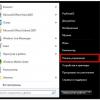
Now let's start. From the actions, we can open IMG and open TXD.
IMG is a file with many textures and models inside. In GTA SA, the main IMG is GTa3.img, located in the MODELS folder.
And TXD is a file only with textures, of which there may be a lot. For example, this is Particle.txd, also found in Models. It contains the textures of all the effects in the game.
Let's change some building.
To do this, click on the Open IMG button and select the GTA3.img file in the models folder.
Many files appear in the TXD Workshop window.

Files with a white icon are models, files with a drawing icon are textures.
The main problem is that it is quite difficult to find this or that texture, everything is mixed here.
In general, the top is San Fierro, in the middle is Las Venturas, and at the bottom is Los Santos. In between, there are textures of cars, trees, people, objects, etc.
Let's change the hospital near Grove Street.
Find this texture:

On the right are textures. Windows, doors, asphalt, etc.
For example, let's change the grass:

First you need to find the texture of the grass. You can just type grass in Google and click the pictures:

Or find a website with textures, for example, http://www.cgtextures.com/.
In general, find any picture.
Now that you've downloaded it, you need it to be in PNG format. Open it in a paint and save it in Png format. (Save As button).
Now in TXD Workshop click on the Import button above the picture and select the desired picture. By the way, you don't need to upload a picture larger than 2048 by 2048, otherwise, maybe, a crash that cannot be fixed in any way. So, downloaded. Click Save TXD. Everything, you can enter the game without turning off the program.

We go in, we go to the hospital. The lawn had to change there. If everything worked out, then great, if not, then repeat everything again.
That's all! Go for it! For example, change posters, make new ads on them to start with. And then do more and more complicated fashion.
Instructions
Take a ready-made texture pack to edit it. There are at least two options for you, which pack can be taken as a basis - available in the Minecraft directory or created by another player. Don't worry that you need some deep design knowledge and a lot of practical experience to work with a graphic editor. In reality, it will be enough that you have an idea of the main functions and tools of such a program.
Save the archive with the finished texture pack to any place on your computer where it will be convenient for you to work with it. Unpack its contents with an archiver to get access to documents with textures. Go there - and your eyes will open a lot of files and folders. Start with terrain.png - it contains the block textures. First, set the resolution that corresponds to your idea of how uniform the image should be in the game, as well as based on the power of your computer (if you choose, for example, 256x256, be prepared for the fact that the game may lag in the event of a lack of random access memory).
When opportunities graphic editor allow this, it is better to select the changes you make with a particular texture in a separate layer. This will make it easier for you to remove it if the conversion fails. In the editing itself, show all your bold imagination. Play with transparency, with different shades of colors. Make textures smoother and smoother by working on them with the appropriate tools (for example, a brush). Adjust the size of the latter to achieve the effect you need at a particular moment.
Make changes to other files and folders as well. Remember: mob is responsible for the textures of mobs, environment - for precipitation and clouds, gui - for the interface (by the way, there is an items.png file that defines appearance things when they are in your inventory), armor - armor, terrain - day and night stars, item - various items (like plates, boats, etc.), document kz.png in art - paintings, misc - everything else ... By referring to the first of the above folders, you will be able to transform beyond recognition those creatures that come across to you during the gameplay. In addition, you can set several different texture options for them, so that even mobs of the same type differ slightly in appearance.
Do not rename edited files or move them. This will help your texture pack display correctly. To finish working on your texture pack, go to the pack.txt and pack.png files to write a name for it and create some distinctive symbols for it (for example, the appearance of the cover). When you complete all the transformations, zip the folder (so that it differs from the original only in content). Save the finished archive in texturepacks in the Minecraft directory. Go to the game menu and select your pack as the main one.
In order to edit textures, you will need an image editor with support for transparency (paint will not work) and at least some basic knowledge of using this program. Of the most popular is photoshop, there is also gimp and many other programs.
If you already have a suitable program, then you need to take some texture as a basis. If you want to do everything from scratch, then you can take the standard textures: (Downloads: 2278)
Unpack the archive and get a folder with subfolders and pictures. Then you just need to find the corresponding picture and edit it.
Let's take a look at the folder structure and what you can find there:
| terrain.png | The most important file is block textures. Lies at the root |
| pack.png | The icon of your texture pack, which will appear in the list of texture packs in the game. |
| pack.txt | The signature of your texture pack, which will appear in the list of texture packs in the game. |
| ctm.png | File for combining blocks. For example, if you put 2 chests side by side, you get a double chest. Or glass connections. |
| particles.png | Particle textures. Lights, potion effects and other little things that float in the air. |
| achievement | A folder with textures for the interface and achievement icons. |
| armor | A folder with armor textures (chain - chain mail, cloth - leather, diamond - diamond, gold - gold, iron - iron). There is also a file witherarmor.png related to the Wither mob and power.png - the texture of the effect when you or the mob was struck by lightning. |
| art | The folder contains 1 file with picture textures. |
| environment | Folder with textures of clouds, rain, snow and lighting. |
| gui | The folder with the textures of the game interface, as well as the textures of items in items.png. |
| item | Few special items like arrows, minecarts, doors, chests. There is also a texture of experience balls (xporb.png). |
| misc | A folder of different textures: colors, day and night, lighting, water texture. |
| mob | Mob texture folder. |
| terrain | Moon and sun. |
| title | Logo and background in the menu. |
Don't be afraid to experiment!
And don't be afraid to use transparency. This is the only way to learn all the subtleties, this is the only way to learn how to make unique textures. Explore other people's creations you like and don't be afraid to experiment yourself!
For example, pictures can be made curly using transparency. You are not limited to a square border:

![]()
Or a zombie, like a player's textures, has a slot for a "hat", knowing this you can create interesting textures, for example, the following zombie texture is made:

But in reality it looks like this:

Higher resolution textures
To create textures of higher resolutions, you need to either take textures of the desired resolution as a basis or manually stretch standard textures to the desired resolution (for 32, stretch 2 times, for 64, 4 times, etc.). No further action is required.
Stretch should be done without using anti-aliasing, otherwise the resulting textures will be blurry (if you are going to redo everything, this is not particularly important), for example, in Photoshop, when resizing, you need to select the "By Neighboring Pixels" interpolation:

For Gimp you need to select "None" interpolation quality:

Then the view of the unchanged blocks will remain standard.
Random monsters
Can be done so that mobs can have different models. Not 100 zombies alike per face, but a motley crowd. For example, let's make random textures for zombies. To do this, draw as many zombie textures as we can and save them as "zombie.png", "zombie2.png", "zombie3.png" and so on. As a result, we get random textures for the zombies. This can be done with any mobs.