In the digital world, there are many tools that make our lives easier. In the last 10 years, since the beginning of the use of digital cameras, a question arose in image processing using a computer. And the main basics are saving images and processing them. All these image processing is done in the popular Photoshop program. For many, it will seem complicated and incomprehensible, but we made this process as simple and understandable as possible.
How to save a photo in Photoshop?
In this manual, we will consider three options for saving images using the Photoshop program:
1.
Normal saving as png, jpg, etc.
2.
Saving in PSD format (the format for saving the project, with which we can continue to work in the future).
3.
Saving for web devices (a method that allows you to reduce the size of the image).
I'll tell you a little before the options for saving images important information, which will be useful to you in the future:
The difference between png and jpg is that png allows you to save images with transparent background... Jpg format keeps transparent background areas in white. Example. If you want to save an image without a background, Jpg format will not work.
PSD is the format in which we can work with layers, texts, etc. If you work with projects (PSD) you can always save the image in any format.
Saving images for Web devices should be considered carefully. Any reduction in quality is displayed in the image. Unnecessarily, I advise you not to use this save option.
Let's get down to saving images.
1
... Open the Photoshop program.
2.
Click File -> Open. Select the image we need on the computer and click Open.
Option 1. Normal saving in jpg, png, etc. format.
1. Click File -> Save As ... We select the place where we want to save the image, write the name, select the format from the drop-down list (JPEG is the most convenient or another one that you need). Click Save.

2. Select the quality with the slider, the higher the quality, the larger the size. And click "OK".

Option 2. Saving the project in PSD format.

Now, at any time convenient for us, we can continue working with our project.
Option 3: Saving for Web Devices.
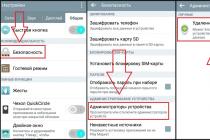
1. Click File -> Save for Web & Devices. Select the JPEG, GIF or PNG format from the drop-down list. Select Quality (quality level) using the slider.
Hello dear readers of the Start-Luck blog! Andrey Zenkov and my practical advice on web design. Today we will talk about the very keys without which your site will never open the door to the world of browser bookmarks (and it is so important for the user to mark favorite pages with an asterisk).
It will be, as you might have guessed, about images. Finding a bright photo on is only half the battle. After its processing, coloring, text overlay and other manipulations, the horizon is ripening new problem: how to save an image in photoshop?
Let's say you've created a pet website and are eager to add an extensive photo gallery. Bang - and you can't imagine a design without charming menu icons in the form of paw prints. And what about a section with funny animations that will cheer up website visitors?
With enthusiasm, you customize all the images, save and ... see that the effort is in vain. Pixels completely kill painstakingly created "legs", and you cannot look at pictures in motion without tears. Photoshop automatically moves to the list of programs to remove, and you make a promise to yourself to find a real craftsman. What for? You can do everything yourself, having learned the main secret that I always use.
Algorithm for saving images in optimal quality depends on their format. I do not want to go into details, talking about which are raster and which are vector. Moreover, you can change them in a couple of clicks. I already wrote about this in one of my articles, sharing with readers to change image formats.
Analyzing the sites that the Internet is rich in, I noticed one interesting detail: all graphic elements are represented by only a few universal formats, while the existence of others is completely forgotten. What are they?
The main groups of images in web design
Graphic content of sites is conventionally divided into three categories.
Collages and photos
They are characterized by JPG format- by the way, the most common on the web. These images are small in size, which allows you to use them in the design of the site without fear of slow page loading. For example, the same landscape saved in JPG and PNG differs significantly in weight:

Icons, buttons and banners
PNG is preferred for these design elements. It allows you to cut out the object and save the image without the background, using instead of it in the future the "background" of the site. I would also recommend this format for images that cannot boast a huge palette. For example, we create a document in Photoshop and - the name of the site:

We save the image in two formats and compare the result:

Animation
GIF is intended for creating animated images consisting of two or more layers. This can be done not only with Photoshop, but also. I would call this format the most capricious, because it is difficult to achieve good quality while saving in it. Fortunately, I have a life hack that will help you get animations with minimal pixelation. Intrigued? Read on!
Step-by-step instructions for saving images
Let's start with JPG: it is very easy to get a photo without loss of quality with it. To do this, click "File" - "Save As". If desired, you can use the Shift + Ctrl + S key combination:

In the window that appears, look for the drop-down list "Files of type" and select the line JPEG. It is usually the default:

In the same drop-down list, you can also select the PNG line, thereby simplifying your task. However, I recommend saving images with a transparent background differently.

Examine the window that opens. Your task is to make sure that PNG-24 is selected in the drop-down list, and there are ticks next to the "Transparency" and "Interlaced" lines:

Please note: the last checkbox reduces the loading time of the image on the site, but at the same time increases its weight. If this does not bother you, click "Save". In the window that appears, select the file path and press the coveted button again to get the PNG image and upload it to the site as soon as possible!
The animation is saved through the same menu item, but now you need to select the GIF option in the drop-down list. A huge number of parameters and incomprehensible words can cause confusion or even fear. Not worth it! Just set the options I use:

Summing up
Working with graphics requires constant improvement of skills, without getting stuck in one or two areas. How to be? At one time, it became a real find for me set of five mini-courses from the project "Photoshop-master". I learned more than one byte from them. useful information.

The material is submitted in an accessible form and free of charge. This is a great alternative to studying in computer academies and hours of searching for the right lessons on the Internet.
That's all. Don't forget to subscribe to VKontakte group and blog updates for a weekly portion of fresh and useful articles.
Andrey Zenkov was with you. Until next time!
09.11.2018 09.11.2018
When the work in Photoshop is ready it must be saved.
Depending on what task you are saving the file for, you need to choose the format. In this article, we will look at how to save and which file format to choose.
In what format should the file be saved?
PSD... This is the standard Photoshop file format. This is where you save your file so that you can continue working at any time. In PSD format, you cannot show your friends (parents, girlfriend, etc.) the photo or graphics that you drew. This format can only be opened with Photoshop.
Jpg... The format is great for photographs and other graphics. Before saving in Photoshop, you can optimize the saved Jpg file- this means you can adjust the image quality so that the file size suits you. The format can be opened on any computers and phones. Good decision to show photos to relatives, send graphics for work, save the background for the site, etc.
PNG image... Used mainly by designers for website graphics, online advertising (banners), graphics for mobile applications etc. The format is remarkable in that it supports transparency in the image. If you need to save the object on a transparent background, save it in PNG.
GIF... This format is used if you want to save the animation. For example, an animated banner, emoticon, short video, or sticker. Remember the well-known gifs walking on the Internet - this is exactly the format.
How to save to PSD
Give the file a name and choose PSD format (usually selected by default).

Be sure to make sure that there is a check mark on the parameter Layers... Otherwise, everything will not be saved and there will be no benefit from saving the file.
How to save to JPG
- Execute the command File - Save.
- Select format Jpg.

After that, a window will appear where you can configure the parameters of the saved file.

Here you can adjust the quality of the photo by setting the value Quality from 1 to 12.
Check the checkbox on the View parameter and you will see how the quality of the photo changes when you change the parameter Quality.
In addition, you can immediately see how much the file will weigh when you save it. The smaller the file, the faster you can send it over the Internet, the faster it will be loaded from another user. Remember that no one likes to wait a long time for photos to upload on the Internet, especially via a mobile phone.

A variation of the format is best left Progressive... Now we will not go into technical details, but this option is the most optimal.
You need to adjust the quality when saving so that the image does not suffer much, while the file weight is significantly reduced.
How to save to PNG
There is no need to save photos to PNG. Use this format if you need to save a high-quality picture with a transparent background.

A window with settings for the saved image will appear.

Choose the PNG-24 format - it will be a quality image with the lowest file weight and with all colors.
Check the box Transparency so that the picture has a transparent background.
Options - Interlaced and Built-in profile must be removed, because this is an extra and unnecessary load on the file.
 a picture with a transparent background saved in Photoshop
 How to save to GIF
Choose GIF format.

The GIF format seriously squeezes the image in colors and, accordingly, in the file weight. A maximum of 256 colors are available here.
Don't forget to check the box next to Transparency to have a transparent background, if needed.
Adaptive color model is the best when you need to keep in maximum quality.
Dithering I set it to 100%, in which case the gradient transitions are smoother.

If you have animation in a GIF, then you can adjust its number of repetitions. Usually put Repeatedly to make the animation endlessly repeatable.
Now you know how to save in Photoshop using the most popular formats. Still have questions? I invite you to comment.
Preparing any digital image readable graphic editor Adobe photoshop, whether it is a PSD file, a TIF image or a "large" JPEG image, for publication on a website, in a forum or social networks, as well as for shipment by e-mail... In other words, "japeg" for the Internet. It turned into a rhyme.
Of course, the image formats that Photoshop can read are hardly limited to these three. And what's nice is that most can be converted to JPEG. Regardless of the source format, there are two ways to "japegize" in Photoshop. The ability to choose is doubly pleasant. Both paths are different. External differences are revealed with the naked eye, the differences in the appointment ("Which way to follow?") I will highlight on purpose.
In this lesson, I will present two step by step instructions with the necessary theoretical "inclusions". It is designed to show you how to optimally save your virtual drawing, collage or photo in the widespread JPEG format. The latter is most effective for images with smooth color transitions.
To consolidate and expand the knowledge gained, as well as in order to develop a skill, I have prepared the appropriate exercises. I suggest you perform them, and then publish your results in the comments to this lesson. Try your skill in the "field"!
The first way
Step 1
Opening the original image in Photoshop. In my case, this is a file called "Example.psd" containing a drawn ball.
I press on the keyboard a combination of keys "Ctrl", "Shift" and the key, indicated by the Latin letter "S" or select in the main menu "File"> "Save As ..." ("Save As ..."). A dialog box titled "Save As" appears.
Step 2

I choose the location of the future JPEG image. In the field "File name" I enter a new name for the picture, if necessary. In the drop-down list "File type" select the format "JPEG (* .JPG, * .JPEG, * .JPE)".
I leave the parameters below unchanged, making sure that “standard” sRGB is specified and selected as the color profile to be embedded in the future JPEG image. If so, then proceed to step 4.
If you specify another color profile instead of sRGB, such as ProPhotoRGB or AdobeRGB, then before starting the procedure in this lesson, I will convert the original image to the sRGB color space in order to display colors consistently on most devices. I will do it as follows.
Step 3

I press the Esc key on my keyboard to close the Save As window.
I choose "Image"> "Mode" in the main menu. If the "tick" is set opposite "8 bit \ channel" ("8Bits \ Channel"), then select "16 bit \ channel" ("16bits \ Channel"). Increasing the color depth is desirable so that the conversion from one color profile to another is accurate. Visually, the change in color depth is unlikely to be reflected in the original and final images.
Then I choose "Edit"> "Convert to Profile" from the main menu. A dialog box titled "Convert to Profile" appears.
In my case, the original color profile ("Source Space"), which describes the colors in the picture, is called "Adobe RGB (1998)". I select from the drop-down list “ Target profile"(" Destination Space ") value" sRGB IEC61966-2.1 ". I check the transformation parameters - they are located below: the parameter "Tool" ("Engine") is set to "Adobe (ACE)", "The method (rendering)" ("Intent") is "Relative Colorimetric", set There is a check mark next to the Use Black Point Compensation option, there is no check mark next to the Flatten Image to Preserve Appearance option.
If you increased the color depth (I did it a little earlier), then the "Use Dither" option will be inactive. If in open image there is only one layer (when you open JPEG-images or "simple" TIF-images, usually, it is), then the option "Flatten the image to preserve the view" is also inactive.
I press the button "Finish" ("OK"). The Convert to Profile window disappears.
Step 4

A new dialog box titled “JPEG Options” appears in the main program window. The “Quality” parameter allows you to set the ratio between the quality of the output image and the volume that the image will occupy in the computer's memory. Thus, the payment for reducing the volume is the degradation of the quality of the original image. The lower the value of the "Quality" parameter, the smaller the size of the JPEG image.
In this example, I will focus on the value equal to 6.
To evaluate the quality of the picture before saving, I will put a check mark next to the "Preview" parameter.
Step 5

I will set the value of the second parameter - "Formatting" ("Format Options") - equal to "Standard optimized" ("Baseline Optimized"). The size of the future JPEG image has decreased, but the image quality remains the same.
Step 6

I click on the “OK” button in the “JPEG Options” window and check the result.
I compare the volumes of the original PSD-image (~ 3000 Kb) and the final JPEG-image (82 Kb). Thus, the JPEG file turned out to be about 36 times smaller than the original image with visually equal quality. Comfortable!
Please note that the size of the final JPEG image remains the same as in the original PSD image, it is equal to 2480 pixels × 2480 pixels.
Second way
Step 1

Opening the original image in Photoshop.
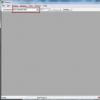
I press on the keyboard the combination of keys "Ctrl", "Alt", "Shift" and the key marked with the Latin letter "S" or select in the main menu "File"> "Save for Web ..." ("Save for Web ...").
A new dialog box with the same title will appear.
Step 2

Step 3

I set the "Quality" value to maximum.
Step 4

I reduce the size of the image using the "Image Size" parameter.
This is an optional operation, but it helps to significantly reduce the size of the future JPEG image, most often with minimal losses as. On the one hand, a decrease in size will lead to a natural decrease in volume and, on the other hand, to a decrease in detail. The latter, in turn, limits my ability to print the final JPEG image. If I do not plan to print the latter, then I will forget about the restrictions.
V this example I enter in the "Width" value 600. The value in the "Height" field will automatically change. Also, the size of the output image will be automatically resized relative to the size of the original image specified in the "Percent" field. Changes occur automatically and the "Percentage" field is in an active state if the "Width" and "Height" parameter fields are linked, as evidenced by the corresponding icon located to the right of the named fields.
In the preview window on the left I will estimate the size and quality of the image. And I can find out the approximate volume of the latter by the number indicated, usually in kilobytes (Kb) or megabytes (Mb) under the left corner of the window.
Step 5

I check the box next to the "Optimized" parameter.
Step 6

If I want to further reduce the volume of the output image, then I decrease the value of the “Quality” parameter. I recommend sticking to values in the range of 45-90.
In this case, I'll choose a value of 75.
As a result, on average, with an Internet access speed of one megabit (1 Mbits), the download time of my drawing from the Internet will be one second. It is indicated under the size of the future JPEG image.
At the same time, visually, the picture turned out to be of quite acceptable quality, the tone transitions are quite smooth.
Step 7

I check the box next to the "Convert to sRGB" option and select the "Monitor Color" value from the drop-down list below.
Step 8

Finally, check the box next to the Embed Color Profile.
The actions in the 7th and 8th steps are desirable so that the future JPEG image will appear approximately the same on different devices.
Step 9

In the dialog box that appears with the title “Save Optimized As”, select the location of the JPEG image and set its name, if necessary. I press the "Save" button in the active window. Both windows disappear. Now I can evaluate the result.
I close the original image. In the window that appears in the dialog box with a proposal to save the changes, select "No" ("No").
The image obtained by the second method is convenient to use for publishing on the Internet. And the image obtained by the first method can be printed in addition to publication on the Internet. Since the size of the image did not change, it was not interpolated, which means that its quality is a priori higher than the quality of the image obtained by the second method.
I will tell you more about interpolation and its effect on the degradation of digital image quality in the lesson "What is interpolation?"

To consolidate the knowledge gained, I suggest you not only save several of your own photographs in JPEG format, but also complete the exercises attached to this lesson. The latter covers the tasks that you may face in taking up photography.