Hello dear readers of the blog site. Sooner or later, every user or administrator is faced with a security problem when storing multiple passwords. You will either choose to create one universal password for all occasions, or you will store all your passwords in some insecure, insecure place. Therefore, if you are worried about the current situation and worried about the safety of your passwords, you will have to look for a solution.
I recommend you a free and reliable solution. KeePass is feature rich, free and open source. The latter eliminates injecting code to track your data and steal passwords. The convenience of using this program lies in the fact that you will need to come up with and remember only one password and you can use it to access the database of all your passwords. Plus, for complete protection against unauthorized access, KeePass has the ability to create a key in the form of a file, without which it will be impossible to access the password file in the future.
Installing KeePass
To install Kipas, go to the download page (here). On the site you can choose 2 versions of the program: Classic Edition and Professional Edition. For the first version of the program to work, you will not need to have Microsoft.NET installed, which is absolutely necessary for the second version of the program. I recommend installing Professional. Plus it is possible to install on a computer portable version... Portable is preferable because it does not leave traces and does not create registry entries. It just works.
You just download the portable version, unzip the archive to the place from where you plan to run the program. Since I work from different places on different computers, I found a solution for myself to use Google Drive to store the program and the password file. With this organization of the location of the program, all changes and settings are saved for any computer wherever I work. Just take and move the program folder to the Google Drive folder. You can also use any cloud service to store the program and the password file. If you are more into removable media, you can use a USB stick. This is exactly what the Portable version of the program has.
How to Russify KeePass
After installation, the first thing to do is to Russify the program. It's very easy to Russify KeePass. Download the file with the translation for your language from this page, and in the case of the portable version, simply save the file from the archive to the program folder (the file looks like Russian.lngx). Please note that you need to select the file corresponding to your version for downloading.

After that, launch the program, select "Change Language ..." in the "View" menu and select Russian in the window that opens (an available language will appear only if you downloaded the file with the correct version of Russification and put it in the program folder). The program will offer to restart it. You agree, and that's the end of the Russification.

Password database creation
The next step is to create a password database. it special file, which actually stores all your data on accounts and passwords with all settings. You can create multiple files that store passwords. And each will have its own password. This can be done if several people work on one computer under one account and each needs access to their passwords. And then in this case, each user only opens his own file and enters his password to access.
To create a new database, go to the "File" item and select "New ..." or you can immediately press the key combination Ctrl + N. In the window that opens, select the location where your password file will be stored. As I said earlier, this file can be stored on any medium (DropBox, Google Drive, Yandex Disk, or just on a USB flash drive). Choose a name for the file and click "Save".

The next step is to create a master password to access your password database. KeePass offers 3 different ways to protect your data. Each of them can be used separately, or all three or at least two methods can be used for complete and maximum protection. The third way (accounting Windows entry) I do not use, so I will not recommend it to you either.

To protect the file:
- We come up with and create a master password for access. This is exactly the password that you will need to remember once to access all passwords. Enter the password in the field and enter the exact same password in the second field “Password repeat:”. If the passwords match, the input field will be highlighted in white, if they do not match - in red. The bar below (Estimated quality) indicates how tamper-resistant the password you have come up with. Try to keep the stripe, if not full, then at least in the green zone.
- If you want to have a check for a key file, click on the "New" button (figure 4 in the figure) and select a location to store this file. Again, this can be any medium, but logically it should be a medium different from the one on which the password file is stored. For example, a flash drive that you carry in your wallet for a key and a file with a database is stored in the cloud storage and you remember the password for it. However, keep in mind that you will not be able to recover the password, and if you lose the key file, you will also lose access to the database and will not be able to restore it. I only use the first method of protection. Came up with a very complex password and remembered it.
- You can also add account as a method of identification. But in the case of, for example, the portable version of KeePass, you will not get access to the password file from another computer other than the one on which you created it.

In the next step, the program will offer to configure some parameters of the Password Database. I usually leave all the settings unchanged. You can increase the number of encryption cycles for better protection. How more number, the longer it takes to open the database with passwords. The time also depends on the power of your computer. The number of cycles can be adjusted for specific computer assuming that the base will open for 1 second. Just click on "Calculate for one second delay". For my work computer, that number was over 14 million cycles. If you specify this parameter, then for less powerful computer(for example, you open the base on a weak old laptop) the opening time will not be 1 second, but much longer. I leave the rest of the tabs by default.
Setting up and creating records
After the successful creation of the database, the program will automatically open this database and sample records will already be created in the window. You can safely delete them or study them as examples.
The program window has 3 main areas that you will constantly use:
- This is an area for grouping your data into folders. With their help, you can see all the records or sort by a specific group. From the outset, it's best to decide on the structure of your data to store. For example, I sort by folders in the following form: my sites, money, email, hosting, ftp, etc.
- The second area is the entries that are in the folder of your choice on the left.
- The third area is information about the entry that is selected.

To create new folder right-click on the folder inside which you want to create. And in the drop-down menu, select "Add group" (1). In the window for adding a group in the "General" tab, enter the name (2) and you can select the icon (3) for convenience.

The next step is to create a record directly that will store all data about the login, password and other fields for quick access to them. To create it, right-click in the field with records and select "Add record ..." or you can press the keyboard shortcut Ctrl + I.

A window for filling in the data with many tabs will open. The main fields for filling are in the first tab.
Fill in the "Name" field as the profile name for generated password... The name will be your login and password, respectively, the password. The link field is either the site on which you use the login password or the link to the executable file if you enter the login and password in the program, and not on the site. Later in the article I will show you how to use this with an example.
If you create an entry for an existing account with a password, you simply enter the existing password. To check if the entered password is correct, simply click on the button with 3 large dots and the program will display symbols instead of dots. If a new account is created and you need to come up with a password, then your best bet is to use the password generator that is built into KeePass.

To open the password generation tool, click on the button with the key and gear image to the right of the "Password repeat" field. To use this tool without opening the record creation form, simply select "Tools" -> "Password Generator ..." in the menu.
With this form, you can create as complex passwords as you need. And thanks to the fact that you no longer need to memorize them, feel free to generate and use the most complex combinations.
In the password generator settings, you can specify which characters, uppercase and lowercase letters, numbers and even special characters to use in generation (1) ... The length of the password is also indicated. After specifying the settings, you just need to open the "View" tab and select any of the proposed in the list (3) ... If it is necessary to exclude any symbol from generation, this can be done in the "Advanced" tab (2) .

After filling in all the data on the first tab, go to the most interesting, convenient and useful "Autoset" tab (it is because of this feature that I fell in love with this particular program). Auto typing allows you to automatically fill in the fields for entering the site or in the program by pressing the key combination Ctrl + Alt + A.
For autodial, go to the "Autodialer" tab, check that autodial is on.
- This radio button selects which sequence to use when filling out login forms. For the most effective use, it would be best to think over the folder structure right away and set up a sequence for each of the folders. In this case, the new entry will inherit the sequence that is defined for the folder.
- Add a target window so that the program can determine which entry with login and password to use. More on this below.

To set the general autodial sequence for a folder, you must:
- Right-click on the folder
- Select in the drop-down list "Change group"
- Go to the "Autodialer" tab
- Click on the stick to generate the sequence
- We set the required sequence. It is set as follows - in the "Placeholder" window, it is selected by clicking on the corresponding entry. The list is very long and it is possible to create almost any sequence. In my case, the following will happen: the title of the record (Title) will be added to the field, then pressing the Tab key, then login, Tab, password and at the end Enter.
After that, if the "Inherit autodial from group" radio button is selected when creating a record, this sequence will be used. If it is necessary to change autosetting for some of the records in the group, select "Use the following sequence" and specify the required one.

How to use KeePass
Using the example of creating records for entering the site in Google browser Chrome, and for connecting to an FTP server using FileZilla, I will show you how to create entries and use them. I always use KeePass to log into my sites.
- In the left window of folders, create a folder of records for entering the sites. In the folder, click create a new entry.
- Knowing my login and password, I write the name of the site in the title, in the name - the login and in the password, respectively, the password.
- Go to the "Autodial" tab and set the switch to the "Inherit autodial from group" position. By default, auto-typing contains a sequence, which in most cases is suitable for filling out login forms.
- The next step is to tell the program the login window so that KeePass can automatically determine which entry to use for (in our case, this is a tab in Google Chrome with open page my site). Please note that the window and site must be open and active. Click the add button.
- In the drop-down list "Target window" we find the element we need and click "Ok". There can be several target windows for one record. And for each you can set a sequence. This is convenient if you use the same username and password for different sites and each needs its own sequence.
- The target window should appear in the list. Click "OK" and save our database by clicking on the blue floppy disk.

The record has been created and it remains for us to check for operability. We open our site with a login form, put the cursor in the login field and press the key combination Ctrl + Alt + A. If everything is done correctly, KeePass will automatically insert your username, password and click on the login.
In order to use KeePass to insert a username and password in a program (for example, such as), you must use the "Name" field and change the input sequence.
- For convenience, create a folder for FTP connections. When creating a folder in the "Autoset" tab, switch to the "Use the following sequence" position.
- Using the "Magic Wand" button to the right of the field, set the following sequence as in the image.
- In the created folder, add a new entry for connecting to FTP and in the "Name" field specify the FTP address that the hosting provider gave you for connection. The Title field will be used in the dialing sequence as (Title). Those. Kipas will take data from the "Name" field (in my case it is 192.168.1.200) and substitute this value in the FileZilla field as an address. Fill in the login and password as in the previous example.
- In the "Autosetting" tab, when creating a record, we specify to inherit autosetting from the group. This is useful if you have a lot of entries in a folder and need to change the sequence. You just change the folder settings and all entries will inherit it.
- Add a target window by clicking the "Add" button and choosing from the list (for this, run the necessary program FileZilla)
- Click "OK" and check the functionality.


One of the key issues of user security on the Internet is creating strong passwords. Almost all of us are registered in social networks, and, as a rule, in several at once. We have e-mail, skype, we use various services (for example, cloud storage of data such as, etc.), we use electronic money to pay for purchases on the Internet, we are registered on forums. A special category is the owners of sites and blogs. The password to your own site is the first precaution, on which not only access to the administration of your resource depends, but also the safety of its visitors. I'm sure that when you find out how to use KeePass, your site will receive another reliable outpost against potential intruders.
It is clear that creating strong passwords for each site or service you use manually is a rather laborious process that requires wiggling. However, if you entrust this task to a program, you can not only make your life easier, but also significantly increase the security of your virtual (and sometimes even real) space. And now I want to teach you how to create a strong password in the program KeePass Password Safe.
Downloading the KeePass Password Safe program
We will download the latest version of the program from the official site so that there are no misunderstandings in such a sensitive issue as creating passwords. So, go to the KeePass Password Safe download page (the link will open in a new tab), and in the right column with the heading Professional Edition click on the first link - KeePass 2.20.1 (Installer EXE for Windows)(please note that version 2.20.1 is relevant only at the time of this writing - for sure, when you download the program, the version will be different). After clicking on the download link, we are transferred to a reliable storage service software Sourceforge.net- and after a 5-second wait a dialog box will appear to save the program installer. Push Save and choose a location on your computer to save.
Don't be intimidated by the native KeePass of English language- just below you will learn how to teach the program to the Great and Mighty 🙂
Downloaded, great. Now we run the downloaded file KeePass-X.XX.X-Setup.exe and proceed with the installation.
Installing KeePass Password Safe
The KeePass installation has nothing to focus on. I will only clarify that at the stage called Select additional tasks check that the option is checked Associate KeePass with .kdbx files(this is the database format in which KeePass stores passwords) and also check Create Desktop Icon to quickly launch the program later by double-clicking on the icon.
At the last stage, when you press the button To complete we will finish the installation, and the program will automatically start (unless, of course, you unchecked the corresponding option at this stage).
Russification KeePass Password Safe
After starting the program, an empty window appears in front of us, and not every user will easily understand what to do with it next. The picture is further clouded by the English-language interface, which for many will also be the cornerstone for starting using KeePass for storing passwords. In fact, this is not such a serious problem, and now we will wean the program from bourgeois habits and instill in it a love for the Great and Mighty.
First you need to download crack KeePass from the program website. To do this, go to and scroll down to Russian flag badge with an inscription English and click on the link in this line on the right:
![]()
KeePass Password Safe Russification File
After that, we will be transferred to the already familiar Sourceforge and after 5 seconds the browser will offer to save the archive Russian-2.20.zip to our computer. For convenience, I saved it to Desktop.
Now we need to copy the crack contained in the archive to the folder where you installed KeePass (if during the installation process you did not change the installation path, then it will look like this: C: \ Program Files \ KeePass Password Safe 2).
We open this folder, and also double-click to open the newly downloaded archive ( Russian-2.20.zip) and drag the file from it with the mouse Russian.lngx v KeePass folder:
![]()
Copy the Russification file to the program folder
Copied? Great, now we just have to tell KeePass the language in which it should communicate with the user. For this in KeePass Password Safe window on the menu View select item Change language and in the window that appears, click on the line English... After clicking, another window will appear with a proposal (in English) to restart the program to activate the Russian-language interface. We press Yes:
![]()
Activating the Russian-language interface in KeePass
After rebooting, the program will be happy to communicate with us in Russian. Congratulations, you did a great job!
Creating a Password Database in KeePass Password Safe
Now we need to create a database in which we will securely store our passwords. To do this, in the KeePass window, on the File menu, select New. A dialog box appears in which you need to select the location to save the password database file and its name and name.
I advise you not to name the database with the phrase "My passwords" or something like that. Of course, we will encrypt the database with a special master password, but in any case, you should not openly tell a potential spherical attacker in a vacuum that it is in this file that you store the keys to everything that his unclean little hands would not mind reaching out to. Contribute to your policy computer security as implicit the names of the password database.

Creating a KeePass Password Database
After pressing the button Save a window will appear in front of us in which it is necessary to set Master password for our base. Manually (this is important) enter it in the field Master password and then, again, manually, re-enter in the field Password Repeat.
There are also a couple of recommendations here: the main password should be quite complex, but at the same time you must remember it by heart. I advise you to do this: come up with and write down a password in your main notebook (paper) or diary, to which unauthorized people do not have access, and then set it as the Main password for the KeePass database. And take some time to memorize this password - this is important.

Setting the master password for the database
After pressing the button OK before us there is another window with the ability to change the settings for the future base. Basically, you can click on the tabs and change something if you are sure of what you are doing, and I will press the button again OK- the default settings are usually optimal for most users and should not be changed.
Now in the KeePass window there is finally a stub for the password database. It already has several groups and even a couple of entries with passwords for example. Something you can remove, and something may come in handy on the farm.
What are groups for KeePass?
As you probably already guessed, groups are needed to sort many passwords into sections. You can, for example, separate passwords used on the Internet from passwords for encrypted archives and protected files on the local computer.
You can create own password groups... To do this, in the left column, right-click on the name of the database and select the item Add group... Enter a name and press the key Enter:

Adding a new group of passwords to KeePass
Similarly, you can add subgroups to groups to further delimit the different types of passwords. For example, in a group Internet create subgroups Social networks and Forums, right click on it and select To create a group.
Create passwords in KeePass Password Safe
The need to create a new password appears, for example, during registration in any online service. For further exploring KeePass, let's go. If you have already studied mine and registered an account with this cloud file storage, then you can simply take the further instructions as an example of using KeePass to manage passwords from other services.
So, let's move on to. Let's see what we need in order to register:

Fields to fill out when registering with Dropbox
So, there are four main fields:
- Surname
- Password
To log into our account in the future, we need to fill in two fields: Email and Password... So let's open our password database and create a new one recording for Dropbox with email address as login and password.
So in the group Internet i created a subgroup Vaults(you already know how to do this, right?). Now click on this subgroup to select it and create a new record using the button Adding an entry:

Adding a New Entry to KeePass
So, we see a window for creating a new record, where we need to fill in several fields. Fields Password and Repeat already filled in with an automatically generated password. If you wish, you can view it by clicking on the button marked in the picture below with a green rectangle, and in the meantime I will fill in the missing fields:

Entering data for a new record
- Name: any that you understand, I called by the name of the service.
- Name: your login on the resource. In this case, I entered my email address here, since it acts as a login on Dropbox.
- Password: by default it is already generated and duplicated. However, you can delete it by clicking on the button with three dots to the right of the field and enter your own. Make sure only that such a password is strong.
- Password Repeat: If you decide to enter your own password in the previous field, then you will have to repeat the entry here again.
- Quality: password strength indicator. Ideally, the bar should end in green, the stronger the password, the more filled in the field.
- Link: additional field to insert the resource address. It is optional to fill in.
- Comments (1): here you can write at least a little novel)) But it is better to write down any data related to the account. V this example I wrote down the field values First Name and Last Name that must be filled in when registering on Dropbox (maybe it will come in handy in the future). It is optional to fill in.
Also, a few points about the automatically generated password. By default, a password is created with a length of 20 characters, containing upper and lower case letters of the Latin alphabet, as well as numbers. This is already a very serious level of password security, but the problem is that not all services allow you to set a password of this length.
So let's create a special profile to generate a password, say, 12 characters long. To do this, click on key button opposite the field Repeat and select the item from the drop-down list Open password generator(see the picture above).
Now, in the opened dialog box, set the length to 12 characters, click on the button Save current settings as profile, set a name for the profile in the pop-up window (I called it "12 characters") and press the button OK... Then one more time the button OK in the window Password generator:
Now, when creating a new record, we only need select the desired profile for the password... Let's set a 12 character password for the entry we're creating now with a few clicks.
So, after saving the new password profile, we are left with the entry editing window (if this is not the case, open it again with a double click). And now all we need to set the 12-character password is to click again on the button Generating a password(opposite the field Repeat), but this time select the item Generate using profile and in the drop-down list click on the profile we just created:

Create a password using a profile
Ready! Now you can create profiles for different occasions - with different character lengths, with additional characters to strengthen the password strength. Do not forget only that it is important to first make sure that the service or program for which you are creating a password supports it in all respects.
How to Use KeePass - Copy Login and Password Manually
The login and password prepared in this way can also be copied automatically, but first, let's figure out how to do it manually (this is also sometimes necessary). So, after creating a record, we can see it in the list in the group Vaults:

Ready entry with login and password
Pay attention to the buttons highlighted with a red rectangle. The first is the button Copy name to clipboard... As its name suggests, when you click on it, the login from the selected entry in the list will be copied to the clipboard. In this example, the e-mail address will be copied, since this is what I set as the login. The second button is called Copy password to clipboard... I don't think it's worth explaining what she does
When using these buttons data is copied to the clipboard for a few seconds(by default - 12). After this time, the clipboard will be cleared... Thus, you do not have to worry that by copying the password and walking away from the computer, you will allow someone in your absence to paste the contents of the clipboard, say, into a notepad, and find out your password.
So, using this method, let's finally create a Dropbox account. Fields First Name and Last Nam e I filled in manually, for Email- copied the login as described above and pasted it into the field, for the field Password- copied and pasted the password. By the way, notice how happy Dropbox is with the password: the strength indicator under the password field on the registration form is now completely green - further proof that KeePass is making great passwords!
To complete the registration, all that remains is to check the box I agree to Dropbox Terms and press the big blue button Sign up:

Completed Dropbox Registration Form
By the way, right after that we will be transferred to the download page of the Dropbox application for installation on a computer. Decide for yourself, and I have been using it for a long time
How to Use KeePass - Auto Insert Login and Password
One of the coolest features for a KeePass user is auto fill authorization forms. More precisely, semi-automatic - we only need to select the desired entry and press the key combination. In order to demonstrate this example, I suggest sign out of Dropbox for a while. To do this, in the upper right corner of the page, click on link with your first and last name and in the drop-down list select the item Sign out:

Sign out of Dropbox

Automatically fill in a form with KeePass
This is how KeePass securely logged us into Dropbox. A little tip: before you give the order to fill out the form, make sure that all the necessary checkboxes are marked under it. In the example above, the option Remember me("Remember me") is checked by default, but this is not the case on all sites - in this case, check the necessary options in advance.
And finally ...
Of course using KeePass Password Safe for authorization on sites - not the most convenient way, although there is nothing complicated in it. It is much easier to use the built-in browser tools to automatically fill out forms. However, to create strong passwords, you will either have to use online generators, or practice creating complex passwords using active massage of convolutions)) And if the browser generated on a third-party resource loses the password, and you don't write it down anywhere, then you will have unnecessary problems with recovery of credentials.
Learning to use such a wonderful password manager, how KeePass, you have at your disposal a reliable guard and assistant in the field of security. And if until now you have used a regular text file and Windows Notepad for this purpose - stop this dangerous practice as soon as possible! With the penetration of the Internet into many areas of our life you endanger not only yourself, but also other users.
If you have any questions or something remains unclear - write about it in the comments, I will try to answer as soon as possible. I would also be glad to know what tools you use to organize passwords.
In this article, there will be no long discussions on the topic - where and why to store passwords, which password manager to choose, etc. etc. If you came to my site from a search engine (and according to statistics, this is my main audience), then you already understand the importance, as well as the convenience of storing passwords in specialized programs... And your choice, as well as mine, is KeePass. Now your task is to figure out how to use KeePass, how to set it up, and how to work effectively with it.
Well, you've come to the right place! KeePass is truly one of the best, most reliable and, moreover, free managers storing passwords. And the video tutorial below tells you almost everything about this program. You can even say that it is step-by-step video instruction by KeePass.
In his video tutorial, the author tried to reveal all the subtleties that both beginners and advanced users need to know in order to effectively use this password manager. The whole process of work is described - from downloading and installing the program to auto-typing and connecting plugins. I have never seen such a detailed video tutorial on the KeePass program on the network.
See for yourself the content of the lesson:
(who is impatient - go directly to watching the video)
- Where to download and how to Russify KeePass
- How to create and configure a new Password Database
- How to create a key for additional protection base
- Overview of the program interface and menu sections
- Details about the capabilities of the password generator
- KeePass section overview - "Settings"
- How to create and edit groups (categories)
- How to add records to the database
- How Autodialer Works
- Installing a plugin for automatic Reserve copy database of passwords.
Each user of the global network has to remember dozens of logins and passwords from various sites. Of course, someone gets by with one code for all occasions, but this is, at least, unsafe.
But there is another option - to use a special KeePassX password store. With this application, you can collect all passwords in one secure database, and extract them from there whenever possible. So let's figure out how to use KeePass, and how to install the program on different operating systems?
KeePass Password Manager is a versatile application that is available on different operating systems... This number includes both desktop operating systems Linux, Windows, MasOS, and its mobile variations.
Installation on Linux is done regular means either through the terminal. In the latter case, you must open command line and type sudo apt-get keepassx. There is no need to connect third-party repositories to install the application on Ubuntu, Linux Mint and other distributions based on Debian or Ubuntu.
To install the program on Windows and MacOS, you need to go to the official website and download the installation package for your OS.

In the installation wizard, you will need to go through the standard steps - choosing the directory where the program files will be stored, as well as creating a shortcut on the desktop.
KeePassX Russification
But how to Russify KeePassX? More old version the program needed to install additional language packs, and the version with the "X" prefix already supports the Russian language. If during installation you accidentally chose the wrong option, then you need to go to the menu "Instruments" and choose here "Settings"... On the main tab, you will find the Language item, where you will need to set the default Russian language.
How do I use KeePassX?
1. Creating a password store
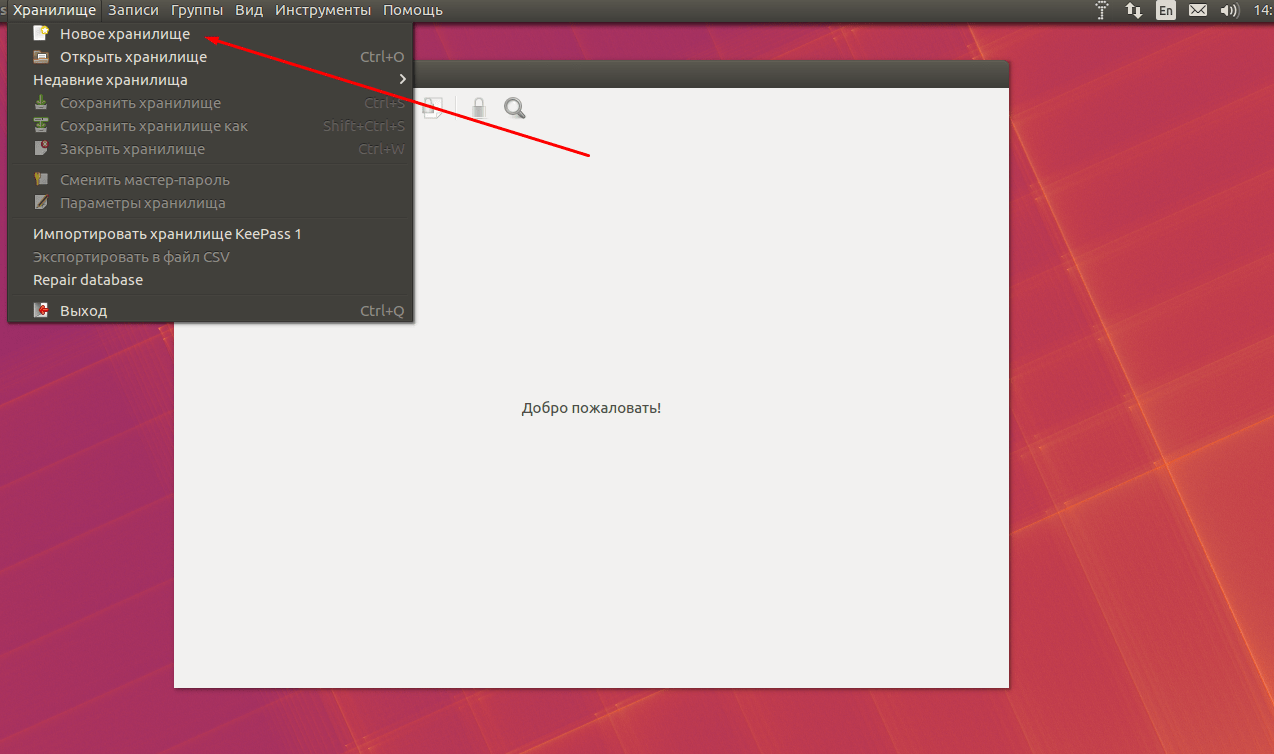
Setting up KeePass begins by creating a vault where all passwords will be stored. To do this, in the main window of the program, go to the menu "Storage" and select the item "New storage".
Next, a window will appear in front of us in which you need to set a master password that will be used to access the saved database. Remember that the security of your data depends on its complexity, so when creating it, be sure to choose the option with mixed case letters, numbers, and it is desirable that they are not combined with significant dates of your life and do not have abbreviations of names.
To enhance protection, you can also connect a key file. You can choose your own Text Document or generate a new one. When you are finished with password operations, click "OK".

Our next step is to save the storage to a file so that you can save it and transfer it to another device at any time. Go to the menu again "Storage" and select the item "Save storage", then specify the path where the file will be stored and give it a name.
2. Save the KeePassX password
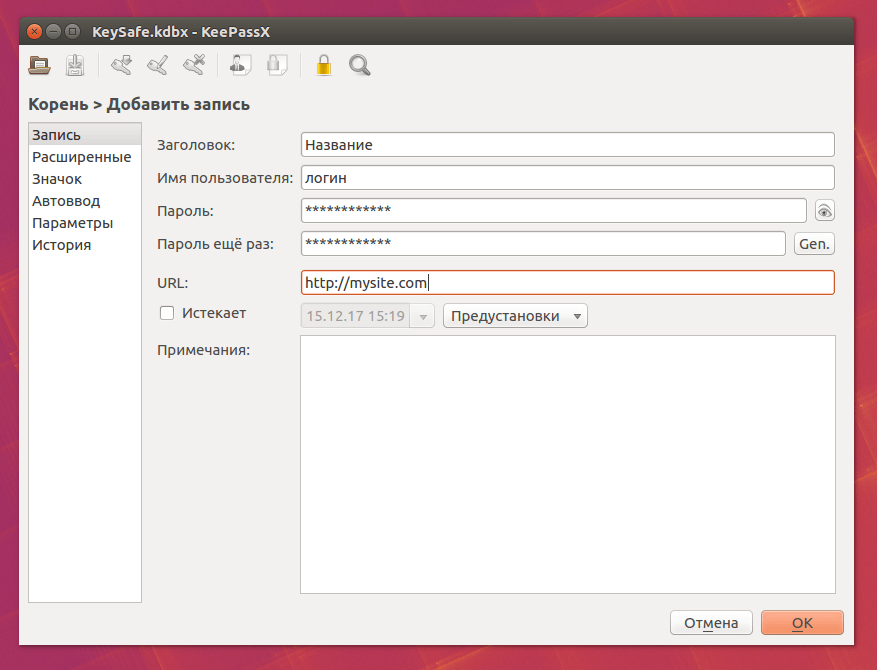
To add a new password to the database, click on the corresponding icon in the main program window or go to the menu "Records" and select item "Add new entry".

In the window that appears, set the name of the entry and enter all the necessary data, such as login, password and a link to the site. Here you can change the recording icon, as well as set the duration during which the entered data can be used.
3. Using passwords
So, we learned how to create records, but now it's time to learn how to use them. There are many options here, among which the user can choose the most convenient.
Open the site where you want to log in. This can be done directly from KeePassX using the keyboard shortcut Ctrl + U or through the context menu - item "Open URL"... You can just enter the link in your browser.

Next, copy the username by pressing Ctrl + B or select the corresponding item in the context menu. Paste the copied data into the login field on the site. Repeat the same operation with the password, only here the combination Ctrl + C is used.
Another option is to use auto-input. To do this, open the required site in a browser or through Ctrl + U, then in the KeePassX context menu, select the "Perform auto-input" item or, having selected the desired entry, press the combination Ctrl + V.

After this operation, all data will be automatically entered into a special form on the site, and the user will only have to confirm the correctness of the login and password.
4. Grouping passwords
When the number of sites used is hard to count on the fingers, it is advisable to group records in advance by one or another criterion. To do this, go to the menu item "Groups" and select "Add group", then enter the name of the category and confirm all actions with the button "OK".

You can also add a group to KeePassX through the context menu right in the main program window. It is worth noting that when you delete a category, all folders will automatically move to the trash bin, which will be created automatically.
5. Restoration and export of storage
KeePassX users can export any repository to a CSV file which is supported by many other programs as well mobile devices... To do this, go to the menu "Storage" and select the item "Export to CSV file"... A previously saved record is imported through the same menu, but you need to select the appropriate item. KeePass is synchronized with the database either manually or automatically. In the latter case, you need to go to the program settings and choose the most convenient option for yourself.

conclusions
In this article, we've covered how to use KeePass. This is a convenient password storage that has an automatic filling function, as well as the ability to export the database to a separate file. All data is stored in encrypted form directly on your computer, and if necessary, it can be moved using a removable storage device.
Introduction
The introduction will be short: a couple of words on the classic theme - "Does using a password manager instead of a notebook with a pen mean severe paranoia?" For most, the answer is obvious: whether you like it or not, the "notepad with a pen" stops working at the very moment when you start writing login information into the 101st newfangled service that you decided to "just test".In general, switching to electronic storage of passwords is like quitting smoking: everyone supposedly realizes this need, only they always postpone it until better times.
KeePass Advantages and Competitors at a Glance
A complete list of all the features of the program is given on this page of the Russian-language site about KeePass.I will focus only on a few key features, the rest we will consider in the course of the article:
- High security. In addition to purely technical details such as the encryption and caching algorithms used (which can be found on the link above), support for two-factor authentication is equally important for us (to open the database, you need to know the password + have a special file).
- Open source. It is believed that reliable cryptographic software cannot be closed. KeePass is an OSI Certified program.
- Cross-platform. Complete, including all mobile operating systems except webOS and Symbian. Details on the official download page.
- Free. When a program of this level can be used for free, I see no reason to pay for analogs.
- Portability. KeePass does not require installation, can work from a flash drive, does not create or store anything on the system.
- Time check. KeePass is a classic. The program has been developed and supported since 2003. In such a delicate matter as storing passwords, obviously, you should not chase the latest innovations.
So, half of them offer their products on a paid basis (and as I said, I could not find any reason why it is worth paying), and the other half store your data in the cloud. In my opinion, it is obvious that a place where thousands of people keep their secrets is a very logical target for all kinds of attacks. So I'm afraid it's only a matter of time, especially since the first news from LastPass has already arrived (proof on the habr "Perhaps LastPass was hacked").
I've never used LastPass, but from the reviews I got the impression that all of its features can be easily configured using KeePass and its plugins. The difference is that in this case only you will own the base of your passwords.
Installation and General settings KeePass
Installation. Download and install latest version can be on the official page of the program. I recommend the portable version followed by installation on a USB flash drive.Russification. Download the Russian version of the language file from here and copy it to the program directory. After that
launch KeePass → View → Change Language → Select language → and Restart KeePass.
Launch at system startup. We force KeePass to start with the OS:
Tools → Settings → Integration → Launch KeePass at system startup (for the current user).And we make KeePass always start in a minimized and locked state:
Tools -> Options -> Advanced -> Run in minimized and locked state.
Automatic saving of the database after changes. Cleverly using the ability to configure triggers for automation, we will achieve instant autosave of the password database after any significant change in it. To do this, go to
Service → Triggers → Add.Next, enter the name "Autosave base" and go to the tab
Events → User interface status updated → Conditions tab → Current Password Database contains unsaved changes → Actions tab → Save Current Password Database.
Increasing the number of encryption cycles. Why this is needed is clear from the screenshot below:

The number of cycles can easily be increased to several million without significant slowdowns. You can calculate what your computer is capable of by clicking on "Calculate for a second delay".
Composite master key
What is it? It's simple, look: there is KeePass, there is a Password Database - a separate file that can be stored anywhere, there is a Master Password - what you should know to access this database, and there is a Key file - what you should have to access this database.1) Master password. A password that you keep in your head or some other dry and safe place. The only thing you need to remember to work with KeePass. Naturally, your master password should be as strong as possible, etc.
Reminder to change the Master password. We expose here:
File -> Password Database Settings -> Advanced:

2) Key file. The password to your database, which is not contained in your head, but in a file. Can be used instead of The main password, but it is recommended to use in addition to him.
- It is recommended to select a file with a large amount of random data as the Key file, which should not be changed under any circumstances (otherwise you will not be able to open the database). The extension and name of the Key file can be anything.
- You should not store the Key file in the same folder with KeePass or the Password Database. It is better to choose a file that will be one of many similar files located in another folder and preferably on removable media. Make sure the name, extension, size, and date of the file are the same as the rest of the files in this folder.
- As a key, you can try to use a file that you can always easily download on the Internet. For example, an image on your blog. It is clear that this is not very reliable, but knowledge of such a life hack can come in handy.
- To make the process of working with KeePass a little safer, you can wean it from remembering the path to the Key file and storing history. To do this, go to
Tools -> Options -> Advanced
and uncheck the "Remember key sources" box. And then in the tab Appearance set the value for "Remember recently used files" = 0. And, finally, do not forget to disable saving the history of recently used documents in Windows:Control Panel → Taskbar and Start Menu → uncheck two checkboxes from Store and Display.
After these manipulations, the path to the Key file at the start of KeePass will need to be selected manually.
Creating new records
Setting up automatic passwords. When registering a new account, KeePass can automatically generate a random password for it. It is very convenient. The default template of the received password can be slightly adjusted to increase reliability. It is done like thisTools -> Password Generator -> Settings

Here we increase the number of characters in the new password and indicate which character sets we want to use when creating new passwords. On the View tab, you can immediately check out examples of passwords generated from your template.
Next, on the same tab, select the "Auto-generated passwords for new entries" profile and click on the floppy disk icon.
After that, in the "Save as profile" drop-down menu, select "Auto-generated passwords" and click OK to overwrite the profile template.
Hotkeys. The universal combination of invoking the KeePass window from any application is Ctrl + Alt + K. If you then click Insert, then KeePass will proceed to creating a new entry in the password database: 
Reminder about expired passwords. At the bottom of this window, set (if desired) a reminder about the need to change the password for the entry. 
Later, in the Comments field, I recommend adding the URL for changing the password on the site - it will come in handy.
Now we will teach KeePass to show reminders about expired passwords when the program starts. To do this, go to
Service → Settings → Additional → Show expired entries after opening the password database.
Ability to attach files to a recording. Yes exactly! On the Additional tab, you can attach any files to the entry that will be encoded and saved along with other data in the password database. There are tons of uses for this function ...
Password change history. KeePass keeps a history of changes for each individual entry. It can be extremely important to know which password was previously used or how long ago it was changed. This, as well as old password recovery, is available on the History tab.
Ways to automate the entry of passwords on sites
Let's move on to the most interesting part. How to make entering passwords as easy as possible? There are several options for this.1) Autodial. With this feature, KeePass can automatically fill in login and password fields on websites. To do this, just put the cursor on the login input field and press the key combination for Autodialer (by default, Ctrl + Alt + A). I bind the shortcut Ctrl + Alt + A to one of the mouse buttons, which further simplifies the use of this function.
Autodialer templates. Autodialer works according to a specific algorithm that can be changed. The default Auto-typing template looks like
(UserName) (TAB) (Password) (ENTER)(i.e. KeePass enters a login on the site → presses TAB to go to the password field → enters the password → presses ENTER).
But this pattern is not universal. For example, sometimes it is necessary to check a checkbox like “Remember me on this computer”. Then you need to create new template or change the current one to
(UserName) (TAB) (Password) (TAB) (ENTER)(the second TAB will switch to the checkbox, and the Space bar will tick the necessary box).
Let's simplify the setting of the Autodialer parameters. In order not to change the template manually for each record, you can use the following life hack: create several groups of records inside the database with different Auto-typing rights (for example, I have it "Standard", "With a checkbox" and "Without Enter" in the screenshot below): 
The fact is that, by default, KeePass entries inherit the Autoset options from their group. Therefore, in the future, it is enough to simply drag the entry into the required group so that the corresponding Autodialer parameters will be assigned to it.
Different sequences for different windows. It also happens that on different pages of the same site, data is entered in a different sequence. For example, on one of them a checkbox should be marked, on the other not. On the Auto-typing tab of each entry, you can select the current window from the drop-down list and, in a couple of clicks, write individual Auto-typing parameters for it.
Several accounts on one site. If you have several accounts on the site, then when you press Ctrl + Alt + A, KeePass prompts you to make a choice (example for the site in the screenshot) 
Pros and cons of Autodialer. For correct work Auto-typing no auxiliary plugins are required for browser integration. Auto-typing works in any browser and application. The browser doesn't know anything about KeePass at all. The main disadvantage is vulnerability for keyloggers. But this problem can be solved with ...
Double complication of Autodialer. This function disables the use of standard keyloggers. The keylogger can "see" the Ctrl-V being pressed, but cannot log the actual content being pasted from the clipboard. Insofar as this function does not work with all target windows, the developer removed the option to enable it by default. So, Double complication must be enabled for each specific entry in the "Autoset" tab.
Simplifying quick search. There are other methods for entering passwords. After all, not always you can or want to use Autodialer. But, before moving on to them, let's set up two settings that are useful for this. To do this, go to
Tools -> Options -> Appearanceand make it easy for ourselves to search our password database in this way:

2) Double click on the entry. To enter data using this method, you need to find and select the record that you are going to use, and double-click on one of its fields.
Depending on which field you clicked on, KeePass will do the following:
- Title: will open a window for editing this entry;
- Name: will copy the username to the clipboard;
- Password: copies the user's password to the clipboard;
- Link: will open the address contained in it in the browser or copy it to the clipboard (the required option is set in the settings).
Sharing one password database and backup
Sharing. No more transferring passwords by ICQ or e-mail! KeePass can be customized for comfortable collaboration. This is how I implemented it with Dropbox:- Create a folder inside Dropbox.
- We share it through the menu of the right mouse button, enter the email of the employee (s).
- In KeePass, create a new password database and select its location in shared folder Dropbox.
- We transfer to other users the Master password, the Key file and the recommendations set out above in the advice "Automatic saving of the database after changes".
By the way, using this example it is easiest to understand the usefulness of the Key file: the base itself is in the cloud, but the Key file is only on users' computers. So in theory, even accessing your Dropbox won't help an attacker in any way.

Backup. Archived for the password database and key file. I am using a combination of cloud storage+ Genie Timeline backup software that I'm talking about. It's set up like this: I just insert the USB flash drive into the computer, Genie instantly starts making a backup, after which I take out the USB flash drive. Bingo!
Whichever type of backup you use, necessarily check if the saved database opens on another computer.