File history in Windows 10
File history - mechanism Reserve copy data, which appeared in Windows 8. Unlike classical backup systems, file history is a rather highly specialized thing. With its help, you cannot create an image of the system or back up a disk, the main purpose of the file history is to provide the user with the most simple and quick way recovery of deleted \ changed files.
Interestingly, the history of files originally came to replace the technology ″ sawn out ″ from the eight. However, in Windows 10, Pervious Versions has returned to its previous place, so that the user has the opportunity to choose between the two technologies. And today we will figure out how to use the file history, and also talk a little about the principle of its operation and the intricacies of setting.
Enabling and configuring
You can open the file history different ways, the fastest is to press Win + R and execute the command filehistory.
By default, file history is not enabled, so the first time you log in, you will be prompted to follow the link and configure it.

The first thing to do is to make sure you have a disk to store your backups. If the system does not find a suitable disk, then a corresponding warning is displayed, and the power button is inactive.

To select a disk, go to the "Change disk" section and specify the location for storing the backups. For archiving you can use:
Any section of the current hard disk(except system);
Any partition on another physical disk;
External USB hard drive or a USB flash drive;
Network folder.

By default, the backup includes all of the user's profile content - Libraries, Desktop, Contacts, and Favorites, as well as content cloud storage OneDrive (if connected). If necessary, some individual folders can be excluded from the backup. To do this, go to the "Exclude folders" section and select folders that you do not need to include in the backup.

Also in the "Advanced Settings" section, you need to configure the frequency of backups. By default, copies are created every hour, but you can specify an interval from 10 minutes to 1 day.

In the same place, we indicate the duration of storage of backups - from 1 month to infinity. By default, this time is not limited and depends only on the availability of free disk space.

After all the settings, it remains only to click the "Enable" button and activate the file history.

After switching on, the initial archiving process starts immediately. Then archiving is performed according to the specified schedule, and you can also start it manually at any time.

You can also customize File History from the new control panel by going to Start -> Settings -> Update and Security -> Backup Service.

Here you can make all the same settings - specify the backup frequency and storage period,

select a drive and exclude unnecessary folders.

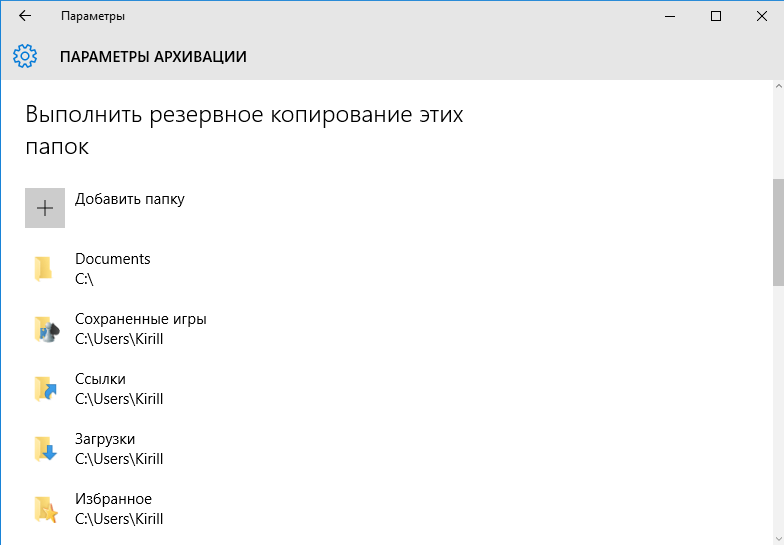
And also from here you can add to the backup any arbitrary folder. For example, I added the C: \ Documents folder, which is not part of the user profile.
Recovery
You can open the file history recovery window using the filehistory command, or select the file / folder that needs to be restored in the explorer and click on the icon on the ribbon.

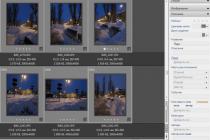
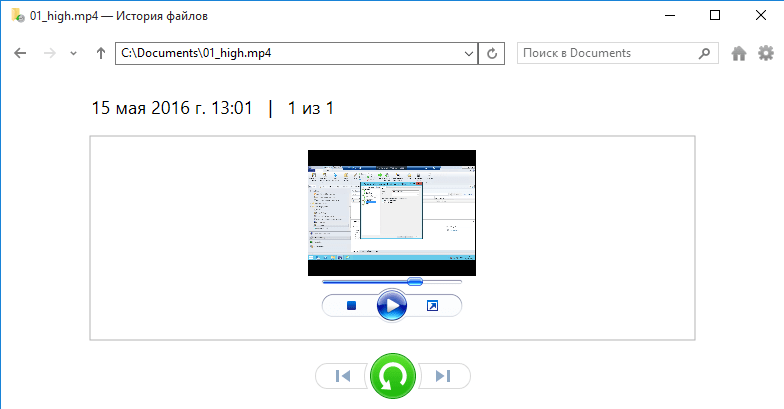
The recovery window is a kind of mixture of the explorer with the media player. Content can be arranged the right way, set the desired view (icons, table, etc.), use the search. Backups are sorted by creation date, navigation through them is done using the arrows located at the bottom of the window.

You can navigate between versions both in the main section and within each folder, which is very convenient. Each folder shows the files that were in it at the time of the backup. For example, if the file was in the Documents folder and was deleted at 13; 05, then it can be found in the folder at 13:01.

Having found desired file, it can be viewed directly in the recovery window. This is very useful if you need to find a specific version of a file. Preview works for text files, images, as well as audio and video files (which can be opened by Windows Media Player). If the file cannot be opened with the built-in Windows tools, you will not be able to view it, but you will be prompted to open it with a suitable program.
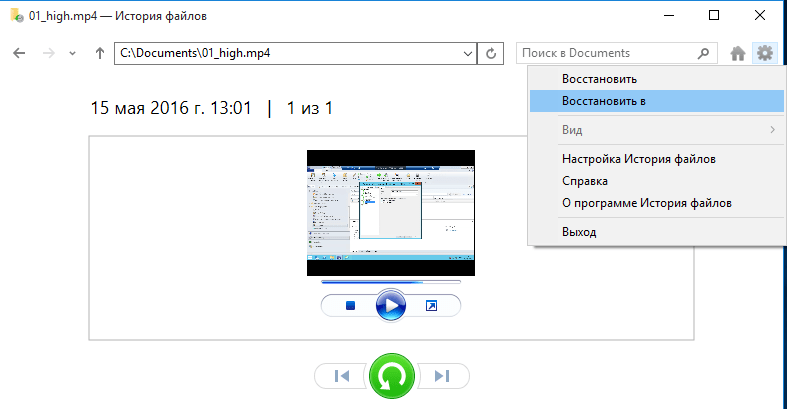
Once you've decided on the version, you can restore the file to its original folder, or choose a different location.
Principle of operation
File history does not use the shadow copying mechanism (VSS) to create backups, a special service is responsible for its work fhsvc... This service is enabled by default and works regardless of whether File History is active or not.
Backups are not done at the block level (like traditional backup systems), but at the file level. Those. instead of completely scanning all directories and files for changes, the service just checks the change log file system NTFS (usn change journal) and makes a list of changed files that need to be copied. Accordingly, only files changed since the last backup are included in the backup.

The data is stored on a backup disk in the FileHistory \ UserName \ ComputerName \ Data folder. This scheme allows you to store backups of different users and (when using shared network storage) from different computers in one location. Notably, the initial separation is based on username, not computer.

The storage structure of backups completely repeats the structure of folders included in the file history. Each folder contains all available versions of the files. Each file contains in its name the date of the backup, in UTC format. For example, in the original Documents folder there are 2 files - FileHistory1.txt and 01_high.mp4. Looking at the contents of the backup storage, we can conclude that 01_high.mp4 was changed once, and FileHistory1.txt was changed twice.
Please note that no compression is used when storing backups. This approach helps speed up navigation and browsing of content, but requires a lot of disk space. This point should be taken into account when adjusting the backup frequency, especially if you have a large number of frequently modified files.

However, if there is not enough space, you can delete excess copies manually. To do this, go to the section additional parameters, click on the "Clear Versions" link and specify the versions that can be deleted.

In addition to custom folders, a Configuration folder is created for each computer, which stores the file history configuration. The EDB file, in theory, should contain a list of paths and file names, and in XML file backup settings are stored. Both files have two versions. Empirically, it was found that the version with the prefix 2 is the original version, and the version with the prefix 1 contains the latest changes.

Offline cache
Another important point to be aware of. In the event that it is not available external drive or network folder where are stored backups File History uses temporary storage, or offline cashe. This cache is located in the user profile, in the C: \ Users \ username \ AppData \ Local \ Microsoft \ Windows \ FileHistory directory. While the disk is unavailable, the files are backed up in the cache, and as soon as the connection to the disk is restored, then all its contents are transferred to the disk and the cache is cleared. Also, the cache stores configuration files, which allows the file history to continue working even when the disk is disconnected.
Interestingly, in Windows 8.1 there was a setting that allowed you to set the cache size as a percentage of the disk size (from 2% to 20%). However, in Windows 10, this parameter is absent, apparently the developers found this information superfluous for the user. However, if desired, these settings can be found in the configuration file, in the section StagingArea for the allowed cache size and location.

Control
Oddly enough, there are no tools for centralized file history management, at least I haven't found them. Apparently this functionality is intended solely for individual use, since there is no command line utility, no PowerShell module, no group policies- only graphic equipment. The only thing I could find was a Group Policy setting to disable the use of file history. It is located under Computer Configuration \ Administrative Templates \ Windows Components \ File History.

If this parameter is enabled, then the file history cannot be used, if it is disabled or not specified (default value), then it is possible.

The same setting can be found in the registry under HKLM \ Software \ Policies \ Microsoft \ Windows \ FileHistory. A DWORD parameter named Disabled which has two meanings:
0 - file history is available for inclusion;
1 - file history is prohibited.

Conclusion
In conclusion, a few important points Things to know when using file history:
It is not recommended to store backups on the same physical disk with the original files. if a disk fails, all files will be lost;
File History does not support the use of EFS (Encrypting File System). If encryption is required, you can use BitLocker;
File History does not back up OneDrive content until it is available offline;
Unlike traditional backup systems, file history does not require the user to have administrative rights for configuration and use. Any computer user can configure a backup of their files to a convenient location;
And just in case, let me remind you that file history is not a full-fledged backup system and can only be used as an addition to a full system backup, and not instead of it.
Opera to delete history you need to go to the "Settings" section in the "Main menu", and in it select the "Delete personal data" item. Selecting this item is a dialog box where you need to expand the full list of data stored by the browser that can be assigned to be deleted. To do this, click the "Detailed" label and mark all the data types that you need. The item "Clear browsing history" is also in this list. Pay special attention to the option to remove passwords - uncheck this item if you want to keep them. Finally, click the "OK" button.
V Mozilla FireFox to clear the visit log ". If you need to delete other data as well, make the appropriate marks. Then click the Remove Now button.

V Internet Explorer to get to the option "Delete browsing", you need to select "Delete browser history" in the "Service" section. This will open a window with several sections. In the "History" section, you need to click the "Delete history" button. The browser will ask you to confirm the operation - click "Yes".

V Google browser Chrome simply press CTRL + SHIFT + DEL to open a window titled Clear Browsing Data. You can also choose a long way - click the icon with the image of a wrench in the right upper corner, select the section "Tools" in the menu, and in it the item "Delete data on viewed documents". In the window for clearing browsing data, you need to specify the period and put a checkmark in front of the "Clear browsing history" item, and then click the "Delete browsing data" button.

Lists open files and connected by USB devices, browser history, DNS cache - all this helps to find out what the user was doing. We have compiled step by step instructions how to remove traces of your activities in different Windows versions, Office and popular browsers. At the end of the article, you will find several scripts to help you automatically keep your machine clean.
1. Clearing lists of recent places and programs
Let's start by cleaning up the list of recent places and programs. The list of recent (in Windows 10 - frequently used) programs is in the main menu, and the list of recent places is in Explorer.

How to turn off this mess? In Windows 7 - right-click on the "Start" button, select "Properties" and in the window that appears, uncheck both checkboxes in the "Privacy" section.

To clear the list of recent locations and documents, you need to delete the contents of the% appdata% \ Microsoft \ Windows \ Recent directory. To do this, open command line and run two commands:
Cd% appdata% \ Microsoft \ Windows \ Recent echo y | del *. *
It also doesn't hurt to delete the contents of the% appdata% \ microsoft \ windows \ recent \ automaticdestinations \ directory. It contains the latest files that appear in the jump list:
Cd% appdata% \ microsoft \ windows \ recent \ automaticdestinations \ echo y | del *. *
To clear recent files automatically on exit, you must enable the "Clear recently opened documents log on exit" policy, which is located under User Configuration \ Administrative Templates \ Start Menu and Taskbar.
Now let's move on to Windows 10. You can turn off the list of recently added and frequently used applications through the "Options" window. Open it and go to the "Personalization" section, the "Start" item. Disconnect everything that is there.

It seems that the problem has been solved, but alas, this is not entirely true. If you enable these parameters again, then all lists with the same composition will appear again. Therefore, you will have to disable this feature through Group Policy. Open gpedit.msc and go to User Configuration \ Administrative Templates \ Start Menu and Taskbar. Include the following policies:
- "Clearing the list of recently used programs for new users";
- "Clear the log of recently opened documents on exit";
- "Clear tile notification log on exit";
- Delete the list of programs pinned to the Start menu.

Clearing recent places in Windows 10 is easier than in the "seven". Open Explorer, go to the "View" tab and click the "Options" button. In the window that appears, turn off the options "Show recently used files on the Quick Access Toolbar" and "Show frequently used folders on the Quick Access Toolbar." Don't forget to press the "Clear" button.

As you can see, a simple task like clearing the last objects has a rather tricky solution. Without editing group policies - nowhere.
2. Clearing the list of USB drives
At some secure facilities, only flash drives registered in the journal are allowed to be connected to the computer. Moreover, as usual, the magazine is the most ordinary one - paper. That is, the computer itself does not restrict the connection of unregistered drives in any way. Does not limit, but records! And if, during the check, they find that the user has connected unregistered drives, he will have problems.
We are by no means advising you to try to steal military secrets, but the ability to clear the list of recently connected drives can be useful in other life situations as well. To do this, look at the following registry keys:
HKEY_LOCAL_MACHINE \ SYSTEM \ CurrentControlSet \ Enum \ USBSTOR \ HKEY_LOCAL_MACHINE \ SYSTEM \ CurrentControlSet \ Enum \ USB \
Here they are - all the drives that you connected to your computer.

It would seem that you just need to take and clean everything. But it was not there! First, the permissions for these registry branches are set in such a way that you will not delete anything even in the "seven", let alone the "ten".
 Oops…
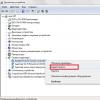
Oops… Secondly, it takes a long time to assign rights and permissions manually, especially if there are a lot of drives. Thirdly, admin rights will not help. The screenshot above was created when I was performing the delete operation with admin rights. Fourth, in addition to these two sections, there is a long list of sections to clean up. Moreover, they need not only be deleted, but competently edited.
If for some reason you need to do everything manually, then look for keywords MountPoints, MountedDevices DeviceClasses, and RemovableMedia. But it's much easier to use a ready-made program that will do everything for you. Some forums recommend USBDeview for this. However, I tested it and I declare that it does not clear information from all the necessary sections. USBSTOR and USB continue to contain information about the connected media.
I can recommend the program. Run it, check the "Perform real cleaning" checkbox. You can enable the "Save .reg undo file" parameter or not, but if the goal is not to check the program, but to prepare for the upcoming computer inspection, then it is better to turn it off.

The program not only cleans the registry, but also displays a detailed log of its actions (see below). When it finishes working, there will be no mention of connecting drives to your computer.

3. Clearing cache and browser history
The third point in our tudu is clearing the cache and browser history. There are no difficulties here - each browser allows you to reset the list of recently visited sites.
Continuation is available only to participants
Option 1. Join the "site" community to read all the materials on the site
Membership in the community during the specified period will open you access to ALL Hacker's materials, increase your personal cumulative discount and allow you to accumulate a professional Xakep Score!
"How to clear history on your computer
files and documents being opened. "
The moment you open on your personal computer documents, viewing photos, or playing a video, all these files are remembered in the list recently open documents which is easy to call using the menu Start - Recent Documents.
If you do not want someone to see which of the documents you are viewing, then this list it is best to clean up recent documents.
If the menu item "Recent documents" you are missing, then it is disabled in the settings. How to enable it in the menu Start, written at the end of this tutorial.
In order to clear the list of recent documents, click on the button Start and in the menu that opens, right-click on the item "Recent documents"... Then you need to select the item "Clear the list of recent items".
After that, the list of recently created documents will be cleared. By the way, the user may not completely clear this list, but remove only certain lines from it on his own.
In order to do this you need to go to the menu Start - Recent Documents and select the document you want to delete. Now it remains to right-click on it and select the item "Delete"... All other lines that are in this list will be saved, and the one you selected will be deleted without a trace.

If you have on the menu Start missing item "Recent documents", then you can return it. To do this, right-click on the menu Start, select the item there "Properties" and in the window that opens, press the button "Tune".

There is a function that saves user data. It's called File History. With it, you can restore an erased drawing, photo, contact, bookmark at any time. Anything. All previously created versions of documents will be copied to the external drive. So you can bring them back to the initial state if you accidentally made the wrong changes. In Windows 10, File History has become a convenient and accessible tool for backing up and caching.
This option is present in various forms in many operating systems. On MacOS it is called "Time Machine". In Win 7 there is a certain analogue of this function - shadow copying. With it you can return previous version document if it was not changed as needed.
The first system from Microsoft to which the file history was added was Windows 8. It was in this OS that it became possible to install a backup to an external drive. Prior to that, backups were stored in the same place as the originals. And if the hard drive was out of order, it was difficult to recover the documents.
However, the option was mainly used by customizers and system administrators... In Windows 10, it has been improved. Then ordinary users became interested in her.
How to turn on?
File history is not active by default. For it to work, you need an external HDD, drive, flash drive, network storage or any other medium. It is important that it has enough memory to copy data.
How to recover files from history?
Thanks to this function, lost, damaged, deleted, changed or forgotten information can be restored.
- In the window of the folder in which the erased document was previously located, click on the "Home" button in the menu bar.
- Click on the "Journal" icon. It looks like a folder with a watch. It can also be found in Windows Explorer Explorer.

Click on the "Journal" icon
- A window with data will open. To do this, the Windows 10 file history disk must be connected.
- Flick left or right to select copies. When you click on one of them, the date it was added to the archive will be displayed at the top.
- Select the documents you want to return. To cover several at once, click on them with the mouse while holding down the Ctrl key.
- Click on the "Restore" button. It looks like a circular arrow.
The method is suitable for both Win 8 and 10.
The same can be done in the history menu (which is in the Control Panel). Click in it on the line "Restore Personal Files" ("Restore Personal Files"). She is on the left.
Many operating systems can back up data. In Windows 8 and 10, this process is automated. Documents are saved to disk at regular intervals. For example, you can look at the previous version of the report if it was rewritten. Or restore a damaged video, photo, presentation. And just put it back in place