ImgBurn is a small (in terms of footprint) but multifunctional application for burning CD / DVD / HD DVD / Blu-ray discs. The program can create images from discs, burn discs from images, burn discs from files, create images from files, check discs for readability.
How to burn a disc image using ImgBurn
1. Start the program.
2. Switch the program to the mode Recordings... You can do it in two ways
a. Using the quick selection mode (start window of the program). Select item "Burn the image to disk"
b. Or select "Mode" - "Record" in the main menu.

3. Insert a blank CD / DVD / BD depending on the size of the image to be burned.
4. Select the image file for recording by pressing the button "Selecting a file ..."

If you created a disc image with ImgBurn, you should look for a file with a *. CUE / *. MDS. If you did not create an image using this program, but, say, downloaded it, then most likely it will be a file with the *. ISO. The program supports all major disk images.
5. By default, the program will record at the maximum speed, but it is recommended to set the write speed somewhere between 50% -75% of the declared maximum speed. For example, I have a DVD-RW disc, the maximum write speed is 4x, I set the write speed to 2x or 2.4x, this is necessary in order to reduce the likelihood of an error when writing
6. Press the big button "Record" .

7. We are waiting for the end of the recording.
ImgBurn is small, but a lot functional program to work with recording and copying CD / DVD / BD. With the help of it, you can manage almost any information entered on the disk, and how this information is presented on the disk.
It has a lot of settings, having dealt with which, you no longer need to install multi-weight and paid programs like Nero.
For correct DVD-Video recording using the program, I recommend reading the topic at rutracker.org
Later, I hope, I will add an overview of the program settings. I would be glad to receive comments, additions and, possibly, experience of personal use of the program.
ImgBurn is an extremely simple yet reliable and time-tested program for burning CDs, DVDs and Blu-Ray discs. ImgBurn is completely free utility, it can be downloaded and used immediately for free for both personal and commercial purposes.
What the program can do:
- Write files to discs, including images. All kinds of images are supported, you can create boot and installation disks;
- Take images, open and unpack them, create images without subsequent recording with saving on any medium;
- ImgBurn is able to automatically check (verify) the written record for full compliance up to the last byte;
- A variety of work with files is supported;
- Checking the quality of disks by sector;
- Mass recording on a large number of media, ImgBurn is perfect for professional work as well.
OS
ImgBurn works in all Windows versions from 95 to tenth. Accordingly, it perfectly passed the test for full performance in XP, Vista, 7, 8, 10.
Download Russian version 2.5
You can download the Russian version of the ImgBurn program at the following links:
- Direct - Recommended;
- You can download only the program russification file - it will come in handy if the program itself is already installed, but you just need to translate it into Russian.
Instructions for working with ImgBurn 2.5.8.0
Installation
Installation of ImgBurn takes a minimum of time. After downloading, open the archive with the program and run the Setup_ImgBurn_2.5.8.0.exe file. Unfortunately, the entire installation process takes place on English language, since Russification is already taking place in the fully installed program.
The images below will show the whole process step by step. They are clickable, click on the images to enlarge them:
- The standard ImgBurn welcome window, click the Next button:
- By checking the box, we agree with license agreement and click "Next" again

- In the next step, we need to select the package components to install. In the overwhelming majority of cases, nothing needs to be changed and you can simply press the NEXT button:

Change the settings here only if you are an experienced user and know exactly which component needs to be installed on the system. - Next, specify the path where you want to install ImgBurn. Usually this path is already set by default and we don't change anything here either:

- Link with other programs in the start menu. Not relevant at the moment, again skip "as is":

- After the previous point, a window will pop up asking whether to show notifications on exit new version ImgBurn program or not. If you want to receive notifications - click "Yes" (YES), if you do not want - "No" (No). In fact, ImgBurn hasn't been updated for several years, so there won't be much of a difference:

- And finally, the seventh step will simply congratulate you on the successful installation of ImgBurn, press the "Finish" button to exit the installer:

ImgBurn is fully installed! A shortcut in the form of a yellow disk and fire appeared on the computer desktop:
But do not rush to launch it, you still need to make the Russian menu.
Russifier
Make sure ImgBurn is not running before proceeding with the next step. If you did run it, you must close the program window.
The downloaded program must include a crack. This is just one file called russian.lng. Go to the folder with installed program, find the "Languages" folder in it and copy this file there:
Typically, the path to the folder is: C: \ Program Files (x86) \ ImgBurn \ Languages , less often like this: C: \ Program Files \ ImgBurn \ Languages , depending on the bitness of the operating system.
After that, launch ImgBurn and make sure that the setting for the Russian version of the interface is automatically installed. If this did not happen, then go to the top menu in the "Tools" tab, then "Settings" and select the Russian language yourself:
Work
In addition to the program itself, the "ImgBurn Report" window will also be launched, you can close it and not use it. At any time later, the report can be opened using the CTRL + Shift + L key combination, or through the "View" menu.
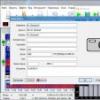
As you can see, the ImgBurn interface itself is extremely simple:
The following functions are available:
- Burn the image to disk;
- Burn files / folders to disk;
- Create an image from disk;
- Create an image from files and folders;
- Check the disk;
- Quality test.
Let's analyze the capabilities of ImgBurn point by point:
Burn image to CD / DVD / Blue Ray
Most often this is required to create a complete copy of another disk, create bootable media, installation disk etc.
To burn, first select the image file itself (see the image below), then the drive, which already has a blank disc, you can set the byte check after recording and set the speed:
If you have nowhere to rush, then you can set the speed lower in ImgBurn. If you need a lot of disks, then set the speed to maximum and select the number of copies lower - convenient for underground pirates :).
With a byte check (verification), the write process will increase by 2-3 times. The test mode will simulate writing to disk, but it will remain blank.
Burn files and folders to disc
The procedure is about the same as with recording an image, but here you can "throw" any number of files, folders, archives, images, etc., as long as it all fits on the disk.
It is not necessary to add or enter file paths manually into the ImgBurn source window. You can drag the mouse over the window. In the same place, you can change the order with the mouse.
You can find out the current total size for a record by clicking on the calculator icon. On the "Device" tab, you can reduce the speed from the minimum and set the number of copies. The name of the entire disk is set in the "Labels" tab, the "Volume label" field.
Create image from disk
It will come in handy when you need to not just copy files from a laser disk to a computer, but to take a complete image using ImgBurn, for example, for subsequent recording of a full copy to another medium or for uploading it to download on the Internet:
Here's what you can do:
- Select a drive with a disc that we will copy using the downloaded ImgBurn;
- In the destination field, indicate where the program will put the image and enter its name;
- The reading speed can be left unchanged in this case.
Creating an image from files and folders
Also, for the subsequent convenient transfer or recording to the medium of a set of different files, folders, including subfolders, ImgBurn has a mode for creating an image from files and folders. In this case, the image will be created on the hard disk of the computer or written to a USB flash drive, you can even put it on remote server to download later.
Everything was simple, but now it's even easier! We just drop in the large field on the left all the necessary files and folders that we want to pack into an image. In the field "Purpose" indicate its location and give a name. By clicking on the icon on the right, you can find out the size of the future image, and even easier - put a tick in front of "Auto".
Checking the disk for compliance with the image
It's just when you need to compare with the original image recorded to disk with the help of ImgBurn. All the same "Data verification". In order not to resort to this tool, during recording, simply put a tick “Check” and then everything will be done automatically at the end of the recording task.
Quality test
ImgBurn will check for damage to the laser media due to scratches, manufacturing defects, thermal effects, surface contamination and the like.
Sometimes it is worth checking disks with important data. For example, family photos and videos, sensitive personal information, documents, work files, etc.
Official site
Our site is the official support site in Russian, where you can download the ImgBurn program for free latest version 2.5.8.0 with a crack.
Free analogues
In the field of recording disc images, there are a large number of both paid and free programs. This niche is gradually fading, but it is still in demand.
Let's consider several worthy analogs of ImgBurn from free software.
Small CD Writter
The Small CD Writter program is so simple and small that its weight is only about 300 kB and, unlike ImgBurn, it does not need to be installed on a computer: just download, run and use it, it was originally created in Russian!
Unlike ImgBurn, the Small CD Writter utility cannot take images from discs, but it implements the three most popular functions for such software:
- Information on laser disk(whether it is rewritable, whether the last recording is finalized, the maximum speed and a number of other data);
- The "Clear" function will simply erase all data from the rewritable "disc";
- And finally, the recording of images, files and folders. You can create installation media for Windows and other operating systems.
As you can see Small CD-Writter has several disadvantages compared to ImgBurn. The main disadvantage is that it does not know how to make images and is not capable of performing a byte-by-byte check after recording, which is extremely important when creating bootable media or recovery discs.
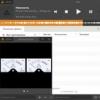
Video on using it:
The official website of the developer: avt-lab.ru, you can download the Small CD Writter program by.
Ashampoo Burning Studio FREE
More powerful, heavier, with a powerful yet intuitive interface.
Downloading and installing it is a little more difficult than the previous two programs, but it might be worth it. From the pros of Ashampoo Burning Studio FREE over ImgBurn:
- It is much easier to create various variations of discs, such as: a music disc for listening in a player that does not support mp3 format;
- Audio CD ripping allows you to rip music from a regular CD to your computer and immediately convert it to mp3 format;
- Burn a classic DVD for watching in an old DVD player that can't read modern compression formats.
You can download it from the official Ashampoo website, but you have to get a personal key to run it. To do this, you just need to enter your address Email and a key will come to him. Or you can download it with the key.
Output
ImgBurn is the most straightforward tool to burn bootable media and then automatically check the accuracy of the recording. Newbies may have questions about downloading, installing and Russification, but our instructions above with screenshots will help with this.
If you have any questions or wishes - add them through the form below. If necessary, our specialist will answer.
ImgBurn – free program for writing and reading disc images, as well as for burning files of all formats to CD, HD DVD, DVD and Blu-ray discs. If necessary, using the program, you can check already burned discs for readability.
Optical disc burning software today is represented by a large number various programs... Some of them are supplied free of charge, others require the purchase of a key. ImgBurn belongs to the first type of programs, so you definitely won't need to pay for rich functionality.
One of the features of the ImgBurn program is support for almost all existing drives from various manufacturers. The application finds mutual language with all latest drives, including recorders with booktype / bitsetting parameters (notably Sony, NEC, LiteOn, BenQ, Plextor)... In the settings of the ImgBurn program, you can set its association with such image files as PDI, ISO, GCM, BIN, NRG, CDI, DVD, IMG, LST, FI, UDI, CDR, MDS.
In addition to all of the above, the user will be able to verify the recorded data on the information carrier and receive necessary information about the disk. The ability to search the Internet and install new firmware for PC drives is present. Supports not only fast, but also complete cleaning of disks from information. Before burning an ISO image, it is possible to change its label, block or unblock the opening of the drive.
Once installed, the app takes up very little space, especially when compared to paid heavyweights like Nero. You can download ImgBurn to your computer using the link below, or from the official website.
Russification of the program
Interestingly, ImgBurn supports a lot of languages (over 30), including Russian. To change the language of the program, just place the translation file .lng to folder Languages (which is located in the directory where the program is installed, usually C: Program Files / ImgBurn / Languages) and select in the settings Tools / Settings / Languages / Russian.
Screenshots of the program