Home comfort
Sometimes the chargers used by gadgets fail. There are people who are interested in trying everything for themselves. As a result, homemade phone chargers are born.
We do portable charging
We take 4 batteries (preferably large capacity) and insert them into the compartment for them.
DIY wireless charger for your phone
We measure the voltage with a tester, it should be at least 5 volts. This is because modern phones can be charged from a 5V USB port.


Related Videos
Making a charging cable

Checking the charging
Wireless charger

Finally
Home comfort
Technologies
Hobby
Hobby
Hobby
Hobby
Technologies
Business
home and family
home and family

This scheme offers:
2) Low consumption
Device diagram-

Transistors - were selected through experiments, so transistors with the lowest opening voltage were selected, this made it possible to create a circuit that starts working from a voltage of 0.55 volts! The output voltage remains stable even if the input voltage is raised to 1.5-2 volts. This function of the converter allows the use of 1.2 volt nickel batteries as a power source.
How to make a portable phone charger ??
This is the main reason for the creation of such a device, since factory field chargers cannot work from 1.2 volts, they need a 1.5 volt battery to work, and as we know they cannot work for a long time, periodic replacements are needed. Of course, you can use Duracell type batteries, but they are quite expensive. In the same device, you can use finger-type batteries, which can be charged.
600mA / h - 35 min
850mA / h - 45 min
1000mA / h - 1h
1500mA / h - 1.5h
2000mA / h - 2h
2200mA / h - 2h 15min
3000mA / h - about 3h
3300mA / - more than 3h 15 min

Program format board LAY
Home comfort
How do I charge my phone? Portable and wireless charging
Sometimes the chargers used by gadgets fail. There are people who are interested in trying everything for themselves.
DIY wireless charging
As a result, homemade phone chargers are born.
Reasons for creating a charger with your own hands
How do I charge my phone? This question does not bother many people, but only until they encounter problems that can lie in wait for everyone.
So why would we need to create a phone charger?
- Failure of the telephone battery - until the purchase of a new one.
- The ability to recharge your phone where there is no network.
- The ability to create a spare charger.
The simplest answer is how to make a portable phone charger from batteries.
We do portable charging
How to charge your phone if you have batteries, a compartment for them, a charger for them or an old mobile phone and a USB extension cable?
Batteries must be AA type. In addition, a soldering iron and a tester must be available.
We take 4 batteries (preferably large capacity) and insert them into the compartment for them. We measure the voltage with a tester, it should be at least 5 volts. This is due to the fact that modern phones can be charged from the USB connector, which has a voltage of 5 V.
From the USB extension cable, which is not a pity to use, we cut off the plug that connects to the computer. We study the pinout of the contacts, call the tester. We find + and -, we remove the rest of the wires with wire cutters and insulate.
We put a thermocambric on the wires and process it with a lighter to ensure a tight entrance. We make a fitting at the place where the plug is attached.
We will need to solder the wires to the metal rivets. For this purpose, soldering acid is used, which can be applied with a tin stick, after which we tin the rivets.
We solder the wires in accordance with their charge.
The connector must be glued to the body after degreasing or scraping off the connector and plastic with a knife.
Apply heated glue to the body and press down. We coat with glue around, closing open contacts. The remaining unnecessary wires are bitten off and covered with glue. If necessary, you can mask it with a marker.
We insert the batteries. They must be of the same capacity. Moreover, their total capacity should exceed that of a telephone battery.
Related Videos
Making a charging cable
After making the charging itself, the question "How to charge the phone?" not removable, since the cable still needs to be made.
Cut off the small connector of the USB cable, the length of the cable should be half a meter.
We cut the wires in the same way. + and - has already been identified, no need to repeat. We bite off the rest of the wires, after which we place them in a thermocambric, clean them, and tin.
Batteries can be charged in different chargers designed for them. In most cases, mobile phone chargers can also be used.
You can not complicate your life, but charge the batteries in appropriate chargers.
Checking the charging
We insert the charged batteries into the booster, to which we connect the USB cable on one side, and on the other side we connect it to the phone and check the charging.
After a while, the voltage on the booster may drop, so it is better to use batteries with a larger capacity.
Thus, we figured out how to charge the phone with our own hands.
Wireless charger
Extension cords can stop charging the phone, they can fray, the charging socket in the phone can become loose. All this necessitates wireless charging. How to make wireless charging for the phone, consider below.
The principle of wireless charging is based on the fact that a coil is built into the charger, which creates a magnetic field, under the cover of the phone there is another coil that serves as a receiver. When the receiver is in the range of the conductor, electromagnetic pulses are activated. Through rectifiers and capacitors, there is an impact on the phone battery.
But before you make your choice in favor of wireless charging, you must take into account that it has a number of negative qualities:
- there is no reliable data on the effect on the human body;
- transmission of energy is ineffective;
- a full charge of the battery is restored in a longer period of time compared to wired charging;
- the working capacity of the battery may be reduced;
- If the package is incorrect, the battery may overheat, leading to premature wear.
Let's see how to make a wireless charger for your phone.
This requires several meters of thin copper wire. The conductor is wound into a coil with the number of turns equal to 15. The spiral to maintain its shape is fixed with double-sided tape or glue. We leave a few centimeters of wire for soldering. The connection to the charging socket is made using a capacitor and a pulse diode, which are attached to opposite ends.
The size of one turn on the conductor should be 1.5 cm.After twisting, the diameter of the resulting coil is 10 cm.
An even thinner copper wire, 30 turns, is used to form the transmitter. The circuit is closed by a capacitor and a transistor. We place this device into the area of the transmitting ring with the display up.
Finally
Thus, the question of how to charge your phone has several answers. Charging can be battery powered or wireless. In any case, a person who understands electricity should do it, otherwise you can run into problems.
Home comfort
How to make a phone stand? Convenient gadget from scrap materials
In our progressive times, it is difficult to meet a person who would not have mobile phone... Even by sending a child to first grade, parents provide him with the necessary means of communication. We use modern mobs ...
Technologies
How to make a speaker for your phone - take your music with you
If you want to learn how to make a speaker for your phone with your own hands, then this guide is especially for you.
Hobby
How to make glasses for dolls quickly and beautifully
V recent times, with the advent of the amazing Monster High dolls on sale, most of the children who have such a toy are carried away creative process to come up with all sorts of things for a full-fledged game with a new object ...
Hobby
How to make a kitchen for Barbie and Monster High dolls?
Play dolls up to 35 centimeters tall are today one of the most popular toys for girls around the world. On sale you can find not only whole doll families for every taste and budget, but also various a ...
Hobby
How to make DIY phone cases
Mobile phones are not uncommon today, they are just a necessity. The modern world simply cannot exist without various devices that help to communicate at a distance. But whatever their technology ...
Hobby
How to make a phone case with your own hands: original ideas
It's hard to imagine, but some 10-15 years ago, a mobile phone in the hands aroused enthusiastic glances from others, because it was a real wonder. Today you will not surprise anyone with this useful device. However ...
Technologies
How to choose a portable battery for your phone. Portable chargers: prices and reviews
Along with increasing the functionality and performance of mobile phones, the requirements for batteries are also increasing. A typical battery is capable of providing operation of the device for 2-3 days, but if ...
Business
Quail food: composition, rate, recipe and price. How to make food for quails with your own hands?
For many, their own private farm has become a symbol of their own vegetables and fruits, which allow them to diversify their table with fresh and organic products. Some breed chickens, geese and ducks to ...
home and family
How to make toys for a parrot with your own hands: a review of ideas, master classes and recommendations
Everyone who has a parrot knows firsthand how restless and curious these motley birds are. That is why it is very important to come up with as many interesting activities for them as possible. If you don't, och ...
home and family
How to make a rabbit enclosure: detailed instructions, drawings and recommendations
Charging a mobile phone from a battery with your own hands
In one of the schemes reviewed on the Internet called charging a mobile phone from a finger battery, many drawbacks were given. And the proposed scheme, taking into account everything, is considered further, and appearance it is shown in this picture on the left.
This scheme offers:
1) High stability of work
2) Low consumption
3) High efficiency of the converter
4) Works in a wide range of input voltages
The output current of the circuit reaches 350mA! This allows you to charge your mobile phone like a standard charger.
Device diagram- charging from a penlight battery:
The circuit uses a storage choke, which was taken from a digital car radio. The choke can be wound on a ring from energy saving lamps. They wind 15 turns with a wire of 0.3-0.6 mm, the wire must be stretched along the entire ring.
Transistors - were selected through experiments, so transistors with the lowest opening voltage were selected, this made it possible to create a circuit that starts working from a voltage of 0.55 volts! The output voltage remains stable even if the input voltage is raised to 1.5-2 volts. This function of the converter allows the use of 1.2 volt nickel batteries as a power source. This is the main reason for the creation of such a device, since factory field chargers cannot work from 1.2 volts, they need a 1.5 volt battery to work, and as we know they cannot work for a long time, periodic replacements are needed.
DIY portable USB phone charger
Of course, you can use Duracell type batteries, but they are quite expensive. In the same device, you can use finger-type batteries, which can be charged.
Charging time, depending on the capacity of the battery used, batteries 1.2 volt.
600mA / h - 35 min
850mA / h - 45 min
1000mA / h - 1h
1500mA / h - 1.5h
2000mA / h - 2h
2200mA / h - 2h 15min
3000mA / h - about 3h
3300mA / - more than 3h 15 min
Zener diode - any for a voltage of 5 - 6 volts, if you are too lazy to buy, then you can evaporate from any impulse power supply unit, for example, a power supply unit from a DVD player. All other components can be found in the attic or bought; in general, the cost of manufacturing such a device does not exceed $ 2. As a result, you get an autonomous charger, the characteristics of which are many times better than similar factory devices.
Program format board LAY
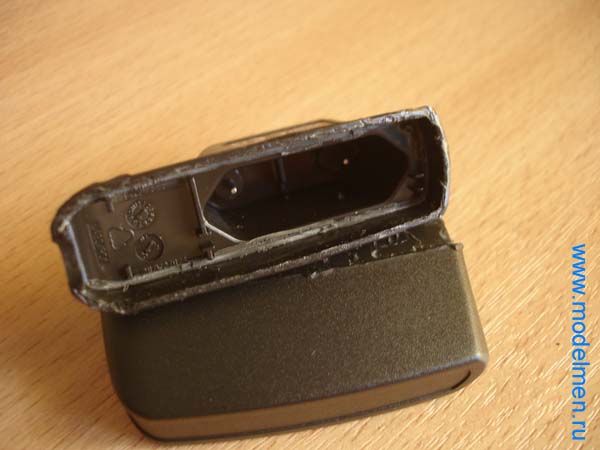
I wonder what the Siemens charger (power supply) consists of and whether it is possible to repair it yourself in case of a breakdown.

First, the block needs to be disassembled. Judging by the seams on the case, this unit is not intended for disassembly, therefore, the thing is disposable and there is no need to pin high hopes in the event of a breakdown.

I had to literally raskurochit the case of the charger, it consists of two tightly glued parts.

Inside is a primitive board and a few details. Interestingly, the board is not soldered to the 220V plug, but is attached to it with a pair of pins. In rare cases, these contacts can oxidize and lose contact, and you think that the block has broken. But the thickness of the wires going to the mobile phone connector pleased me pleasantly, you don't often find a normal wire in disposable devices, usually it's so thin that it's scary to even touch it).

There were several details on the back of the board, the circuit turned out to be not so simple, but still it is not so complicated that you would not be able to fix it yourself.

Below in the photo are the contacts of the inside of the case.
There is no step-down transformer in the charger circuit; an ordinary resistor plays its role. Then, as usual, a couple of rectifying diodes, a pair of capacitors for rectifying the current, then a choke and finally a zener diode with a capacitor complete the chain and output the reduced voltage to a wire with a connector to a mobile phone.

The connector has only two pins.

If such a charger breaks down, first of all, pay attention to the appearance of the parts, often only by appearance it is possible to determine which part is out of order.
How to make a phone charger
Inspect the throttle carefully, it has a very thin wire and it can simply burst. If you cannot identify anything by eye, and you yourself do not understand anything in electronics, ask those in the know to check the details with a tester. If the power supply cannot be repaired at all, then you can assemble your circuit much easier, and if you use a step-down transformer in the circuit, as is done in branded memory from mobile Nokia phones, then the problems with breakdowns will disappear for a long time. And finally, the easiest way to fix this charger is to buy a new one 🙂
One of the most important problems modern man having a smartphone is the constant discharge of the device's battery. Especially for such cases, portable chargers have been created that allow you to connect a gadget using USB cable and charge your smartphone using the battery built into the charger.
So, to make a portable charger, we need:
- Two krone accumulators (one of the accumulators can be used),
- Box (you can use a metal candy box),
- A switch that can be removed from an old cassette player or a broken children's toy
- And most importantly, a USB car charger, which can be purchased for about $ 2-3,
- And also the copper wires with which we will connect everything.

First of all, we need to make a removable stamp for the battery. If you have old toys or devices at home that use krone batteries, then ready-made brands can be removed from them. If there are no such toys or devices, then you can make the brand yourself. To do this, you need to remove the upper part of the crown battery, smear the flux on the metal contacts from the inside and solder copper wires to them. For fixing and insulation, you can use regular hot melt glue.

Brands are ready, they can be attached to the contacts of the second battery (wide contact to narrow, and narrow to wide).

The next thing we need to do is to disassemble the car charger, taking the board on which the USB connector is located. It remains only to collect all the components of our portable charger and connect everything through the switch.

When connecting the stamp to the battery, you can see which of the wires is positive, and which is negative, if you use multi-colored wires. If not, then you can mark a plus one for greater convenience and ease.
The center wire or spring on the car charger is always positive, and the wire on the side is always negative. So, we must connect the positive wire of our battery to the switch, and the negative wire directly to the charger board.

If the positive wire on the charger is made in the form of a spring, it can be replaced with a normal one for greater convenience.
After that, the two positive wires must be soldered to the two pins on the fork.

The device is almost ready. It remains to assemble it in a box, on which in the side you need to cut out two passages for the USB input and the switch.
Method 4. External energy storage with a solar battery
Another interesting option. As daylight hours begin to increase, it is important to discuss the benefits of solar energy storage. You will see how to make a portable charger that can be charged from solar panels.
We have to:
- Lithium-ion battery of 18650 format,
- Case from the same drives
- 5V 1A voltage boost module.
- Charge board for the battery.
- Solar socket 5.5 V 160 mA (any size)
- Connection wiring
- 2 diodes 1N4007 (others are possible)
- Velcro or double-sided tape for fixing
- Hot glue
- 47 ohm resistor
- Contacts for energy storage (thin steel plates)
- Pair of tumblers

- Let's study the basic circuit of an external battery.
The diagram shows 2 connecting wires of different colors. Red connects to "+", black to "-".
- It is not recommended to solder the contacts to the lithium-ion battery, so we put the terminals in the case and fix them with hot glue.
- The next task is to place the voltage boost module and the charging board for the battery. To do this, we make holes for the USB input and USB output 5 V 1 A, a toggle switch and wires to the solar panel.
- We solder the resistor (resistance 47 Ohm) to the USB output, on the back of the module that increases the voltage. This makes sense for charging iphone... The resistor will solve the problem with the very control signal that starts the charging process.
- To make the panels easy to carry, you can attach the panel contacts using 2 small female-male contacts. Alternatively, you can connect the main body and panels with Velcro.
- We put a diode between 1 contact of the panel and the charge board of the energy storage. The diode should be placed with an arrow in the direction of the charge board. This will prevent the storage battery from discharging through the solar panel.
IMPORTANT. The diode is placed in the direction FROM the solar panel TO the charge board.
How many charges will such a Power Bank last? It all depends on the capacity of your battery and the capacity of your gadget. Remember that discharging lithium drives below 2.7V is highly undesirable.
As for the charge of the device itself. In our case, we used solar panels with a total capacity of 160 mAh, and the battery capacity is 2600 mAh. Therefore, under direct light conditions, the battery will be charged in 16.3 hours. Under normal conditions - about 20-25 hours. But don't let these numbers scare you. It will charge via miniUSB in 2-3 hours. Most likely, you will use the solar panel when traveling, hiking, long trips.
Finally
Choose the method that works best for you and build your own portable battery. Such a thing will definitely come in handy on the road or on a trip. There are a lot of advantages of the made device: it is a unique appearance, and also a way to get the power that will satisfy exactly your needs. With the help of a portable battery, you can charge not only phones, but also tablets, wireless headphones and other small gadgets.
Recently have become very popular portable chargers for mobile phones or otherwise they are called Power bank ... They are sold in many stores, and we can buy them without any problems, but I think many radio amateurs are much more interesting make your own portable charger for your mobile phone. This article will show you a simple scheme charger powered by AA batteries.
Almost all devices that recharge via USB computer such as mobile phones, MP3 players, cameras and much more can be charged from conventional AA 1.5 volt batteries, if desired, they can be replaced with rechargeable batteries.
Experimental model of portable charger with overvoltage protection:
The scheme according to which you need to assemble the charger:

Since the circuit uses discrete components, an overvoltage protection system has been included in the circuit, in case any element fails. How the circuit works will be described below.

The main component of the circuit is chip 7805, which is a 5-volt voltage regulator with a maximum output current of 1.5 amperes. Therefore, this charger will give a maximum of 1.5 A to charge your mobile.
Let's make a small digression from the topic. Recently I encountered a problem, I needed to help my relatives from Germany to issue a visa, the queues at the embassy turned out to be a couple of months ahead and then I came across the site http://www.visardo.ru/ where the visa was made in just a week.
The zener diode in the circuit provides an output voltage of no more than 5.6 volts, and if the output voltage exceeds 5.6 volts, automatically protection will work disconnecting the power supply of the 7805 microcircuit.
For reliability, a 2A fuse can be installed in front of the microcircuit to be more sure that the charger will turn off when an overvoltage occurs.
Output 7805 is connected to a USB type "mother" from which you will recharge your gadget. In this circuit, we used four AA batteries, 1.5V and 1.5A each.
Well, yes, perhaps this charger will be larger than those sold in stores and it needs batteries, but as I said at the beginning, much it's more interesting to do something with your own hands than just buy.
Making a solar USB charger for your phone with your own hands is one of the most interesting and useful projects on. Making a homemade charger is not too difficult - the necessary components are not very expensive and are easy to obtain. Solar USB chargers are ideal for charging small devices, for example, a telephone.

The weak point of all homemade solar chargers is the batteries. Most are assembled on the basis of standard nickel-metal hydride batteries - cheap, affordable and safe to use. But unfortunately, NiMH batteries have too low voltage and capacity to be seriously considered as a quality, the power consumption of which only grows every year.

For example, iPhone battery 4 2000 mAh battery can still be fully recharged from a homemade solar charger with two or four AA batteries, but the iPad 2 is equipped with a 6000 mAh battery, which is no longer so easy to recharge with such a charger.

The solution to this problem is to replace the nickel-metal hydride batteries with lithium ones.

In this tutorial, you will learn how to make a solar USB charger with a lithium battery with your own hands. Firstly, compared to this homemade charger, it will cost you very little. Secondly, it is very easy to assemble it. And most importantly, this lithium USB charger is safe to use.
Step 1: Required components for solar USB charger assembly.

Electronic components:
- Solar cell 5V or higher
- 3.7V Li-ion battery
- Charge controller lithium ion battery
- DC USB Boost Circuit
- 2.5mm Panel Mount Connector
- 2.5mm plug with wire
- Diode 1N4001
- The wire

Construction materials:
- Insulating tape
- Heat shrink tubing
- Double Sided Foam Tape
- Solder
- Tin box (or other enclosure)

Instruments:
- Soldering iron
- Hot glue gun
- Drill
- Dremel (optional, but desirable)
- Nippers
- Wire stripper
- Friend's help

This guide will show you how to make a solar powered phone charger. You can refuse to use solar panels and limit yourself only to the manufacture of a conventional USB charger on lithium-ion batteries.

Most of the components for this project can be purchased from online electronics stores, but the USB DC step-up circuit and lithium-ion battery charge controller will not be easy to find. Later in this guide, I'll show you where you can get most of the required components and what each one is for. Based on this, you yourself decide which option suits you best.

Step 2: Benefits of Lithium Battery Chargers.

You may not guess, but most likely the lithium-ion battery is right now in your pocket or on your desk, or maybe in your wallet or. Most modern electronic devices use lithium-ion batteries characterized by large capacity and tension. They can be recharged many times. Most AA batteries are nickel-metal hydride in terms of chemical composition and cannot boast of high technical characteristics.
From a chemical point of view, the difference between a standard AA NiMH battery and a lithium ion battery lies in the chemical elements contained within the battery. If you look at the periodic table of elements of Mendeleev, you will see that lithium is in the left corner next to the most reactive elements. Nickel, on the other hand, is located in the middle of the table next to chemically inactive elements. Lithium is so reactive because it only has one valence electron.

And it is precisely for this reason that there are many complaints about lithium - sometimes it can get out of control due to its high chemical activity. A few years ago, Sony, a leader in laptop batteries, manufactured a batch of low-quality laptop batteries, some of which spontaneously burst into flames.
That is why, when working with lithium-ion batteries, we must adhere to certain precautions - very accurately maintain the voltage during charging. This manual uses 3.7 V batteries, which require a charging voltage of 4.2 V. If this voltage is exceeded or decreased, a chemical reaction can get out of control with all the ensuing consequences.
This is why extreme care must be taken when working with lithium batteries. If handled with care, they are reasonably safe. But if you do the unacceptable things with them, it can lead to big trouble. Therefore, they should only be operated strictly according to the instructions.
Step 3: Selecting a lithium-ion battery charge controller.

Due to the high chemical reactivity of lithium batteries, you must be 100% sure that the charge voltage control circuit will not let you down.
Although you can make your own voltage control circuit, it's best to just buy a ready-made circuit that you can be sure of working. Several charge control schemes are available to choose from.
Adafruit is currently launching the second generation of lithium battery charge controllers with several available input voltages. These are pretty good controllers, but they have too much big size... It is unlikely that on their basis it will be possible to assemble a compact charger.
On the Internet, you can buy small modules of lithium battery charging controllers, which are used in this manual... I also collected many others based on these controllers. I like them for their compactness, simplicity and the presence of an LED indication of the battery charge. As with Adafruit, in the absence of the sun lithium battery can be charged via the USB port of the controller. USB charging is an extremely useful option for any solar charger.
Regardless of which controller you choose, you must know how it works and how to properly operate it.
Step 4: USB port.

The USB port can charge most modern devices... This is the standard all over the world. Why not just plug the USB port directly into the battery? Why do you need a dedicated USB charging circuit?
The problem is that according to the USB standard, the voltage is 5V, and the lithium-ion batteries that we will use in this project have a voltage of only 3.7V.Therefore, we will have to use a USB DC boost circuit that increases the voltage to enough to charge various devices... Most commercial and home-made USB chargers, on the contrary, use step-down circuits, since they are assembled on the basis of 6 and 9 V batteries. Lower-voltage circuits are more complex, so it is better not to use them in solar chargers.

The circuit used in this manual was selected as a result of extensive testing of various options. It is almost identical to the Minityboost Adafruit scheme, but costs less.
Of course you can buy an inexpensive USB charger online and disassemble it, but we need a circuit that converts 3V (voltage of two AA batteries) to 5V (voltage on USB). Disassembly of normal or car USB charging will do nothing, since their circuits work to lower the voltage, but on the contrary, we need to increase the voltage.
In addition, it should be noted that the Mintyboost circuit and the circuit used in the project are capable of working with Apple gadgets, unlike most other USB chargers. Apple devices check USB info pins to know where they are connected. If the Apple gadget detects that the info pins are not working, it will refuse to charge. Most other gadgets do not have this check. Trust me - I've tried a lot of cheap charging schemes from eBay - none of them have been able to charge my iPhone. You do not want your homemade usb charging could not charge Apple gadgets.
Step 5: Battery selection.
If you google a little, you will find a huge variety of sizes, capacities, voltages and costs. At first, it will be easy to get confused in all this diversity.
For our charger, we will be using a 3.7V Lithium Polymer (Li-Po) battery, which is very similar to an iPod or mobile phone battery. Indeed, we need a battery exclusively for 3.7 V, since the charging circuit is designed specifically for this voltage.
The fact that the battery should be equipped with built-in protection against overcharge and over discharge is not even discussed. This protection is usually referred to as "PCB protection". Search on these keywords on the eBay online auction. She is only a small printed circuit board with a chip that protects the battery from over-charging and discharging.
When choosing a lithium-ion battery, look not only at its capacity, but also at its physical size, which mainly depends on the case you choose. I had an Altoids tin box as the case, so I was limited in the choice of the battery. At first I thought of buying a 4400 mAh battery, but due to its large size I had to limit myself to a 2000 mAh battery.
Step 6: Connect the solar panel.

If you are not going to make a solar charger, you can skip this step.
This guide uses a 5.5V 320mA solar cell in a hard plastic case. Any large solar panel will do. For the charger, it is best to choose a battery rated for 5-6 V.

Take the end of the wire, split it in two and strip the ends a little. The wire with the white stripe is negative, and the completely black wire is positive.

Solder the wires to the corresponding pins on the back solar battery.
Cover the solder joints with tape or hot glue. This will protect them and help reduce stress on the wires.
Step 7: Drill a tin box or case.

Since I used an Altoids tin box for the case, I had to do a bit of work with a drill. In addition to a drill, we also need a tool such as a dremel.
Before you start working with the tin box, fold all the components into it to make sure in practice that it suits you. Think about how best to place the components in it, and only then drill. The locations of the components can be marked with a marker.

After the designation of places, you can get to work.
There are several ways to remove the USB port: make a small cut right at the top of the box, or drill a hole of the appropriate size on the side of the box. I decided to make a hole in the side.

First, attach the USB port to the box and mark its location. Drill two or more holes within the designated area.

Grind the hole with a dremel. Be sure to follow safety precautions so as not to injure your fingers. Do not hold the box in your hands under any circumstances - grip it in a vice.
Drill a 2.5mm hole for the USB port. Expand it with a dremel if necessary. If you don't plan on installing a solar panel, then there is no need for a 2.5mm hole!
Step 8: Connect the charging controller.

One of the reasons I chose this compact charging controller is its high reliability. It has four contact pads: two in the front next to the mini-USB port, where DC voltage is supplied (in our case, from solar panels), and two in the back for the battery.

To connect the 2.5 mm connector to the charging controller, you need to solder two wires and a diode from the connector to the controller. In addition, it is advisable to use heat shrink tubing.

Fix the 1N4001 diode, charging controller and 2.5mm connector. Place the connector in front of you. If you look at it from left to right, the left contact will be negative, the middle one will be positive, and the right one is not used at all.

Solder one end of the wiring to the negative leg of the connector, and the other to the negative terminal on the board. In addition, it is advisable to use heat shrink tubing.
Solder one more wire to the leg of the diode, next to which the mark is applied. Solder it as close to the base of the diode as possible to save more space. Solder the other side of the diode (unmarked) to the middle leg of the connector. Again, try to solder as close to the base of the diode as possible. Finally, solder the wires to the positive terminal on the board. In addition, it is advisable to use heat shrink tubing.
Step 9: Connect the battery and USB circuit.

At this stage, you only need to solder four additional contacts.

You need to connect the battery and USB circuit to the charge controller board.

Cut some wires first. Solder them to the positive and negative pins on the USB circuit, which are located on the underside of the board.

Then connect these wires together with the wires coming from the lithium-ion battery. Make sure to connect the negative wires together and connect the positive wires together. Let me remind you that the red wires are positive, and the black ones are negative.

After twisting the wires together, weld them to the contacts on the battery, which are on the back of the charge controller board. Before soldering the wiring, it is advisable to thread it through the holes.
Now we can congratulate you - you have 100% completed the electrical part of this project and you can relax a little.

At this point, it is a good idea to test that the circuit is working. Since all the electrical components are connected, everything should work. Try charging your iPod or any other gadget equipped with USB port... The device will not charge if the battery is low or defective. Also, place the charger in the sun and see if the battery charges from the solar panel - this should illuminate the small red LED on the charge controller board. You can also charge the battery via a mini-USB cable.
Step 10: Electrical isolation of all components.

Before placing all the electronic components in the tin box, we must be sure that it cannot cause a short circuit. If you have a plastic or wooden case, then skip this step.
Place a few strips of duct tape on the bottom and sides of the tin box. It is in these places that the USB circuit and charging controller will be located. The photographs show that the charging controller was left loose.
Try to insulate everything thoroughly so that a short circuit does not occur. Make sure the solder is strong before applying hot glue or tape.
Step 11: Place the electronic components in the housing.

Since the 2.5mm connector needs to be bolted in, place it first.


My USB circuit had a switch on the side. If you have the same circuit, then first check if the switch that is needed to turn on and off the "charging mode" works.

Finally, you need to secure the battery. For this purpose, it is better to use not hot glue, but a few pieces of double-sided tape or electrical tape.

Step 12: Operate your homemade solar charger.

In conclusion, let's talk about the correct operation of a homemade USB charger.
The battery can be charged via the mini-USB port or from the sun. A red LED on the charge controller board indicates charging, and a blue LED indicates a fully charged battery.


