If Windows has stopped loading, then to recover correct work you can use standard utilities.
One of the main nightmares of computer enthusiasts is to face a situation where they cannot turn on the device. The operating system starts to load, but eventually displays a message like: “Failed to configure windows updates, the changes are being canceled, do not turn off the computer. " After that, nothing new happens - the software cannot recover, and the download stubbornly does not help. Best Antivirus for Windows 10 The best antivirus for Windows 10 Viruses and all kinds spyware are the most common causes of PC problems. We figure out how to defend. More details
System recovery tools
Before the release of Windows 7 similar situation turned into numerous dances with a tambourine, and often a complete reinstallation of the operating system. Now everything is different, and often the problem is solved by standard Microsoft tools, which do not even need to be specially installed. The task comes down to, in principle, to be aware that such a toolkit exists, as well as to the banal remembrance of it when suddenly something "irreparable" happened.
The trick is to boot your computer, even before the icons appear. Windows boot, have time to get into the advanced parameters of this boot itself, where it will be possible to run diagnostics and, if necessary, restore the system to the selected checkpoint. In Windows 7, when booting, it was required to press the F8 function key, and then select the "Troubleshoot" option (although in rare cases the "Last Known Good Configuration" option saved).
Additional boot options for Windows 7
Once in the "System Recovery Options" menu, in most cases one of the first two options became the salvation. "Startup recovery" could have saved the operating system in automatic mode, and System Restore required you to manually select a checkpoint to roll back to.

Recovery options Windows systems 7
Windows 10 backup Windows 10 backup In order to be able to restore it to its original state in the event of a malfunction of the operating system, you must make a recovery disc in advance. More Microsoft would have changed itself if, with the update of its brainchild, it would have left all the useful tools in the old way. Restoring the Windows 10 system is carried out by pressing the "hot keys" Shift + F8, and, unlike the "seven", you need to press this combination very, very quickly, since the operating system itself began to load much faster.

Windows 10 boot options
Has undergone changes and appearance saving menu. Having chosen "Diagnostics", in the "Additional parameters" there are already familiar to us "System Restore" and "Startup Recovery" (only in a different order). There is also an option "Return to the previous build" if you upgraded to the "dozen" from one of the previous versions of Windows.

Extra options boot Windows 10
If automatic repair didn't work
Restoring your Windows system to one of the past checkpoints is not a difficult task. It is only important that these points themselves exist in the system, because sometimes users themselves manually disable their creation, at the same time deleting the existing ones. Indeed, it makes sense to clean up old checkpoints from time to time, since they take up a lot of space. But giving up recovery points altogether is a risky business. Safe Internet via DNS Safe Internet via DNS How to navigate the Internet without catching viruses? Secure DNS servers will help. Learn more To make sure that restore points are automatically created for you or to make changes to the appropriate settings, you need to select the display of icons "Large icons" (or Small, but not Categories) in the "Options" window and select the "Recovery" item. There already select "System restore settings", check whether protection is enabled and, if necessary, use the "Configure" button. Here you can manually create a point for later recovery.
Recovery Windows computer 10
Windows 10 restore points
If we have restore points, then using the method described earlier, that is, using the built-in Windows tools to restore the system, you can quickly roll back to an earlier state of the computer without losing important files.
Create a Windows 10 recovery image
As a last resort, you will have to restore the system to its original state or according to a previously created system image. It is advisable to create the "System Image" and "System Recovery Disc" in a working state of the operating system, after you have installed all the applications you need. This is all done through the same "Control Panel" (aka "Options"), when browsing by "Categories", selecting "Backup and Restore (Windows 7)". Here you can restore operating system to a previously created image, if the computer is still booting, but has already stopped working as it should. Limiting Windows 10 Tracking Limiting Windows 10 Tracking With each release of the operating system, Microsoft asks more and more information from users. But you can moderate her appetites. More details
Restoring a laptop to factory settings
If standard means do not help, and you do not have a disk or USB device with a recovery image, laptop owners can use the "hot keys" to launch the built-in recovery utility. Some models may even have a separate key for these purposes, for example, Lenovo's OneKey Recovery, but this is rather an exception. In other cases, it is important to know which " hotkey»For your laptop, as it tends to differ from manufacturers.
Hotkeys for laptop manufacturers:
F3 - MSI; F4 - Samsung; F8 - Fujitsu Siemens; F8 - Toshiba; F9 - ASUS; F10 - Sony VAIO; F10 - Packard Bell; F11 - HP Pavilion; F11 - LG; F11 - Lenovo ThinkPad; Alt + F10 - Acer (before that select in BIOS - Disk-to-Disk (D2D)); Ctrl + F11 - Dell Inspiron; Clamp - Rover.
The factory utility will restore the device to its original state, as if it were fresh from the store. This will delete all programs with settings, all files, including your favorite photos, which just for such cases it makes sense to store in cloud services... However, the device will be able to work again, and in some cases this method will simply help to prepare the laptop for subsequent resale or transfer to relatives.
pcgramota.ru
Five methods to recover Windows 10 system (step by step guides)
Windows 10, like earlier operating systems, can be susceptible to, for example, virus attacks or system errors. As such, Microsoft has provided Windows 10 with special built-in features so that you can perform a quick recovery of the operating system, allowing you to effectively return it to a working position. Among these tools, the new product contains, as well as the methods of reanimating the OS that have already been tested over the years, for example, using a previously created restore point or recording an image of the entire OS on an external medium, but some improved methods have also been introduced, such as USB creation specifically for the possibility of recovery.
This article describes in detail for Windows 10 five methods to ensure quick recovery from system failures. The first three methods should be used when not particularly difficult situations arise, and the last two will effectively help even in cases where the system cannot be loaded. The option of a clean installation of the system will not be considered here, since it already refers to the cardinal methods and even in its essence can no longer be called a recovery method, since the OS will be installed "from scratch" (with the formatting of the system partition hard disk).
Method 1: Using the Return Point to Healthy State
It is provided that in the automatic Windows mode 10 like her previous versions at regular intervals creates points for the possibility of its recovery. But at any time, the user can always save such a point and in manual mode... For example, before making any important adjustments to the system, or before installing applications and special software.
The main advantage of method 1 is that after the procedure, all information on the user's computer is saved and only software installed later than the date of the restore point will be removed.
If the user is interested in the question: "How to restore the OS using 1 method?", Then the procedure is as follows:

Method 2: Rollback to factory state
The Top Ten now has a function that allows you to return your PC to factory settings. This method provides the ability to perform a total system rollback or without affecting the personal information of the owner stored in the computer.
How to restore the OS through the reset function? This requires the following sequential steps:

Method 3: Using the file backup function
In Windows 10 there is a convenient function "File History", with which the user can independently or by setting automatic execution in the settings, create backup copies of the information stored in the PC. To do this, you just need to enable this setting and show what exactly needs to be backed up. The time interval after which you need to create copies of files is specified in the settings. This, in the event of failures or errors in the OS, will allow you to quickly and without investing much effort, return your information and resume full-fledged work with them. 
Method 4: by creating a USB disk
In cases where the OS does not start at all, the first three methods will not be able to help. In this case, you will need to already use the recovery disc, which allows you to use additional features downloads.
The algorithm of actions consists of the following stages:

Method 5: using bootable media with Windows 10
If there is no previously created recovery disc and if it is impossible to boot the PC, you will need to use bootable media with Vindos 10 to restore the system. Bootable (installation) media is created on a USB flash drive or on a DVD drive.
The sequence of steps to be performed is as follows:


WindowsTune.ru
Windows 10 System Restore
- 1 Create a snapshot
- 2 Recovering
- 3 If it does not load
Windows 10 is under continuous testing. This means that errors pop up from time to time. It's no wonder that restoring Windows 10 in such conditions is a necessary process. Problems arise due to the implementation of updates by developers. After all, this whole bunch of applications and equipment that exist on the market must be adapted to the requirements of the new operating system.
Create a snapshot
You can imagine that the return of a computer to its previous state is a leap in time. Windows 10, in addition to our desire, automatically photographs its configuration. Such fragments of memory have important files and drivers in working versions. So for Windows 10 it is very important to take a snapshot of itself before installing any software. The user can do such an operation on his own.
To do this, click on the Start menu and select Control Panel.
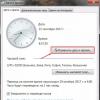
After that, you need to click on the System item.
Go to a new window and click on System Protection.
We check such a parameter as the partition for which Windows 10 recovery is enabled. Place the cursor on this section, select it and click Configure.
In the next window, you need to put a full stop opposite Turn on system protection. It is recommended to allocate around 15% for the storage of all our restore points. Next, you need to click OK.
After realizing that the restore point is being created on the C drive, we begin this process.
We restore
So, let's say something bad happened. For example, a virus got on the computer or a new program strongly affected its work. In this case, rollback to previous snapshots is applied.
Press the Restore button in the System Properties window.
See also: What's the catch in upgrading to Windows 10
Windows 10 will then prompt us to select any snapshot. For example, we can stop at the one that we created ourselves.
If it does not load
And if everything is really bad, and Windows 10 does not even boot, then you can try to restore it by first inserting the boot disk. Such a disc can be created from DVD media. For this purpose, the usual Windows tools will help us.
- Press the Start button.
- Then select Control Panel.
- Next, we click on System and its maintenance.
- Then we select Backup and Restore.
On the left side of this window there will be a command Create a system recovery disc. You just need to follow the instructions. Naturally, such operations must be done in advance, even before fatal problems with the computer begin. After you've managed to create a disc, you need to use it wisely.
- We insert the disc into the DVD drive of the sick computer.
- We reboot the machine using a special button on the case.
- If boot from disk is not set, then we go to BIOS and bring up boot from DVD up in the Boot menu.
- In the menu that boots up, you need to select the recovery option and click Next.
That's all, as you can see, there is nothing to be afraid of computer failures. There are both automatic saves and manual methods for archiving the integrity of the software. If you do everything correctly, then you just need to click on several buttons a couple of times and roll back to the working one. Windows versions 10. Windows 10 recovery will always save us.
(Visited 1 924 times, 1 visits today)
windowsprofi.ru
Windows 10 recovery
Let's try to restore Windows 10 and deal with many options in ascending order of complexity. Actually, they have a lot in common: in all cases without exception, except for the full recovery of Windows 10, we need a backup.
To begin with - the most important files and documents, and ideally - the entire system disk ... To ensure the reliability of the system, we need to secure the most important disk - the first one, the system one, as well as our user information, that is, documents. Restoring Windows 10 can be done in several ways:
- Returning the computer to the initial state
- Using File History
- Using restore points
- From the system image
- Using a recovery disc
How to restore Windows 10 to its original state
First of all, you need to pay attention when we want to restore Windows 10 to its original state, this is the "Restore" function. To do this, open Settings >> Update & Security >> Recovery and click the Get Started button.

Here we are offered two options for action. Reset the computer to its original state. "Reset" the system with the deletion of all installed programs, with or without saving personal files. The last resort should only be used in an emergency ... and with a backup of all valuable information.

Special download options. Finally, other operations to restore the system can be done by restarting the computer in a special "recovery" mode - we will return to this later.
The last item on this menu offers a clean install of Windows using new program Refresh is the same reset, only with a subsequent reinstalling Windows 10 from the "distribution" automatically downloaded from the network. We will use this method only in those cases when the usual "reset" will be impossible.
In both cases, take care of backing up your documents and photos in advance - unless, of course, they are stored in the "cloud", as I advised you, and not on a separate disk. Remember: a system reset only affects the master, system disk, all other drives on your system remain safe.
Recovery disk
If the computer refused to start, then an installation disc or a recovery disc that we created earlier will come to our aid. See: How to create a Windows 10 recovery drive. To start from removable media, you need to make some settings. It is necessary to use boot menu put the boot from USB Flash Disk, only then we will boot from the recovery disk.
Once in the recovery environment, you will be presented with multiple tasks to restore the system, even rollback to the initial state if other methods do not help.

Windows 10 recovery mode
You can roll back to the previous "restore point" even if the computer does not boot at all. In such cases, after several boot failures, the computer automatically boots into a special Windows 10 recovery mode, from where you can "get to the bottom" of any saved "snapshot".
How do I start recovery mode? Restart your computer and use special commands: Options >> Update and Recovery >> Recovery >> Special boot options. If you see this picture after restarting your computer, you can first try clicking on the first item and continue downloading as usual. If this did not work out, we have a direct road to the Troubleshooting section.

In this menu, we will find many useful commands that will help us in case of a failure. For example - loading in Safe Mode, with a minimum of commands and attachments. In Safe Mode, you only have to make do with standard drivers and programs ... but that's what we need! This mode can be used if the system "hangs" at the very last stage of loading, after the logo appears and disappears from the screen. Most often this happens due to problems with drivers or some programs in the Startup Menu - in safe mode they won't start, so you can, with some experience, catch them and remove them. But the most important section with recovery tools will open to you when you press the F10 key.
Thus, we get access to boot management - an unusually powerful tool that will come to your aid in case of various kinds of errors. Here the system will offer you to "reset" to a clean system state - either keeping your personal files and settings, or completely. Of course, this method is too radical for simple failures - it will fix the errors, it is undoubtedly, but in passing it will destroy all the programs installed on the computer. Well, let's leave this recipe as a last resort and click on the Additional link: there is one more "First aid kit".
This is much more interesting: for a start, we can try to fix boot problems (if any) - this will help us with Startup Repair. It does not affect our personal data or installed programs, checking the integrity system files and a number of drivers. Alas, in case of the most severe failures, this repairman will not help us, but at least it is worth trying.

The Windows 10 System Restore tool will allow you to roll back to a saved "restore point" (we will talk about them below). Let me remind you that such "points" with a snapshot of the registry and other important system files are created automatically when you install new programs ... But you can do it manually - say, some potentially dangerous software.
Finally, the Boot Options menu will allow you to restart in "safe mode" without launching most of the device drivers and startup programs. This can help you in case of problems with video card drivers or antivirus: they are potentially the ones that most often "freeze" the system at startup.
As you can see, the Boot Menu capabilities are large enough to fix most Windows 10 problems - although I sincerely hope you never have to see it on screen.

And at the same time, I will remind you of my favorite method of resurrecting a system from the dead during the most severe failures, up to a complete failure of a hard disk - restoring from an image, a backup saved on another hard disk (preferably an external one). I must say right away that Windows itself is able to create such "images", and it is not for nothing that the Restore Image command is included in the boot menu. But this is just the case when you should not hesitate to choose a separate program for this job, be it the free Rescue Kit on Paragon or talented in every way, but hopelessly paid Acronis True Image.
Restoring Windows 10 from a system image
If we have a copy of the system image, when the time comes to make Windows recovery 10 from the image will not be difficult and we can restore the computer in a few minutes without having to install all the programs. In order to restore a system partition from an image, you need to start the computer in the recovery environment: Options >> Update and Recovery >> Recovery >> Special boot options.

After entering the password account, you will need to select the image from which the system distribution will be restored.

After simple manipulations, the system will warn you: All data on the recovered disks will be replaced with data from the system image. Click "Yes" and wait for the process to complete. After restarting your computer, you will see that the system looks the way you made it at the time of the imaging. See the article: How to create a Windows 10 image.
Recovery point
Creation of "restore points", that is backups configuration files and important system files. They take up little space, but they will allow you to reanimate the system in the overwhelming majority of cases. Windows periodically (usually when new programs are installed) creates snapshots of the system state. And if you have several such “points” at your disposal, you can return the system “back to the past”. And not until the moment of the birth of life on your computer, but only a day or so ago, until the "glitch" appeared.
To do this, we need to go to the old System Restore menu of the Control Panel (System and Security section) - you already know that the easiest way to get to it is by typing the word "Recovery" in the search bar.

Click on the line "Start System Restore" - a "calendar" will open in front of us, in which all restore points will be listed. And at the same time - the programs, before the installation of which they were created. And if you know for sure that your system was "damaged" by a video card driver, you just need to find its name in the list and roll back to the date before its installation.
 One subtlety: By default, the "restore point" system in Windows 10 is disabled. And if you are going to use it, then even when you first start your computer with a "fresh" system, you need to enable and configure it. This is done in the System Restore Settings menu: please note that for each disk on your computer it is turned on separately (if there are several of them on your computer, I recommend limiting yourself to only the system one). In addition, you can adjust the amount of disk space allocated for storing "points" - the more you allocate space, the more "points" the system will be able to store.
Using the same menu, you can create a Restore Point manually (although the configuration is automatically "backed up" by the system after installing important updates or programs, so you have to resort to this operation less and less). See article: Restore point in Winows 10
The Windows 10 recovery procedure is reversible: in case of failure, you can easily return the system to a previous state
Using File History
It is better to store documents and photos from the very beginning in the "cloud", that is, not in folders on the Desktop, as we are used to, but in storages such as Dropbox or OneDrive (if this is more convenient for you, create a shortcut for these folders on the Desktop) ... See How to use cloud storage.
If you don't trust the Net, store them in special folders Documents, and include Backup OneDrive in the system settings, and if you have a separate storage device (for example, an external USB hard drive), use Back up using File History.
Unfortunately, this method only protects your information, but not system files; it will not help restore Windows 10 after a crash.
Hello to all! In the last article, we learned how. In today's article, we will learn how to enter Windows 10 Safe Mode if the system does not boot due to any errors.
Friends, as a result of which our operating system usually stops loading? That's right, due to damaged system files and critical drivers, but most often Windows does not load because of the programs and drivers we have installed that are not designed to work in our operating system. Let me explain in a little more detail.
How to enter Windows 10 Safe Mode if the operating system won't load
Recently, one person contacted me, he successfully updated his Windows 7 to Windows 10, but after the update his drivers for the video card and TV tuner were lost. I updated the driver for the video card for him, but with the TV tuner it turned out to be more difficult, on the official website of the device only drivers for Windows 7 were posted, there were not even drivers for Windows 8.1. In support, I was told that there are no 100% working drivers on Win 10 yet, but there are beta drivers and they suit someone and who does not.
I downloaded and installed the drivers along with the software on the TV tuner without even creating a restore point just in case. The driver installed and asked for a reboot, after the reboot, a blue death (blue screen) appeared on the monitor, several reboots led to the same effect - the system boot ended with a blue screen.
What happened. Blue screen death is a defensive reaction of Windows to an incorrectly working code, that is, the system was automatically protected by a blue screen, from a malfunctioning TV tuner driver. To remove the incorrect driver, I decided to use Safe Mode.
- Note: everything would be easier if I had before installing the driver.
We all know that Safe Mode is specially designed to troubleshoot various operating system malfunctions. In Safe Mode, Windows 10 starts with a minimal set of Microsoft-owned and trusted processes. Therefore, we can use safe mode to remove incorrectly working drivers, or programs that led to a failure to boot Windows or its unstable operation.
All this is clear, but how to enter Safe Mode if Win 10 won't boot !?
In the initial window of the system installation, click keyboard shortcut Shift + F10.
A command prompt window will open, enter (suitable for any computers, including laptops with UEFI enabled and the Secure Boot option, the command:
bcdedit / set (globalsettings) advancedoptions true
the command will make a change to the boot store configuration (BCD) file.
The operation completed successfully.

Restart your computer, the Special Boot Options window will open.
Press the key F4 or 4 to enter safe mode, you can also use other special modes used when troubleshooting Windows 10.
If you want to enter the operating system in the usual way, then press Enter on the keyboard.

Here we are in Windows 10 Safe Mode.

We remove the incorrect driver or program in the usual way.
Drivers are usually installed into the operating system along with the software.
Open the Computer window and click Uninstall or change the program.

Find the name of the software that is not working properly and click Remove.

If you installed the driver manually without the installer, uninstall it directly in the Device Manager - right-click on it and select Uninstall.


If you want to remove the appearance of the Special Boot Parameters window at startup, then boot from a bootable Windows 10 USB stick into the recovery environment, run command line, enter the command:
bcdedit / deletevalue (globalsettings) advancedoptions

This command will undo the previously made changes to the Boot Storage Configuration (BCD) file.
For insurance, before work, you can do.
One of the worst things that can happen to your computer is if it just refuses Windows 10 does not start or does not load for a long time... If the system cannot even initialize, it can be difficult to pinpoint the source of the problem.
But don't despair. Even if it seems that things are very bad, there can be a lot of reasons, and it is worth trying the recipes for solving them before admitting that nothing will help. windows 10 offers several methods for diagnosing the boot process that you can easily apply yourself. And with a bit of luck, this guide will help you fix your boot problems.
Windows 10 won't load or take a long time to load. Solution
Step 1. Checking the battery
If you have a laptop, the reason for the reluctance of the system to boot normally may be. Try using a different charging cable. Make sure the cable works by plugging it into another laptop. Take out the battery and connect the device to a power source.
Removing the battery will help you understand which component is causing the problem, and whether the problem is in general. The main thing here is to check only one element at a time. If the system does not boot due to a power problem, it is important to understand what exactly needs to be replaced - the cable, the battery, or some other component.
We load into the command line
If your computer won't boot normally, there isn't much you can do with it. However, it is possible that it can boot into the command line, which will give you more tools to diagnose it, and even to solve the problem. To do this, you need Windows 10 on boot disk or .
To boot into the command line, start the system. While they are initializing, try to see the keyboard shortcut for entering. It usually appears next to the supplier's logo.
Go to the tab Boot and set the first boot device to USB or DVD (depending on where your copy of Windows is located). The details of this process may vary from system to system, so check the steps against the instructions on the screen. Next, insert the disc with copy of Windows into the system, save the configuration and restart the computer.
When prompted, indicate that you want to boot from disk. Enter the language and other requested parameters and on the next screen select Repair your computer. Next select Troubleshoot > Advanced options > Command Prompt, and you will see a window for entering commands.
Using System Restore or Startup Repair
If you are already booting Windows with installation disk or a USB stick, it is worth trying a couple of utilities available in the process. When you boot according to the instructions above, you will have access to settings that can reanimate your computer. On the Advanced Options screen, look for links to System Restore and Boot Repair.
System Restore is a utility that allows you to roll back to a previous restore point while the computer was still working normally. If the boot problems were not caused by the hardware, but by changes you made, this might solve them.
Boot Repair is a tool specifically geared towards solving problems when Windows refuses to start. If you can't find the source of your boot problems, it's worth running this utility.
Reassign the drive letter
If multiple drives are installed in the system, it may cause boot problems for Windows users 10 if you accidentally assign a different letter to the partition where Windows is installed. However, this question will require minimal effort if you use the command line.
Boot into a command prompt as described above and enter the following command to launch the disk partitioning utility:
After that enter list volume to see options for all partitions on your system.
Here use the commandsselectandassign lettersto assign the correct letters to the sections you want. For example, if I want to assign the letterEsectionAudio CDin the picture above, I first enter “ select volume 0 " and then " assign letter = E ».
Be extremely careful when making any changes via the command line. Errors can cause new problems.
Bypassing the Windows 10 bootloader
If the problem occurs with a "fresh" Windows installation 10, the case may be in new version loader utilities. Sometimes it can simultaneously try to load an OS already installed on another disk.
Fortunately, there is a fairly simple way to figure this out. Boot into command line and enter the following command:
bcdedit / set (default) bootmenupolicy legacy
Restart your computer and you should see that the bootloader old version replaced the Windows 10 version. Now you should have no problems booting into Safe Mode or accessing an already installed OS.
We use a third-party utility
The hardest part about solving boot problems is figuring out what exactly is causing the problem. When the system does not even want to start, diagnosing the "disease" is not an easy task. Can help with this Boot Repair Disk utility.
Boot Repair Disk is an open source program that automatically searches for and fixes boot problems. It is very easy to use - you just need to choose which version of Windows you have installed, 32- or 64-bit. The further process of finding and fixing errors is completely automatic, although there are some settings.
When you already seem to have gone through all the options and nothing comes to mind, try Boot Repair Disk. It does not guarantee a cure, but it can pinpoint the source of the problem that has never been found.
Problem loading Windows 10 operating system can occur for a variety of reasons. One of them is damaged standard bootloader Windows Boot Manager, which is responsible for the actual launch of the "dozens". This usually happens when several operating systems are installed on the computer and we have unsuccessfully removed one of them. There are other reasons as well. In these cases, immediately after the start screen, instead of the Windows logo, an inscription appears about the impossibility of loading the operating system (for example, "An operating system wasn't found") and a lot of other text on the whole screen on a black background.
If the matter is in damage boot sector then you can try automatically repair Windows 10 bootloader using the media with the ISO image of the version of Windows 10 installed on the computer (flash drive or DVD). There are other ways (for example, through the command line, again when starting from a flash drive with an ISO image), but personally, in all cases, it was the simple option described below that helped me - so why look for complex paths where simple ones can work?
To automatically repair the Windows 10 bootloader, so that our the operating system started to start again, you need to boot from the USB flash drive. How exactly to do this, you need to look specifically for each computer. For example, at startup I need to press F12, and then select a USB flash drive with a clean image of Windows 10 from the list and the computer will boot from it. You can set the USB flash drive as a priority device for booting into BIOS (or UEFI). if something is not clear, then on the Internet you can find options for downloading from removable media for your specific model computer or laptop.
Automatic bootloader repair using Windows 10 ISO image (from flash drive, DVD)
After starting from USB stick after a while, a screen will appear as in the picture below. Click on it "Next", as well as about the usual clean installation Windows 10.
But at the next step, we need to select NOT "Install", but " System Restore».

Now we choose the following action: " Troubleshooting».

In the next menu, go to " Extra options».


We choose our operating system (it is not always suggested to do this - sometimes the recovery begins without going through this stage.)
As a rule, in the end, Windows 10 still starts as expected. And this indicates that the bootloader has been restored.
If repair Windows 10 bootloader automatically did not work, then you should try to do it using the command line.