Planning to get a new computer? You have 2 ways - buy a ready-made one or assemble it yourself. The advantages of the first way are obvious: bring it, plug it in and use it. No unnecessary hassle... Convenient, but ... deciding to do this, you are likely to overpay. Yes, and inside the sealed system unit may not be what you expected. For example, cheap "noname" hardware sold to you at a high end price, or a slightly trimmed defect that, at best, will fail before the warranty expires. And at worst, right after it ends.
Assembling a computer from separate components is a troublesome, but more reasonable way. First, such a purchase is 10-25% cheaper. Secondly, you will know exactly what your iron "pet" consists of. And thirdly, you can do it yourself quite well, even if you have no idea about the compatibility of parts. Online configurator services will come to your aid, and this article will teach you how to use them.
Before starting the assembly, check for yourself:
- For what tasks will the new PC be used.
- What budget do you have.
The most economical option is office class computer... The range of tasks for which it is intended is small. This is work in undemanding applications, the Internet, listening to music, watching videos on YouTube, simple games. Such a car (turnkey kit) will cost about 15-25 thousand rubles. It usually includes:
- Inexpensive motherboard.
- Inexpensive processor like Intel Celeron with built-in graphics core so that you can save on the graphics card. Or plus a budget graphics card.
- Box cooler.
- Hard disk drive (HDD).
- 2-4 GB random access memory.
- Case with built-in power supply, peripherals.
Medium budget option - multimedia pc... These are most often bought for the home. Multimedia computers are used for a wide variety of tasks, excluding heavy games and particularly resource-intensive applications. The assembly cost is 30-60 thousand rubles. As a rule, it includes:
- Motherboard based on a modern chipset with a large set of slots and USB (optimally - with USB 3.1 support).
- Modern processor Intel Core i3-i7 or AMD equivalent.
- Cooling system (CPU cooler + 1-2 case fans).
- Multimedia or gaming grade video card.
- SSD + HDD (the first is for the operating system, the second is for data storage)
- 8-16 GB of RAM.
- Power supply unit for 500-650 watts.
- Multimedia monitor.
- Case, peripherals, expansion boards.
An expensive option - gaming pc... The price of a computer for gaming on average starts from 60,000 rubles, the upper threshold is not indicated. The assembly usually includes:
- Gaming motherboard.
- Modern Intel Core i5-i7 processor or AMD equivalent.
- Productive cooling system of air or water type.
- 1-2 gaming graphics cards.
- Discrete sound card (with good sound built-in audio is optional).
- SSD + HDD.
- From 16 GB of RAM.
- Power supply from 550 W and more powerful.
- 1 or more gaming monitors.
- Case, gaming keyboard, mouse and other accessories.
Separately, we will single out servers and specialized computers, for example, for video editing, mining, etc. Their price can be anything, but it is usually quite high. The composition of the configuration is determined by its purpose.
How to budget when buying parts
Start shaping the assembly of your future computer with the key and most expensive part. This is, as a rule, a processor, and when buying a gaming PC, a processor + video card bundle. And sometimes a monitor.
Secondly, we select:
- Motherboard.
- Cooler.
- Power Supply. We determine the required power after the selection of the remaining components, but we allocate funds in advance, since it is impossible to save on the power supply.
The third stage is what you can save on. Of course, the savings should in no way affect the quality of the devices. This category includes parts, the purchase of which can be postponed in the event of a shortage of money. Or buy in less volume than planned.
- RAM. If it is not possible to buy everything at once, for some time you can get by with one module.
- HDD.
- Expansion cards ( sound card, TV tuner, DVD / Blu-ray drive, etc., optional for PC operation).
- Periphery. If you do not have enough funds for expensive gaming devices, you can use the usual ones for a while. It's better than slashing your budget for a graphics card or power supply.
- Frame. The cost of the case of the system blocks does not always reflect their quality. Some manufacturers increase prices only for decor - lighting, unusual shapes, etc. If jewelry is not the main thing for you, feel free to buy a case with a regular design. The main thing is that it is roomy (especially important for long video cards and tall tower coolers), with a convenient location of the compartments (the power supply is at the bottom, the shelves for disks are across, the compartment for cables is present), as well as with ergonomic placement of buttons and connectors on "Muzzle".
Assembling a computer using the online DNS store configurator
Let's figure out how to use the online configurator using the example of the DNS computer store service. The choice fell on him, since there is a device compatibility check and everything else is very simple and intuitive. For example, let's put together a game system unit in the minimum configuration.
Let's start by choosing a processor. To do this, go to the service page and click the "Add" button in the first line.

The left column of the next page contains the characteristics of the CPU, and the right column lists products from the store's assortment. We select an Intel brand processor with a free multiplier (for overclocking). After we marked the parameters of interest, the service automatically found suitable models. Having chosen one of them - Intel Core i5-6600K without a cooler, we press "Set".

- For a gaming computer.
- GPU manufacturer - NVIDIA.
- GPU Model - GeForce GTX 1080.
- The amount of memory is 8 GB.
They may be different for you. In general, when choosing components for a gaming PC, be guided by system requirements the most resource-intensive game you intend to play on it. Then you can't go wrong.

Our choice fell on the GIGABYTE GeForce GTX 1080 WINDFORCE OC. We add it to the kit and proceed to the selection of the motherboard.
In order for the service to display only those motherboards that are suitable for the selected processor, in the upper part of the filter (characteristics) table we put the label "Compatible".
From the rest, we noted:
- For a gaming computer.
- Form factor - ATX (full size).
- On the base Intel chipset Z270.
- With USB 3.1 type A and C ports.
Next to the name of each product, there is a short list of its characteristics. To open Full description, just click on the directory line.

The kit went Gigabyte board GA-Z270-Gaming K3.
We noted:
- Tower type.
- Copper base.
- 4-pin connection connector.

The choice fell on the DEEPCOOL GAMMAXX 200T.
The next components are RAM and SSD. Let's take 2 Kingston HyperX FURY Red 16 GB sticks and solid state drive Plextor M8SeY 512 GB.
Finally, let's pick up the power supply. The total power consumption of our assembly is 352 W (to find out, click on the button shown in the screenshot at the top of the page).

It is desirable that the rated power of the power supply exceeds this value by at least 25-30%. We got almost 2 times more, and that's not bad.
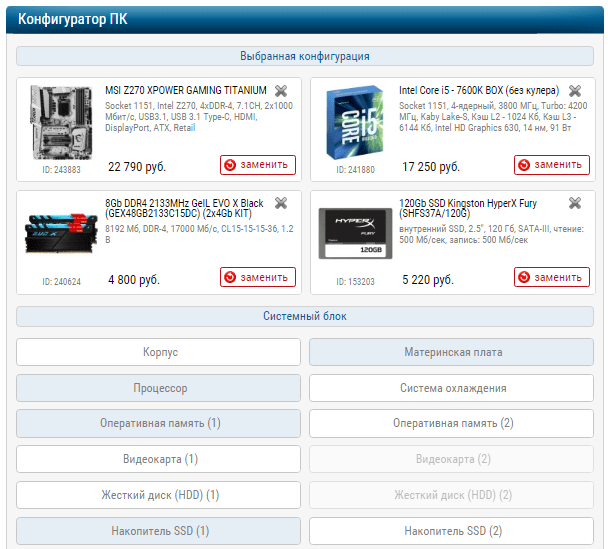
There are no compatibility problems in our assembly. When they are there, the first button on the panel (with puzzles) turns red. The hardware is selected optimally, only the case of the system unit is missing. But we will buy it sometime later, since the price of all this stuff was as much as 124,993 rubles.

You can save your assembly to personal account on the DNS website (registration is required) and in the same place, if you want, to make a purchase. But we do not advise you to do this right away, since there are similar configurator services in other stores, where prices may be lower, the assortment is richer, and the delivery time is shorter. Let's get to know them.
Regard store configurator
Computer configurator with compatibility check allows you to quickly assemble the system unit with the necessary for the user technical characteristics... With the help of our online construction set, you can easily build a reliable office machine, home multimedia system unit or a powerful gaming configuration.
Assembling your computer online
Nowadays, like many years before that, assembling a computer from self-selected components is popular. it good opportunity pick up exactly what you want. Nothing limits you, hundreds of options are available for assembly, among which there will definitely be one that you like.
Our online store offers the possibility of assembling a computer online through the configurator. In it, this process is presented in the form of categories of components, from the processor to the power supply. Each category contains an expanded assortment of models with descriptions of characteristics for ease of selection.
To simplify the selection of components, a compatibility filter for the main components of the assembly is configured in the configurator. For example, by selecting a specific processor, the following components are automatically filtered by compatibility. Also, you will be presented with a choice to install the operating system. After completing the assembly process, you get the final result in three parameters: price, technical data, rendered image. After placing an order and confirming it by phone, our specialists assemble this complete set, check its functionality.
The advantage of this method of buying a system unit is that you not only choose the components you want, but also have the opportunity to choose the brand or company of the manufacturer of the part.
After collecting a certain configuration, completing by pressing the assemble / buy buttons, the assembly is assigned a certain serial number, by typing which in the product search bar, you can find this PC and send a link to it to friends or acquaintances for consultation or recommendation to them for purchase.
An important feature of our configurator is the function "get an expert opinion" By sending your request via this form, You will receive a detailed answer with a recommendation for email specified by you.
Try it and see for yourself - assembling a computer online is easy and simple! In case of difficulties, you can always get advice from our specialists on all issues of interest to you.
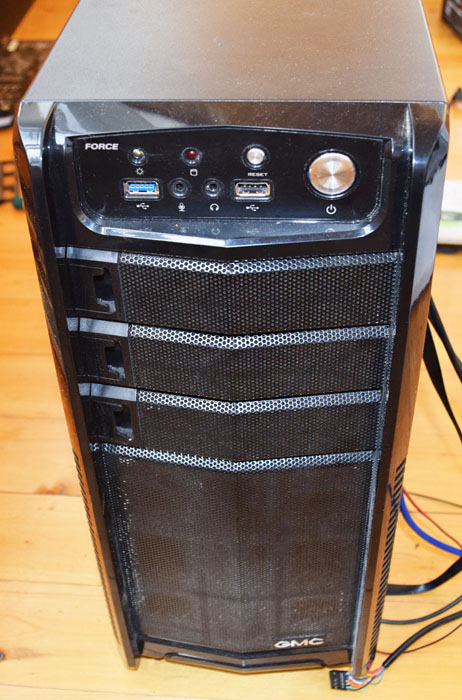
At first need to prepare the case system unit for assembly.
- Unscrew the screws from the side panels of the case
- Remove both side covers
- Installing the motherboard connector panel before installing it in the case
This panel for connectors, already always included with motherboard. Carefully (so as not to cut yourself on its sharp edges) we insert it into the body until a characteristic click, it should snap tightly in the case.

Preparing the motherboard for assembly into a PC case
At this stage, we prepare the motherboard to install it in a PC case. We will install:
- CPU
- RAM modules
- Cooling system for the CPU (cooler, fan)
Installing an Intel processor (Intel)
First thing remove the protective black plastic from a processor socket. Simply squeeze the retaining clip and remove the plastic protection.

Gently grip the processor with your fingers and set it to socket paying attention to its correct orientation.

Back clamp the clamp with some effort at the end of the action.
The central processor must "fit into the socket" effortlessly and the use of force.

At this stage, we will install cooling system for the processor... In this case, a standard cooler is used, the one that came with the processor, the so-called "boxed" one.
If you have your own thermal grease, it is best to replace the one already applied to the heatsink with it. If not, leave it as it is and install the CO (do not forget to remove the film from the thermal paste!).

We install the cooler so that the fasteners the pins entered their corresponding holes v motherboard... Please note that the power cable reached the connector power supply (in our case, it is located at the top of the motherboard).
Then with an effort snap pins diagonally, and every time there should be a characteristic click.
Connect the fan to the "CPU FAN1" power connector.

Now we need to produce installation of RAM on the motherboard. For this spread the latches to the sides-slot clamps for RAM modules.
Pay attention to the notch in the module RAM, it must necessarily coincide with the partition in the slot. This is protection against incompatible modules. Don't miss this moment, otherwise you can damage RAM!
By installing the RAM module, snap it with snaps that you previously spread apart.

to install into the case motherboard, take it with your hands and install it into the case of the system unit. All side connectors and I / O ports must be very exactly enter the plate with holes for them, pre-installed by you in the case in the previous stages of assembling the computer.

Now screw the motherboard bolts to the case of the system unit. It is better to tighten the first screw a few turns not to the end, so that the other bolts will fit exactly. Tighten the rest of the screws until there is a clear resistance, then screw the first one.

Front panel motherboard connection with usb and audio output
In the manual (instructions) for our motherboard, we should find information on how to connect the front panel with audio and USB output. You must also make sure that all cables do not interfere with the free flow of air in the case.


Installing a hard drive into the case of the system unit
Now install HDD HDD 3.5 inches into the case of the system unit. It is quite easy to do this, as you can see in the photo, the HDD is installed in a specially designated place for it closer to the front of the case.
Secure the hard drive to the sides four bolts, two on each side.

Installing the power supply computer, too, should not cause you any difficulties. Just put it in the appropriate compartment housing and secure with four bolts. Always fasten the bolts better diagonally!


Connecting the Power Supply Cables
At this stage of the build, you need connect power to accessories... SATA (SATA) cable you connect to hard disk and the floppy drive if you choose to install it. As well as EPS cable (CPU power), 24-pin motherboard connector, graphics power PCI cards-E. Make sure that the cables are laid so that no difficulty in heat dissipation.
The power supply has a special output with 4 yellow-black wires, so we connect it into the processor power socket on the motherboard.

In this photo you see connected by SATA cable(5 wires - 2 yellow, 2 black, 1 red) hard drive, top. And power is connected motherboard, bottom right in the photo.
On modern motherboards, you need to connect an additional 4-pin connector, which, as a rule, is separate from the main cable. To make it easier to connect, hold the main connector in your hands, and connect it with additional... Then connect the entire structure to the connector on the mat. board.

Signal cable connection SATA from hard disk to the motherboard to the "sata 1" connector.

Installing a video card in the case
For installation video cards in the case computer, you first need to remove metal strip opposite the PCI-E slot.

Further install the video card itself into the PCI-E slot on the motherboard. For this you need release the locking clip and stick the card until it clicks. Then screw the card to the panel where you removed the metal plate with a screw.

The result of self-assembly of the computer system unit
As you can see, with self-assembly PC system unit anyone can handle the user, if he has all the necessary components and wants to do it himself at home.
- 1. System unit - how to choose accessories?
- 2. Installing the processor, RAM and cooling system.
- 3. Applying thermal paste to the processor
- 4. Installing the motherboard into the case
- 5. Connecting the case controls to the motherboard
- 6. Installing the power supply
- 7. Installing drives
- 8. Installing a video card
- 9. Cable routing and completion of works
Each of us at least once faced a situation when, trusting a sales assistant, he chose a ready-made Personal Computer, and after a few months I realized that for the same money I could get a much more productive version. So that such a story does not happen to any of our readers in the future, we have prepared instructions on how to assemble a computer yourself.
This process, in fact, turns out to be much simpler than many users far from technology assume, but it still has a number of nuances, which we want to dwell on in detail in our material. And we will start with a brief reminder of what a computer consists of and how not to be mistaken in the choice of components.
System unit - how to choose accessories?

When a customer walks into a computer store and sees the breadth of choice of motherboards, processors, video cards and other components, it seems to him that to connect all these devices together, you need to have at least a doctorate in technical sciences. But not everything is so bad, the manufacturers of computer hardware took care of us and many years ago adopted a single standard - Advanced Technology Extended, which unifies the entire hardware of a computer.
The choice of components is the most difficult task when assembling a PC, much more laborious than connecting them together, but this material is devoted to just the last problem, and you can find a comparison of the characteristics of video cards and processors in our other publications.

The basis of our entire future system is the motherboard, as its name implies. It practically does not affect performance, but it is responsible for the proper operation of all components of our computer.
The whole process of assembling a PC essentially consists in connecting components using connectors and wires to the board, and therefore it is worthwhile to first assess what kind of computer you would like to have at the output and, based on this, choose a motherboard with one or another number of cells for RAM, suitable for the desired processor socket, and so on. Same way important characteristic a motherboard is a form factor - it determines what dimensions you need a case, so be careful right away and when purchasing a large E-ATX motherboard do not expect to fit it into a compact case.
Installing the processor, RAM and cooling system.
To assemble a computer at home, we suggest starting by working on an “open stand”, rather than immediately installing your components in the case, not knowing if the system is working or not. The process is as follows: we connect all our parts to the motherboard, update the firmware of the board, install operating system and test the resulting assembly for errors and conflicts. If they are not identified, then we are happy to install all this in the case.
Let's start the process by installing the heart of our future PC - the processor. It should be remembered that two market leaders in the production of processors - AMD and Intel, fundamentally use different socket designs, the former have contact pins on the processor, while the latter prefer to place them in the socket.

For installation AMD processor it is necessary to raise the metal lever, insert the legs into the holes provided for them, and then return the lever to starting position... Thus, we will close the contacts of the processor with the contacts of the socket and reliably fix this position.

When installing Intel, lift the lever and hold-down cover, and after installing the processor, follow these steps in reverse order. Both the one and the other type of processors should be installed in a strictly defined position, which is shown by arrows on the processor itself and on the motherboard socket.

As for cooling the processor, you need to remember that they are all installed in different ways and the only reasonable action would be to strictly follow the instructions. For example, AMD has a passion for fasteners with plastic lugs, and Intel basically doesn't use such a design solution. In general, most CPU coolers are quite universal, and therefore can work with chipsets from both companies, but be careful when choosing - there are also models that are loyal to only one brand.

Do not forget that many coolers can be installed in two positions, which determines through which wall the heated air will come out - back or top. Therefore, before installing, weigh the potency of both options and your case and choose the most productive one.

After we have secured the heatsink and installed the fan on it, all that remains is to connect the power connector to the corresponding connector on the board called CPU_FAN. More expensive motherboards can provide two similar connectors for two coolers at once.
So, to complete the initial work, we just need to install the RAM modules in the DIMM slots. Each bracket has a security key that makes it impossible for you to insert it in the wrong direction, and you will also not be able to insert memory of the same type, for example, DDR3, into a socket on the motherboard that is not provided for it. Thus, installing RAM is the simplest process in the algorithm for assembling a personal computer.

Most processors have a dual-channel set of RAM, and therefore it is recommended to insert an even number of strips. It must be remembered that a sufficiently large processor cooler can overlap the RAM slots on some motherboards, and therefore it is worthwhile to thoroughly study their compatibility before purchasing.
Applying thermal paste to the processor
Many beginners make a common mistake and think that assembly is solely about assembling parts a la constructor. Thermal paste is no less important for the performance of the processor than itself and the cooling system, which helps their tandem to demonstrate maximum performance. As a rule, a small layer has already been applied to the fan sole, so this does not have to be done during the first assembly.

However, if it is absent, just add a couple of drops of the composition and spread them evenly over the area of the CPU heat-distribution cover. Excess, on the contrary, will reduce the thermal conductivity between the processor and the cooler, which will negatively affect the performance of the computer. If you already decided to assemble a computer with your own hands, then at least do not harm it.
Installing the motherboard into the case
The main line when choosing a case for you should be the one that is responsible for the supported form factors of motherboards. The following are the maximum possible sizes of the installed components - believe me, when it comes time to wire the wires, you will say thank you to yourself for choosing the most comfortable case in which you can install all the desired hardware without unnecessary manipulation.

To install the motherboard, you first need to screw the fastening nuts with external and internal threads. As a rule, all bolts and nuts are included with the body, they are standardized, so you hardly need to look for something unique to install your assembly. By fixing the plugs and screwing the nuts, you can move on.
Connecting Chassis Controls to the Motherboard
The panel of a standard case is usually equipped with on / off buttons, as well as USB ports and a headphone jack. As a rule, these interfaces are located at the bottom of the motherboard, and therefore we find them and connect them to the case.

The set of wires is quite standard:
- PWR_SW is responsible for the on / off button;
- RESET_SW activates the reset key;
- HDD_LED ("plus" and "minus") activates the drive activity indicator;
- PWR_LED ("plus" and "minus") is responsible for the operation of the computer status indicator.
Installing the power supply
It's time to install the power supply and connect the cables to the motherboard. All connectors have keys that prevent incorrect connection, so an inexperienced user can handle it. Each connector speaks for itself, and if it says SATA, then it is probably intended for a device with the same interface.

V recent times The power supply compartment is located at the bottom of the case for better ventilation, so make sure that the length of the wires is sufficient for components located in the part of the video card remote from the block. After installing the unit, we stretch two main cables - 24-pin to the motherboard itself and 8-pin to the processor. When purchasing a PSU, we advise you to immediately purchase a bundle of nylon ties so that your bundle does not get confused between the PC parts.

Installing drives
There are several drive form factors: 2.5 ", 3.5", and M2 SSDs. The latter are installed on the motherboard itself, but the first two must first be installed in the case.

Installing a drive into a slot with a slide is as simple as installing RAM, and therefore we will not dwell on this point in detail. It remains only to bring cables from the motherboard and power supply unit to them, which have a SATA connector.

If you want to install an optical drive, then the algorithm is the same - we fix it in the 5.25-inch compartment, remove the front cover and turn on the power.
Installing a graphics card
Since we have set ourselves the goal of assembling a PC correctly, then we cannot do without an item dedicated to the video card. It is installed last and the power cables are pre-installed for it. The graphics accelerator must be installed at the very first PCI Express x16 port, but modern video cards occupy two or even three slots, so access to the downstream port will be blocked.

After these procedures, it remains only to remove two plugs, on which the radiator will be brought out, and also tightly screw the video card to the motherboard and back cover housing. The number of power cables will depend on the power of the video card and in extreme cases you will have to get cables to the power supply unit or use adapters.
Cable routing and completion
The entire list of components is combined into unified system, so it's time to put the finishing touches on it. If the assembly is standard, then you just need to choose what to connect the coolers to: motherboard, reobass or power supply unit. After that, you just need to carefully lay the remaining cables and tighten them with nylon ties, and then close the case cover.

After that, we connect the monitor and other peripherals to the system unit, install the operating system and use a brand new assembled computer.
We hope that our material on how to assemble a computer yourself will help you save money and choose the most successful combination of elements, regardless of the tricks of computer equipment sellers!
Hello everybody! The other day one of my clients asked me to help with choosing a ready-made system unit in a digital supermarket. As I did not try to dissuade him, explaining that in collected computers are almost always selected incorrectly, and the prices for such products are greatly inflated, he remained on his own, and only after I calculated in detail the cost of a system unit for him, as if we assembled it ourselves, and compared the resulting price with the price tag of an already assembled PC, my client agreed with me.
Friends, the whole point is that I know this "kitchen" from the inside. Almost always, a ready-made system unit is assembled from horribly matched components that could not be sold at retail, for example, together with a low-performance processor, a powerful video card can be installed in such a computer (it is because of it that the PC will be called a gaming one), but this is a vidyuha will never give it its full capacity due to a flawed processor. As for the quality of the components, there is a similar story here. In particular, you will not be able to establish the manufacturer of the RAM and video card, and the processor cooling system will be factory-installed and very noisy, the SSD solid-state drive will be from an unknown Chinese "Fast Disk", and the power supply unit has no name at all, on a small microATX motherboard you will not find the PCI slot you need, and on the front panel of the ugly case of USB 3.0 ports, instead of two case fans, you will get one and it will buzz a mile away. And most importantly, the price of this monster will be in the region of 50 thousand rubles! You will be surprised, but if you assemble the system unit yourself, then it will cost 10 thousand rubles cheaper and the quality is undoubtedly better. Yes, I agree that in some cases you can find a decent ready-made computer with normal components, but its price will always be more expensive than you would have built it yourself.
Selection of components for a computer
First, let's define the build sequence. In most cases, the components of the future computer must be selected in this order: Processor-> Motherboard-> Video card-> Power supply-> Cooler-> RAM-> Storage-> Case. A lot of links can be included in this chain (external devices, additional PCI cards, additional coolers, and so on)
CPU
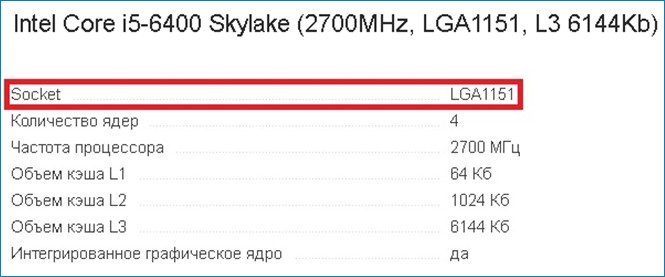
Let's get started! The very first in line is this. We start with a computer heart because such components as a video card, motherboard and cooler are selected for it, and not vice versa, but first things first. The modern computer market is teeming with a huge variety of processors from which you have to choose. Personally, I chose the i5 6400, because it is powerful and inexpensive (11 thousand rubles), besides, it is very easy to overclock (overclock) and operates at a frequency above 4.3 GHz.
So, after you have settled on a model, you, by and large, need two things: remember the socket of this processor (socket is the socket where the processor is inserted) and decide whether the processor will be overclocked ( ).
If you decide that you will overclock, then you will need a specific motherboard based on the z170, z270 chipset (a chipset is a set of microcircuits that coordinates the joint work of all components).
Motherboard
We need to know the processor socket type for. Here we are smoothly and come to the second step. In general, the motherboard offers the buyer the largest and most diverse set of functions and characteristics in comparison with other components. Everyone decides for himself how many slots for RAM he needs, the number and variety of ports on the panel, SATA connectors, etc. That is why its choice should be approached very carefully and prudently. I decided that I would drive the percent. Accordingly, I need a mother on the z170 chipset (or on the z270) and with 1151 sockets. I fixed my gaze on the Asrock z170m pro 4s (price 7 thousand rubles).

If you don't plan to overclock, then take any motherboard you like with the functionality and socket that suits you. Also, do not forget to look in the column "supported processors", in my case the i5 processor is on this list, everything is in order. it had the required number of PCI-Express x16 slots.

The next thing you need to pay attention to is the type of supported RAM (DDR 2, 3, 4), the number of slots for the RAM and its maximum possible volume. This information will be useful to us directly when choosing the memory itself.

Now we look at the parameters "Main power connector" and "Power connector for the processor".
The main connectors are of two types, 20 pin and 24 pin. The connector for powering the processor is 4pin, but 8pin is better.

Another characteristic we need is the form factor of the motherboard. There are four main types of them (not taking into account various modifications): mini-ITX, microATX, ATX, XL-ATX. Their main difference is size. When choosing a case, for the most part, we will be based on this parameter.

In my case, a MicroATX motherboard, choosing it, I was guided by the fact that they are usually cheaper and it had everything I needed, why pay extra for additional slots and connectors that I will never use (for example, I do not need PCI slots).
Video card
Now on to dessert - a graphics card!
When selecting components, again, let me remind you that it is precisely when matching with each other, and not choosing, the main parameters are the dimensions of the card, the recommended power of the power supply and connectors for additional power. We will need the knowledge of the dimensions further when selecting the case, and the rest of the information will be required when selecting the power supply unit, which is next in line. By the way, the video card should be selected, as I wrote above, for the processor, after all, it is the processor that reveals the full potential of the video card, and not vice versa.
In my case, the GeForce GTX 1060 3GB is ideal for the i5 6400.


Power Supply
So, . The main selection criteria are the power, types and number of power connectors. The recommended power supply unit is indicated in the specifications for any video card on the manufacturer's website, plus, if you are going to overclock the equipment, you need to buy an even more powerful unit. And there should always be a small margin, because later it is possible to upgrade the system or purchase additional devices that also require energy, albeit small.
As for the connectors, everything is simple. We look at the motherboard specifications, which we talked about just above. Main power connector and power for the processor. We select a block in accordance with these criteria. In general, the most versatile power supply in terms of the type of connectors is considered to be a 24pin main power supply and an 8pin processor power supply.
Also, do not forget about the additional power supply to the video card, it can be 4, 6, 8, 12pin. Not all cards need it, but there are more and more of them now. Again, we look above, in the specification for the vidyuha, everything is written there. Based on all these parameters, I picked myself a modest Aerocool KCAS 600W.


CPU cooler
So we got to. Here, we are looking at the socket that must match the motherboard socket, compatibility, dimensions, and connector type.

In my case, the DEEPCOOL GAMMAXX 400 tower cooler has socket 1151 and is compatible with an i5 processor.
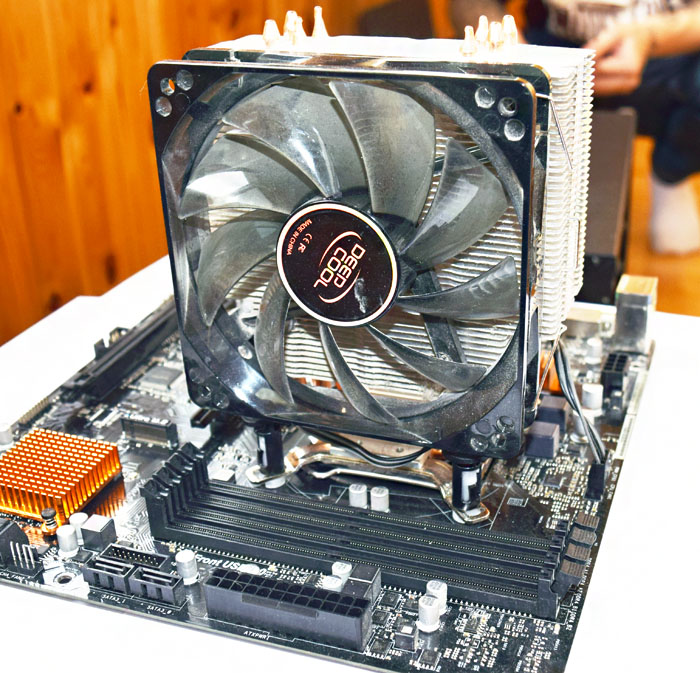
Of course, there are universal coolers that fit any socket, but do not forget to look at this parameter when choosing. Next - the dimensions. We are mostly interested in the height, because if the cooler is too high, there is a chance that the side wall of the case will not be able to close, be careful. In general, there are two types of coolers - tower and box coolers. Tower coolers have better system cooling and are placed mainly on overclocked iron. Boxing, in the overwhelming majority, are either office or weak gaming computers... So, if you choose a boxed cooler, then you don't have to bother with the dimensions, but if you are choosing a tower cooler, then be sure to pay attention to its dimensions. And finally, this is the type of connector (CPU FAN), with which the cooler receives the necessary energy from the power supply through the motherboard. They are 3pin and 4pin. Now many will say that you can put a 3pin connector into a 4pin connector, and with the proper skill and desire, vice versa. But I advise you to take a cooler with a connector in accordance with the connector on the motherboard.

RAM
That's it with coolers, let's move on to RAM. It must be selected based on such parameters as: memory type, speed indicators and frequency. With the type and frequency of memory, everything is simple. The specifications of the motherboard always indicate these two characteristics, which we have already highlighted above.
Based on this, I picked myself up two bars AMD Radeon R7 Performance Series 8gb each.


Now about the speed indicator. Let's go back to the processor for a while. The specifications for it always indicate its bandwidth.
Ideally, the total speed of the RAM should be equal to the maximum possible processor bandwidth. In my case, the memory has a speed of 17000 MB / s.
Since I have two strips, we multiply 17000 by 2 and just get 34000 MB / s.
I hope I didn’t explain too hard and you understand me. If something is not clear, I will be glad to answer you in the comments. Also, do not forget about the maximum possible amount of memory supported by motherboard... Although in the current realities, few people may need more than 64GB of memory. Oh, yes, I almost forgot about the two-channel mode. If, for example, you need 8GB of RAM, take two strips of 4GB each. In two-channel mode, the processing and transmission speed is faster.

Well, I think everything is clear here, there is no need to explain anything. This concludes our selection. Finally, I want to say that the selection of components is a very painstaking and tedious business, but in my opinion it is worth it. Be careful, in no case take your time, and you will be happy in the form of saved finances and a powerful computer.


