Often, printer owners are faced with one of the very frequent problems and then they try to figure it out and understand why Canon printer does not scan at all or has stopped scanning now. The reason for such a problem can be very different, for example, sometimes it lies in the printer, or the printer happens to be in order, and all because of the personal computer, since either a driver error, or the printer was not connected to the computer exactly. In order for us to find the cause of the problem and figure out why our scanner is not working at the moment, we just need to consider a few of the most logical reasons, and after we find them, we need to try programmatically eliminate them. First, you should make sure that installed scanner at the moment it is in a stable working condition, and then you need to check it by connecting to another personal computer... If these did not help in any way, then the best solution, of course, is that you turn to the services of service centers.
Now we will consider the most possible reasons, we will also talk about methods that will help to eliminate them. So what should you do when the printer stops scanning?
Why Canon Scanner Doesn't Work
To understand why the Canon printer does not scan, first of all pay attention to the computer, which, together with the printing device, must be turned off, and then disconnected from both devices the power cable. Wait about a minute, and after reconnecting the power, turn on both devices. By doing this, the memory of the computer and the multifunction device will be cleared, allowing the multifunction device to operate normally.
But if the scan did not start, and the previously working multifunctional device began to issue various error codes, then be sure to eliminate them in a timely manner. Find them detailed descriptions see the instructions that came with the printer. In addition, a multifunctional device of almost any model makes it possible to perform scanning and copying in the so-called. service mode. To start it, first of all, turn off the device itself. Then hold down the "Reset and the" Power. Then release the first button and press it twice (for different models the number of such clicks may be different - read more in the instruction manual of the device). Finally release Power and check if the printer is responding to scan commands.

Why isn't it scanning the Canon printer?
If the printer does not scan and the above recommendations did not help you, then be sure to try reconnecting the USB cable. Pull it out and plug it into a different port on your PC. It is advisable to organize such a connection not via a USB hub, but directly to a personal computer. Then, first of all, check if the PC has begun to see the printing device connected to it. If the printer has become visible to the computer, then try scanning and printing a couple of sheets.
Another reason the printer prints but doesn't scan is because of the scanner drivers that the user simply forgot to install. The question arises, what to do in this situation? So, if the PC does not see the scanner for this very reason, then download the appropriate drivers from our website or from the website of the manufacturer of your office equipment and install it. If you do not know what to download specifically, then it is better to download the full device driver. In addition, the reason may even lie in the installed driver, which simply “crashed”. In such a situation, you will have to first uninstall it and install the updated version.
Scans another device - a scanner. It is he who can translate (digitize) various images, documents and other things into electronic format.

It's another matter when the scanner and printer are combined in one device. In this case, the question is quite justified (let's lower our eyes to the curvature of the wording)
Canon printer won't scan, what should I do?
Everything is very individual, so I won't talk about the reasons without seeing the patient. Here are a couple of universal tips that can help.
Replacing the cable with a shorter one
In some cases, changing the USB cable to a shorter one can help. The trick is that some peripherals may not work correctly when the cable length is more than 1.5m. Some devices work, while others fail. Technomagic, in a word.

Installing the latest drivers
Any brand of printer has its own official website where you can download the latest drivers. Sometimes the drivers that came with the purchase become outdated (for example, when the user changes the OS) and new ones stop working.
Correct setup and connection
Do everything according to the instructions, do not forget to make the printer the “default printer” (we go through the control panel and change it)
Cartridge stitched incorrectly
Printing problem? If difficulties arose after refilling the cartridge, then it is incorrectly stitched.
Clear "print queue"
The fact is that for combined devices (printer-scanner-copier), the simultaneous performance of functions is technically impossible. Those. it will not be able to print and scan at the same time.
Introduction
The sapper is known to be wrong only once. The number of errors allowed for the scanner is, of course, not so strictly limited, but also very limited. It is enough that the designer twice has a desire to launch something heavy at the scanner operator for poor-quality work, and he will never come to you again. You will lose a client and money. Moreover, the fate of the scanner is difficult to envy - it is ultimately always the last one, the one on whom you can blame all the blame for a poorly executed order. Therefore, the quality of his work should be so impeccable that neither the designer nor the client would have any suspicions about the poor quality of the original digitized image obtained after scanning. Moreover, the customer, of course, is always looking for an opportunity to get the maximum quality for the minimum money, and since the end result really directly depends on the operation of the scanner, the quality of the device itself, along with the skill of the scanner, determines a considerable share of the success of your company. A huge number of articles have been devoted to the problem of choosing the right scanner, so here I will try to highlight some typical mistakes, both elementary and not entirely obvious, that the scanner operator should avoid, since they clearly show that the image is damaged precisely at the scanning stage.
Errors when selecting an original
Of course, I was slightly twisted when I said that the scanner operator is always the last one in the order fulfillment chain - from receiving the initial task to issuing the result. The quality of the result depends very much on the original that you receive, so my first advice: be careful about choosing it. You should never say, "Put it on the nightstand there, I will scan it when I finish my current work." It is necessary to take the original in hand and critically assess its suitability for scanning, since then all claims for a poor-quality picture will already be addressed to you.
I hope that a few immutable rules that every scanner operator should know are already framed on your wall. First, it is advisable to completely abandon the scanning of printed prints, and if this cannot be done, then they need to be scanned only with a subsequent reduction by at least 1.5-2 times. Secondly, if you can choose between scanning a photo and a negative (slide), then the choice should always fall on the negative, since the photo has less dynamic range and, therefore, does not convey all the details that the negative contains. Thirdly, you should never enlarge an image more than 8 times (this is what the Soviet GOST advises, and on this I completely agree with him). Therefore, even if the resolution of your scanner allows you to do this, send those who want to scan a 35 mm slide to A3 format anyway - your client will never understand that the specks spoiling the whole picture are nothing more than the grain of the film.
Fourth, never scan a negative without the scanner driver's standard ability to invert colors based on the film type and manufacturer. It is theoretically possible to carry out such an operation manually in Photoshop, but in practice not every designer can do it, and it will certainly take a huge amount of time.
Hereinafter, it is meant that your scanner meets the tasks that you usually perform, that is, it satisfies a certain set of requirements that can provide decent slide scanning at a minimum level. This is a resolution from 1000 dpi, dynamic range from 3D, the ability to color-calibrate the scanner (its color rendition depends on the temperature in the room, geographical latitude, the degree of lamp wear and in general on a huge number of parameters, which requires periodic - at least once every 3 months - calibration), the ability of the driver to invert the negative image depending on the type and manufacturer of the film, the ability to edit the tonal curves for each of the color channels, both in RGB, and in CMYK and CIELab systems, and the descreen filter setting depending on the original ruling. In terms of price / quality ratio, in my opinion, professional products from Umax and AGFA satisfy these parameters in the best way, and I will use the capabilities of their drivers later.
And finally, a few additional parameters, according to which, if possible, either reject the original, or warn the customer that the resulting image will not be as high-quality as we would like. Originals with mechanical damage (fingerprints, scratches, wrinkles) requiring more than 8 times magnification (in rare cases, when it comes to professional slides, up to 10 times are allowed), originals with very a large dynamic range (maximum 2D is reproduced when printing, and therefore it is impossible to correctly prepare a slide with a 3.7D range for printing without loss of detail), unsharp originals (no Unsharp Mask filter is able to return sharpness that is absent on the original), the presence of a strong background color ( this is being corrected, but in this case it is worth warning the customer or negotiating an increase in payment for a larger amount of work).
Now a few tips in case you do have to scan a bad original.
Let's start with the magnification. Of course, you can't get away from film grain, but very often the quality can be slightly improved by playing with the parameters of the descreen filter, which is usually used for scanning printed prints. It will not completely remove the grain of the film, but it will make the image more pleasant to look at (albeit with some loss of sharpness).
The presence of a common color background, if the distortion is linear (the same in shadows and highlights), is removed by specifying a gray point on the object that should have neutral tones in the image. As a rule, this is not difficult, but it is worth warning against a mistake: you should never choose white and neutral gray points on highlights and reflections of shiny objects. Look for matte neutral objects such as a white shirt or piece of paper in the shade, asphalt in dry weather, etc. Also, I do not advise putting a point of gray on the teeth and whites of the eyes - they are far from always neutral.
Mechanical damage is, of course, very unpleasant, but here you should still try to do everything possible to remove defects, and then your customer will turn to you for help more than once. Some scratches on the negative and paper jams can be removed by scanning the object twice, rotating it 90 degrees after the first scan (that is, the second scan goes in a direction perpendicular to the first), and then superimpose one image on top of another in Fotoshop in the form of two semitransparent layers. You can also scan 4 times, rotating the original 90 degrees each time, for even better results.
It is also helpful to remember the corresponding filter Adobe photoshop- Dust and Scratches: With a slight loss of sharpness, it still removes most minor scratches. In addition, you can use some slide scanners that perform double scanning specifically to eliminate scratches (Nikon Coolscan), the scan quality will be worse than on a professional tablet, but this device removes scratches well.
Thus, the main thing is to be careful with the choice of the original. Tell the client about the standards described above, and if his original does not meet at least one of them, tell the client that he will not receive the ideal quality. Of course, try to do everything in your power, but warn about the unsuitability of the original in advance.
Crop errors and automatic driver settings
So, you have a usable original, you have already evaluated its exposure on a standard 5000 K white viewing table, and it is already on the scanner glass. At the initial stages of scanning, the number of possible errors made is small, however, they can have a very significant effect on the result. The main mistake is actually one: the desire to trust the automatic settings. Below I will explain why this should not be done.
Let's start with a simple operation - cropping. Since in the future we will have to evaluate the histogram of the image more than once, when cropping (determining the scanning area) it is very important not to capture the edges of the original, and even more so not to go beyond its borders. Do not allow the black borders of the slide or, conversely, the white borders of the photo to fall into the scanning area. Firstly, if, nevertheless, not trusting your hands, you use the automatic settings of the scanner, then when capturing the fields of the slide, the automation will incorrectly make the correction. Actually, the actions of the automation are quite simple - it determines the lightest and darkest areas of the original and makes them, respectively, as white and black as possible. The catch is that not all images have white and black objects. For example, a shot of a snowy field and a blue sky with clouds above it has no shadows at all. Automation in this case will fail and spoil the picture. That is why you should not capture the fields of the slides when cropping - the automation will consider them shadows and will incorrectly correct them.
It is also unacceptable to use automation on images with the desired color shift (sunset shot) and with human faces in low-contrast lighting conditions.
Although, in my opinion, it should never be used at all if the driver allows it to be disabled.
Errors when choosing black, white and gray points and adjusting colors
Here I will describe what mistakes you can make by replacing automatic settings manual adjustment. The first step is to set the white and black points. In fact, if you have a head on your shoulders, then it is difficult to make a mistake here - the main thing is to set the points on the really whitest and darkest areas of the image, and not put the white point on highlights on shiny objects and the black point on images without deep shadows, but white point in dark pictures with low highlights. To give better contrast to a faded image, it is better to build an S-shaped tonal curve at 5 points (0, 25, 50, 75, 100%). Too bright, overexposed images and, conversely, too dark, it is also desirable to correct the tonal curve (or by setting the appropriate gamma value). It is also a good idea to take a look at the histogram before and after adjusting to see if you have lost detail in highlights or shadows.
With the gray point, everything is much more complicated. The fact is that when you tell the program an object that, in your opinion, has a neutral color, the driver makes color adjustments one point for each tonal curve for three or four color channels (depending on whether you are scanning in RGB or CMYK ). That is, the corresponding extra color cast is removed fairly evenly (slightly weaker in shadows and highlights and stronger in midtones). But practice shows that a uniform extra color background is a rare luck for a scanner. As a rule, a situation arises when, for example, you need to remove 10% Cyan from the shadows, 5% Magenta from the highlights, and 20% Yellow from the middle tones. In this case, one-point adjustment, that is, the setting of a gray point, is simply excluded.
Now, how to determine how much correction an image needs and whether it can be done by setting the gray point or if more careful adjustment with tonal curves is required.
Much depends on the features of your scanner driver. It would be best to be able to view the color information of a specific point in the image in CMYK and RGB colors. If this is not possible, then I can congratulate you - you will have to first scan the image, then view the color values in Photoshop, and then go back to the driver and make the appropriate settings there.
There are usually four characteristic colors in an image. It is white, black, gray and flesh-colored. All that remains is to find them and see the meaning of the CMYK colors for each of them. This will give us at least a knowledge of the color deviations for the four points on each tonal curve. This is enough to build a tonal curve for each color.
The CMYK values for characteristic colors must be memorized or a sticky note on the wall in front of you. Lights 5C 2M 2Y, shadows (here there is some freedom of action, but the main thing is that in the sum of 4 components they give no more than 300 - the SWOP standard and at least 280 - print magazines), for example 80C, 70M, 70Y, 70K, although these parameters depend from the printing method. Gray - equal values for yellow and magenta and a slightly higher value for cyan, for example 30C, 22M, 22Y. European skin - about 8C, 35M, 40Y. Dark skin can have values of 15C, 35M, 70Y. Greater blue and black values give the skin an earthy tint. The ratio between the colors in percent is important here, and not their absolute values.
Now, by looking at your color values for these characteristic hues, you can easily determine if the image can be corrected by simply setting the gray point. If, for example, there is too much blue and yellow in all shades, and in approximately the same proportions, then feel free to put a point of gray. If there is too much purple in the skin and too much yellow in the highlights, then you cannot avoid editing the tonal curves separately for each color channel.
A small note for those unfortunate people whose driver does not allow editing tonal curves in CMYK and generally does not know how to work in systems other than RGB. First, the gray value in RGB is always defined as equal values for the three colors. Try to find some gray objects of different brightness and look at their values. If both the highlights and the shadows have the same color deviation (for example, a lot of red), then set a gray point, otherwise, edit the corresponding curves in RBG.
Finally, convert some of the typical CMYK skin tones above to RGB and look at their meanings in the image.
Actually, it is already difficult to make a big mistake when editing tonal curves. You have 4 desired values for different points of the tonal curve, and your only task is to adjust reality to the desired values.
Another tip: if you have a limited number of original suppliers, slides from the same source tend to have similar color shifts, so save your newly created tonal curves to a separate file and apply them to the next original without having to do these tedious operations again. ... The driver from AGFA, for example, allows you to automate this work altogether. Of course, this does not mean that you do not need to check the result for color matching.
Some more pitfalls that may await you at this stage.
First, never trust the monitor. Look only at numbers. On some monitors, the image may look just awful after editing. However, I can assure you that when you print, you will get exactly what you expected.
Secondly, I will repeat a third time, never put a gray point on highlights and shiny objects ( typical mistake- when scanning a served table, put a point of gray on a knife or fork).
Third, try not to be mistaken in your choice of lights. The slightest deviation in color is primarily noticeable in highlights. Look at several white objects, in your opinion, and see which one is closer to the desired CMYK ratio and if they all have the same color shift. If, for example, two of the three white areas are shifted to blue, and the third to yellow, then most likely it is yellow and you should not choose it for the white point, no matter how white it glitters on your monitor.
If you, for example, have to scan nature more often than portraits, then find your characteristic colors. For example, the color of the sky is almost constant, while the color of the grass varies slightly. The snow can be yellowish, but not purple, but the sand on the shore is clearly an unreliable object, which changes color greatly depending on the lighting.
Filters
A few quick notes on using additional opportunities scanner software. These are descreen and Unsharp mask filters. The first one should be used to suppress moire that occurs when scanning printed prints. The only adjustable parameter it has is the ruling of the original. (If it is not configured on your scanner, offering standard values of the newspaper-magazine type, then take your scanner to the trash heap or give it to a friend for his office tasks. There is no place for such a device in the printing industry.) It is important to correctly evaluate the value of this very lineature, for which it is harmless to have a transparent scale at hand to determine it, otherwise you are doomed to perform several scans with different filter parameters to obtain the optimal result. Setting the value at random (like magazine means 133 lpi) is fundamentally wrong: as a result, you will get both moiré and a blurry image.
Sharpening is generally hard to numerical tints, and the only caveat here is don't overdo it. It is better not to apply it at all than to overdo it in focusing. The designer will easily set the sharpness that he needs, but spoiling the image using an Unsharp mask with incorrect parameters is more than real. In addition, sometimes out-of-focus images look more artistic and pleasing.
Genre: Sketches (sketches)
A quick overview of the tools that will help you bring your art into a presentable form before displaying it.
1. Why is all this necessary or features of perception

A little bit of lyrics about the difficulties of publishing sketches on the web. Here is the finished drawing and I really want to show it to someone! The joy of the creator is such a special feeling that every person who has completed a certain work experiences, fanfic drawing is not important. And all the moaning about what happened is not at all what I would like to be secondary. In fact, we love our works, admire them, enjoy them, but of course we never admit it =) So we happily scan or photograph our picture. We spread it as it is. And we run into a setup that all more or less experienced artists know about: other people do not see your drawing the way you see it. I will conventionally call this the boundary between the author's and the audience's perception. In the case of drawings on paper, it works like this: when we look at our work live, as it is on paper, we see it in a specific way, with us the light falls this way and that beautifully, and the texture of the paper plays a role, giving a special charm image, and we treat all our strokes and lines as we want. In general, we have before us all the charm of our work. The only problem is that when scanning and photographing, we do not get all this "beautiful" in the end. The scanner reveals a bunch of unnecessary things and the paper turns out to be gray and not white, the color fades in color works, the photo is also difficult to make so that it conveys all the nuances. And we will have to try to make our "beautiful" be seen by the rest of the people to whom we decided to show this picture by posting it on the network. And photo editors will help us with this. For this lesson-review, I specially took a sketch, which was made in order to then use it in graphic editors line art to do. That is, the draft in all its glory, I did not bother with the accuracy of drawing / scanning / photographing at all. Dirt, unnecessary elements, the protruding cover of the sketchbook is all with him. I will consider using the example of Photoshop, but almost all the tools are in similar photo editors (GIMP for example). And everything, except perhaps the eraser, is in viewers like Xnwiew, ACDSee.
2. "Cut to hell!" or the crop tool

The boar was scanned with an old EPSON v 100 scanner. In the first step, you can see the scan as it is. The first thing to start with is pruning. All sorts of notebook springs, visible covers usually only spoil the view, do not carry a semantic load, and distract from the picture. (Unless the author had a different idea, but more on this some other time.) In this case, we consider the option when it is understood that we want to get a "clean" drawing. Crop tool, also known as crop, or, in some editors, "frame". In Photoshop, it is called with the C key. It works simply. Stretch the frame so that all unnecessary remains outside of it and press the enter key. Voila, we cut off the excess. With the help of the frame, you can also align the "overwhelmed" picture (for FS) by turning the frame in the desired direction.
3. Down with the dullness or the "levels" tool

So, here we cut off the excess, already better, but the drawing looks dirty. The Levels tool will help to restore the whiteness of the paper. In FSh it is called by the ctrl + L key combination. In the window that appears, move the white, gray and black sliders until you get the desired effect.
4. And the final touches

Take the eraser tool and erase the remaining unnecessary details from the background, everything that the "levels" did not eat. We clean it up manually where we think is necessary. Voila! We have a clean, neat sketch. So we extended the picture to the watchable level. But this does not mean that it is imperative to stop at this stage. It all depends on what you want to get at the end and on your imagination. You can do whatever you want with your work. Climb the tabs, poke buttons, try, experiment. Do not forget to save intermediate options;) Look for other lessons, learn. Curiosity is the engine of creativity. A beautifully and tastefully submitted work is the best self-promotion. Treat the fruits of your own creativity with respect, love them. And you will definitely find like-minded people =)
The scanner does not scan: instructions for solving the problem
There are many reviews and a lot of questions on the Internet, like "The scanner does not scan, help!" or "bought new printer and the scanner is not working. What to do ??! ”, A lot of information on the repair or elimination of“ disease symptoms ”. Experts say that in 30% of cases a completely serviceable car gets sick. So there is no need to immediately run to the service center and return the printer for repair. You can do the repair yourself.
For example, try a prescan, that is, run any software which will get the image.
Starts earlier when scanning starts installed driver... If the driver has not been installed, then you need to take installation disk that comes with the kit, and just install the one you want. If the driver is installed and ready to work, then the actions are completely different.
The driver is installed, but the scanner still does not work
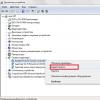
So, the software is there, but the device is not detected. The first step to start diagnosing the problem is by clicking on Start, Find and go to Control Panel. Then find the item Administration, click on it. A window opens with a list of different functions. You need to find and run the device manager (a lightweight option is to go to the My Computer shortcut, right-click on an empty space, and go to the hardware tab).
The item is found and another window pops up on the monitor, with a bunch of plus signs and names. It is necessary to find the scanner and determine if it is installed. Searching for "Imaging Devices" shouldn't take long. So, click on the plus sign and here it is, the name of the model and an exclamation mark next to it on a yellow background. What does it mean? This means that the drivers are either not suitable or outdated. But the way out is the same. We go to the Internet and find the driver we need.
You can also download a program that will automatically update all drivers on the hardware. The drivers were found and installed, we restart the machine, everything is ready.
But what if everything is in working order in the device manager? The scanner is detected, but still refuses to work? There is another snag. For normal operation, you need to purchase a specific program on the manufacturer's website. And, of course, not for a small amount. But this problem is solved in the same way, you need to go to the Internet and find the necessary software.
Having considered technical problems, let's move on to physical
Very often they ask such a question, why does the hardware refuse to scan with a working device? Some solutions to this problem.
Checking the power supply and power wires (in case of a malfunction, both elements will not allow the scanner to function).
Look for visible damage to the wire connecting system unit and the scanner itself.
Check the voltage in the network (it happens that there are many electrical appliances work at the same time, and the scanning device simply does not have enough power).
Some experts argue that the scanners may not work due to the creation of microwaves by any objects (just in case, turn off the microwave, it may help).
Check the grounding of the electrical wiring.
Finally, check your settings, if it's just misconfigured and resetting to defaults will restore all work.
If the device uses the YUSB interface, then perhaps the reason is in the connection port and installation on a different port will solve all problems.
It still does not work, although everything has already been checked?
An important role is played by the operating system installed on a computer or laptop. Most manufacturers in recent times make printers, and scanners are designed for use on operating system Windows 7.
Let's summarize
The simplest method to check is to open the "device manager" and check the controller, it should not be marked with a yellow exclamation mark. The controller should be operating optimally. If there is a problem, then it is worth trying to install the scanner on another computer, perhaps a problem with your hardware. It often happens that perfectly serviceable systems simply refuse to work. A prime example is the Mustek scanner, which simply refuses to work with the Tekram bus controllers. So before installing the scanner, you should definitely consult which bus it is running on. this product or ask for a recommendation on choosing a new controller.
If none of the proposed options came up and the scanner refuses to work further, then there is only one way out: carry it to the service center for warranty service... V service center they will definitely help you and explain what the reason was.
- Permission
Check 2 Set the display scale to 100%.
Some software applications do not display images clearly when the scale is too small.
Check 3 Update calibration data.
Calibrate by scanning after selecting for parameter Execution on every scan(Execute at Every Scan) in Calibration settings(Calibration Settings) value is ON. (ON) on the Scanner tab in the Preferences dialog box of ScanGear (scanner driver). Calibration time depends on the computer.
For details, see the "Scanner Tab" section for the respective model on home page document Online manual.
Check 4 If moire (stripes) appears, take the measures below and scan again.
Set one of the following items in the (Settings (Document Scan)), (Settings (Custom Scan)), (Settings (Scan and Stitch)), (Settings (COPY)) or (Settings (SEND)) dialog box of IJ Scan Utility, and then scan from the IJ Scan Utility main screen.
- For parameter Select a source(Select Source) set to Magazine, and set Color Mode to (Color Mode) - value Color (Color)
- Select the Reduce moire check box in the Image processing options(Image Processing Settings)
- Dialog window Settings (Scanning a Document)
- Dialog window Settings (Custom Scan)
- Dialog window Options (Scan and Registration)
- Dialog window Parameters (COPY)
- Dialog window Parameters (SEND)
On the Basic Mode tab of ScanGear (scanner driver), select Magazine (Color) for Select Source.
For details, see the Native Mode Tab section for your model on the main page of the document. Online manual.
On the Advanced tab. ScanGear's Advanced Mode, set Descreen in Image options(Image Settings) is ON. (ON).
Online manual.
Note.
- If moire appears when scanning digitally printed photographs, take the above measures and scan again.
- Service
Check 7 If the condition of the documents is unsatisfactory (dirty, dark, etc.), use the Remove dust and scratches(Reduce Dust and Scratches), Fading Correction(Fading Correction), Grain correction(Grain Correction) etc. in the section Image options(Image Settings) on the Advanced tab. (Advanced Mode) of the ScanGear window.
For details, see the Image Options section for this model on the main document page. Online manual.
Check 8 If the color tone of the image with a uniform color tone (such as the sky) differs from the color tone of the original document, take the steps below and scan again.
On the Advanced tab. (Advanced Mode) of ScanGear, set Image Adjustment(Image Adjustment) under Image options(Image Settings) to None.
For details, see the Image Options section for this model on the main document page. Online manual.
On the Color Settings tab of the ScanGear Preferences dialog box, enable the Color matching(Color Matching).
For details, see the "Color Options Tab" section for your model on the main document page. Online manual.
- Check 9 Cover the scanner with a black cloth if white spots, streaks, or colored patches appear in the scanned image caused by stray light.
Check 1 Increase the scan resolution if the image has jagged edges.
Check 5 Check the color quality of your monitor.
See Help Windows systems or your monitor manual for information on checking the color quality of your monitor.
Check 6 Clean the platen and scanner cover.
Gently, without pressing, clean the scanner platen or the scanner cover.