The most popular graphic editor is a snap when you master it. Perseverance and availability of time are your main assistants in this matter. We, in turn, will tell you about some of the features of the most stable version Adobe photoshop CS 5 and we will conduct a small educational excursion into the world of working with graphics using Photoshop.
First important point in using Photoshop is free space on system disk... Our advanced editor is able to "eat" computer memory, and in large quantities. Make sure that RAM your PC is at least 1 GB, and to do this, click on the "My Computer" icon with the right mouse and go to properties. The second feature in working with images is a monitor with good color reproduction. It is the key to beautiful photographs and drawings. Tablets, laptops, and the like are unlikely to be compared to a desktop PC.

Photoshop has a secret - the editor loves patient users. If at first it seems to you that the task is impossible, do not quit the lessons. Set it aside for a while and start studying again. Learn Photoshop - get the opportunity to have a stable income without leaving your home!
Adobe Photoshop CS5 is a multifunctional graphics editor that allows you to solve a wide variety of tasks. The uniqueness of the program is that the same result can be achieved in different ways.
Adobe Photoshop CS5 allows you to process ready-made images, such as photographs. There is an opportunity not only to adjust the color gamut, brightness and saturation of the image, but also to remove individual elements or change their colors, combine several images and even completely change the look of the photo by changing the time of day or making an old fresco from the photo.
In addition, in Adobe Photoshop CS5, you can render your images from portraits and landscapes to individual graphic elements of web design.
Adobe Photoshop CS5 was created for working with raster graphics, but it supports the necessary minimum of functions for working with vector objects, creating images in 3D, as well as animation.
Where to begin
For those who have never encountered graphic editors and is going to get serious about working in Adobe Photoshop CS5, it is important to become familiar with the theory about the nature of color, color palettes and their uses, and image types and resolutions. After that, you can start studying the program.
First of all, you should study its interface and decide which functionality should be considered more carefully, starting from the tasks that are planned to be performed using Adobe Photoshop CS5.
For photographers, you need to know the tools for color correction and retouching, they will be the main ones when working with the program. When creating your own image, color correction is important, as a rule, at the final stage. It is necessary to learn how to adjust brightness, saturation, color balance even if the user of Adobe Photoshop CS5 is going to paint exclusively landscapes. Often without this, it is impossible to achieve a sense of the integrity of the picture.
If the use of the program will not be limited to color correction of ready-made images, it is useful to learn the basics of working with layers and masks, as well as learn how to use simple tools from the toolbar and their properties.
It is also useful to consider the properties of layers and filters. These functions can save you a lot of time, allowing you to create the desired effects in just a few steps.
Explore in detail Adobe capabilities Photoshop CS5 is available for tutorials or video tutorials. However, the best option is usually a personal tutor or paid training courses in a group.
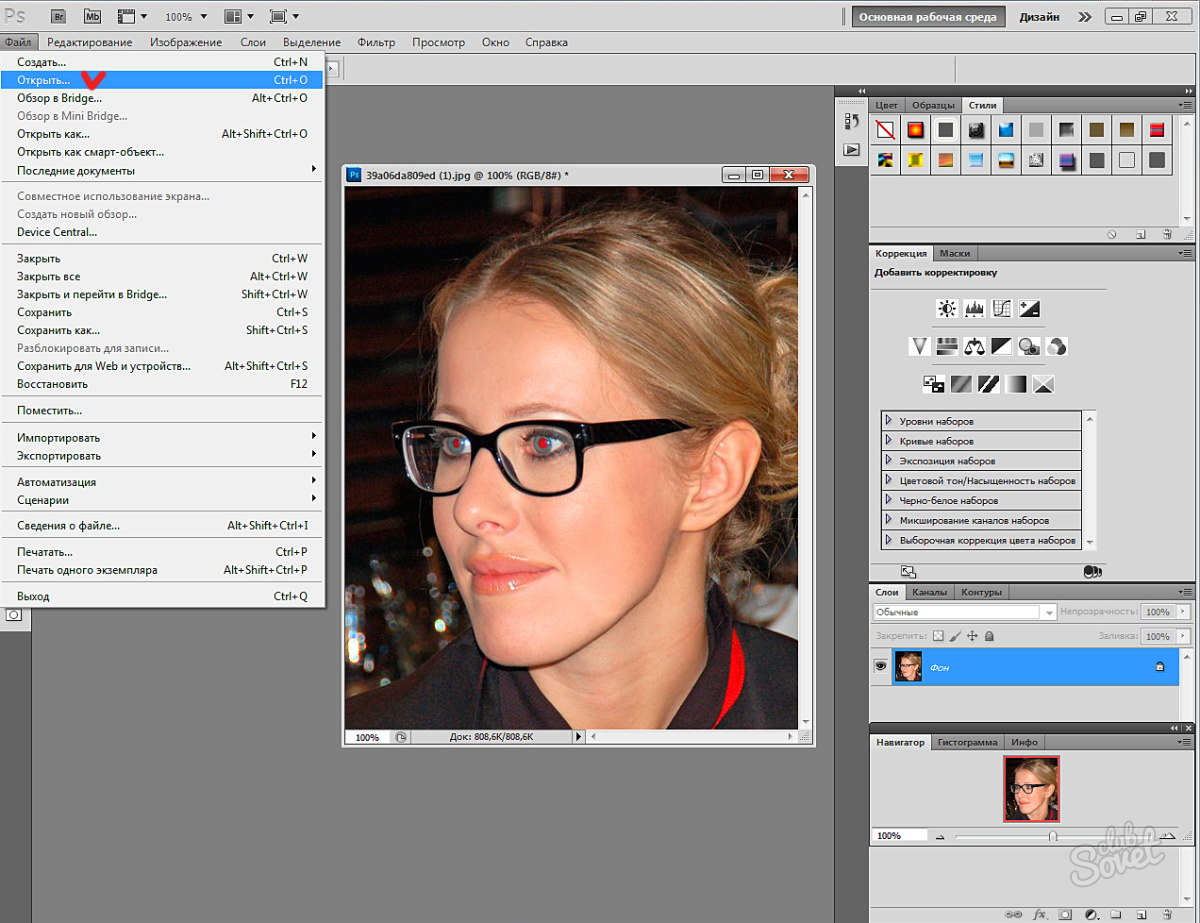
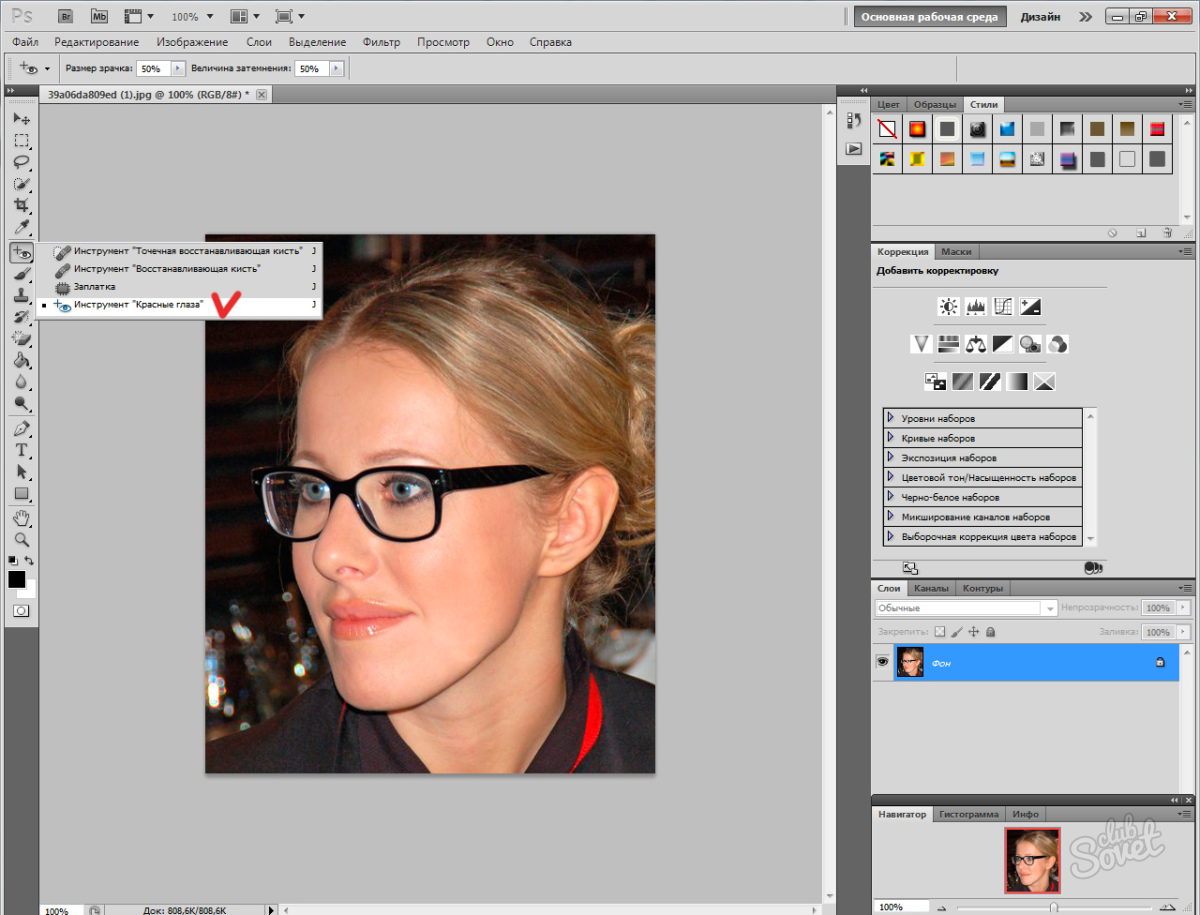
Browse through all the tools. You can find the tools in the pictographic menu. Understand which icon gives you access to a specific tool.
- You can choose different types Selection tools, such as Rectangular Margin, Oval Margin, Region (Horizontal Line), or Region (Vertical Line). These lengthened selection options work on every tool except Move and Scale.
Highlight different areas of the image as needed. There are several tools that can help you with this:
- Rectangular Marquee: Select a tool by clicking on it and then click and drag on the image.
- Move: With this tool you can position the selected layer. Basically, this tool is used to move objects (layers).
- Straight Lasso - This tool is used for the same purposes as the Selection tool, but it allows you to draw the shape of the selection yourself. You can create any shape. To do this, first select the tool and then start clicking on different places in the image, tracing the area you want. Then click on the starting point to complete the selection, or just press the Enter key.
- Magic Wand: Selects areas of an image based on the color or luminance similarity of adjacent pixels.
Crop the image using the Crop tool. It serves for cropping the image - creating a frame and cropping areas that are not in the frame. Just click on the tool, define the area you want to crop and press the Enter key.
Pick colors from your image using the Eyedropper tool. With it, you can select colors from the image. You can click anywhere in your image to select a color, and then you can use that color for other purposes.
Repair the problematic image with the Spot Healing Brush tool. You just need to click on an object (defect) and the tool will fill it with color based on the pixels surrounding this object (defect). Parameters such as lighting, shading, texture, transparency will be taken into account (everything is calculated automatically).
Use a variety of painting tools.
- "Brush": The favorite tool of painters and painters, which is used for drawing. You can adjust the size and type of the brush by right-clicking on the artboard of the image.
- Clone Stamp: This tool is used to clone one part of an image onto another part. Select the tool while holding the Alt key and then click on the area you want to clone, then release Alt and the area you selected will be cloned.
- History Brush: The tool is used to show the initial state image when you first opened it in Photoshop. For example, if you made a color image black and white (Alt + Shift + Ctrl + B) and then started painting over it using the History Brush tool. In the places where you painted, the image will become as in its original form - in color.
- Pen: With this tool, you can easily draw a vector shape of any shape that can be resized without loss of quality. Position the cursor where you will start drawing and click to create the first anchor point. The other anchor points will connect with each subsequent one and you will have a shape. To complete the shape, click on the first anchor point or press Enter.
Erase unwanted areas with the Eraser tool. It is used to erase strokes or layers of an image.
Create effects in specific areas of the image.
- Gradient: This tool can make a color gradient over a selected area or over the entire image. Select the tool and then click on the image, drag it in the direction you want.
- Blur: Use this tool to blur an image or brush strokes. Just select a tool and select the area you want to blur.
- Highlight: Used to brighten the dark area of the image. Just select a tool and start painting from the image.