Google is developing, especially in big cities. Very few organizations have not yet appeared among his countless marks. However, a significant part of them has not been confirmed, and there are several reasons for this:
- First, business owners simply don't know what they have there is page in Google Business, and therefore do not know about the possibility of its verification.
- Secondly, many entrepreneurs underestimate page in Google Business as a tool to promote yourself on the Internet. There is already an article on this subject:
- Thirdly, many are stopped by the need to wait emails from google to confirm the page.
We all know firsthand how the Russian Post works: a letter can arrive in a week, a month, or not at all.
All these factors stop entrepreneurs, and if you are reading this article, then most likely you have already decided verify your Google+ business account. How to do it? Let's look at all the possible ways.
I have already briefly mentioned this method, I will just say a few more words. In my experience, an average of 1 out of 10 misses is lost, and the typical delivery time for correspondence is 2-3 weeks. There are cases when letters arrived literally in 3-4 days, but my experience and the experience of my friends says that you should not rely on this.
Method 2: Website
Your organization's Google account can be verified if your site is connected to the system Google Webmaster, and the email specified in Webmaster matches the email associated with the organization's account.
However, Google's help says that this account verification may or may not occur. At the same time, it is not explicitly stated which categories of business fall under the “simplified” procedure, and which do not.
There is one more negative point: Google Webmaster is usually in demand, first of all, by the site developer - the web studio that made it - to track the indexing of the site by search engines, monitor errors, and so on. Linking Google Business and Google Webmaster to the same mail account- an inconvenient idea and fraught with bad consequences.
My experience is that verifying a business account using this method happens about 1 out of 4 times.
 Google Certificate
 Method 3: Contact a Google Certified Representative
The simplest and fast way, which allows you to verify your organization's business account within one or two days. The only exceptions are organizations providing services of an intimate nature, such as erotic massage. In this case, the confirmation may be delayed and take up to 2 weeks.
You just need to find out the email of a certified Google representative, and provide administrative access to your business page (how to do it). Be sure to require binding to your mobile phone! You should receive a confirmation code from Google, which a company representative will enter to confirm the correctness of the information. Also, to confirm the data about the company, you will need a screenshot of the official website with contact information or a photograph of a corporate business card. After providing this data, confirmation of the company data will take 1-2 days. Also, a certified representative will help you avoid mistakes when designing a business page and avoid problems when confirming your data. Be sure to ask the representative to show you their work done for Google.
What is the price?
- Posting your information to Google Business is lifetime and free.
Unlike the simplified and standard ones, a verified account on the State Services provides full access to all electronic services on the site. It is not difficult to go through the account verification procedure (the same as identity verification).
Account Types
- Simplified. To create this type of account, it is enough to enter your phone number during registration, and also, preferably, the address Email. Suitable for foreign citizens. It provides access to the following services: obtaining a temporary residence permit in the Russian Federation, obtaining a residence permit, a labor patent, etc. However, citizens of the Russian Federation with such an account can only make an appointment with a doctor.
- Standard. To obtain this status, you must enter in the passport data and the SNILS number, and then wait for the data to be verified. This account gives you access to more services, such as checking tax debts and paying car fines.
- Confirmed. By creating this type of account, you can take full advantage of all the services and features on the Public Services Portal.
Check the status of your account. To do this, click on your last name on home page site. The status will be indicated on the left side of the screen.
Step 1Create a standard account
If you don't have an account with Public Services yet, create one. If you have an account with one of the following banks: Sberbank Online, Tinkoff or Post Bank Online, you can immediately create a verified account from it (see below). Identity verification options for public services - Online, through bank accounts). If you don't have a bank account, create a standard account on the State Services.
- Open the State Services website. Click " Register».

- Enter your last name, first name and phone number. Also include an email address (optional). Click " Register».

- Enter the confirmation code that came in an SMS message to the specified phone number. Click " Proceed».

- Enter the password 2 times. Click " Ready».

- Your account has been created and you will be taken to the " My details”, where it is proposed to indicate passport data and SNILS number.

- Now you are the owner of a simplified account. You can see this information in the personal account section " My details". To get a standard account, click " Fill out a profile».

- Enter your personal details.

- Enter your passport details and SNILS number. Click " Save».

- Wait for data verification.

- After successfully checking the documents, you will see a message that you have a standard account. Now it can be confirmed.

Step 2. Verify your identity in one of the ways
| Wayconfirmation | Rendering timeservices | Advantages | Flaws |
| Online Banking | 5 – 10 minutes |
|
|
| Post office | 2 weeks |
|
|
| Electronic signature | 5 – 10 minutes |
|
|
| Service Center | 10 – 15 minutes |
|
|
Option 1. Online, through bank accounts
If you are a client of one of these banks: Sberbank, Tinkoff, Post Bank, then you can either confirm the existing standard entry on the State Services, or immediately create a verified account. The second option will save a lot of time, since you do not need to enter passport data and SNILS number into your profile on the State Services portal, and also wait for data verification. The procedure is the same in both cases and will take a few minutes.
The procedure for verifying an identity using the example of Tinkoff Bank:
- Sign in to your bank account.

- Open the " Payments».
- Go to the " public services».

- Select " Registration for public services».

- Check your details and click " Register».

- The screen will inform you that your request has been accepted. If you register for the State Services, and do not verify your identity, you will receive a password via SMS. To enter the portal, you will need to use your phone number (specified in Tinkoff) or SNILS number and the password sent.

- Now you have a verified account (ready in a few minutes after sending the request).

Option 2. By letter via Russian Post

Option 3. Using an electronic signature

Option 4: Personal visit to the service center
You can confirm your identity by contacting one of the service centers and presenting your passport and SNILS. The service center can be a department of the Ministry of Internal Affairs, a bank, an MFC, a library, etc.

The first version of the Android platform has undergone several updates since its release. Google, paying great attention to the further development of the system, is constantly working not only to correct the errors found, but also to expand the functionality of the popular OS.
One of the innovations of the developers operating system Android has become the latest protection system that appeared on devices starting with version 5.1. This function (Factory Reset Protection or FRP lock) is as follows: in case of loss of a smartphone or its theft, the owner will be able to lock his gadget, after which, without a Google account login / password pair, the phone will not be subject to further use. The same protection will work when you try full reset settings (hard reset).
But how to bypass a Google account if we reset the settings ourselves, for example, when flashing a device or deleting graphic key? In addition, there are cases when the system does not accept the correct password / login.
In any case, when you first start the device and try to access wifi networks, the smartphone screen will prompt you to verify your Google account on Android:

This is where the need arises to find a way to cope with the problem.
bypass google account
It should be noted the following: the situation is complicated by the fact that in the conditions of a large number of companies producing smartphones based on Android, and more more models, single one-stop solution for all devices simply does not exist. Therefore, we will now consider several proven options.
How to avoid the reset problem
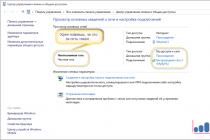
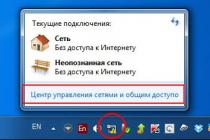
In order not to get into an unpleasant situation, do not forget to take advantage of the opportunity provided by the developers. To do this, before performing a reset, go to " Settings", select the section" Accounts" (may be " Accounts”), we find “ Google", open.
Next, call up the menu by clicking on the three dots in the upper right corner, select " Delete account” (on some models, the choice of action is called up by a long press on the account field). Now we need (USB debugging) and activate the item " OEM Unlock»:

Five Ways to Bypass Google Account Protection
Method number 1
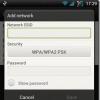
The first step is to remove the SIM card and then turn on the smartphone. Next, select the desired language, ignore the SIM window (button " skip"). In the next window, where you need to enter a phone number or email. mail, press and hold the symbol @ until the settings button appears, press it first, and then " Settings android keyboards ". After that we press touch button « back” at the very bottom of the display, then in the same place the button to call the submenu by long pressing (you may have to press the button “ home”, on all devices in different ways) until the Google search bar appears:

In the search box that opens, write the word " settings". Once in the settings section, select " Recovery and reset", and then turn off " Auto recovery" and " Preservation backups "(Moreover, in this sequence), after which we reset the settings:

Method number 2
Another generic method, which can help in a difficult situation, when there is no way to enter the Internet or settings or other actions are also not possible to perform.
What should be done:
We insert a SIM card into a locked phone, from which we will delete the hum account. Then, we call this number from another device. We receive a call and select the action " Add new challenge”, then enter any numbers in the dialer:

Now we need to enter our Google account, from which we know the password (or create a new one). After that, we save the contact to this particular account:

After the done manipulations, restart the smartphone.
Method number 3
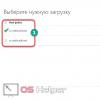
We insert a SIM card into the smartphone that we will unlock and call this number from another phone. Further, as it was described in the second method, click on + (i.e. add a new call), and reset the call. After that, the keyboard will open, with its help we enter the following combination: *#*#4636#*#* (see screenshot):

Immediately after entering the last character, there will be an automatic transition to a new window with information and advanced settings. Now click on the arrow on the left upper corner screen and go to the standard settings of the device, select the section " Recovery and reset", turn off" Copying data" and " Auto recovery" (may be " Archiving" and " Data recovery”), after which we reset the settings (or hard reset):

It remains to wait for the completion of the procedure, and after that we go to our Google account via Wi Fi.
Method number 4
You can try to enter the standard settings in another way: on the main screen, press and hold the " Home”, and when the Google icon appears, “tap” on it and go to the search bar, press, the keyboard appears, type the word “ Settings»:

Method number 5
Please watch the video, which tells how to bypass the Google account using the application after resetting the settings QuickShortcut Maker, which will help provide quick access to the settings of a locked smartphone, as well as to the menu of applications installed on it:
We talked about the simplest and most popular ways that can help resolve the issue without harming the device. You can find a lot of other ways on the Internet, but do not forget that if you are not sure of your actions, then there is a danger of causing even more harm to your gadget. Therefore, if you have kept receipts, and the warranty period has not expired, then in service center experts will help you for free.
* Note: if the described actions did not bring the desired result, do not rush to test everything at once. It makes sense to wait from one to three days, and then proceed to the next attempts, because this is the period provided by the developers to unlock the device.
Was the information provided helpful to you? Have you encountered such a problem? If yes, then tell us how you managed to bypass Google account on Android. And that's all for me, good luck!
After resetting the smartphone using Hard Reset, the next time you turn on the phone, you need to enter credentials from Google account. This is how the user described the situation to me, who brought me a phone with a request to confirm an account that was previously synchronized with a smartphone.
In general, this is something similar to the Apply ID, which has long been used in devices manufactured by by Apple. Since many have complained that android data not protected at all, and you can crack any password on your phone with a regular hard reset, Google decided to refine several aspects of this protection.
As a result, starting from the series android firmware 5.1.1, a hard link to a Google account has begun. That is, even after resetting the settings, you will not be able to fully use the smartphone until you enter the credentials of the account that was linked to it when you first turned on the device.
Of course, the user who contacted me about such protection did not even suspect and calmly reset the settings without ulterior motives. Of course the data account no one remembers since it was created on hastily only in order to have access to the Play Market.
So, after another such smartphone, I decided to share my experience and show how I managed to bypass protection with Google account confirmation after resetting the settings (Hard Reset).
Resetting the smartphone to the factory state through the phone settings
Very often, a normal reset directly from the standard settings menu helps. This is due to the fact that such a reset occurs directly from the phone and the security system recognizes this as if the user did it himself, respectively, and does not request Google Account Verification (FRP).
Of course, the most difficult thing that we have to do is get into the same settings menu, but we will still try to do it. This method was tested by me on android 6.0 and 6.0.1.

Bypass Google Account Verification (FRP) after reset with QuickShortcutMaker
If you did not become the proud owner of a device that was helped by the first method, then most likely you will have to turn to third party applications, which will help us remove the binding of a Google account.
One such application would be QuickShortcutMaker. By the way, I would say that this method helps 80% of cases that are associated with FRP. So I recommend that you use it first of all.

You can see a visual implementation from points 10 to 17 in this video, starting at 5:30 minutes:
Important information for those who have Google Accounts» there will be no item with login and password. In order for it to appear, you will have to additionally, in addition to QuickShortcutMaker, install the Google account manager patch. After that, the desired item should be displayed without problems in the list of Google accounts.
The third option to bypass Google's FRP using Test DPC
The third option is also to install and use additional programs, this time it is " Test DPC". If the previous method did not help you, then you should definitely try this option.

An illustrative example of implementation this method, look at the video:
It was with these images that I personally managed to bypass protection with Google account confirmation after resetting the settings on Android. If none of the described methods suits you, do not be discouraged, and it happens.
There are a lot of different options for bypassing this protection, you just need to find it on our website or on some forum. Where users could share the option that is right for you.
There is also a theory that by turning off the phone and putting it on the shelf for about 72 hours, the binding disappeared by itself and the smartphone turned on the next time as if it had just been taken out of the box.
Bypass Google Account Verification (FRP) after resetting your smartphone (Hard Reset)
To help protect your account, Google sometimes asks you to verify your identity. For example, this happens if you are logged out on your device or try to:
- log in to your account from a new device;
- view saved passwords;
- change account recovery information;
- download your data.
Note. Most often, you'll be asked for confirmation if you're using a new device or signing in from an unknown location.
Add a phone number
The easiest way to verify your identity is to mobile phone. Can be used:
To sign in to your account, follow the steps below. Keep your phone close to you. If possible, it should be connected to the Internet.
- On the Verify Identity window, follow the on-screen instructions or select the option Additional ways checks. All or some of these methods will be available:
- Get notified on your phone.
- Receive confirmation code via SMS.
- Listen to the confirmation code on the phone.
- Get a security code on an Android device.
- Use the screen lock or fingerprint feature on your Android device.
- Follow the instructions.
Why do you see this request
This extra step helps protect your account in case someone tries to log into it on your behalf. If attackers find out your username and password (for example, through phishing), they still won't be able to use your account for their own purposes.
Troubleshooting
The phone is not available
If for some reason you cannot use your phone or your account does not have a recovery phone number, try other ways to verify your identity.
Phone notification not received
If a few minutes have passed and you haven't received a notification, follow these steps:
If you still don't receive a notification, click Another way and try other options.
If you are unable to verify your identity using the methods listed above, try signing in:
- on the device (computer, phone or tablet) from which you log in to your account most often;
- while you are where you usually log in to your account (for example, at home or at work);
- in the browser you use most often, such as Chrome or Safari.
Note. You can try again in a few days.
You did not receive an identity verification request
To protect your account from hackers, Google may block certain activities when:
- there are no associated devices in your account;
- You sign in to your account in a different way, such as from a new location or a new device.
If you didn't receive an identity verification prompt, please try again in a few days from the device you normally use to sign in to your account.