You hardly need web server, which cannot send mail from your site. Below is an easy way to quickly deploy sendmail as an MTA (Mail Transfer Agent) that sends mail for the site.
To start installation
sudo apt-get install sendmail
Second and most important - correct setting the host itself. The mailer needs to clearly know what DNS FQDN the host has and that it exists in the vast world wide web.
Let's assume that the server sendmail works has an IP address 123.123.123.123
We also have the domain name domainame.com, which is correctly delegated to the server's IP address.
Editing the file /etc/hosts so that the server itself knows its DNS name (naturally, it must be correct and real)
sudo nano -w /etc/hosts
The second line that should be added is a description of the server's domain name, its comparison with the real IP address of the host and the internal system name:
127.0.0.1 localhost 123.123.123.123 box1.domainname.com your-web-server
Then you need to make changes to the file /etc/hostname
sudo nano -w /etc/hostname
And enter the correct server name there, which was entered in /etc/hosts in our example, this is your-web-server.
The contents of the /etc/hostname file after editing:
Your web server
After these steps, you need to restart the server or run:
/etc/init.d/hostname restart And execute 2 commands: hostname hostname -f
If everything is correct, the system should return the same names in both cases: your-web-server
I advise check email sent Thus
# telnet localhost smtp gives us: Trying::1... Trying 127.0.0.1... Connected to localhost. Escape character is "^]". 220 localhost6.localdomain6 ESMTP Sendmail 8.14.3/8.14.3/Debian-9.2ubuntu1; Thu, 9 Dec 2010 15:31:17 +0200; (No UCE/UBE) logging access from: localhost.localdomain(OK)- localhost.localdomain enter: HELO localhost gives us: 250 localhost6.localdomain6 Hello localhost.localdomain , pleased to meet you enter: MAIL FROM: [email protected] gives us: 250 2.1.0 [email protected] Sender ok enter: RCPT TO: [email protected] gives us: 250 2.1.5 [email protected] Recipient ok enter: DATA gives us: 354 Enter mail, end with "." on a line by itself enter test message . I hope you guessed that the indicated mail above should have been replaced with your last one, which telnet writes to us 250 2.0.0 oB9DVHsE004837 Message accepted for deliveryAs a result of executing a sequence of commands on specified e-mail ([email protected]) should receive a message ("test message").
php.ini setup
gedit/etc/php5/apache2/php.ini
Find and edit the next line
sendmail_path = /usr/sbin/sendmail -t -i
Checking the mail() function
echo mail(" [email protected]","test message", "test message","From: [email protected]"); ?>
Setup completed, I hope you succeeded set up sendmail on ubuntu
The book discusses in detail the settings of network services that allow you to create a server with the required configuration and functionality based on the Linux OS. You can set up a server of any type: from the server local network to Internet server and server remote access. Linux administration is described in detail.
The presentation of the material is based on the Red Hat and Mandrake distributions. A lot of unique information: launching Windows games under Linux and creating a Linux server for the game room, setting up Dr. Web and AVP for Linux, MRTG traffic accounting program, LIDS protection and intrusion detection system, and much more. Particular attention is paid to the security of Linux servers. The Linux OS itself is described in sufficient detail and a reference book of its commands is given. After reading the book, you will become the owner of knowledge on configuring and compiling the kernel, creating own rpm packages, the bash shell, use RAID arrays. You will get to know the inner world of Linux. The book is suitable for both professional and novice administrators, since the presentation of the material begins with the installation of the Linux OS, and the first chapter describes the main network technologies and protocols (Young Administrator Course).
All listings given in the book are checked up in practice and placed on the enclosed CD. In addition, it contains a lot of reference information (HOWTO, RFC), as well as articles on Linux. A rich set of auxiliary utilities and software for the server (Apache, MySQL, MRTG, etc.).
Book:
If you are using a distribution that is compatible with RedHat, then you will need to install the appropriate packages. I am using sendmaiI-8.11.0 and imap-4.7c2. latest version sendmail can be downloaded from the Internet at http://www.sendmail.org.
Before you can set up sendmail, you need to set up DNS properly. Setting up a DNS server was discussed in detail in Chap. 10. If you only customize mail server, you do not need to configure DNS server on the same computer. It will be enough to specify the DNS servers of your network in the /etc/resolv.conf file for the name resolution system to work correctly. However, sendmail can be configured to work without DNS usage, but I will not consider this option.
To get started with basic sendmail configuration, run the netconf utility (see Figure 13.1). It works both from under the X-Window and from under the console. The netconf utility is available in RedHat Linux, Mandrake, ASPLinux and other distributions, it is definitely not in KSI Linux. Naturally, you must be logged into the system as root. If you don't have the netconf program, you will enjoy editing the /etc/sendmail.cf file by hand. It is in this file that all sendmail settings are stored.
Pic. 13.1. netconf configurator
Select Mail delivery system from the menu, then Basic sendmail configuration. In the Present your system as field, simply enter your domain name. Then be sure to check the "Accept email for your_domain.com" box (see Figure 13-2). If you don't, messages can be redirected through your server to another server. At the same time, extra traffic will go through your server, which you do not need at all. Once upon a time there was even such a type of attack to deny through email. Its principle is as follows: a letter is sent from a non-existent user [email protected] another non-existent user [email protected] The letter is sent through the hostcom computer, which allows you to redirect the message (the "Accept email for domain.com" mode is not enabled). The mail server of the B.com domain sends a message to the address [email protected] that the user [email protected] does not exist. In turn, the mailer of the A.com domain reports that the user [email protected] also does not exist and sends a message to the address [email protected] There is an indirect recursion. Now imagine that such a message is not one, but, say, 100 and the volume of each is at least 1 MB! As a result, one of the servers in the domain1.com - host.com - domain2.com chain should "fall".
Rice. 13.2. Basic sendmail configuration
I'm sorry, I've gone off topic a bit, let's continue configuring sendmail. Set the protocol for sending messages to smtp (Mail gateway protocol).
This information is already enough for your sendmail to function. You can set additional options for the sendmail program using netconf.
Now make sendmail only accept mail from allowed addresses. You don't even need to configure sendmail itself for this - you just need to tweak the /etc/hosts.allow and /etc/hosts.deny files. The first one contains a list of hosts that are allowed to access this machine, and the second contains a list of hosts that are denied. Please note that despite the name - "allowed" or "forbidden", the restrictions that are set by the first file are much stricter. For example, to deny access to all hosts other than computers on your network, add the following line to the /etc/hosts.allow file: 192.168.1.
Here we mean that the network has the address 192.168.1.0 and the mask 255.255.255.0. You can read more about the format of the hosts.allow and hosts.deny files by typing man hosts.allow.
Now it's POP3's turn. After installing the imap package, you have almost everything configured, i.e. I want to say that it is already possible to check the configuration. Restart the inetd or xinetd daemon, whichever you are using, and enter the following:
telnet<имя_только_созданного_почтовика> 25
In response, you should see something like this:
Trying 192.168.1.1 . . .
Connected to 192.168.1.1
escape character is
220 de.dhsilabs.com ESMTP Sendmail 8.11.0/8.8.7 Sun, 17 Jun
2001 10:54:22 +300
This means that sendmail is working, it remains to be seen how well it does it. To do this, enter something like this:
mail from: [email protected]
220 2.1.0 [email protected]…. SenderOk
rcpt to: [email protected]
220 2.1.5 [email protected]…. RecipientOk
After that, enter the data command, then the message text, and to end the entry, put a dot in empty line. Sendmail will report that the message has been sent (or rather queued to be sent). Recording [email protected]- the name of the user you are sending mail to. The user must actually exist. The den.dhsilabs.com entry is the name of your mailer.
Note. Names [email protected] and dhsilabs.com are given as examples. Instead, you must provide your own values.
Note that the host my.host.com does not exist, and the sendmail program reports that "Sender Ok". That's why it's better to enable the Wait for DNS option in the sendmail settings.
Now we need to run some mail client, like kmail, and get mail. Use the following network settings in kmail: Network? Sending mail set SMTP, port 25, server name - the name of your mailer, in this example it is den.dhsilabs.com. Then add an account for POP3:
Username - den
Password - The password that is used to log in to the system.
Server - den.dhsilabs.com
As a result, you should get the message that you entered after data. This may cause problems with name resolution. To avoid them, you must correctly configure DNS or use its IP address instead of the name of the mail server. When adding a new user, be sure to set their login password. If you do not do this, but try to receive mail without specifying a password, you will receive an "Authentication failed" message.
Basic configuration of the sendmail program is very easy using the configurator, but sometimes the basic configuration is not enough. For finer tuning, you need to familiarize yourself with the configuration files of the sendmail program.
Note. In most cases, you will be fine with the basic setup until spammers take you under their "protectorate" - then you will need to read ch. 23 about anti-spam methods. However, one of Murphy's laws may work - there will be no sendmail configurator for your system, and then you still have to deal with the configuration files.
The main sendmail configuration file is /etc/sendmail.cf. On some distributions, this file is located in the /etc/mail directory. This file is said to be longer than Bill Gates' limousine and that it is edited in the "eyes afraid, hands do" mode. If you don't believe me, open this file and see for yourself. Only professional administrators or sendmail developers can edit this file manually.
Typically, the m4 macro processor is used to edit this file. First you prepare a special mc file. This file contains the .sendmail settings, but in a more "readable" form. When editing configuration files, their size also affects. For comparison, my mc file is 2459 bytes and sendmail.cf is 46302 bytes. It's one thing to edit a two kilobyte file, and quite another if the file size is 46 kilobytes. Unlike the sendmail configuration file, you will immediately understand what this or that mc file is for. Then, after editing the mc file, you need to run the m4 macro processor to create the sendmail configuration file:
m4 my_config.mc > /etc/sendmail.cf
Before running this command, I strongly recommend that you save the original sendmail.cf file somewhere. When incorrect settings you can always restore it.
The default configuration file that is used by the t4 macro processor to create the sendmail configuration file (sendmail.cf) is located in the /usr/share/sendmail-cf/cf directory. In older versions of the sendmail program, it may be located in the /usr/lib/sendmail directory.
Typically, this file is named sendmail.mc. It may sometimes have a different name, such as redhat.mc, if you are using a Red Hat or compatible operating system.
An example of a standard /usr/share/sendmail-cf/cf/redhat.mc file is shown in Listing 13-1.
Listing 13.1. Standard file redhat.mc
diver(-1)
dnl This is the sendmail macro config file. If you make changes to this file,
dnl you need the sendmail-cf rpm installed and then have to generate a
dnl new /etc/sendmail.cf by running the following command: dnl
dnl m4 /etc/mail/sendmail.mc > /etc/sendmail.cf
dnl
include("../m4/cf.m4")
VERSIONID("linux setup for Red Hat Linux")dnl
OSTYPE("linux")
define("confDEF_USER_ID","8:12") dnl
undefine("UUCP_RELAY")dnl
undefine("BITNET_RELAY")dnl
define("confAUTO_REBUILD")dnl
define("confTO_CONNECT", "1m")dnl
define("confTRY_NULL_MX_LIST",true)dnl
define("confDONT_PROBE_INTERFACES",true)dnl
define("PROCMAIL_MAILER_PATH", "/usr/bin/procmail")dnl
define("ALIAS_FILE", "/eto/aliases")dnl
dnl define("STATUS_FILE", "/etc/mail/statistics")dnl
define("UUCP_MAILER_MAX", "2000000")dnl
define("conf USERDB_SPEC", "/etc/mail/userdb.db")dnl
define("confPRIVACY_FLAGS", "authwarnings,novrfy,noexpn,restrictqrun")dnl
define("confAUTH_OPTIONS", "A")dnl
dnl TRUST_AUTH_MECH("DIGEST-MD5 CRAM-MD5 LOGIN PLAIN") dnl
dnl define("confAUTH_MECHANISMS", "DIGEST-MD5 CRAM-MD5 LOGIN PLAIN")dnl
dnl define("confTO_QUEUEWARN", "4h")dnl
dnl define("confTO_QUEUERETURN", "5d")dnl
dnl define("confQUEUE_LA", "12")dnl
dnl define("confREFUSE_LA", "18")dnl
dnl FEATURE(delay_checks)dnl
FEATURE("no_default_msa", "dnl")dnl
FEATURE("smrsh",Vusr/sbin/smrsh")dnl
FEATURE("mailertable", "hash-o /etc/mail/mailertable.db")dnl
FEATURE("virtusertable", "hash –o /etc/mail/virtusertable.db")dnl
FEATURE(redirect)dnl
FEATURE(always_add_domain)dnl
FEATURE(use_cw_file)dnl
FEATURE(use_ct_file)dnl
FEATURE(local_procmail, "", "procmail -t -Y -a $h -d $u")dnl
FEATURE("access_db","hash –o /etc/mail/access.db")dnl
FEATURE("blacklist_recipients")dnl
EXPOSED_USER("root") dnl
dnl This changes sendmail to only listen on the loopback device 127.0.0.1
dnl and not on any other network devices. Comment this out if you want
dnl to accept email over the network.
DAEMON_OPTIONS("Port=smtp,Addr=127.0.0.1, Name=MTA")
dnl NOTE: binding both IPv4 and IPv6 daemon to the same port requires
dnl a kernel patch
dnl DAEMON_OPTIONS (xport=smtp,Addr=::1, Name=MTA-v6, Family=inet6")
dnl We strongly recommend to comment this one out if you want to protect
dnl yourself from spam. However, the laptop and users on computers that
do dnl not have 24x7 DNS do need this.
FEATURE("accept_unresolvable_domains")dnl
dnl FEATURE("relay_based_on_MX")dnl
MAILER(smtp)dnl
MAILER(procmail)dnl
Cwlocalhost.localdomain
Using the FEATURE directive, you can enable one or another feature of the sendmail program. For example, the mailertable function is designed to override routing for specific domains. You can easily expand functionality sendmail program by adding the functions you need to the mc file.
Let's say you want to hide the computer names of a domain. This is easily achieved by adding the masquerade_envelope function to your mc file. To do this, copy the redhat.mc file to the hide_hosts.me file and add the following lines to the end of the hide_hosts.me file:
MASQUERADE_AS(my-domain.com)dnl
FEATURE(masquerade_envelope)dnl
Then run the command:
m4 /usr/share/sendmail-cf/cf/hide_hosts.me> /etc/sendmail.me
That's all! Node names will be hidden. Description of other functions is presented in Table. 13.1.
sendmail program functions Table 13.1
| Function | Description |
|---|---|
| access_db | Defines an access table. This table lists the hosts that are allowed or denied to send mail through your mail server. This option is effectively used to fight spam. Spam protection is discussed in detail in the section of the same name in Chap. 23 |
| accept_unresolvable_domains | Allows mail to be sent to domains that cannot be recognized |
| bestmx_is-local | Messages will only be accepted if the DNS MX server entry points to this mail server. |
| blacklist_recipients | "Black list". Another option to combat spam. It requires the access_db option to work. |
| dnsbl | Used for blacklisting, dnsbl is short for DNS Black List. In earlier versions this option was called (Resolve Black List) |
| domaintable | Used to resolve domain names |
| genericstable | Used to change the send address in messages |
| local_procmail | Specifies that mail should be delivered using the local procmail utility |
| mailertable | Overrides routing for specific domains |
| masquerade_entire_domain | Used to mask (conceal) the entire domain. This function must be used together with the MASQUERADE AS (or MASQUERADE_DOMAIN) directive, e.g. MASQUERADE_AS(f117.ru)dnl |
| masquerade_envelope | Allows you to hide domain hostnames. Replaces the received from field of the message header before passing the message to another |
| redirect | Used to redirect to another mail server. Means refusal to accept mail with the message please try (try to use this address) |
| relay_based_on_MX | Allows mail forwarding (relay) only for hosts that are specified in the MX DNS server records |
| relay_hosts_only | Allows relaying only for nodes specified in access_db |
| relay_mail_from | Allows relaying only if the sender is in the accessdb RELAY list |
| smrsh | Using the limited sendmail shell |
| use_cf_file | When specified, sendmail will look in the sendmail.cf file for a list of trusted users. |
| use_cw_file | When specified, sendmail will look in the sendmail.cw file for a list of local hosts. |
| virtualusertable | Converts recipient address to local user address |
The /etc/mail/sendmail.cw file lists all the aliases for this mail server. Suppose your server name is mail.dhsilabs.ru. If the sender sends mail to [email protected], the letter will be delivered to the user den without problems. What if someone sends a letter to [email protected], then its delivery will cause certain difficulties, since it is not clear to which node of the dhsilabs domain the message is addressed? The solution to this problem is to put a line in the sendmail.cw file.
It appeared back in 1983, but is actively used to this day. Among the key features are support for many platforms that exist today, as well as free. The application comes along with open source code. This means that anyone can add their own functionality to it, or change it at will. In the Ubuntu operating system, Sendmail, which is configured through the Linux command line, has taken root due to good support and rich features.
The message processor - Sendmail - is widely used in the business world.
Today, the "message processor" Sendmail Sentrion, which was created taking into account the needs of large companies, is quite common. Its distinguishing features are high performance and good integration with all business processes. Sentrion proposes to use legacy applications along with new technologies that have taken root well. Also the app is friendly enough to suit home users.
Program installation
You need to install Sendmail on the basis of a local server or a web server. In the second case, the mail agent will be more functional. To get all the web server components, you need the LAMP component stack. It can be found in the repository.
IMPORTANT. Before installing new software, do not forget to update the package lists in the local repository using the command
"$ sudo apt-get update"
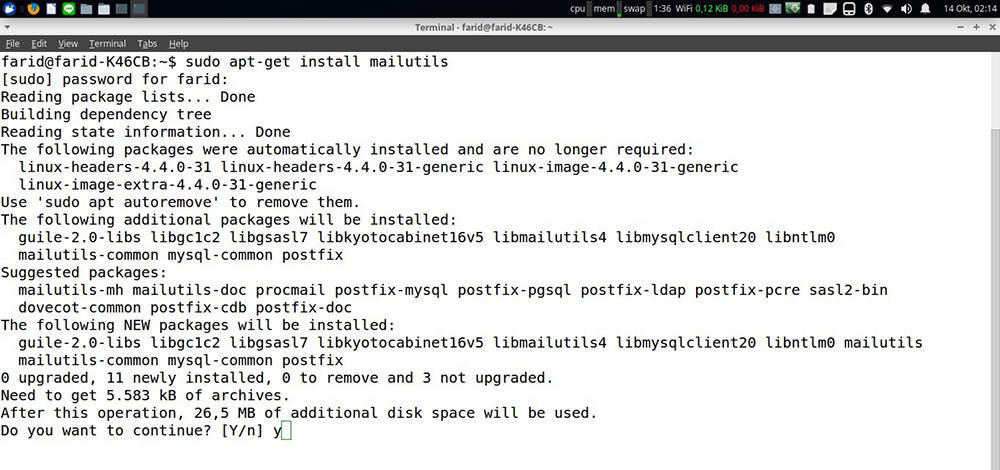
The Sendmail installation starts with the command "sudo apt install sendmail" which will download the mail agent packages.
mcedit /etc/hosts
"sudo sendmailconfig"
After that, you need to restart the services of the program itself, as well as the Apache web server:
"sudo /etc/init.d/sendmail restart"
"sudo /etc/init.d/apache2 restart"
If necessary, you can install utilities for working with mail:
"sudo install mailutils"
We check the performance testing of the entire system:
"mail your_mail< /dev/null»
where "your_mail" is the current postal address.
And finally, let's check the log file. This is the mail service file where installation errors will be displayed:
"tail -f /var/log/mail.log"
All you have to do is go to the box. Email. It should already contain a test message.
So, you've learned more about an Ubuntu program called Sendmail, which turned out to be quite easy to set up. If you have questions about other aspects of working with programs for Linux - look for answers to them on the pages of our site!
To start, a little digression
SMTP - Simple Mail Transfer Protocol - a service in TCP / IP networks for the transfer of messages (ie mail). Usually port 25 is used for SMTP (see /etc/services file)
POP - Post Office Protocol - is used to receive mail from the server. Default port - 110 (for POP3 protocol)
Now I will try to explain how to set up a small mail server using POP3 and SMTP
First, let's install the necessary software. We need sendmail and imap. If you are using an RH compatible version of Linux, you will need to install the appropriate packages.
I use
sendmail-8.11.0
imap-4.7c2
Before you can set up sendmail, you need to set up DNS correctly, otherwise this program will not work correctly (although you can configure sendmail to work without using dns).
Let's produce basic setup sendmail. To do this, you need to run the utility
netconf. It works both from under X and from under the console.
The netconf utility is in RH, Mandrake - I don't know for sure about other versions. (it is not available in KSI Linux). Naturally, you must be logged into the system as root
Select from the menu mail delivery system, then Basic sendmail configuration
In the Present your system as field, simply enter your domain name
Then check the box Accept email for ...
Set message sending protocol to smtp ( Mail gateway protocol)
This information is already enough for your sendmail to function.
You can set additional sendmail options with
netconf. If you don't have the sendmail program, you will get an unforgettable
the pleasure of manually editing the file /etc/sendmail.cf - in it
settings are stored
Now let's make sure that sendmail only accepts mail from
addresses. You don't even need to configure sendmail itself for this - you just need to
tweak /etc/hosts.allow and /etc/hosts.deny files
The first one contains a list of hosts that are allowed to access this
car, and in the second - is prohibited. Please note that despite the name
(allowed|disabled), restrictions that are set by the first file
much stricter.
Example. To deny access to all hosts except computers on your
networks in the file /etc/hosts.allow add the line
"192.168.1.
Here we mean that the network has the address 192.168.1.0 and the mask 255.255.255.0
You can read more about the format of hosts.allow and hosts.deny files,
by typing man /etc/hosts.allow
In order to accept mail only from "their" domains, you need to add to
mc file (usually /etc/mail/sendmail.mc) the following lines (use
tabs, not spaces)
LOCAL_CONFIG
FR-o /etc/sendmail.cR
LOCAL_RULESETS
Scheck_rcpt
# anything terminating locally is ok
R< $+ @ $=w
> [email protected] OK
R< $+ @ $=R
> [email protected] OK
# anything originating locally is ok
R$* $: $(dequote "" $&(client_name) $)
R$=w [email protected] OK
R$=R [email protected] OK
[email protected]
[email protected] OK
# anything else is bogus
R$* $#error $: "550 Relay Denied"
Now create a file /etc/sendmail.cR and enter the names of "your" domains into it -
one in each line.
Only on these domains the mailer will be able to receive mail - all the rest will receive
Message 550 Relaying Denied
Now it's POP3's turn. After installing the imap package, you have practically
everything is set, i.e. I want to say that it is already possible to check the configuration.
First, restart the inetd daemon
After it is restarted, the sendmail and popd services will be activated (more precisely
one sendmail and popd is called as needed)
Try doing the following:
enter telnet<имя_только_созданного_почтовика> 25
You should see something like this:
Trying 192.168.1.1 ...
Connected to 192.168.1.1
Escape character is "^]"
220 de.dhsilabs.com ESMTP Sendmail 8.11.0/8.8.7 Sun, 17 Jun 2001 10:54:22 +300
This means that sendmail is working, it remains to be checked whether it is correct :)
Enter
mail from: [email protected]
220 2.1.0 [email protected].... Sender Ok
rcpt to: [email protected]
220 2.1.5 [email protected]... Recipient Ok
Now we enter data, then the text of the message, to end the entry we put a dot
on an empty line
Sendmail will report that the message has been sent (or rather placed in
departure queue)
[email protected]-name of the user I'm sending mail to.
den.dhsilabs.com - the name of my mailer
Please note that the my.host.com node does not exist in nature, but Sender Ok.
That's why it's better to enable the Wait for DNS option in the sendmail settings
Now you need to run some email client such as kmail
and pick up mail.
network settings in kmail
Network -> Send mail set SMTP, port 25, server name -
the name of your mailer,
I have - den.dhsilabs.com
Then add a POP3 account
Logs - den
Password - the password used to log into the system
Server - den.dhsilabs.com
Port - 110
You should get the message you entered after data.
Installation and configuration guide for one of the oldest MTA (Mail Transfer Agent), a program for sending e-mail - sendmail, which is available for installation on any operating system. On many OSes, sendmail is installed by default and there is no particular need to change this default MTA to another one. At the same time, the same PHP is configured by default to work with this MTA. If the sendmail setup takes too long, install postfix(), don't waste too much time.
Preparation
Check if you have sendmail installed and not exim4 or another MTA:
Ls -la `which sendmail` # lrwxrwxrwx 1 root root 26 2011-01-17 19:58 /usr/sbin/sendmail -> /etc/alternatives/sendmail
Installation
sudo apt-get install sendmail sasl2-binConfiguring /etc/hosts
127.0.0.1 localhost localhost.localdomain e5530Note
You must specify your main host (computer name, mine is e5530) and localhost.localdomain otherwise you will get an error: My unqualified hostname (myhostname) unknown; sleeping for retry" and "unable to qualify my own domain name (e5530) - using short name, sendmail takes a long time to start and sends mail slowly. Possibly a host localhost.localdomain can be skipped, not sure.
After that, you need to specify the names of the local hosts from which sendmail will accept requests to send email messages, in the /etc/mail/local-host-names file:
AuthInfo:smtp.gmail.com "U: [email protected]" "I: [email protected]" "P:YourPass" "M:PLAIN" AuthInfo:smtp.gmail.com:465 "U: [email protected]" "I: [email protected]" "P:YourPass" "M:PLAIN"
Note
Instead of port 465, you can try to knock on 587 (if there are problems with authorization):
AuthInfo:smtp.gmail.com:587 "U: [email protected]" "I: [email protected]" "P:YourPass" "M:PLAIN"
Chmod 600 /etc/mail/auth/*
sendmail.mc config
Config file /etc/mail/sendmail.mc . Compare your config. It should be something like this.. The order of the instructions is important!
dnl # include(`/etc/mail/m4/dialup.m4")dnl include(`/etc/mail/m4/provider.m4")dnl include(`/etc/mail/tls/starttls.m4")dnl include(`/etc/mail/sasl/sasl.m4")dnl FEATURE(`authinfo",`hash /etc/mail/auth/client-info")dnl define(`SMART_HOST",`smtp.gmail.com" )dnl define(`RELAY_MAILER_ARGS", `TCP $h 587") dnl define(`ESMTP_MAILER_ARGS", `TCP $h 587") )dnl define(`confAUTH_MECHANISMS", `EXTERNAL GSSAPI DIGEST-MD5 CRAM-MD5 LOGIN PLAIN")dnl # dnl define(`confDOMAIN_NAME", `e5530")dnl
Apply sendmail config
cd /etc/mail sudo su # just sudo won't work! m4 sendmail.mc > sendmail.cf makemap -r hash authinfo.db< auth/client-info make /etc/init.d/sendmail restart # Перезагрузка конфигаProblems and Solutions
If everything is set up correctly, but the messages end up in a "delayed queue" and are not relayed to another SMTP:
- Check your IP "shnik in the blacklists. You can check the IP ban here smart-ip.net, my IP got into the spamhaus database".
- Check if your ISP is blocking outgoing packets on port 25.
Problems with Intertelecom!
I didn't manage to set up a message relay on GMail via sendmail on an Intertelecom connection - sendmail stubbornly knocked on port 25, which is closed by the provider. I had to configure postfix .
PHP setup (if needed)
Specify the sendmail startup parameters in the /etc/php5/apache2/php.ini config (/etc/php5/cli/php.ini):
## PHP sendmail setup: sendmail_path = /usr/sbin/sendmail -t ;sendmail_path = "/usr/sbin/sendmail -t -f [email protected]-i"
Let's check the settings
echo "Message text" | mail -s "Subjet" [email protected] sendmail -t [email protected]-f [email protected]-v -i< ~/mail-body.txtTo test postfix, try sending some messages from the console. How to do this I painted in this article: "".
sendmail management
View the entire message queue:
sudo mailq
View the message queue at a specific address:
sudo mailq | grep" [email protected]" | wc -l
Clear the entire sendmail message queue:
Sudo rm -r /var/spool/mqueue-client/*
Purge the sendmail message queue by destination:
Cd /var/spool/mqueue ls | xargs -ti sh -c "grep" [email protected]" "()" > /dev/null && rm -f "()""
#sendmail, #LAMP, #MTA
P.S. If you want to learn the Linux console enough good level- I recommend reading a fresh book by Denis Kolisnichenko " Command line Linux and automation of routine tasks».