Each user of the global network has to remember dozens of logins and passwords from various sites. Of course, someone gets by with one code for all occasions, but this is at least unsafe.
But there is another option - to use a special KeePassX password store. With this application, you can collect all passwords in one secure database, and extract them from there whenever possible. So let's figure out how to use KeePass, and how to install the program on different operating systems?
KeePass Password Manager is a versatile application that is available on different operating systems. This number includes both desktop operating systems Linux, Windows, MasOS, and its mobile variations.
Installation on Linux is done regular means either through the terminal. In the latter case, you must open command line and type sudo apt-get keepassx. There is no need to connect third-party repositories to install the application on Ubuntu, Linux Mint and other distributions based on Debian or Ubuntu.
To install the program on Windows and MacOS, you need to go to the official website and download the installation package for your OS.

In the installation wizard, you will need to go through the standard steps - choosing the directory where the program files will be stored, as well as creating a shortcut on the desktop.
KeePassX Russification
But how to Russify KeePassX? More old version the program needed to install additional language packs, and the version with the "X" prefix already supports the Russian language. If during installation you accidentally chose the wrong option, then you need to go to the menu "Instruments" and choose here "Settings"... On the main tab, you will find the Language item, where you will need to set the default Russian language.
How do I use KeePassX?
1. Creating a password store
Setting up KeePass begins by creating a vault where all passwords will be stored. To do this, in the main window of the program, go to the menu "Storage" and select the item "New storage".

Next, a window will appear in front of us in which you need to set a master password that will be used to access the saved database. Remember that the security of your data depends on its complexity, so when creating it, be sure to choose the option with mixed case letters, numbers, and it is desirable that they are not combined with significant dates of your life and do not have abbreviations of names.
To enhance protection, you can also connect a key file. You can choose your own Text Document or generate a new one. When you are finished with password operations, click "OK".

Our next step is to save the storage to a file so that you can save it and transfer it to another device at any time. Go to the menu again "Storage" and select the item "Save storage", then specify the path where the file will be stored and give it a name.
2. Saving the KeePassX password
To add a new password to the database, click on the corresponding icon in the main program window or go to the menu "Records" and select item "Add new entry".

In the window that appears, set the name of the entry and enter all the necessary data, such as login, password and a link to the site. Here you can change the recording icon, as well as set the duration during which the entered data can be used.

3. Using passwords
So, we learned how to create records, but now it's time to learn how to use them. There are many options here, among which the user can choose the most convenient.
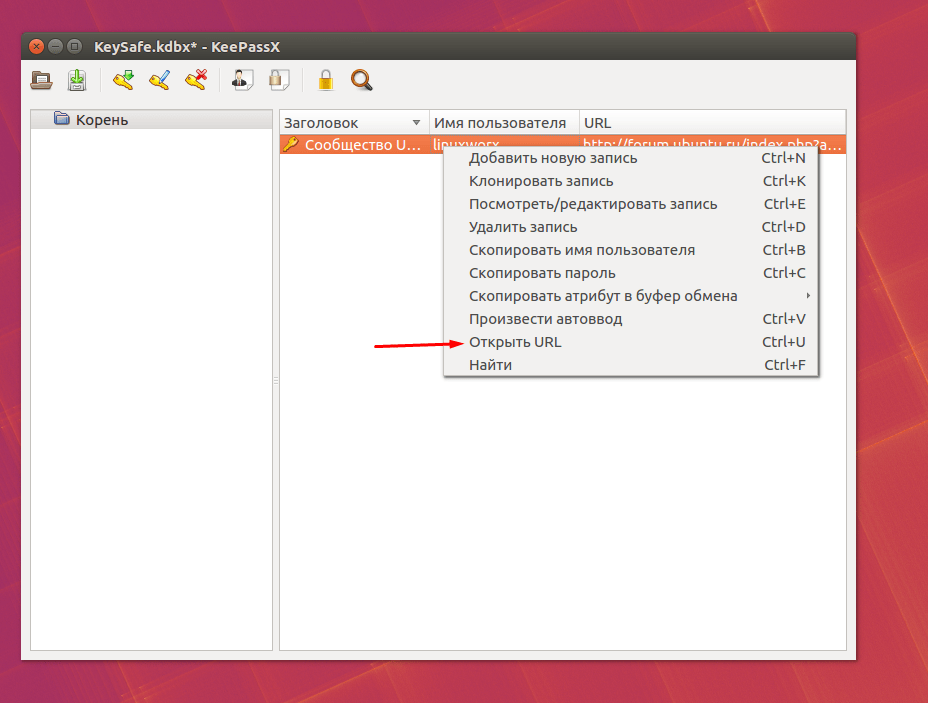
Open the site where you want to log in. This can be done directly from KeePassX using the keyboard shortcut Ctrl + U or through the context menu - item "Open URL"... You can just enter the link in your browser.
Next, copy the username by pressing Ctrl + B or select the corresponding item in the context menu. Paste the copied data into the login field on the site. Repeat the same operation with the password, only here the combination Ctrl + C is used.
Another option is to use auto-input. To do this, open the required site in a browser or through Ctrl + U, then in the KeePassX context menu, select the "Perform auto input" item or, having selected the desired entry, press the combination Ctrl + V.

After this operation, all data will be automatically entered into a special form on the site, and the user will only have to confirm the correctness of the login and password.
4. Grouping passwords
When the number of sites in use is hard to count on the fingers, it is advisable to group records in advance according to one or another criterion. To do this, go to the menu item "Groups" and select "Add group", then enter the name of the category and confirm all actions with the button "OK".

You can also add a group to KeePassX through the context menu right in the main program window. It is worth noting that when you delete a category, all folders will automatically move to the trash bin, which will be created automatically.
5. Restoration and export of storage
KeePassX users can export any repository to a CSV file which is supported by many other programs as well mobile devices... To do this, go to the menu "Storage" and select the item "Export to CSV file"... A previously saved record is imported through the same menu, but you need to select the appropriate item. KeePass is synchronized with the database either manually or automatically. In the latter case, you need to go to the program settings and choose the most convenient option for yourself.

conclusions
In this article, we've covered how to use KeePass. This is a convenient password storage that has an automatic filling function, as well as the ability to export the database to a separate file. All data is stored in encrypted form directly on your computer, and if necessary, it can be moved using a removable storage device.
Everyone who has to deal with the Internet, be it work or entertainment, sooner or later comes to the need in some way store passwords for sites... In this case, all stages of storage are passed. At the beginning, passwords are stored as separate files with no specific location. Then, after losing several of them, the passwords are stored in one file, usually in text. And when the number of passwords exceeds several dozen and they become more and more important, the understanding comes that they cannot be stored in this form and it is time to look for a program for storing passwords. But you don't have to do this - such a program has already been found, and it is called KeePass
Description of KeePass
KeePass (full name - KeePass Password Safe) - free program for storing passwords, designed by Dominik Reichl for operating system Windows. KeePass supports Advanced Encryption Standard (AES, Rijndael) and Twofish algorithms for encrypting their database passwords. It is possible to export the database to TXT, HTML, XML and CSV formats, as well as to import it from many different formats.As you can see, Kipass has a lot of advantages - free, open source, high level of data protection and portability. KeePass can be carried on a flash drive and used in a wide variety of places. And the Advanced Encryption Standard password encryption algorithms are the most reliable in the world - banks use them in their work. So you don't have to worry about the safety of your data. Among other things, the KeePass project is actively developing, which guarantees the release of new versions.
Let's download KeePass as soon as possible and begin a closer acquaintance with this wonderful program. An overview of all its capabilities is not included in the scope of this article, but we will learn how to set up and work with it.
Installation
At the time of this writing, there are two versions of the program: 1.17 and 2.10. They differ from each other - 2.10 is more advanced in terms of features and convenience. For me, for example, the ability to synchronize data in this version is very important, since I have 3 copies of Kipass: at home, at work and a flash drive. It is clear that the data on them should be the same, and when changing (adding) the password, I do not need to go into each of the programs - I use synchronization and that's it last changes are automatically transferred to another copy of the program. Great, agree. But for version 2.10, the Microsoft library must be installed on the computer. NET Framework above version 2.0.
Version 1.17 is also working and supported, it just has fewer features. For its work, it does not need additional libraries and it is guaranteed to run on any computer. Appearance both versions are no different.
Since Microsoft .NET Framework is free and installed in Vista by default, we will download the portable version 2.10.
You can download the program from the official website, the Russian language module will have to be downloaded separately. We go to the KeePass website. Click on the link "Portable KeePass 2.10 (ZIP Package)" and on the next page wait for the download to start. If it doesn't start, click on the "direct link" and upload the archive.
Regardless of the download option, we will receive an archive that needs to be unpacked. Since this is a portable version of KeePass, this completes the installation. The program folder itself can be placed on any drive, except for the system drive (usually drive "C"). Thus, if the system crashes and then reinstalls Windows passwords will remain intact.
Russification
In the section, download the Russian translation file for your version of the program, unpack it and drop the file with the extension ".lngx" into the root folder of the program.
Working with KeePass
Getting started. Launch KeePass by clicking KeePass.exe. Now we need to activate our installed Russian language module. Go to View-> Change language and change the language to Russian.
The program will close and then start again with the Russian interface. The next step is to create a new database file that will store our passwords. Click on the icon with a leaf and in the window that opens, specify the name and location of the file. Choose the name yourself, but you need to place the file in the same folder as the program itself.

After specifying the storage location for the database file, a window will open in which you need to enter the password to access the database.

Create and enter a password. The longer it is, the more secure the database will be. Find a compromise that is long enough, contains at least letters and numbers, and is easy to remember. Click OK and get into the next window, in which you do not need to do anything. There are settings in its tabs, but they are fine for work. After clicking OK, a new database will be created. It already has some data that can be used for work.
Now let's go to the "Tools-> Options" menu.

In the "Advanced" tab, check the box "Automatically save when closing / locking the password database". Now the database itself will be saved when the program is closed. Before creating new entries with passwords in the database, close the program and, starting it again, check the entry into it. A password entry window will appear at the entrance.

We enter our password. By clicking on the box with three dots, we will make the password visible - a very handy contraption. Then click OK and get into the already fully configured and ready-to-use program with open base data.

By clicking "Cancel" we will also open the program, but without opening the database.
How to add a new username and password to KeePass
Easily. To do this, select the group in which they will be located and add it through the "Edit-> Add Record" menu.

In our case, the entry will be added to the "General" group.
We will often work in the "Add Record" window that opens, so we will consider it in more detail.

There are no special problems when working with it - everything is clear from the names of the fields. In the "Title" field, enter a logical name for the entry. I usually refer to the site address without using "http" in the name. As a result, the entries are in alphabetical order, which is very convenient. In the "Name" we enter our login to enter the site, in the "Password" - the password. In this case, the bar under this field will display the strength of the password. While creating new entry the program itself generates a password that you can use. We will enter our own, not forgetting to press the button with three dots when entering it. We repeat the password.
We will now move on to the Comments field. It is not necessary to fill out, but in practice it is difficult to do without it - there will always be information that can be entered into it. When working with a plastic card, I keep in it all its details - from the number and CVV code, to the secret question, address and passport data. Thus, all data is at hand. Click OK and the entry we created will appear in the "General" section.
Features of working in KeePass
It is quite convenient to work in the program. The basis for work is a line with a record. As we can see, it consists of the values of the fields we entered: title, name, password of the link and comment.
On each of them, by clicking 2 times with the mouse, we will get the result. By clicking on the name, we will open a window for editing the record. Double clicking on the rest (except for the field with the link) will copy the contents to memory for 12 seconds, after which the memory will be cleared. Thus, you can not be afraid that an important password will hang in the computer's memory after you close KeePass.
Let's see how the site entrance will look like. We click on the area with the link - the site opens. We click on the area of the line with the name - the login is copied into memory. Go to the site and paste it. Returning to Kipass, we click on the area with the password, which will be copied into memory. Going back to the site, paste it into the appropriate field. That's all.

As already mentioned, records are conveniently found when they are in alphabetical order. To do this, in the drop-down menu you need to go to "Order" and select "Sort by username".
How to sync KeePass databases
If you have more than one copy of the program, then you need to somehow synchronize the data in them. Do not climb through each record and check it against the record of another copy, right. Fortunately, KeePass makes this procedure very easy. Go to the menu "File-> Synchronization-> Synchronize with file" and in the window that opens, specify the database file of another instance of the program. By double-clicking on it, or by clicking the "Open" button, we synchronize both databases - after this process, the databases will become the same. At the same time, the novelty of the base is determined not by the time of its last update, and for each specific record.
Of course, most of the KeePass settings are beyond the scope of this little tutorial to get started. But believe me, those small changes that we made in conjunction with the default settings are quite suitable for work. If you have an irresistible desire to delve into other program settings - to your health. Do not forget to just do backup program by copying its entire folder to a safe place.
Did the article help? Help and you develop the site, publish the link!
Hello dear readers of the blog site. Sooner or later, every user or administrator is faced with a security problem when storing multiple passwords. You will either choose to create one universal password for all occasions, or you will store all your passwords in some insecure, insecure place. Therefore, if you are worried about the current situation and worried about the safety of your passwords, you will have to look for a solution.
I recommend you a free and reliable solution. KeePass is feature rich, free and open source. The latter eliminates injecting code to track your data and steal passwords. The convenience in using this program lies in the fact that you will need to come up with and remember only one password and you can use it to access the database of all your passwords. Plus, for complete protection against unauthorized access, KeePass has the ability to create a key in the form of a file, without which it will be impossible to access the password file in the future.
Installing KeePass
To install Kipas, go to the download page (here). On the site you can choose 2 versions of the program: Classic Edition and Professional Edition. For the first version of the program to work, you will not need to have Microsoft.NET installed, which is absolutely necessary for the second version of the program. I recommend installing Professional. Plus it is possible to install a portable version on your computer. Portable is preferable because it does not leave traces and does not create registry entries. It just works.
You just download the portable version, unzip the archive to the place from where you plan to run the program. Since I work from different places on different computers, I found a solution for myself to use Google Drive to store the program and the password file. With this organization of the location of the program, all changes and settings are saved for any computer wherever I work. Just grab and move the program folder to the Google Drive folder. It can also be used to store the program and a file with passwords any cloud service... If you prefer removable media, you can use a USB stick. This is exactly what the Portable version of the program has.
How to Russify KeePass
After installation, the first thing to do is to Russify the program. It's very easy to Russify KeePass. Download the file with the translation for your language from this page, and in the case of the portable version, simply save the file from the archive to the program folder (the file looks like Russian.lngx). Please note that you need to select the file corresponding to your version to download.

After that, launch the program, select “Change Language ...” in the “View” menu and select Russian in the window that opens (the available language will appear only if you downloaded the file with the correct version of Russification and put it in the program folder). The program will offer to restart it. Agree and this is the end of Russification.

Password database creation
The next step is to create a password database. it special file, which actually stores all your data on accounts and passwords with all settings. You can create multiple files that store passwords. And each will have its own password. This can be done if several people work on one computer under one account and each needs access to their passwords. And then in this case, each user only opens his own file and enters his password to access.
To create a new database, go to the "File" item and select "New ..." or you can immediately press the key combination Ctrl + N. In the window that opens, select the location where your password file will be stored. As I said earlier, this file can be stored on any medium (DropBox, Google Drive, Yandex Disk, or just on a USB flash drive). Choose a name for the file and click "Save".

The next step is to create a master password to access your password database. To protect your data, KeePass offers 3 different ways protection. Each of them can be used separately, or all three or at least two methods can be used for complete and maximum protection. The third way (accounting Windows entry) I do not use, so I will not recommend it to you either.

To protect the file:
- We come up with and create a master password for access. This is exactly the password that you will need to remember once to access all passwords. Enter the password in the field and enter the exact same password in the second field “Password repeat:”. If the passwords match, the input field will be highlighted in white, if they do not match - in red. The bar below (Estimated Quality) indicates how tamper-resistant the password you have come up with. Try to keep the stripe, if not full, then at least in the green zone.
- If you want to have a check for a key file, click on the "New" button (figure 4 in the figure) and select a location to store this file. Again, this can be any medium, but logically it should be a medium different from the one on which the password file is stored. For example, a USB flash drive that you carry in your wallet for a key and a file with a database is stored in cloud storage and you remember the password to it. However, keep in mind that you will not be able to recover the password, and if you lose the key file, you will also lose access to the database and will not be able to restore it. I only use the first method of protection. Came up with a very complex password and remembered it.
- You can also add an account as an identification method. But in the case of, for example, the portable version of KeePass, you will not get access to the password file from another computer other than the one on which you created it.

In the next step, the program will offer to configure some parameters of the Password Database. I usually leave all settings unchanged. You can increase the number of encryption cycles for better protection. How more number, the longer it takes to open the password database. The time also depends on the power of your computer. The number of cycles can be adjusted for specific computer assuming that the base will open for 1 second. Just click on "Calculate for one second delay". For my work computer, that number was over 14 million cycles. If you specify this parameter, then for less powerful computer(for example, you open the base on a weak old laptop) the opening time will not be 1 second, but much longer. I leave the rest of the tabs by default.
Setting up and creating records
After the successful creation of the database, the program will automatically open this database and sample records will already be created in the window. You can safely delete them or study them as examples.
The program window has 3 main areas that you will constantly use:
- This is an area for grouping your data into folders. With their help, you can see all records or sort by a specific group. It is best to decide from the outset on the structure of your data to store. For example, I sort by folders in the following form: my sites, money, email, hosting, ftp, etc.
- The second area is the entries that are in the folder of your choice on the left.
- The third area is information about the entry that is selected.

To create new folder right-click on the folder inside which you want to create. And in the drop-down menu, select "Add group" (1). In the window for adding a group in the "General" tab, enter the name (2) and you can select the icon (3) for convenience.

The next step is to create a record directly that will store all data about the login, password and other fields for quick access to them. To create it, right-click in the field with records and select "Add record ..." or you can press the keyboard shortcut Ctrl + I.

A window for filling in the data with many tabs will open. The main fields for filling are in the first tab.
Fill in the "Name" field as the profile name for generated password... The name will be your login and password, respectively, the password. The link field is either the site on which you use the login password or the link to the executable file if you enter the login and password in the program, and not on the site. Later in the article I will show you how to use this with an example.
If you create an entry for an existing account with a password, you simply enter the existing password. To check the correctness of the entered password, simply click on the button with 3 large dots and the program will display symbols instead of dots. If you create a new account and need to come up with a password, then your best bet is to use the password generator that is built into KeePass.

To open the password generation tool, click on the button with the key and gear image to the right of the "Password repeat" field. To use this tool without opening the record creation form, simply select "Tools" -> "Password Generator ..." in the menu.
With this form, you can create as complex passwords as you need. And thanks to the fact that you no longer need to memorize them, feel free to generate and use the most complex combinations.
In the settings of the password generator, you can specify which characters, uppercase and lowercase letters, numbers and even special characters to use in generation (1) ... The length of the password is also indicated. After specifying the settings, you just need to open the "View" tab and select any of the proposed in the list (3) ... If it is necessary to exclude any symbol from generation, this can be done in the "Advanced" tab (2) .

After filling in all the data on the first tab, go to the most interesting, convenient and useful "Autoset" tab (it is because of this feature that I fell in love with this particular program). Auto typing allows you to automatically fill in the fields for entering the site or in the program by pressing the key combination Ctrl + Alt + A.
For autodial, go to the "Autodialer" tab, check that autodial is on.
- This radio button selects which sequence to use when filling out login forms. For the most effective use, it would be best to think over the folder structure right away and set up a sequence for each of the folders. In this case, the new entry will inherit the sequence that is defined for the folder.
- Add a target window so that the program can determine which entry with login and password to use. More on this below.

To set the general autodial sequence for a folder, you must:
- Right-click on the folder
- Select in the drop-down list "Change group"
- Go to the "Autodialer" tab
- Click on the stick to generate the sequence
- We set the required sequence. It is set as follows - in the "Placeholder" window, it is selected by clicking on the corresponding entry. The list is very long and it is possible to create almost any sequence. In my case, the following will happen: the title of the record (Title) will be added to the field, then pressing the Tab key, then login, Tab, password and at the end Enter.
After that, if the "Inherit autodial from group" radio button is selected when creating a record, this sequence will be used. If it is necessary to change autosetting for some of the records in the group, select "Use the following sequence" and specify the required one.

How to use KeePass
Using the example of creating records for entering a website in a browser Google chrome and for connecting to an FTP server using FileZilla I will show you how to create entries and use them. I always use KeePass to log into my sites.
- In the left window of folders, create a folder of records for entering the sites. In the folder, click create a new entry.
- Knowing my login and password, I write the name of the site in the name, in the name - the login and in the password, respectively, the password.
- Go to the "Autodial" tab and set the switch to the "Inherit autodial from group" position. By default, auto-typing contains a sequence, which in most cases is suitable for filling out login forms.
- The next step is to tell the program the login window so that KeePass can automatically determine which entry to use for (in our case, this is a tab in Google Chrome with open page my site). Please note that the window and site must be open and active. Click the add button.
- In the drop-down list "Target window" we find the element we need and click "Ok". There can be several target windows for one record. And for each you can set a sequence. This is convenient if you use the same username and password for different sites and each needs its own sequence.
- The target window should appear in the list. Click "OK" and save our database by clicking on the blue floppy disk.

The record has been created and it remains for us to check for operability. We open our site with a login form, put the cursor in the login field and press the key combination Ctrl + Alt + A. If everything is done correctly, KeePass will automatically insert your username, password and click on the login.
In order to use KeePass to insert a username and password in a program (for example, such as), you must use the "Name" field and change the input sequence.
- For convenience, create a folder for FTP connections. When creating a folder in the "Autoset" tab, switch to the "Use the following sequence" position.
- Using the "Magic Wand" button to the right of the field, set the following sequence as in the image.
- In the created folder, add a new entry for connecting to FTP and in the "Name" field specify the FTP address that the hosting provider gave you for connection. The Title field will be used in the dialing sequence as (Title). Those. Kipas will take the data from the "Name" field (in my case it is 192.168.1.200) and substitute this value in the FileZilla field as the address. Fill in the login and password as in the previous example.
- In the "Autosetting" tab, when creating a record, we specify to inherit autosetting from the group. This is useful if you have a lot of entries in a folder and need to change the sequence. You just change the folder settings and all entries will inherit it.
- Add a target window by clicking the "Add" button and choosing from the list (for this, run the necessary program FileZilla)
- Click "OK" and check the performance.


Hello dear readers of the blog site. Not so long ago, I wrote about my problem with who got there by stealing passwords from my favorite FTP manager, Filesila.
The program itself is not very bad, but the entered authorization data is stored in it in an open form - I don’t want to take it. And in browsers, not everything is so cloudless with the storage of data entered into them. In this regard, I took care of finding a way to solve the problem secure password storage.
Probably many of you are already using a password manager of some kind. But I just now bothered to attend to the search for such software and my choice fell on KeePass... This program has a built-in generator of complex combinations, stores them in an encrypted database, and also quite conveniently allows them to be inserted into browsers, FTP managers and other software.
In addition, Kipas is free and has open source code, which allows you to believe in the reliability of storing your confidential data in this program (any person versed in programming could have brought him to clean water since 2003, however, since this did not happen, then you can trust this software 100%).
Installing and configuring the KeePass password manager
In the field of data encryption, open source code is more a plus than a minus (TrueCrypt, I wrote about it in my article about, is a confirmation of this). Of course, this program has a lot of paid and free analogues, which some of you probably use in their daily practice, but due to a combination of factors, KeePass is what I liked the most at the moment.
Among other things, third-party developers release plugins for it, which, for example, can integrate this manager with popular browsers to improve reliability and convenience of storing passwords in them... Although, Kipas already has such a tool as AutoType by default.
Those. you just put the cursor in the first line of the authorization form on the site or any program, and then press the key combination Ctrl + Alt + A, and if for this page or software you are concerned about creating a profile in KeePass, then the form will be safely filled with a login and a password, and the entered data will not remain in or in any other places accessible to malware.
Absolute reliability, of course, no one guarantees, but by setting up this password manager, you can reduce the risk of interception and theft of important data to a minimum. For example, the copied data lives in the clipboard for a specified number of seconds, the program can close access to its database (enable blocking) after a certain time and after certain actions.
In general, let's talk about the pros and cons of this generator and storage of important data along the way. Download KeePass can be completely free on this page, but you will immediately have to choose between simplified version 1 ..., which does not need Microsoft.NET (or Mono in free software) to work, and version 2 ..., which needs this framework, but on the other hand its functionality is much wider, and it can work not only under Windows, but also under Linux, Mac OS X, BSD and other linux-like systems. See details.

By the way, the full name of this password saver sounds like KeePass Password Safe and, in addition to the division into versions described just above, there is also a division according to the type of installation of the program: regular and portable ( Portable Kipas).
The second option, in my opinion, is preferable, because it does not have any disadvantages before full version, does not leave any traces behind itself in the operating system and can safely live on a USB flash drive (it will be desirable to duplicate it periodically in order to avoid losing everything at once).
Actually, I also use the portable version. For russification or ukrainization of the interface For this password generator, it will be enough to download the translation file from this page for the version you are using and copy it to the program folder (in case Portable version). Then go into it and go from the top menu along the path: "View" - "Change Language". In the window that opens, select your language, Kipas will reboot and the desired language will be applied to the interface.
Where to start? WITH creating a new base... You can create an unlimited number of them, for example, when several people work on the computer and each will have their own individual set of complex KeePass-generated passwords that the other user will not have access to. In most cases, you can do with one base, because it will be difficult to memorize several master keys from them.
To do this, click on an empty piece of paper on the toolbar of this manager (or choose from the menu "File" - "New"):

If you have a portable version, then it makes sense to save the database to the program folder (on a USB flash drive). If the version of the manager is full or you copied Portable to the C drive, then in no case throw the file with the database there, because if it fails or is restored from the image, it can rest in Bose along with all the invaluable passwords.
It can be placed, for example, in, so that you always have the opportunity to pull a copy from the Internet. You should not be afraid for its safety, because the data in it is encrypted in a very reliable way.
In the next step, you will be asked how secure access to stored passwords should be. This will be expressed in how many stages of authorization you select in the composite key window to access the database:

Access to the encrypted database in Kipas can be closed with as many as three barriers:
- Master key for entering the manager (you will have to remember or write it down, because without it ...)
- Key file - choose, for example, on your computer, or preferably a flash drive, some inconspicuous file (best of all among a bunch of similar ones) and say that it will now be key. It will be possible to create it on purpose. But be sure to dig it into a few more places (another flash drive, HDD(but not in C) or in a cloud storage like Yandex Disk or Dropbox, because if you lose it ...)
You can even bind this program for storing passwords to your Windows account even before the heap, although in the case of using portable version KeePass on a flash drive will be superfluous, because on another computer you will not open this password manager (you will not get access to the encrypted database). If you plan to work with only one computer, then linking to the account will further increase the security of the databases.
But remember that adding any new device will change this very account and problems will arise. Anyway, I had it that way after the replacement motherboard... Therefore, be careful with this option.
Next, you will be prompted to change some settings of the created base... You can, for example, increase the strength of the encryption method used by increasing the number of cycles (passes), but this will somewhat (not significantly) slow down its opening and storing data in it:

It will be possible to enable or disable the bases to reduce the size it occupies, as well as decide whether or not to use the "Recycle Bin" built into this manager, where the deleted profiles will fall.
On the "Advanced" tab, you can ask the program to remind you of the need to change the master key after a certain number of days (if paranoia is overwhelmed and you started setting up the password manager, then a periodic key change will not seem superfluous).
At the end of this process, you will be taken to the tab with your newly created base for passwords and logins (they are located on horizontal stripe tabs), where you will find carefully created for you KeePass custodian daddies and profile examples:

You are free to remove all this demo wealth in order to blank slate build your well thought out hierarchical tree in this generator and keeper. Well, I told the most difficult thing, and then you yourself ... It's clear that I'm joking, because there is still a lot of text left below. I will try to tell in all the details about what I still managed to figure out.
Generator and keeper of passwords with their convenient insertion
My main task was to configure the most secure work with FTP manager FileZilla, as well as convenient and safe storage passwords from money programs (for example) and money sites (or no less popular or). Well, and there are a lot of sites, passwords from which the attackers should not know.
There is also the problem of hacking mail, where letters with passwords and logins to all this wealth are often stored, but, firstly, I focus on everything more or less important on my own, because there is a binding to my computer and using SMS sent to my cell ... Secondly, I periodically delete all mail from there in order to avoid ...
I'll make a reservation right away - why start this whole circus with the creation of complex passwords and storing them in encrypted form. After all, there are password managers in the same FTP clients, and browsers are not offended by such tools. Waste of time? Not at all. Do you have Filezil on your computer? Now go along this path:
C: \ Users \ [account name] \ AppData \ Roaming \ FileZilla \ sitemanager.xml
Or like this in the case of old XP:
C: \ Documents and Settings \ [account name] \ Application Data \ FileZilla \ sitemanager.xml
This file can be opened, for example, in my favorite. And what do we have? And we have a full set of passwords saved in this program, which absolutely not protected from theft, because the file is not encrypted, and its location is the same for 99.99% of computers.
And even a little earlier I scolded my beloved for this. Take it - I don't want to.
Think browsers are doing better? Well, maybe a little, but if you type in the search queries "How to find out the password in the Opera", you will probably get the answer that they are stored in the wand.dat file, which is not difficult to find in the c: \ Users \ account name \ AppData \ Roaming \ Opera \ directory.
Well, the free software Unwand will help to open its contents. As a result, you will receive a list that can be copied into the same Notepad ++, and using the built-in search to find all the passwords you are interested in.
I myself have used this opportunity more than once to search for a never-written, but remembered password and login. I will not say for other browsers (it is possible that somewhere passwords are encrypted and this is done securely), but most likely the situation is not very optimistic. Therefore, I decided to remove all important profiles from the managers built into browsers, transferring them first to KeePass.
In general, something similar to convenient and secure storage and generation of passwords I managed to organize. Something I didn't manage to figure out, but here I hope for you - suddenly someone knows English well and understands the essence that I do not understand.
So, first you need to think over the structure of the hierarchical tree in Kipas. New subfolders are created using the context menu of the parent folder:

Although, you can then use the mouse to drag folders inside other directories as you like. After creating the structure, you can start creating profiles in this manager. There is a special shortcut for this on the KeePass toolbar.
Go to the desired folder in the left pane, and then click on this shortcut with the key, or in the right pane from the context menu, select the "Add entry" item:

A window with a number of bookmarks will open. The main fields for filling are located on the first tab:

In most cases, the "Name" field must be filled in with the name of this password profile, but sometimes not (more on that later). In the "Name" field, enter the login, and in the next two - the password. If you fill out a profile in Kipas for an existing account, then password generator you will not need it, but if you are simultaneously registering on any website or program, then you will simply have to generate a complex and hack-resistant code.
For this purpose, in Kipas there is a tool for automatic generation of passwords for a new account (its complexity can be estimated in the "Quality" line), which can be configured by a button with a key and a gear called "Generate passwords", which you will find at the end of the "Repeat" line.
The same tool to create passwords of any complexity will be available to you from the top menu of the manager: "Service" - "Generator":

As you can see from the screenshot taken, you are free to set the length of the generated password in symbols, and also very finely configure which of the possible symbols will participate in the generation. You will be able to contemplate the approximate variants of the created codes on the "View" tab.
The tool is quite powerful and passwords can be created overly complex, but you still won't need to memorize them, and you won't even have to type on the keyboard - the smart KeePass manager will do everything for you, and thanks for that.
So that all the settings you made here are then always applied to the automatically generated passwords of the new profile, just click on the blue floppy disk at the end of the "Profile" line and select the option to save "Auto-generated passwords for new entries".
Close the generator settings window and fill in the remaining fields "Link" and "Comments". For sites, filling them out will be prosaic, but for programs, for convenience, you will need to insert the path to the executable file of this software in the "Link" field (for example, cmd: // "C: \ Program Files \ FileZilla FTP Client \ filezilla.exe" ), and in the comments about her (see the example with Filezila just below in the text). Everything? An, no.
The most interesting thing in the Kipas manager is that the passwords entered into it can be automatically inserted using the Ctrl + Alt + A hotkeys already mentioned just above (well, or what is more difficult - Ctrl + U and Ctrl + V). However, in order for all this splendor to work, you will now need to spend a bit of time setting up, so immediately in the new task window go to the tab "Autodial":

What kind of beast? This thing allows you to explain to the program exactly where to insert the login and password on the required page of the site or the program window. Imagine, you put the mouse cursor in the initial field of the authorization form, which in most cases will consist of two fields for entering a login and a password, respectively. Then press Ctrl + Alt + A and KeePass automatically fills in these fields. But in reality, it obeys the rule:
(USERNAME) (TAB) (PASSWORD) (ENTER)
This means the following. The contents of the "Name" line are entered into the first field, then pressing the "Tab" key on the keyboard is simulated, which provokes a transition to the next field of the authorization form, where the password is inserted, and then pressing Enter on the keyboard is simulated. As a result, you safely enter the site or program. Shaitanama.
This is a standard combination that will work on most sites, but not all. I once wrote where I mentioned the popular Direct / Advert service. The teaser is wonderful, but now we are not talking about that, but about a certain non-standard form for entering this site:

Why is it unusual? This is shown in the screenshot with an arrow. When using a standard combination, only the login will be entered, since the second field is a link to request a new password. The entrance to the site will not take place, but your mailbox a letter will come with a request to change the password. What to do?
Create your own profile in Kipas for this site by ticking the box “Use the following sequence” in the previous screenshot and slightly change it:
(USERNAME) (TAB) (TAB) (PASSWORD) (ENTER)
After pressing the Autodial keys (Ctrl + Alt + A), nothing may happen since KeePass Manager will not match the page you open in your browser to the profile that was created for it. What to do? Teach him, of course.
To do this, we once again look at the previous screenshot and see there the button "Add" in the middle of the autodialer settings window. Click on it a little later, but first open in your browser the page where the login form is located, or open that application (for example, filezila), which will be the receiver of auto-typing fields. Have you opened it?
Well, now go to Kipas and click on "Add":

From the "Target window" drop-down list, select the application you need (for example, the Opera browser with the authorization page on the Direct / Advert website open in it), and then click on OK.
By the way, in the same window you can use a more extended set of operands for more fine tuning behavior of the KeePass auto-typing bot in the specified program, but this is already for inquisitive minds (there is a link to help on Auto-Type, but it is in English).
Now, on the auto-typing settings tab in the password manager, a corresponding line will appear, which will rigidly link the site page with the authorization form (or application) to the password profile you created in Kipas:

Everything. Click OK. Go to the website page with the authorization form, put the cursor in the first field and use treasured combination of three fingers(Ctrl + Alt + A). Happened? So that's great. I'm very happy for you.
How to use KeePass with Filezilla
Great, but now let's get back to where I started all this - possibility of safe and comfortable work with sites on FTP across . As we saw just above, the built-in password manager is no good in terms of security.
Therefore, we open the Kipas program, create an FTP folder in its left column and create the first profile for entering one of our sites via FTP.

There are several nuances in filling it out. In the first field, we write the address of your hoster's FTP server, then enter the login and password given to you to access the site via file protocol, but in the "Link" field we insert a command to open Filezila, which is quite convenient.
For normal Windows it will be:
Cmd: // "C: \ Program Files \ FileZilla FTP Client \ filezilla.exe"
And for 64-bit:
Cmd: // "C: \ Program Files (x86) \ FileZilla FTP Client \ filezilla.exe"
It would be best to write the name of this connection in the comment field, since FTP server address can be of little information. Next, open the filezilla and without entering any passwords into it, go to the "Autoset" tab of the KeePass program to link this profile to our FTP manager:

As shown just above in the text, click the "Add" button, select the "Target window" FileZilla from the drop-down list (it should be open at this moment and there should be nothing in the authorization fields), and then click OK.
The checkbox in the screenshot is in the "Inherit autodial from group" field, because I registered the necessary operants for the entire group (FTP folder) by selecting the "Change group" item from its context menu and going to the "Autoset" tab:

You are free to rearrange the checkbox in the "Use the following sequence" field and for each FTP connection enter a set of operands in the field located just below:
(TITLE) (TAB) (USERNAME) (TAB) (PASSWORD) (ENTER)
This does not change the essence. Now, to check, open FileZilla, put the cursor in the first line of the authorization field and press the three magic keys (Ctrl + Alt + A):
If you create several password profiles for different FTP connections using the algorithm described just above, then when you press the magic keys, you will be asked where you still want to enter (the same will be true for sites where you have several accounts):

Can use another login algorithm... Open your program for storing passwords (kipas), go to the FTP folder, click once on the line with the required FTP account and press Ctrl + U on keyboard.
The focus is transferred to the Filezilla program that opened at the same time (this is why the cmd: // "C: \ Program Files \ FileZilla FTP Client \ filezilla.exe" link was added), but without going anywhere else you go back to KeePass and press the key combination Ctrl + V... As a result, the authorization fields in FileZilla will be filled in automatically and you will be able to access your site. Which method of automatic password entry is more convenient is up to you.
And, finally, you can simply copy the login and password to the clipboard by double-clicking on them in turn in the Kipas window (in the name and password columns). Double-clicking on the names of the record will open its editing window, and double-clicking in the "Link" column will activate the transition to it.
How long passwords are stored in the clipboard set in the settings (Service - Settings - Security - Buffer autocleaning) and by default is equal to 12 seconds.
So, and a couple more steps that will allow remove all traces of passwords entered into FileZilla from KeePass... The fact is that this FTP manager keeps the history of the entered passwords for some time and a certain amount. To eliminate this incident, you will have to do a number of simple manipulations.
First, delete the sitemanager.xml already mentioned above (see above for its storage folder). Secondly, you will need to slightly change the program settings.
To do this, find the fzdefaults.xml.example file in the c: \ Program Files (x86) \ FileZilla FTP Client \ docs \ directory and rename it by removing the ending in fzdefaults.xml. Move this file to the folder with Filezilla (c: \ Program Files (x86) \ FileZilla FTP Client) and, opening it for editing in Notepad ++, delete all its contents, replacing it with this:
Save the changes, then go to the C: \ Users \ [account name] \ AppData \ Roaming \ FileZilla \ folder and delete the recentservers.xml and filezilla.xml files there. That's it, your FileZilla now won't tell anyone what passwords were entered into it automatically from the KeePass manager. What was required to be implemented.
More about KeePass
During its long existence this program overgrown with the richest functionality, about which you can write a small book. There are many opportunities, but not all of them are obvious. In addition to the built-in functionality, there is the ability to expand by installing plugins which can be downloaded from the official page.
Plugins are installed by simply copying them into the program directory and then restarting it. The aforementioned Favicon Downloader adds an item "Download Favicon" to the context menu, by clicking on which, favicons will be downloaded from the Internet for those sites whose passwords you store in this program. As a result, the visibility of working with it is significantly increased.
There is still a whole galaxy of plugins that work in tandem with the corresponding extensions in the browser, allowing, as I understand it, to raise the level of interaction of these programs to a higher quality high level... However, in practice, I still do not understand what all this is for. If anyone is in the know, please describe the advantages and principles of using these extensions in browsers. Thanks.
Yes, there is still a mass programs for mobile phones and tablets who know how to use the KeePass password database that you shared through DropBox or Google Drive. For my beloved iPad, this program is called KyPass.
In the Kipas settings you can activate its launch together with the start of Windows. To do this, select "Service" - "Settings" from the top menu and go to the "Integration" tab:

There you can also change the keyboard shortcuts for auto-typing and calling the manager window. In the tab "Additionally" you can make more than a dozen more settings, including putting a tick in the "Run in minimized and locked state" box, which can be useful:

In addition, KeePass has the ability to create your own filters for events and assign actions to them. This is done in the menu "Service" - "Triggers" (?). If you've ever set up filters in an email program, you can easily figure out what's what. However, I will give an example. Let's say that we want to automatically save the newly entered or changed passwords to the database.
To do this, select "Triggers" from the top menu of the "Service" program, and in the window that opens, click on the "Add" button:

Now you need to name the rule and then go through the Events, Conditions and Actions tabs one by one. On each of these tabs, click on the "Add" button and select the following options from the drop-down list (then click on OK), if you want, so that the base is saved automatically.
For Events - User interface status has been updated, for Conditions - Current database contains unsaved changes, and for Actions - Save current password database. Now save all this by clicking on the "Finish" button and enjoy the result. For sim let me take my leave.
Good luck to you! See you soon on the pages of the blog site
You may be interested
 FileZilla - where to download for free and how to learn how to use the popular Filezilla FTP client
  Windows clipboard and saving its history in Clipdiary
  Total Commander is the best file manager for Windows, its capabilities, installation and configuration of plugins
  Extensions and themes for Google Chrome
  Opera - how to customize the browser for yourself, as well as Opera Link, config, express panel and mail client
  Mozilla Firefox- download, install and configure the most extensible of the browsers called Mazila Firefox How to search the contents of files in Total Commander
  TrueCrypt - how to put a password on a folder or computer, as well as password and encrypt a USB flash drive
One of the key issues of user security on the Internet is creating strong passwords. Almost all of us are registered on social networks, and, as a rule, in several at once. We have e-mail, skype, we use various services (for example, cloud storage of data such as, etc.), we use electronic money to pay for purchases on the Internet, we are registered on forums. A special category is the owners of sites and blogs. A password to your own site is the first precaution, on which not only access to the administration of your resource depends, but also the safety of its visitors. I'm sure when you find out how to use KeePass, your site will receive another reliable outpost against potential intruders.
It is clear that manually creating strong passwords for each site or service used is a rather laborious and wiggling process. However, if you entrust this task to a program, you can not only make your life easier, but also significantly increase the security of your virtual (and sometimes even real) space. And now I want to teach you how to create a strong password in the program KeePass Password Safe.
Downloading the KeePass Password Safe program
We will download the latest version of the program from the official site so that there are no misunderstandings in such a sensitive issue as creating passwords. So, go to the KeePass Password Safe download page (the link will open in a new tab), and in the right column with the heading Professional Edition click on the first link - KeePass 2.20.1 (Installer EXE for Windows)(please note that version 2.20.1 is relevant only at the time of this writing - for sure, when you download the program, the version will be different). After clicking on the download link, we are transferred to a reliable storage service software Sourceforge.net- and after a 5-second wait a dialog box will appear to save the program installer. Push Save and choose a location on your computer to save.
Don't be intimidated by the native KeePass of English language- just below you will learn how to teach the program to the Great and Mighty 🙂
Downloaded, great. Now we run the downloaded file KeePass-X.XX.X-Setup.exe and proceed with the installation.
Installing KeePass Password Safe
The KeePass installation has nothing to focus on. I will only clarify that at the stage called Select additional tasks check that the option is checked Associate KeePass with .kdbx files(this is the database format in which KeePass stores passwords) and also check Create Desktop Icon to quickly launch the program later by double-clicking on the icon.
At the last stage, when you press the button To complete we will finish the installation, and the program will automatically start (unless, of course, you unchecked the corresponding option at this stage).
Russification KeePass Password Safe
After starting the program, an empty window appears in front of us, and not every user will easily understand what to do with it next. The picture is further clouded by the English-language interface, which for many will also be the cornerstone for starting to use KeePass for storing passwords. In fact, this is not such a serious problem, and now we will wean the program from the bourgeois habits and instill in it a love for the Great and Mighty.
First you need to download KeePass crack from the program website. To do this, go to and scroll down to Russian flag badge with an inscription English and click on the link in this line on the right:
![]()
KeePass Password Safe Russification File
After that, we will be transferred to the already familiar Sourceforge and after 5 seconds the browser will offer to save the archive Russian-2.20.zip to our computer. For convenience, I saved it to Desktop.
Now we need to copy the crack contained in the archive to the folder where you installed KeePass (if during the installation process you did not change the installation path, then it will look like this: C: \ Program Files \ KeePass Password Safe 2).
We open this folder, and also double-click to open the newly downloaded archive ( Russian-2.20.zip) and drag the file from it with the mouse Russian.lngx v KeePass folder:
![]()
Copy the Russification file to the program folder
Copied? Great, now we just have to tell KeePass the language in which it should communicate with the user. For this in KeePass Password Safe window on the menu View select item Change language and in the window that appears, click on the line English... After clicking, another window will appear with a proposal (in English) to restart the program to activate the Russian-language interface. We press Yes:
![]()
Activating the Russian-language interface in KeePass
After rebooting, the program will be happy to communicate with us in Russian. Congratulations, you did a great job!
Creating a Password Database in KeePass Password Safe
Now we need to create a database in which we will securely store our passwords. To do this, in the KeePass window, on the File menu, select New. A dialog box appears in which you need to select the location to save the password database file and its name and name.
I advise you not to name the database with the phrase "My passwords" or something like that. Of course, we will encrypt the database with a special master password, but in any case, you should not openly tell a potential spherical attacker in a vacuum that it is in this file that you store the keys to everything that his unclean little hands would not mind reaching out to. Contribute to your computer security policy in the form of implicit the names of the password database.

Creating a KeePass Password Database
After pressing the button Save a window will appear in front of us in which it is necessary to set Master password for our base. Manually (this is important) enter it in the field Master password and then, again, manually, re-enter in the field Password Repeat.
There are also a couple of recommendations here: the main password should be quite complex, but at the same time you must remember it by heart. I advise you to do this: come up with and write down a password in your main notebook (paper) or diary, which is not accessible to unauthorized people, and then set it as the Main password for the KeePass database. And take some time to memorize this password - this is important.

Setting the master password for the database
After pressing the button OK before us there is another window with the ability to change the settings for the future base. In principle, you can click on the tabs and change something if you are sure of what you are doing, and I will press the button again OK- the default settings are usually optimal for most users and should not be changed.
Now in the KeePass window there is finally a stub for the password database. It already has several groups and even a couple of entries with passwords for example. Something you can remove, and something may come in handy on the farm.
What are groups for KeePass?
As you probably already guessed, groups are needed to sort many passwords into sections. You can, for example, separate passwords used on the Internet from passwords for encrypted archives and protected files on the local computer.
You can create own password groups... To do this, in the left column, right-click on the name of the database and select the item Add group... Enter a name and press the key Enter:

Adding a new group of passwords to KeePass
Similarly, you can add subgroups to groups to further delimit the different types of passwords. For example, in a group Internet create subgroups Social networks and Forums, right-click on it and select To create a group.
Create passwords in KeePass Password Safe
The need to create a new password appears, for example, during registration in any online service. For further exploring KeePass, let's go. If you have already studied mine and registered an account with this cloud file storage, then you can just take the further instructions as an example of using KeePass to manage passwords from other services.
So, let's go to. Let's see what we need in order to register:

Fields to fill out when registering with Dropbox
So, there are four main fields:
- Surname
- Password
To log into our account in the future, we need to fill in two fields: Email and Password... So let's open our password database and create a new one recording for Dropbox with email address as login and password.
So in the group Internet i created a subgroup Vaults(you already know how to do this, right?). Now click on this subgroup to select it and create a new record using the button Adding an entry:

Adding a New Entry to KeePass
So, we see the window for creating a new record, where we need to fill in several fields. Fields Password and Repeat already filled in with an automatically generated password. If you wish, you can view it by clicking on the button marked in the picture below with a green rectangle, and in the meantime I will fill in the missing fields:

Entering data for a new record
- Name: any that you understand, I called by the name of the service.
- Name: your login on the resource. In this case, I entered the address here Email, since on Dropbox it acts as a login.
- Password: by default it is already generated and duplicated. However, you can delete it by clicking on the button with three dots to the right of the field and enter your own. Make sure only that such a password is strong.
- Password Repeat: if you decide to enter your own password in the previous field, then you will have to repeat the entry here again.
- Quality: password strength indicator. Ideally, the bar should end in green, the stronger the password, the more filled in the field.
- Link: additional field to insert the resource address. It is optional to fill in.
- Comments (1): here you can write at least a small novel)) But it is better to write down any data related to the account. In this example, I wrote down the field values First Name and Last Name that must be filled in when registering on Dropbox (maybe it will come in handy in the future). It is optional to fill in.
Also, a few points about the automatically generated password. By default, a password is created with a length of 20 characters, containing upper and lower case letters of the Latin alphabet, as well as numbers. This is already a very serious level of password security, but the problem is that not all services allow you to set a password of this length.
So let's create a special profile to generate a password, say, 12 characters long. To do this, click on key button opposite the field Repeat and select the item from the drop-down list Open password generator(see the picture above).
Now, in the opened dialog box, set the length to 12 characters, click on the button Save current settings as profile, set a name for the profile in the pop-up window (I called it "12 characters") and press the button OK... Then one more time the button OK in the window Password generator:
Now, when creating a new record, we only need select the desired profile for the password... Let's set a 12 character password for the entry we're creating now with a few clicks.
So, after saving the new password profile, we are left with a window for editing the record (if this is not the case, open it again with a double click). And now all we need to set a 12-character password is to click again on the button Generating a password(opposite the field Repeat), but this time select the item Generate using profile and in the drop-down list click on the profile we just created:

Creating a password using a profile
Ready! Now you can create profiles for different occasions - with different lengths of characters, with additional characters to strengthen the password strength. Do not forget only that it is important to first make sure that the service or program for which you are creating a password supports it in all respects.
How to Use KeePass - Copy Your Username and Password Manually
The login and password prepared in this way can also be copied automatically, but first, let's figure out how to do it manually (this is also sometimes necessary). So, after creating a record, we can see it in the list in the group Vaults:

Ready entry with login and password
Pay attention to the buttons highlighted with a red rectangle. The first is the button Copy name to clipboard... As its name implies, when you click on it, the login from the selected entry in the list will be copied to the clipboard. In this example, the email address will be copied, since this is what I set as a login. The second button is called Copy password to clipboard... I don't think it's worth explaining what she does
When using these buttons data is copied to the clipboard for a few seconds(by default - 12). After this time, the clipboard will be cleared... Thus, you do not have to worry that by copying the password and moving away from the computer, you will allow someone in your absence to paste the contents of the clipboard, say, into a notepad, and find out your password.
So, using this method, let's finally create a Dropbox account. Fields First Name and Last Nam e I filled in manually, for Email- copied the login as described above and pasted it into the field, for the field Password- copied and pasted the password. By the way, notice how happy Dropbox is with the password: the strength indicator under the password field on the registration form is now completely green - further proof that KeePass is making great passwords!
To complete the registration, all that remains is to check the box I agree to Dropbox Terms and press the big blue button Sign up:

Completed Dropbox Registration Form
By the way, right after that we will be transferred to the download page of the Dropbox application for installation on a computer. Decide for yourself, and I have been using it for a long time
How to Use KeePass - Auto Insert Login and Password
One of the coolest features for a KeePass user is auto fill authorization forms. More precisely, semi-automatic - we only need to select the desired entry and press the key combination. In order to demonstrate this example, I suggest sign out of Dropbox for a while. For this in the right upper corner page click on link with your first and last name and in the drop-down list select the item Sign out:

Sign out of Dropbox

Automatically fill in a form with KeePass
This is how KeePass securely logged us into Dropbox. A little tip: before you give the order to fill out the form, make sure that all the necessary checkboxes are marked under it. In the example above, the option Remember me("Remember me") is checked by default, but this is not the case on all sites - in this case, check the necessary options in advance.
And finally ...
Of course using KeePass Password Safe for authorization on sites - not the most convenient way, although there is nothing complicated in it. It is much easier to use the built-in browser tools to automatically fill out forms. However, to create strong passwords, you will either have to use online generators, or practice creating complex passwords using active massage of convolutions)) And if the browser generated on a third-party resource loses the password, and you do not write it down anywhere, then you will have unnecessary problems with recovery of credentials.
Learning to use such a wonderful password manager, how KeePass, you have at your disposal a reliable guard and assistant in the field of security. And if until now you have used a regular text file and Windows Notepad for this purpose - stop this dangerous practice as soon as possible! With the penetration of the Internet into many areas of our life you endanger not only yourself, but also other users.
If you have any questions or something remains unclear - write about it in the comments, I will try to answer as soon as possible. I would also be glad to know what tools you use to organize passwords.