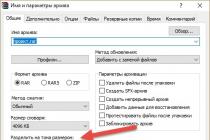
Dial-up connections and dedicated ADSL lines for Internet access have long since sunk into oblivion. Many people from the younger generation do not even know what a dial-up modem is, but many older people still have strange boxes that are like a suitcase without an arm: it’s a pity to throw it away and it’s already unbearable to carry. Many enthusiasts find use for outdated modem models, and in this article we will try to figure it out what can be done from an old modem.
The first thing that comes to mind is just to create a universal box for storing any small items or tools. It doesn't take much intelligence here. It is enough to pull out all the insides from the external modem and remove one of the walls. All external modems are provided with a wall mount, which is quite practical. But this is not all that can be done.
With proper dexterity and relevant knowledge, you can find application for almost its intended purpose, but there are many restrictions in terms of hardware: what chip is installed, is it possible to reassign ports, the presence USB port, whether there is a built-in WiFi adapter and much more.
Using built-in dial-up modems
As a rule, external and internal PCI or ISA modems with Dial-Up mode of operation can only be used as an answering machine, and then only if there is a built-in voice communication function. It is not difficult to do this. You just need to download a program from the Internet that performs the functions of a phone. There are a lot of such programs, and they perform the following functions:
- the ability to make incoming or outgoing calls through the telephone network using a headset (headphones and microphone) connected to the computer;
- can receive and send faxes;
- it is possible to record a telephone conversation;
- using the automatic redial function allows you to transmit previously recorded voice information to many subscribers;
- built-in auto-responder function.
With two such modems, of course, you can create a peer-to-peer network between two computers, but the connection speed will not meet modern needs. And the distance at which it will work will not be able to exceed 50-60 meters. It is more convenient to use a long twisted pair cable.
External ADSL modems and routers
With external modems, things are much more fun. They often have many more built-in features to use. All modems latest versions have a built-in web server that is used to edit the configuration, so there is no difference in configuration between such a modem and Ethernet.
Virtually all ADSL modems there is the possibility of port reassignment, Of the 4 built-in LAN ports, one must be configured to work with an Internet provider, i.e. make it WAN. Other ports can be connected to computers or other network devices, such as network printer. If this modem is a router with WiFi adapter, then it will still work in full-fledged access point mode.
Please note that some required features may not be available. standard firmware, but there are communities of enthusiasts involved in the development alternatives microprograms, and laying them out in the public domain. It is enough to drive the existing modem model into the search bar and download the firmware on an open platform.
Another option for using an old modem is to make a server out of it. You can read about it in the article "How to make a server out of a router". A special plus will be the moment if it is possible to connect an external USB, then the server's capabilities will be significantly expanded.

USB modems that are used to access the Internet via a network mobile operator, also sometimes become obsolete. Operator communication standards, coverage areas, etc. are changing. However, you should not immediately throw away such modems. If there is no desire to redo and configure anything, then such a modem is very well used as a “flash drive”: each of the modems has support for microSD cards.
If you want to tinker, you can configure such a modem as a WiFi access point, but for this you need, for example, for the Yota Egg modem, connect and bring out an external Wi-Fi antenna. There are a lot of materials written on the Internet about how this is done.
It was not the intention of this article to provide clear instructions on how, and what can be done from the modem, which is just gathering dust on the shelf. I tried to simply collect information from forums where interesting ideas are posted and summarize it.
A modern router, as a rule, is no longer just a router, it combines several devices. It can perform different tasks, one of which we will talk about in this article. There is such a device as a Wi-Fi receiver, or adapter. His task is to take wifi signal, in other words, connect a specific device to a Wi-Fi network. Such adapters are built into laptops, tablets, smartphones, TVs, etc.
There are also external adapters, for example, for desktop computers (I wrote about them in the article), or for TVs. But what if we need to connect to the Internet via Wi-Fi the same stationary computer, or a TV that does not have a built-in Wi-Fi receiver. And we don't have any outside either. We do not want to buy it, or simply there is no such possibility.
In such a situation, an ordinary router can help us out, it can act as a Wi-Fi network receiver. That is, it will receive Internet via Wi-Fi from our wireless network, and transfer it to the device (TV, computer) via network cable.
It should be noted right away that there are routers that have a separate "Adapter" mode of operation. But in most devices, you will need to configure the mode of the repeater, bridge (WDS), client, or wireless connection to the provider.
Now we will take a closer look at these modes on routers. different manufacturers, and find out how to use the router as a wireless network receiver. Consider the most popular manufacturers: TP-LINK, ASUS, ZyXEL, D-Link, Netis. Look for the heading below with information on your device.
Making a Wi-Fi receiver from a ZyXEL router
I decided to start with ZyXEL devices. From the line of routers ZyXEL Keenetic. This company's routers support a variety of operating modes. And including there is an "Adapter" mode. On devices with new version firmware NDMS V2, which is blue in appearance.

In addition, everything is configured very simply and clearly. And everything works. I have already checked all modes of operation ZyXEL router (on the example of the Keenetic Start model), and of course prepared detailed instructions. Just put the router near the computer or TV, connect them via a network cable, set the "Adapter" mode, and you're done.
If you suddenly do not have such an operating mode, then you can (wireless connection to provider). By the way, this method can be used on older versions of devices.
Media Bridge Mode
Only in the process of writing this article, on a more expensive Asus models RT-N18U I found a Media Bridge mode that suits us much better than the amp mode (even if you look at the operation scheme in the control panel).

But the Asus RT-N12+ does not have this mode of operation. Which, in principle, is logical, because it is not very suitable for serious multimedia tasks. I will prepare soon separate instruction to set up the Media Bridge mode. I will check everything and write how it fits or not.
Wi-Fi receiver from TP-LINK router
Especially, they often ask how to convert such popular partitions as TP-LINK TL-WR740N, TL-WR841N, etc. into a receiver.
On such devices, you will have to use bridge mode, aka WDS.

Since in repeater mode, these routers do not work (wrote about this). But I can’t say anything yet about the new routers from TP-LINK. Perhaps there is already support different modes work. I know that only access points from TP-LINK can work in repeater mode. And there is no adapter mode, as far as I know.
There is also a separate instruction for setting up WDS mode on TP-LINK:
I can say with confidence that in the bridge mode, the Internet from the TP-LINK router via a network cable works. There were many questions about this, I asked TP-LINK support, everything works. You just need to disable DHCP. The article at the link above has all necessary information.
D-Link router as receiver
I can’t exactly answer for all models of D-Link routers, but based on own experience, I can say that in order to use these routers as an adapter, they can be configured in wireless client mode. Checked on DIR-615, DIR-300.

It must be recognized that this mode of operation D-Link router Great for Internet distribution over cable. In addition, it is possible to turn off the wireless network, which is very useful.
More detailed instructions For setting up client mode on D-Link devices, see here: . See after the heading "Connecting a D-Link router to another router via Wi-Fi (client mode)". Everything is detailed there. Perhaps later I will prepare a separate instruction.
Adapter (client) mode on Netis routers
If you have a Netis router and want to use it to connect devices to the Internet via a network cable, then it's best to set it up in "Client" mode. You can also use it without any problem. Checked, everything works.
Configuring the router in "Client" mode
Everything is very simple. In the settings, which can be accessed at netis.cc go to advanced settings by clicking on the big button Advanced and immediately go to the "Wireless" tab - " WiFi settings". In the "Radio Mode" drop-down menu, select "Client". Click on the "AP Scan" button.

A list of available networks that you can connect to will appear. Opposite your network, select the "Connected" radio button. Click on the "Connect" button.

Then set the password for the main Wi-Fi network, and click on the "Save" button.

After these steps, my router rebooted, and the Internet immediately started working via cable.
Important point: in client mode, the Netis router does not broadcast the Wi-Fi network, which is very good. If you need internet via cable and Wi-Fi, then set it up in repeater mode (link to instructions above).
Afterword
Later I will try to add information on other manufacturers: Tenda, Linksys, etc.
Almost any router can be turned into a receiver. Many, I think, have an old router that is already just gathering dust on a shelf, and only takes up space. And it might still come in handy. And replace the adapter for a desktop computer, TV, game console and other devices. In order not to pull the network cable through the whole house.
Often after changing the Internet connection or buying a new, more powerful router, we put the old one far into the closet. Do not rush to do this, because. the old router can be used differently. What are the capabilities of Wi-fi routers, and how to use outdated models?
To have a clear understanding of routers, you need to understand what features are built into them:


- Distribution of the Internet from the modem through the router. The router, if it has a USB input, allows you to connect a modem to itself. With this connection, the signal level and range will greatly increase.
- The ability to download torrent files without a laptop or computer. You need to connect an external router to the router. HDD and enable the ability to download torrent files in the settings.

These were some great features of Wi-fi routers, where else can you apply this technique?
How to use an old router?
- Turning into an access point. An access point is built into the routers, some even have 2 or 3 of them. You can make an external access point for the new one from the old router. This step will greatly increase the coverage of Wi-fi in the house. Some routers have a built-in "access point" mode, if yours does not have it, do the following:
- Do not use in a router WAN port. He is responsible for the distribution of the Internet by the router for other devices, i.e. it will function as a router on its own.
- Look at the IP address range and the new router. Type in "start" the command "cmd" and go to "ipconfig" and hold down "enter". You saw the IP address, it looks like 4 groups of numbers separated by dots. On many providers it is the same.
- Log into the web interface of the router by entering the IP address. Go to the IP change section and change it to 1 of the possible ones. Usually the section is called Lan or Network. Save changes and reboot your router.
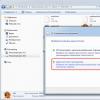
- Log in again to the router settings at the new address. Next, go to the "network" icon and disable the DHCP server function.
Now the old router needs to be connected to the new one using a cable.

- Connecting to a wireless network. Such a router allows the user to connect to any wireless network in range. For example, does the neighbor across the street allow you to use his internet? If you connect a router to the network, the signal strength and Internet speed will become much faster.
- Turning into a phone book. It is possible to insert a DECT set-top box into the router. The router will start working as telephone exchange with connection to 6 phones.

Conclusion
Don't be in a hurry to sell or throw away your old router, it can be used in many ways, from using it as an extra when traveling, to extending the Wi-Fi zone in the house. Follow the tips from the article, and you will find a use for an outdated router.
How to make a switch from a router (1 video)
All illustrations of this article (6 photos)

You will also like:
 Everything you need to know about Qualcomm Snapdragon 810
 Smartphones with the best screen in 2015
 Most popular smartphones as of August 2015
One router is enough for the network to function. However, when you replace an old router with a new, faster one, you can spend time trying to get away with it, or you can turn it into an Access Point (AP). Placing this homemade AP at the far end of the house and connecting it to a new router (via a long network cable) - The best way cover your house Wi-Fi network. How to do it?
Your home Wi-Fi router has a built-in AP (or even two or three built-in access points in the case of dual-band or tri-band routers) in addition to its function as a main router. Wireless clients such as , tablets, etc. can also connect.
First, let's turn to the new router, which is located in home network as Router A. The old one will be converted to Router B. The task is to make Router B an external AP for Router A.
Many routers over the past few years have been able to operate in access point mode, which can be enabled via an interface.
Note A: Some routers have an access point mode (you will see this in the feature list if available). If this is the case for your Router B, you can simply enable this mode and it will start acting as an access point.
This guide is only needed for WiFi routers, which do not have this feature (or if you do not know how to enable this feature) and is only suitable for routers that have a web interface, which, fortunately, most routers have.
General guide (for advanced)
If you are familiar with configuring routers and networks in general, you need to do the following.
1. Tape the WAN port () of Router B. You want to avoid using the port as this will prevent you from converting the router to an access point.
2. Range Router A by IP address. For example, if Router A's IP address is 192.168.1.1, then we can safely assume that the IP pool ranges from 192.168.1.2 to 192.168.1.254.
3. Manually set Router B's IP address to an unused IP in Router A's range. For example, you can make it 192.168.1.2. Just make sure you don't have and won't use this IP address for any other device.
4. Disable the DHCP function in Router B.
That's all. Now if you connect Router B (which is no longer a router) to Router A with network cable(from LAN port to LAN port), it will function as an access point, giving you best range Wi-Fi for devices.
Detailed description (for beginners)
If you are new to the network, first of all, figure out how to set uphome router. When you're done with that, follow these steps.
Step 1Disable the WAN (Internet) Port Router B.
If the router does not have a native AP mode, you should completely avoid using the WAN port. Using this port will cause the router to function as a router because that is the intended role of the device. Seal, for example, the port with tape to avoid its accidental use.
text-align: center;"> The IP address of the router is easy to find out on the network
Step 2: Find out what is the range of Router A.
This is a step in two parts. First you need to find out the IP address of Router A. Connect your computer to Router A via Wi-Fi or with a network cable through one of the LAN ports.
If this is a Windows computer:
- Launch a command prompt (you can search cmd From the Start menu in Windows 10 or Windows 8, simply type cmd when you're in the Metro Start menu and then press Enter).
- In the window command line enter ipconfig and press Enter. You will see a lot of possibly incomprehensible numbers and words, but the IP address is on the right side of the line Main gate: This is the address of the router. This is the number you need.
Or on Mac:
System Preferences > Network > select the currently connected connection (you should see a green dot indicating the connection is working) > Advanced > under the TCP/IP tab, note "Router:". The router's IP address will be displayed next to it.
Once you have determined the router's IP address (which always consists of four groups of numbers, separated by a dot between each group), use it to determine the range of IP addresses. The range of numbers you can choose from uses the same numbers in the first three groups, with the last group ranging from 1 to 254. The router's current IP address will not be available for use.
For example, if the router's IP address is 192.168.1.1, then the IP address pool will range from 192.168.1.2 to 192.168.1.254. If the router's IP is 192.168.1.254 then the IP range will be 192.168.1.1 to 192.168.1.253. When a device is connected to Router A and has an IP address within its range, it will be accepted into the network.
This guide assumes that 192.168.1.1 is Router A's IP. This will probably be your case as well, because many home routers (from Netgear, Asus, D-Link, etc.) tend to use this Default IP address.
Step 3: Set Router B's IP address as an unused IP within Router A's IP range.
Connect your computer to Router B via Wi-Fi or with a network cable through one of the LAN ports to find out the router's current IP (repeat the first part of step 2).
Log in to the router's web interface by pointing the browser to its IP address. In the interface, go to the section where you can change your default IP address. Depending on the router, this section is usually called Network, LAN, or Settings. Change this IP address to one of those in the IP pool identified in the second part of step 2 above. For example, if Router A's IP is 192.168.1.1, you can make Router B's IP 192.168.1.2 (make sure you don't manually assign this IP to another device, if so, choose a different IP address) and then save the changes. Router B must be restarted for the changes to take effect.
text-align: center;"> Disabling the old router's DHCP server function and assigning an unused primary router IP will allow the old router to act as an access point when its WAN port is not in use.
Step 4: Disable the DHCP server function in Router B.
Log in to Router B again by manually pointing the browser to the new IP address from step 3 (in our case, it was 192.168. local network or networks. Disable the DHCP server function here. Save your changes and you're done.
(Depending on the interface, some routers allow steps 3 and 4 to be done as one without a reboot).
Now Router B, when connected to Router A with a network cable, will function as both a switch (allowing you to use its LAN port to add wired devices to the network) and an access point.
This is how you can use the old router.
Leave your comment!
Sometimes when using a wireless network in a large apartment or office, it becomes necessary to strengthen the WiFi signal. The best way to improve reception is to use a repeater. It allows you to relay the network so that the signal is available even in rooms far from the access point. The simplest repeater can be made from an old router or other network device with your own hands.
Using devices with a built-in repeater
Some home devices that can connect to WiFi are equipped with a signal relay function. They can be used as a repeater. In particular, wireless cameras, smart lamps and even sockets can have such a function. Check the instructions for the wireless devices. If it is possible to relay the WiFi signal, activate this function in the settings.
How to make a repeater from a router
The most popular device used as a repeater is a regular router. Often, wireless network users have old routers that can be used to expand WiFi coverage. The main advantage of this method is its versatility. The router may operate using standards that differ from your connection method. The main condition is the ability to connect to WiFi.
For example, older ADSL routers can also be used instead of repeaters. They will work even if FTTx technologies are used to access the Internet.
Do-it-yourself WiFi repeater from a TP-Link router
Sign in to administrative panel router. To do this, enter the IP address indicated on the sticker on the bottom of the device into the address bar of any browser. The page will ask for a username and password. As a rule, they are also indicated on the sticker. In the absence of these data, they can be clarified in the documentation.
Go to the menu "Wireless -> Wireless Settings" and check the box "Enable WDS" on home page this section. After specifying to reboot the router, the device will switch to the wireless bridge mode (Wireless Distribution System). Click "Search" among the group of additional settings that will become available when WDS is activated.

Find your wireless network in the table that opens. Click on the "Connection" link next to the line with the BSSID and the name of your WiFi. In the next step, you will need to enter the settings for connecting to the network:
- Encryption type;
- WEP index;
- Authentication method;
- Password.

Important! The channels on the main router and the device used as a repeater must match. If they differ, the additional router will offer to change the channel value to the one indicated on the main one.
Setting up a repeater on an ASUS router
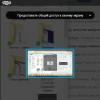
On the ASUS routers It is most convenient to configure WiFi signal relay through the built-in configuration wizard. To go to the step-by-step specification of parameters, press the button « Quick Setup Internet" in the upper left corner of the page. At the stage of selecting the operating mode, check the option "Repeater (repeater)". If necessary, change the connection settings for the relayed network.

Select desired network, specify the type of encryption, and enter a password for authorization. The device will automatically determine the channel, after which the connection will be made. When you select the "Network Map" item, a table with the values of the main settings will open. The Wireless Network Name field will be editable. In dual-band routers, you can also change the frequency at which the repeater operates (2.4 or 5 GHz).

Advice! The use of other models of routers is also possible as a repeater. If your device does not support this mode by default, try setting alternative firmware— DD-WRT.
Tutorial video: Do-it-yourself wifi signal repeater
Creating an antenna for a repeater with your own hands
The principle of the majority homemade antennas, available for assembly at home, is to redirect radio waves. Standard router and repeater antennas are omnidirectional. This means that the signal propagates perpendicular to the plane in which the antenna is located.