User question
Hello.
I got an error with the image ... One game was launched, for some reason an error occurred abruptly: "... what AMD work the video driver was stopped in mind ... "and then I noticed that everything on the monitor screen got big.
Also, if before I could put a hundred shortcuts on the desktop, now there are already 10 - and there is not almost half of the space! How so, what needs to be done to return everything to its previous state?
Anatoly.
Good time everyone!
This happens due to the fact that the selected is not optimal screen resolution (in your case, the video driver may have crashed, and because of this the resolution got lost).
Generally, if you explain in simple words, then screen resolution- This is the number of points, which are used to build a picture on the monitor. Of course, the more dots there are, the clearer and more accurate the image contours.
Each monitor has its own optimal resolution, which, in most cases, is worth choosing (if you set the resolution higher than the recommended one - then the text and some elements will become too small and it will be difficult to read them, if less than the recommended one - everything on the screen will become large, like from the author of the question).
And so, let's get down to business ...
Screen Diagonal Ratio
In general, as I said above, each monitor has its own optimal resolution, which (usually) is installed by Windows by default (at least if you have all required drivers). In some cases, this does not happen ...
The permission is associated with diagonal of the monitor ... The larger the diagonal, the higher the resolution, as a rule. If anyone does not know, the diagonal is measured in inches (1 inch = 2.53 cm).

What is the diagonal and how is it measured (1 inch = 2.53 cm)
A little below I gave a plate in which the diagonal of the monitor and the resolution on it are linked (please note that the numbers are conditional (although most often it is) since each manufacturer sets its own parameters).
| Diagonal | Permission | Designation | Format (aspect ratio) |
|---|---|---|---|
| 15.0 | 1024x768 | XGA | 4:3 |
| 15.6 (laptop) | 1366x768 | HD | 16:9 |
| 17.0 | 1280x1024 | SXGA | 5:4 |
| 17.0 | 1440x900 | WXGA + | 16:10 |
| 17.3
(notebook) |
1600: 900 or | Full HD | 16:9 |
| 19.0 | 1280x1024 | SXGA | 5:4 |
| 19.0 | 1440x900 | WXGA + | 16:10 |
| 20.1 | 1400x1050 | SXGA + | 4:3 |
| 20.1 | 1680x1050 | WSXGA + | 16:10 |
| 20.1 | 1600x1200 | UXGA | 4:3 |
| 20.8 | 2048x1536 | QXGA | 4:3 |
| 21.0 | 1680x1050 | WSXGA + | 16:10 |
| 21.3 | 1600x1200 | UXGA | 4:3 |
| 22.0 | 1680x1050 | WSXGA + | 16:10 |
| 22.2 | 3840x2400 | WQUXGA | 16:10 |
| 23.0 | 1920x1200 | WUXGA | 16:10 |
| 24.0 | 1920x1200 | WUXGA | 16:10 |
| 26.0 | 1920x1200 | WUXGA | 16:10 |
| 27.0 | 1920x1200 | WUXGA | 16:10 |
| 30.0 | 2560x1600 | WQXGA + | 16:10 |
Also, monitors can be with different aspect ratios (in the form of a "square", elongated rectangular, etc.). The table below links the resolution to the aspect ratio.

Optimal Resolution Setting
By the way, to find out the current monitor resolution, you can use the online services:

Important!
If you do not have video driver icons in the tray, on the desktop and in the panel Windows management- most likely you do not have video drivers.
Also, if they are not there, you will not be able to change the resolution (it is just that there will not be an optimal option in the list). Until you install new drivers (or update the "old" ones), the problem cannot be fixed.
On my blog there is a detailed article on updating video adapter drivers, I recommend it for review:
In IntelHD video driver (nVidia, AMD)
This is one of the most simple ways quickly change many screen parameters: resolution, brightness, contrast, color gamut, refresh rate, and more.
If you have a video driver installed, then you just need to use the tray icon next to the clock (or right-click anywhere on the desktop). In my case, it is IntelHD, yours may also have AMD (Ati Radeon) or nVidia (GeForce).

In the settings, as a rule, you need to open the section of basic parameters (in IntelHD it is "Basic settings". In general, many parameters and menu variations depend on the version of your video driver: all possible options it is unrealistic to foresee in the article ☺).
You need to alternately change the resolution - choose the one that is most convenient and comfortable for work. Focus on what is recommended first. If the elements on the screen are too small, try moving the resolution down by 1-2 points, making it a little smaller.

On Windows 7
If you have Windows 7, then you just need to right-click on any free space on the desktop, and select "Screen Resolution" in the menu that appears, see the screenshot below.

Further, in the "Resolution" tab, you can see what you have selected at the current time, and what else can be installed. The optimal resolution is usually marked as "Recommended" (see screenshot below). Most often, they choose either the best option, or 1-2 points lower (so that the picture and text on the screen are larger, it is important for monitors with a large diagonal).

Screen customization in Windows 7
On Windows 8/10
Press the button combination Win + R then enter the command desk.cpl and press Enter. See screenshot below.

Next, the "Display" section will open and you can change many parameters: brightness, text (font) size, resolution, etc. Open additional options, see what permissions you can set (see example below).

By the way, if you do not have such a list, and the optimal resolution is not indicated at all - most likely (as already mentioned above) - you simply do not have a video driver. Try to update it (the link to the article was given above).
Important!
If you have an old CRT monitor (these are so thick ☺, now there are few of them, but in some places they are used) - be sure to check sweep frequency (measured in HZ).
This parameter should not be less than 85 HZ (at 60 HZ - flickering of the monitor is very noticeable, which causes discomfort and). Better yet, set it to 100 HZ.
It's no secret that for different monitors, the best is a different screen resolution, which indicates the number of dots on the display. The higher the value, the better the image quality. But, unfortunately, not all monitors are capable of correctly supporting high resolution work. In addition, some users deliberately lower it in order to get better computer performance instead of beautiful graphics. Also, changing this parameter is required to perform a number of specific tasks. Let's take a look at how to customize the resolution on Windows 7 in different ways.
All available methods for changing this display setting on Windows 7 can be divided into three groups:
- Application of third-party software;
- Using the video card software;
- Application of built-in operating system tools.
At the same time, even when using methods with built-in OS tools, you can use different options. Let's talk about each of them in more detail.
Method 1: Screen Resolution Manager
First of all, we will consider using third-party programs to solve the problem posed in this article using the Screen Resolution Manager application as an example.
- After the Screen Resolution Manager installation file has been downloaded, the program should be installed. To do this, run the installer. A welcome window will open. Click in it "Next".
- Next, a window is launched license agreement... Here you should accept it by setting the switch to the position "I accept the agreement"... Then press "Next".
- Next, a window opens, where the location of the executable file of the installed program is indicated. Unless there is a specific reason, this directory does not need to be changed, so just click "Next".
- In the next window, you can change the name of the program icon in the menu "Start"... But, again, there is no point in doing this for no particular reason. Click "Next".
- After that, a window opens, where all the previously entered data are summarized. If you want to change something, then press "Back" and do the editing. If everything suits you completely, then you can proceed with the installation procedure of the program, for which you just need to click "Install".
- The installation procedure for Screen Resolution Manager is in progress.
- After the completion of the specified process, a window opens, indicating that the installation was successful. You just need to click on the button "Finish".
- As you can see, this program does not provide the ability to automatically start after installation. Therefore, you will have to start it manually. There will be no shortcut on the desktop, so follow these guidelines. Click the button "Start" and choose "All programs".
- Look for the folder in the list of programs Screen Resolution Manager... Come into it. Then click on the name Configure Screen Resolution Manager.
- Then a window is launched in which you need to either go to entering the license code by clicking on "Unlock", or use free version for seven days by pressing "Try".
- The program window opens, where direct settings of the screen resolution are made. For our purpose, we need a block "Screen settings"... Check the box next to "Apply selected screen resolution when I log on"... Make sure that in the field "Screen" was the name of the video card currently used on your computer. If this is not the case, then select the desired option from the list. If your video card is not displayed in the list, then click on the button "Identify" to carry out the identification procedure. Next, by dragging the slider "Resolution" left or right, select the screen resolution you want. Optionally, in the field "Frequency" you can also change the refresh rate of the screen. To apply the settings, click "OK".
- Then restart your computer. If you are using trial version program, then after rebooting the start window Screen Resolution Manager will open again. Click on the button "Try" and the screen will be set to the previously selected resolution.
- Now, if next time you want to change the resolution from Screen Resolution Manager, this can be done much easier. The program is registered in autorun and constantly works in the tray. To make adjustments, just go to the tray and right-click ( PKM) by its monitor icon. A list of monitor resolution options opens. If the desired option is missing, then hover the cursor over the item "More ..."... An additional list will open. Click on the required item. The screen settings will immediately change, and this time you don't even have to restart your computer.


The main disadvantages this method is that the free term of use of Screen Resolution Manager is limited to only one week. In addition, this application is not Russified.
Method 2: PowerStrip
Another third-party program with which you can solve this problem is PowerStrip. It is much more powerful than the previous one and specializes mainly in overclocking a video card and changing all kinds of its parameters, but it also allows you to solve the problem posed in this article.
- The Power Strip installation has a number of features, so it makes sense to dwell on it in more detail. After you have downloaded and run the installation file, a window for accepting the license agreement opens immediately. In order to accept it, check the box next to the item "I agree with the above terms and conditions"... Then click "Next".
- After that, a list of operating systems and video cards supported by the program opens. It is recommended to check in advance if the name of your OS and video card is in the list, so as not to install the utility in vain. It must be said right away that PowerStrip supports both 32-bit and 64-bit Windows version 7. So the owner of this OS can only check the presence of a video card in the list. If you find the required parameters, then click "Next".
- Then a window opens in which the program installation directory is indicated. By default, this is the folder "PowerStrip" v general catalog programs on disk C... It is not recommended to change this parameter unless there is a specific reason. Push "Start" to start the installation procedure.
- The installation procedure is in progress. After that, a window opens asking if you want more correct work add programs to the system windows registry some additional entries. To do this, press "Yes".
- Then a window opens in which you can adjust the display of utility icons in the menu "Start" and on "Desktop"... This can be done by installing or unchecking the checkboxes opposite the items "Create a PowerStrip program group in the Start menu" for the menu "Start"(enabled by default) and "Place a shortcut to PowerStrip on the desktop" for "Desktop"(disabled by default). After specifying these settings, click "OK".
- After that, to complete the installation of the program, you will be prompted to restart the computer. First save all open but not saved documents and close running programs. Then, to activate the system restart procedure, press "Yes" in the dialog box.
- After restarting the PC, the utility will be installed. It is registered in the autostart in the system registry, so that when the system boots, it will automatically start working in the background. For our purposes, click on its tray icon PKM... In the list that opens, hover the cursor over the item Display Profiles... In the additional list, click on "Tune…".
- The window is launched Display Profiles... We will be interested in the settings block "Permission"... Set the desired value by dragging the slider in this block to the left or right. In this case, the value in pixels will be displayed in the field below. In the same way, by moving the slider in the block "Regeneration frequency" you can change the refresh rate of the screen. The corresponding value in hertz is displayed to the right of the slider. After all the settings are done, click Apply and "OK".
- After that, the display parameters will be changed to the specified ones.


Method 3: Using graphics card software
The screen parameter we are studying can also be changed using software the manufacturer of the video card, which is installed with it and serves to manage it. In the overwhelming majority of cases, this type of program is installed on the computer along with the video card drivers. Let's see how to change the display settings in Windows 7 using the software designed to control the NVIDIA video card.


V NVIDIA Control Panels there is very interesting function, which allows you to set the resolution even if it is not supported in the standard monitor settings.
Attention! When making subsequent actions, you need to understand that you are performing the procedure at your own peril and risk. It is even possible that the actions described below may harm the monitor.
- In our case, the maximum monitor resolution is 1600 × 900. It will not be possible to establish a large value by standard methods. We will try with the help NVIDIA Control Panels set the indicator to 1920 × 1080. To go to changing the parameters, click on the button "Setting ...".
- A window opens, where a number of additional parameters are presented that we did not observe in the main window. Their number can be increased by checking the box, which is unchecked by default, opposite the item Show 8-bit and 16-bit resolution... In order to add the selected combinations to the main window, just put a checkmark in front of them and click "OK".

After the values are displayed in the main window, to apply them, you need to perform the same procedure that was already discussed above.

But, as it is easy to see, in this additional window the parameters of a rather low quality are set. They are not displayed in the main window simply because they are rarely used. Developers just want to keep the main window clean. NVIDIA Control Panels rarely applicable parameters of low quality. We have the opposite task - to create a resolution higher than in the standard settings. To do this, press "Create custom permission ...".
- The window for creating custom settings opens. Here you need to act very carefully, since it was already mentioned above, incorrect actions in this section can entail disastrous consequences for the monitor and for the system. Go to the settings block "Display mode (as reported by Windows)"... The fields of this block display the current vertical and horizontal screen resolution in pixels, as well as the refresh rate in hertz. Drive the values that you need into these fields. In our case, since the parameter should be set to 1920 × 1080, in the field Horizontal Pixels enter the value "1920", and in the field Vertical lines — "1080"... Now click "Test".
- If the specified values do not exceed technical capabilities monitor, a dialog box is displayed indicating that the test was successful. In order to save the parameters, in this window, before the end of the timer, press "Yes".
- You are returned to the window for changing the parameters. In the list in the group "Custom" the parameter we created is displayed. To enable it, check the box next to it and click "OK".
- We automatically return to the main window NVIDIA Control Panels... As you can see, the created parameter is also displayed here in the group "Custom"... To activate it, highlight the value, and then press Apply.
- Then a dialog box will appear in which you must confirm the configuration change before the timer expires by pressing the button "Yes".


All of the above applies to computers and laptops with a discrete adapter from NVIDIA. Similar manipulations can be performed by owners of AMD graphics cards, using one of the "native" programs - AMD Radeon Software Crimson (for modern graphics cards) or AMD Catalyst Control Center (for older models).
Method 4: using built-in system tools
But the task can also be solved using only the built-in tools of the system. Moreover, most users have enough of their functionality.
- Click "Start"... Next, choose "Control Panel".
- Then press "Design and personalization".
- In a new window in the block "Screen" select an option "Adjusting the Screen Resolution".

There is another option to get into the window we need. To do this, click PKM on "Desktop"... Select from the list "Screen resolution".
- When using any of the described algorithms, a standard tool for changing the screen parameter we are studying opens. In field "Permission" the current value is indicated. To change it, click on this field.
- A list of options opens with a slider. To increase the quality of the displayed material, drag the slider up, to decrease - down. At the same time, the value of the slider position in pixels will be displayed in the field. After the slider is set opposite the desired value, click on it.
- The selected value is displayed in the field. To apply it, click Apply and "OK".
- The screen will turn off momentarily. After that, the selected parameters will be applied. In the window that appears, click on the button "Save changes" before the timer expires, otherwise the screen settings will revert to their previous values.


You can change the screen resolution by applying third party programs or the software that comes with the video card, and using the built-in tools of the operating system. Moreover, in most cases, the capabilities that the OS provides are quite enough to satisfy the needs of most users. It only makes sense to refer to third-party software or video card settings if you need to set a resolution that does not fit into the standard range, or apply parameters that are not in the basic settings.
Modern systems, starting with Windows 7, can independently choose the optimal value for the screen, so basically you shouldn't worry about this. It turns out that there are people, most likely beginners, asking the question of how to change the screen resolution, and it does not matter which operating system is installed and which computer. The instruction will be individual for everyone and, I hope, will help you.
There are a couple more points that I will touch on here. Let's say you have a monitor with a resolution of 1920 x 1080, or higher. It is known that you cannot set the value 800x600 for it. Why? And because you will see screen distortion, as the values do not correspond to the physical values for the screen.
Let's start from the depths, namely the seven. Using this particular operating system, you do not have to worry that the value will not be chosen accurately. Although sometimes the value is set lower than necessary, therefore knowledge that can be gleaned from this manual comes to the rescue.
There were moments on the topic in the article, and the article itself is quite useful. If interested, you can read it.
For manual setting screen resolution, you need to right-click on an empty space on the desktop. A menu will appear where we select the option "Screen resolution".
One of the subsections of the control panel, called "Screen Settings", opens. Here we see three parameters:
- Screen;
- Permission;
- Orientation. (Read: )
Naturally, we are concerned about the second point. The former is responsible for choosing an additional monitor, and the latter is already clear. Open the options tab "Permission" and choose the maximum. In my case - 1366 by 768. Most likely, the corresponding word will stand opposite the maximum resolution - Recommended.

The note: it is worth paying attention to the moment when you cannot change the value of the screen. The fact is that you must install the drivers for the graphics adapter. As a result, you can change the screen value not only from the control panel, but also in the video card settings. Below I will explain how to use these settings. (Drivers are usually installed automatically).
How to change the screen resolution in Windows 10
In the specified operating system there are the same parameters from the control panel, but it still needs to be found. We will not bother, but see how to do it from the options menu.
As in the first case, we right-click on the desktop and select the option Screen Options.

A window opens with a subsection "System". There are many tabs, but we are interested in "Screen". On the right side of the window, we see several parameters:
- Night light mode - best for reading at night;
- Scale and layout- what we need;
- Multiple displays - we can connect additional monitors.
Find the parameter "Permission" and change to the maximum value, it will be marked "Recommended".
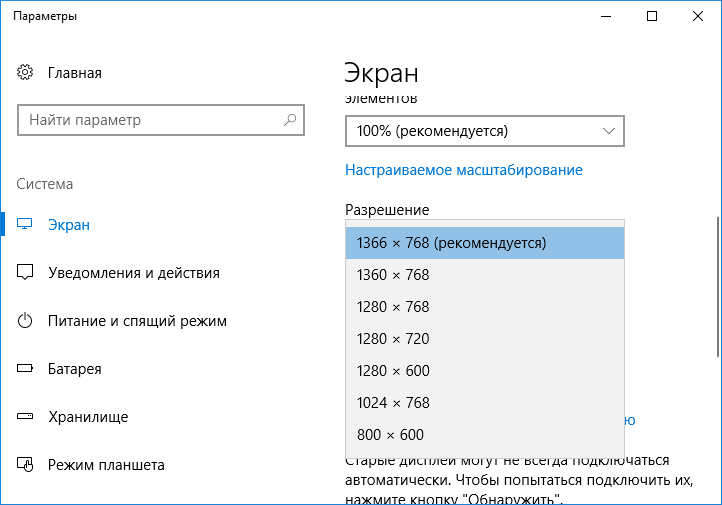
In addition, you can specify the size of the text in applications. The default is 100%, but the value can be changed to 125%.
Unfortunately, this method is the only one in the top ten. In the control panel removed the "Screen" section and change desired settings possible only through the "Parameters" menu. That's how bad they are, these Microsoft people.
Using the graphics adapter utility
I'll show it using an example of an NVIDIA video card, since I don't have AMD.
When we click on the desktop with the mouse to call the context menu, we can see the following items:
- Graphics Specifications (Intel HD Graphics);
- NVIDIA Control Panel.

Both of these sections have many settings, but only the first includes screen resolution options. Let's take an example Intel HD. If you have this software, then launch it.
Very often users are faced with a situation where the monitor displays a "save mode", "out of range" or "unsupported resolution" message, or «
»
.
This means that the video card settings are set to a resolution that the monitor does not support.
On many forums and sites, you can find this advice:
“To change the screen resolution, you need to booting Windows press F8 and set any minimum resolution, then reboot into normal mode and enjoy life. "
But, as practice shows, this does not always work.
I want to share 100% way to reset screen resolution on computer.
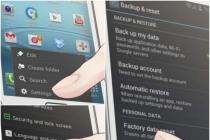
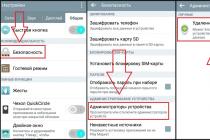
In order to reset the screen resolution, you really need to boot your computer in Safe Mode, but let's step by step.
- When loading Windows, press F8;
- We select the item "boot the computer in Safe Mode";
- Press the key combination Windows + Pause (we get to the properties of my computer), go to the Hardware tab, press the Device Manager button;
- Expand the Video adapters list;
- We select your video adapter, call the context menu and select Disable (Windows may ask “Do I need to remove the drivers?” You can answer “no”, but sometimes it is necessary);
- We reboot the computer in normal mode;
- And now you don't need to do anything, we observe a miracle, Windows will re-detect the video adapter and reset the monitor screen resolution.
This method helped out many times.
There is another way to reset the screen resolution - return it back old monitor or reinstall Windows :) And why are you laughing, in many forums I have come across advice about reinstalling Windows! Just imagine, a 5-minute problem can be solved in a few hours.
How to boot Windows 10 in Safe Mode to reset graphics card settings
In the comments they asked a question (stated): " in windows 10 it is not possible to boot into safe mode without first enabling this option in the OS itself , and since it is impossible to enable this option without a working monitor, your advice for Win 10 users is not relevant. Any other thoughts that would work for Win 10?
PS: there is no other monitor at hand, no built-in video adapter. "
This is not entirely true ... Yes, you can really enable the boot menu only from the "working" Windows 10. But the boot menu, where "Boot in Safe Mode" (Safe Mode) will be, can be called up several times by restarting the computer with the Reset button on system unit... Windows 10 will understand that for some reason it cannot boot and will offer various options for recovery. Once booted into Safe Mode, you will be able to perform all the necessary steps to reset the screen resolution in Windows 10, which are described above.
FAQ
Q: how to reset screen resolution via bios
A: information about the screen resolution settings is stored in the operating system configs, you cannot reset the screen resolution through the BIOS
Anyone who constantly works with a computer knows that an incorrectly configured image on a laptop screen or computer monitor can cause discomfort. At the same time, the eyes are the first to suffer from fatigue. And here, quite naturally, the question arises of how to adjust the screen resolution on Windows 7 for yourself in order to make your work more comfortable. This will be discussed further. There are several simple methods that will allow even inexperienced users to configure the settings.
Screen resolution: what does this setting affect?
For some reason, most users usually associate screen resolution only with the detail of the graphic image, completely losing sight of the fact that this parameter affects some other aspects.
Yes, indeed, when the resolution is increased, the picture becomes more natural, while when the value of this parameter is decreased, it looks composed of squares. However, if you look at the problem of how to adjust the screen resolution on Windows 7 on a laptop or computer monitor, you will notice that in some applications even the workspace may increase, and previously hidden controls appear.
This situation can be seen in many applications. For example, in the FL Studio music sequencer, at low resolution, the synthesizers and effects used simply do not fit on the screen (multiple monitors are required), and when the work area is enlarged, the problem disappears. The same goes for design software like AutoCAD, where the ability to install additional monitors absent.
What settings should you use?
Of course, the question of how to manually adjust the screen resolution on Windows 7, if the system has not done this automatically, is a priority, but do not forget about such parameters as the refresh rate, color rendition or image contrast. They play an important role.

What is refresh rate is not hard to understand. It is enough to move away from the monitor for a couple of meters, as horizontally changing stripes will immediately become noticeable. On close examination at a distance of about 30-50 cm, they are not visible, however, this affects the eyes in a negative way. The same goes for strong color saturation, because too toxic colors also cause discomfort. So, when talking about how to adjust the screen resolution on Windows 7 or any other operating system, you should take these parameters into account. But let's go directly to the setup.
How to adjust the screen resolution on Windows 7 in the simplest way?
At any Windows system this setting is done by means of the OS is very simple. First, you need to right-click on a free area of the "Desktop" to bring up the context menu, in which there is a line at the bottom of the transition to the corresponding settings.

Actually, the very problem of how to adjust the screen resolution on Windows 7 is reduced only to choosing from the drop-down list of supported values exactly the one that needs to be installed at the moment. For the convenience of setting, you can use a special slider by moving it up and down. When the desired value is selected, the settings should be saved with the "Apply" button, after which the screen will turn off for 1-2 seconds. Nothing wrong with that.
If the user parameters are satisfied, you can finish here. Otherwise, they should be changed. As a rule, you can leave the recommended values or set more a high resolution if supported. Only then will the GUI elements become smaller, and visually impaired people will have to change the same size of the taskbar or icons on the "Desktop" on their own.

In the question of how to adjust the screen resolution on Windows 7, one cannot ignore the refresh rate, which, as mentioned above, also has a significant effect on vision. These settings can be found in the section of additional parameters, which is called by clicking on the hyperlink of the same name. On the "Monitor" tab there is a drop-down list in which the current value is set.
For laptops, 60 Hz is usually used, but on stationary monitors, you can set both 100 and 120 Hz, if such values \ u200b \ u200bare supported. In general, the higher the value set, the less eye fatigue.
How do I adjust the screen resolution on Windows 7 after reinstallation?
It also happens that after reinstalling the system, the screen resolution is not automatically adjusted. There is only one reason for this - the absence or incorrect installation of the video driver.

It makes no sense to install it from the "Device Manager" (if the system has not detected it automatically, it will not detect it in the future). Therefore, the installation must be done from the original driver disk, use packages like Driver Pack Solution, or simply download the original driver from the website of the graphics adapter manufacturer.
Control programs for video cards Radeon and NVIDIA
The question of how to adjust the screen resolution on Windows 7 for Radeon and NVIDIA accelerators is much easier to solve. As a rule, the system contains special programs control of accelerators and their settings already in a pre-installed form. If there are none, you can install them additionally (PhysX, Catalyst, etc.). Their toolbox has more possibilities, and the setting is much more subtle, since you can also change the aspect ratio.

These utilities are especially useful when exposing best parameters images in computer games.
Instead of a total
That's all in a nutshell for the basic screen resolution settings. It remains to add that if discrete video cards are installed on board, it is better to refuse the settings by means of the system, and use the "native" utilities. By the way, for the same integrated Intel chipsets there are also such programs, however, from Windows tools they are not very different.