The policy of our site is quite simple - we value your time and therefore show only those options that have already passed the strict selection of our editorial staff. However, we are not specialists in all areas. Therefore, for today's review of one of the best programs for creating screenshots (pictures taken from a computer screen), we invited Farid Karimov - a person who tirelessly improves his life and regularly writes about it. Already someone who, and he understands how to quickly illustrate this or that thought.
So, hello everyone, this is Farid Karimov. I have already done a great review of free screenshot programs for myself. But today I decided to study the most expensive solution - the Snagit program from the well-known manufacturer Camtasia.
What to pay 50 bucks for? Let's figure it out!
Free trial
And fully functional.
So let's go over the functions and see if they provide them. free analogues... By the way, Snagit can also record video (both from the screen and from the camera) and even edit it a little. But in this review, I will only touch on the screenshot functions.
Function # 1. Screenshot with arrows and captions
The function itself is very cool, but not at all original. Everyone, even the most seedy one, can do it.
As he knows how to "obscure" unimportant or secret information, underline, crop and scale screenshots.
Or are there some special arrows and inscriptions here?
Yes, they are more confusing. For example, you can make the arrow itself semi-transparent. Or direct it in an arc. You can even adjust the “butt” of the arrow. As many as 5 options!
Do you need it? I don’t.
Function no. 2. Quick link to screenshot
Every screenshot can do this. How about that at Snagit?
Not good. What did not like:
Next ... For some reason, the last selected save service is not remembered. After all, you usually keep all screenshots in one place. Every time you have to make an extra click. Probably, all this can be accelerated through macros (about them below), but after all, not everyone bothers like that.
Function no. 3. Hotkeys
Hotkeys are such a shabby, but no less cool life hack. Keyboard shortcuts are especially important for a screenshot. Sometimes what you need to capture is on the screen for just a second and it is important not to miss the moment.
In Snagit, by default, there are only 5 hot keys, but you can create Presets (for example, a panoramic shot, with the necessary edge processing, the desired filter, or anything else) and have different hot combinations on them.
Function no. 3. Effects
More mischievous, but still ... You can crop the edges, apply any shadow or gradient to your screenshot:
There are so few where you will see.
Function no. 4. GIF recording
You know, sometimes a screenshot is not enough to explain something. You need to make several of them or ... just make a gif!
Snagit can make small GIFs.
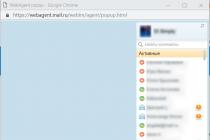
For example, here's a simple GIF explaining how to bring back a closed tab:
The GIF is not recorded immediately. First, you make a video, then you select a piece from which you would like to make a gif, and then the parameters of this gif. It sounds complicated, but in reality everything is simple and convenient.
Function number 5. Long-term screenshot
A screenshot is, by definition, a screenshot. One. Everything that is visible on the screen will go to it.
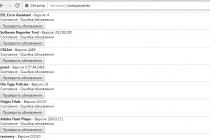
But what if you need to take a snapshot of a long web page and turn it all into one image? Most free screenshots are baffled by this. But Snagit can do it (click to enlarge):
And we do everything fully automatically (he scrolls the page himself).
Function no. 6. Panoramic screenshots
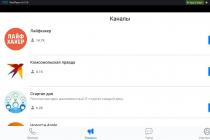
This is an even more advanced feature of the previous one. For example, in 2 minutes I made the following screenshot (click to enlarge):
Honestly, I have never had such a need. But ... what if?
Function no. 7. Customizable interface
You can drag the main buttons on top to customize as you like:
I especially appreciate that. I love to customize everything, to be more precise, to simplify everything.
Function no. 8. Macros
What are Snagit macros and why are they needed?
Well, for example, you need to take 100 screenshots with the same design: border thickness, shadow, watermark.
To avoid doing this manually every time, you can set up a simple macro:
You can also put the sharing settings (Google Drive, Facebook, etc.) into the macro. In short, whatever your heart desires!
Function no. 9. Periodic screenshots
Eh ... now I will try to explain the meaning of this tricky function.
You can force the program to take screenshots by itself, say, every minute. And save them to the default folder. By the way, you can add macros here so that screenshots are processed as you want.
It does not occur to my head why someone might need this, although it sounds impressive.
Function no.10. Stamps
These are just sets of pictures for all occasions. You can add all these stamps directly to your screenshot:
There are also paid sets. For example. There are more pictures, they are brighter, more voluminous ... This pleasure costs 27 dollars.
Disadvantages?
No Russian language))
Outcome
Snagit is such a screenshot super harvester.
For whom?
For bloggers, for streamers, for people who work with content on the Internet. And at the same time they do not know how or do not want to bother with Photoshop.
For all other people, I think free screenshots will be more than enough))
Write in the comments!
What program are you using for screenshots and why?
Have a problem? You are new? You need take a screenshot... This is essential when blogging. I will help you.
Screenshot or Screen comes from the English. screenshot - screenshot. In our case, this is a screenshot of the display (monitor) personal computer(PC). It is carried out by scanning ("photographing") the image of the screen area. It can be done in various ways: by means operating system, special programs and even using a camera or camcorder.
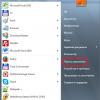
If you need to do full screen screenshot, then just press the "PrtScr" button on the PC keyboard. The screen image is saved to the operating system (OS) clipboard, such as Windows. It can be copied from the clipboard to the Paint.NET graphics editor of Windows OS, edited and used at your discretion. For example, insert into text editor Word or an article on your blog.
I personally use the Snagi program t. According to many Snagit best program and I am subscribing to this opinion. It is paid. But she's worth it. You can find a free option, but I didn’t tell you about it, dear newcomers of Infobusiness! Snagit's functionality is even overloaded.
Snagit allows you to:
Scan a rectangular or arbitrary area of the screen.
Scan one full window or a scrolling window (multiple windows).
Adjust the color gamut of both black-and-white and color images: from grayscale for a black-and-white image to adjusting brightness, contrast, and color saturation for a color image.
Set the ratio of automatic enlargement (reduction) of the screenshot size, set the width and height of the screenshot both with maintaining the aspect ratio, and without it.
Add caption to image with the necessary information and anywhere along its borders.
Add a border for an image in 2 or 3 dimensions.
Add a watermark anywhere in the image.
After taking a screenshot, the program automatically switches to Snagit editor, which allows:
Insert text comments, specifying the font you need, its size and color.
Place lines and arrows on the image, choosing the desired design.
Draw using the Pencil tool, use the Fill and Eraser functionality.
Many more others useful functions has a Snagit program. For example, she may record video from the screen Your monitor. You can learn more about the Snagit program.
I am sure, my friend, that in the future you will master all the features of the Snagit program you need and thank me for the information you received today.
Screenshot of a multi-page (multi-window) document... Why is it needed? Sometimes site authors prohibit copying text (content). This screenshot will help you to get the necessary document in the form of an image. Do you want to keep your website content highly unique? Paste the excerpt from the borrowed source into your article as a screenshot. But, of course, you should definitely refer to the source of borrowing, so as not to violate copyright.
How to take a screenshot of a multi-page (multi-window) document
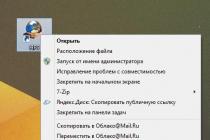
After reading the above, I am sure that at least you are new to the information business, you have already installed the Snagit program on your computer. Let's go into it. In the "Profiles" section, left-click on the "Window" icon. It will be highlighted in yellow. In the "Profile parameters" section, select the "Window" icon, left-click on the triangle in it, select "Scrolling" - "Scrolling window". The Window icon changes to a Scrolling Window icon. Click on the button "Data collection".
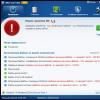
A red border will appear on the document, and a tooltip will appear in the upper left corner:
- Click left button mouse in the middle of the window to start recording (scanning).
- Wait for the complete completion of automatic scrolling of the window (more precisely, the document).
At the end of the operation, a Snagit editor with the scanned document.
 Select the required fragment of the document (the fragment will be in a black dotted frame). Select the Image tab and click Crop To Selection. If necessary, you can select the design you need to display the picture on the "Image style" tab. Save the resulting result using the "Save As" operation.
Here is a possible outcome of our work: 
And this is the result of the work of the Snagit editor:  Examples of representation of the use of a borrowed document on a blog can be viewed.
It's never too late to learn. I am sure that after reading this content, you have learned what it is screenshot and what is it for. Having done practical actions, you have learned not only how to do full screen screenshot your monitor, but also screenshot of a multi-page (multi-screen) document... Know how to use the program Snagit. You can edit the image using Snagit editor.
Snagit is designed to copy images, texts and small videos from your computer screen.
Snagi t is a program that is designed to create screenshots on the computer. Snagi t is equipped with a powerful editor that allows you not only to save an image in the desired format, but also to resize images, cut objects, and apply various effects
Screenshot (screenshot, screen or screenshot, screenshot) - an image obtained and showing exactly what the user sees on or another visual device output (usually without a mouse cursor) - Wikipedia.
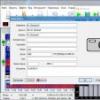
Launching the program. Program interface. Data collection methods
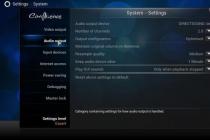
Launching the program - After launching the program, a window appears:  Fig. 1. Snagit main window
In the area of the main window of the Snagit Profiles program, the icons indicate the capture methods. In the area of the Profile parameters window, using the 1 (Data collection mode) button, you can set the data collection method. Clicking on the 2 (Start data collection) button starts capturing the screen.
Click on the red round button in the lower right corner of the program (2). The program window will disappear. An area appears where you want to take a screenshot.
Move the cursor, press the left mouse button and circle the area of the screen that you want to get on the output as a screenshot: 
Fig. 2. Allocate an area of the screen to capture. The left mouse button is pressed.
Release the left mouse button. A window will open graphic editor Snagit, where the screenshot you took will be located.
Data collection. Main window menuSnagit
The method for selecting a fragment (how the screen will be captured) is determined in the menu of the main program window Snagit Data collection, Input
Fragment selection method Region
Screenshot of any part of the screen using a rectangle shape.
1.In the Snagit program, run the command Data collection, Input, Scope


Fig 3. Data collection menu
2.Click the left mouse button on the red icon in the lower right corner (Fig. 1).
3. Select the fragment that interests you.
4. Release the mouse button. The area will appear in the Snagit Editor
A method for selecting a fragment Window.
From a crinshot of a separate window open on the desktop.
1.Open the window from which you want to take a screenshot in the workspace or on the desktop.
2.In the Snagit program, run the command Data Acquisition, Input, Window
3. Press the PrtScr key ( Print screen ) or click the Collect Data button in the lower right corner of the window. The window will be highlighted.
Fragment selection method A scrolling window (web page, document, etc.).
Sca rinshot of a page or window, the information on which does not completely fit on the desktop (there is scrolling). All information on a web page or window is saved as one file.
1.Install Data collection, Input,Scrolling window
2. Press the PrtScr key or click the Collect Data button in the lower right corner of the window.
3.Use the arrows to highlight the entire window
4. Click LMB. The area will appear in the Snagit Editor
Method of selecting a fragment of the Menu.
1.Install Data collection, Input, Menu
2.In any application, display on the drop-down menu
3.Press the PrtScr key or click the Collect Data button in the lower right corner of the window
4. Click LMB. The area will appear in the Snagit Editor
Fragment selection method Form
 Fig. 4
Fragment selection method Multiple areas
1.Set the capture method Multiple areas... The default is All-in-One ( All- in- One) in the area of Profiles, see Figure 1, which allows you to select any object or area on the screen.
2. Select different areas with the help of a frame that transforms when hovering over different parts of the screen (shortcuts on the desktop). In this case, the selected areas freeze and darken.
3.In the context menu (right mouse button) select the required command. The captured areas will be displayed on transparent background in its natural size and position.
Fragment selection method Full screen.
With it, you can take a screenshot of an entire desktop.
Buttons in the main window areaSnagitProfiles (Fig. 1)
Full Screen- creates a screenshot over the entire size of your monitor.
Copy to clipboard (no preview)- takes a screenshot to the full width and height of the object. For example, a website. When choosing of this type, it will take a screenshot of the site completely from top to bottom.
Web page as PDF with links- creates a screenshot and immediately converts it to PDF.
Copy text to clipboard- creates a screenshot for text only. The program will automatically filter text from graphics and the screenshot will contain only text, no graphics.
Free hand- to create a screenshot of an arbitrary area.
Menu with time delay- Creates a screenshot of various window menus. For example, you have an open Word program, pressed the P rint S creen key and the program will create a screenshot open window Word programs.
In order to take a screenshot, you need to select the type in the profile that is suitable for your task in the program (by default, All- in- One) and press the P rint S creen key.
Data Entry Methods (Capture Profiles)
The input method is how the screen capture will be done. V Snagit there are four types:
Collection Images
Retrieving text
Recording video
Pictures web pages
and each has several modes that we discussed above:
separate area;
separate window;
scrolling window (web page, document, etc.);
arbitrary area;
Full Screen.
In addition, there are many additional modes: a separate object, a fixed area on the screen, import from the clipboard, graphic file, scanner or camera and others.
Capture profile Extracting text
Open a web page with text.
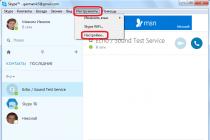
Go to the main Snagit window.
Click the button Data collection mode(button 1, Fig. 1) and from the list select Extracting text.
Click button 2 Start collecting data(see Figure 1)
Select the text section.
The result of the capture is saved in the Snagit Editor.
Edit the text fragment: add or delete part of the text. Apply font formatting.
Save in your folder as .rtf file
Capture profile Video recording .
Click the button Data collection mode 1 (see Figure 1) and from the list select Record video
Open a web page with a video (for example,)
Play video.
Press the PrtScr key ( Print screen )
Highlight the video area of the webpage
A window appearedVideo recording(Fig. 5) where you need to click the buttonBegin:
 Fig. 5
Video recording has started.
Press the button to stop recording video. PrtScr ( Print Screen) and in the window that appears Video recording(Fig. 5) click the buttonTo complete.
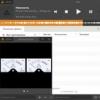
Snagit will open the video recorded from the screen in its editor, where you can view it and, if necessary, save it in the format you need.
Capture profile Snapshots from web pages

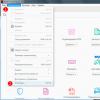
Processing in Snagit Editor
By default, capture results (screenshots) are sent to Snagit Editor, where editing and exporting takes place. It is possible to save to a file, upload via FTP, print, transfer to the clipboard, send via e-mail (the last three for images and text), as well as open in external applications. Fully integrated with Snagit the following applications: Office Word, Excel and PowerPoint, native Camtasia studio and the Screencast.com service as well as YouTube.com.
Snagit Editor can open image, video, text from disc. The program has a Ribbon-style ribbon interface with an object in the center and thumbnails of files added to the library at the bottom.
Snagit Editor is a suite for working with images captured by this program. Application features: adjusting an image, adding color, inserting text, highlighting image elements with a line or arrow, deleting image fragments with an eraser, adding effects, resizing an image, saving in any of the standard formats, and much more.
 Fig. 8. Snag main windowit Editor
The control panel displays six tabs by which functions are grouped: Painting , Image , Active areas , Tags , View and Dispatch (in the case of working with text). The latter is intended for sending a file to other applications and is no different from the output function when creating screenshots in Snagit. Export is carried out in the usual way: by the command Save as in standard formats, SWF, PDF or SNAG. Tab " View "Allows you to customize the program interface, and the tab Tags - group files using various flags.
Image processing
Tab " Painting "A set of objects is displayed that can be added to the screenshot. These are footnote, arrow, stamp, pencil, highlight area, text, line, shapes, fill; selection tools, scale and eraser are also available. The added objects can be moved and stretched, add shadow, anti-aliasing, transparency effects to them, select fill and outline colors.
Tab " Image "Is intended for changing the graphic parameters of the screenshot. Here you can crop and crop the picture, rotate it in any way, change the size of the image and the color of the canvas. A frame is superimposed on the screenshot, effects (shadow, swipe, perspective, offset), edges are highlighted (shark teeth, raised borders, etc.). Numerous color effects, filters are added, as well as the effect of increasing the selected area, blurring the image, and applying a watermark.
Tab "Active areas"- this function will only work when exporting an image in Flash format. It can be used to add a clickable area in the format of a square, circle or polygon to a picture, clicking on which will open the specified web link. The object becomes colored or invisible, and a tooltip may be displayed when hovering over the hot area.
Exercise. Working in the Snag programit Editor
Open Snagit Editor
Select any sketch saved in Snagit Editor (Fig. 8)
UsingDrawing toolsin the tab Painting , edit this sketch: add Footnote , Arrow , Stamp , Pencil , Highlight Area, Text, Lines, Shapes, Fill, Eraser
On the second sketch, apply all the options to change the image on the tab Image
Open a map image of your area.
Go to tabActive areas.
Set a prompt text for the name of your place of residence. Interactive hint - the name of your educational institution.
Set a graphical hint to the fragment of the map with the name of the city of Moscow
Save this image in your folder as.swf(flash format)
Add the saved Flash image to your presentation slide.
Today we will get acquainted with the program for capturing images from the monitor screen Snagit. And today about an option called management and creation of additional profiles. And the topic of our lesson will be creating a video profile in the Snagit program.

In the screenshot, the arrows show the area of the program where the buttons for controlling and creating profiles and working with them are located. By the way, a good question arises, why should we create them? And the fact is that they are included in the program, but the manufacturer left their customization "for themselves" to us. One of the interesting and necessary of them is the "video" profile, since with its help the webmaster can create video lessons on various topics on his computer.
Snagit profile management system
So what is included in the profile management system as always LEFT TO RIGHT:


So, we start by clicking on the button number 2 - Wizard for creating a new profile of data collection, the first plate appears with a list of additional profiles, we press RECORD.

Creating a video profile in Snagit Open it and adjust the width-height of the capture of the video image.

The program can offer the setting of this parameter as a frame for collecting data. In this case, place the cursor in the upper left corner and by pressing the left mouse button move it diagonally to the lower right corner. After releasing the button, your table will automatically display new data.
And if you want, then by clicking on the number of dots on the numbers in the plate, enter your data immediately.
It also has the option to record video - open it and see where the image will be saved. Now click on NEXT and go to the data output parameters.

Here we uncheck AUTO SETUP, and below there is a window for choosing your device for recording sound. Choose which microphone is installed on your computer and click APPLY and OK and NEXT. In the next window, click RECORD SOUND, then again further and that's it. After pressing the last DONE button, you will have a new VIDEO profile, by the way, in the process there will be an invitation to name your new profile. Whatever you want, you name it, the profile folder will be signed with your version.
It is very often necessary for those who work on computers and laptops to take screenshots from the browser window or the application that they are working on. Even though the task seems simple, it can be tedious at times. Typically, if you want to take a picture, you will use the hotkeys on your Windows system, paste it into Paint, and then change them accordingly. However, this comes with several disadvantages:
- You have to use the keyboard shortcuts and paste in Paint.
- You cannot take screenshots of a portion of the screen (without cropping it in Paint later).
- If you are taking a screenshot of a webpage and need to scroll to see it all, you won't be able to put it in one image. As a temporary solution, you will have to take a few screenshots of the web page and then merge them, which is certainly a common task.
In order to overcome all these disadvantages, I generally use a tool called Snagit, which allows:
While Snagit can do all of the above, we will limit ourselves to discussing Screeshot features in this article.
Download SnagIt
Step 1: Download the free trial version Snagit from this location: https://www.techsmith.com/snagit.html
Step 2: Follow the installation instructions after downloading the installer. There are two things to be created: Snagit and Snagit editor. The first one will be used to capture images while the editor will be used to do any post-capture manipulation.
Step 3: After installation, open the SnagIt app. You will see a red tray on the right side of the screen with a round red button (called the "Start New Capture" button). Open the screen for which you would like to take a screenshot. For my example, I am taking a screenshot of the Point Tutorials site.
Step 4: Click the "Start New Capture" button. You will be prompted to select the region from which you want to capture the screenshot.

Once you select a region and release the mouse button, you will be prompted to select an option to capture an image or video. Choose an image option and you're done. The captured image will open in the SnagIt editor.
Step 5: From the editor, you can edit and save images. On the top menu, you will see the options File, Tools, Pictures, Share, and Libraries.
Explore SnagIt Menu
Tools menu
This menu contains options for image editing, text editing, drawing tools, clipboard, and other settings. The following example shows an edited screenshot when the user is prepackaged in.

Picture menu
This menu contains options for editing the canvas (like cropping, rotating, resizing, etc.), effects, styles, and modifications (like grayscale, watermark, etc.).
Share menu
This menu allows you to split images by e-mail, FTP, Word, Powerpoint, Youtube, Dropbox, Google Drive, OneNote, etc.
Library menu
This menu stores all the images you took with SnagIt. The best part about this library is that even if you forgot to save your screenshots, you will always be able to view those images and get them back.
Take Scrolling Screenshots
So far, we have taken screenshots of individual regions and windows. However, you can also take advantage of scrolling screenshots of open web pages. To do this, follow these steps:
Step 1: Open the SnagIt app.
Step 2: Click on the "Type Capture" button. You will see region suboptions, windows and scroll windows. Select "scroll windows" from this.

Step 3: Click on the "Start New Capture" button. This time, you will see a scroller at the end of the window (screenshot below). Click on this scroller and it will start scrolling through all the web pages by itself and capture a screenshot of the open window of the entire website.

Step 4: And we're done !! This is one of the best and most useful features of Snagit.
summing up
We've researched a very useful tool today to help you with the best image and video editing. Now that you know the basics of using SnagIt, you can try the others. interesting features offered by the tool.