Pockets ZALMAN VE300. For those who do not know - this pocket is not just a SATA-> USB 3.0 adapter, this pocket can also hardware emulate an optical drive with any disk, the images of which can be thrown onto the HDD. Well, FINALLY I myself got this pocket at my disposal! True, this is not quite ZALMAN, and not at all at the price that was two years ago. But I think it's worth it)
(Price - $ 59 as of August 2018.)
Why didn't I buy the actual zalman? But because the VE300 is no longer in stores, it may have stopped producing. More a new version VE350, but judging by the reviews, it works much worse than the 300th, and even fresh firmware did not solve all the problems.
There are not many differences between IODD and zalman - a slightly different firmware, logos on the box and another cover. By the way, you can upload firmware from Zalman to IODD and vice versa.
Let's move on specifically to my purchase.
The seller offers pockets only in black (and also sells pockets 2541 (similar to Zalman VE400)).
Tracking number provided, working.
Goods ordered on March 29th, received on May 3rd.
Packaging - a cardboard box containing the original box with the product.
Photos of parcels and boxes


Inside - two layers of cardboard ... pallets or what? One contains a case and a USB 3.0 cable (with SAMSUNG logos, 1 meter), in the case there is a bag with a screwdriver (the screws cannot be magnetized to it, it is very difficult to tighten anything) and 4 screws (only 2 are needed) and a warranty card.
The second "pallet" contains the actual pocket in the package.


There is no paper instruction in the kit, the seller offers to download its electronic version.
Also, the kit does not include a disk with the Backup Utility iodd 2531, you can download it.
The pocket itself is aluminum, the upper part with electronics is plastic (acrylic and polycarbonate). 


From the controls we have a lever that you can move up / down and press it, and a "backup" button. There is also a two-line monochrome display and an activity indicator (blinking white when connected via USB 2.0, and blue when connected via USB 3.0).
Comparison of sizes with external HDD and 2.5 HDD. Dimensions 136x78x13. 

The pocket is large enough and, unfortunately, does not fit into.
The case from the kit is completely different from the chic one that comes with the zalman. Soft, rag and too small (the lever is constantly pressed). 
Soldering quality: 


The screw holes are hidden behind rubber bands on the sides. Screws connect the top and bottom of the pocket together. I do not recommend using the pocket without tightening the screws - the upper part together with hard disk can be pulled out simply by pulling on the cable in the connector or by shaking the pocket - the hard drive will push out the top. 
Without a carrier, the pocket shows the inscription "iodd 2531". With the media, access to the menu appears. Current firmware: R1288N. The letter N means that the pocket is stitched with the NTFS version of the firmware. New ones are available on the manufacturer's website, 1555 and 1558. I'm not going to reflash yet. 
The menu is called up by long pressing the lever. Moving the lever up / down, pressing the lever - select a menu item, "backup" - back.
On the menu Mode pocket mode can be selected (HDD, ODD, Dual).
V Settings- adjust the brightness of the screen backlight, the time after which the screen will darken and set the factory settings.
Information- find out the state of the HDD, its model, serial number, temperature, pocket firmware version, USB mode and supply voltage (shows current and lowest).
V USB Connect you can reboot the pocket (new images will be loaded, if you added them) and start safe extraction (the pocket will disconnect the hard drive and the screen will say "Plug Out").
On the menu Advanced you can "unmount" the hard drive, enable write protection on the hard drive. There is also a checkmark "Force USB 3.0", but what it does I can only guess.
Some tricks that you don't know about from the instructions
1. If you hold down the Reserve copy(BackUp) when connected - then write protection will be automatically enabled.
2. If you hold the left button while connecting, then the automatic protection will be removed
3. If during operation the wheel is turned down and held, preparation for safe shutdown devices. Pressing and holding the BackUp button will have the same effect.
4. If the wheel is turned up and held during operation, the _ISO directory will be scanned. Conveniently, after recording new images to the HDD.
5. If the BackUp button is pressed in the Menu, it moves 1 level up.
6. Besides the Menu, the backup button is used for its initial
data backup functions (if a backup program is installed and running).
As a carrier, I will use a Hitachi hard drive removed from a netbook tortured by service centers. 


Preparing the disk for work: delete the first hidden partition from the manufacturer and create a primary NTFS partition. 
If you are going to partition the disk, keep in mind that IODD only looks for the _iso folder on the first partition.
After formatting on the disk, create the "_iso" folder and fill it with images. Declared support for ISO / VHD / VMDK / DSK / RMD / IMA.
I downloaded images using utorrent directly to disk.
After the update, the images were not mounted and a pocket labeled "Defrag" hinted to me that it would be nice to start defragmentation.
After defragmentation, everything worked.
The image is selected with a lever up / down, mounted by pressing the lever.
Any images can be used. Operating systems, boot disks, utilities, and even games. 


Despite the fact that the cable is long and soft, the pocket with the disk works fine when connected via USB 2.0 through the front panel. The maximum consumption that I saw is 600mA (of course, this will still depend on the consumption of the drive itself). 
Disk speed measurements in your pocket and without it. 
As you can see, IODD pulled everything out of this disk.
Let's compare the speed of the disk in the drive (the image of the Win7 HP x64 installation disk is recorded) and the speed of the virtual disk IODD (the image is the same).
The maximum read speed of my drive is 16x, and a Verbatim DVD-R 4.7Gb 16x blank. 

Let me remind you that if you install a faster hard or SSD in your pocket, and not the old Hitachi, the speeds will be even more pleasant. And with such a hard disk, the read speed is on par with CDs (48-52x). And the access speed is much better than any optical disc.
UPD Feb 2020
Because I got an extra SSD for experiments and tried to install it. Naturally, the speed was limited by the SATA2-USB3.0 converter.
CrystalDiskMark 
And once again comparing the speed of a blank DVD and IODD with an installed hard and solid-state drive. 
Well, what can I say, this pocket will be a great assistant for those who work with computers, especially those that do not have an optical drive.
Personally, I'm already tired of lugging my drive here and there and preparing an installation flash drive every time I need to install something.
The price, of course, bites a little, but only the dollar exchange rate is to blame - at the old exchange rate, this pocket (like the zalman) cost 1800-2500r.
Thank you for your attention, I hope the review was useful, happy shopping, bye everyone!
And congratulations on radio day to all radio amateurs and radio professionals)))
We will talk about the external pocket (box) of the Zalman-VE500 (Fig. 1), we will see the unboxing, main functions, characteristics, pros and cons, and also tell you how to solve problems that, unfortunately it does. In the future, we will often refer to this gadget,because this is some kind of colossal saving of time and nerves. Forward!
Fig. 1 Box for HDD Zalman ZM-VE500
The declared parameters.
Model - Zalman ZM-VE500. The device is presented in black and silver colors (Fig. 1). The back cover is made of metal, and the main part is made of plastic. Connected HDD interfaces - SATA-I / SATA-II, SATA III. PC connection interface USB 3.0 / USB 2.0 Powered from USB. For other parameters, see Table 1.
| Specification | ZM-VE500 |
| Body material | Aluminum alloy, acrylic, polycarbonates |
| The weight | 91 grams (Without HDD) |
| Dimensions (edit) | 146 x 80.8 x 14 mm |
| Maximum transfer rate | 5Gbps |
| Nutrition | DC5V (USB Power) |
| OS support | Win XP / 2000 / VISTA / Win7 / Win8 / Win8.1 / Win10 / Linux / MAC |
Table 1 Zalman ZM-VE500 Specification
Equipment.
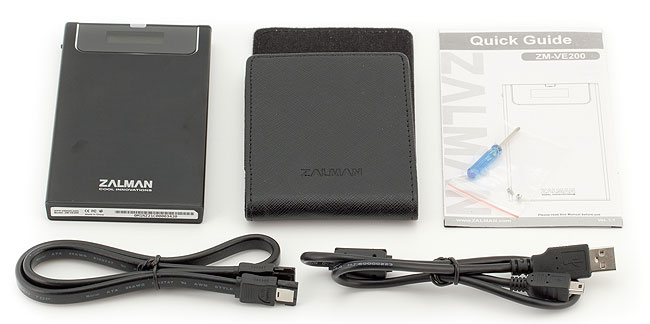
 Fig. 2 Zalman ZM-VE500 complete set
 Package contents (Fig. 2): NS nur USB 3.0, guide, sidewith Zalman-VE500, a case for it (the material is not leather, but it's good that it still exists, it serves as a good shockproof protection), a small screwdriver and two screws to screw the back cover after inserting it into the HDD box.
Everything is very simple here and the instruction is not needed, although it is available at the place where you need to install the HDD.And so at an angle, insert the 2.5 "HDD into the SATA connector and lower it into the box, close everything with the lid and screw in the small screws with a small screwdriver out of the box (Fig. 3).
 Fig. 3 Installing the HDD into the box.
 Preparation for use.
When you turn it on for the first time, at best, you will be greeted by the phrase "NO ISO FILES" or a file system error. To avoid the file system error, let's partition and format the disk right away. We will do this in a free program EaseUS Partition Master 12.5.
Step 1.
Find the Zalmana disk, in our case it is "Disk 2 (MBR)" at the bottom of the window there is a graphical display of partitions, right-click on our disk. and select the item "Delete all partitions" (Fig. 4). EaseUS Partition Master 12.5 does nothing right away, we first assign a list of tasks to it, and at the end we confirm their completion.
 Fig. 4 Partitioning a disk in EaseUS Partition Master 12.5
  Fig.5 Partitioning a disk in EaseUS Partition Master 12.5
 A window with formatting settings will open, it differs from the standard settings only in that you need to switch from "Logical" to "Primary". Click "Ok" (Fig. 6).
 Fig. 6 Partitioning a disk in EaseUS Partition Master 12.5
 All tasks are set, now we confirm their completion - click "Apply" (Apply changes) in the upper left corner of the window (Fig. 7).
 Fig. 7 Partitioning a disk in EaseUS Partition Master 12.5
 We confirm our consent and wait until all operations are completed (Fig. 8).
 Fig. 8 Partitioning a disk in EaseUS Partition Master 12.5
 Step 2.
On the Zalmana disk, create a "_iso" folder (without quotes), and upload our images there, this is the only way Zalman will see them. In addition, in the "_iso" folder, you can create more folders, for order, so to speak. For example, we will create "BackUp" "Linux" and "Windows", transfer our iso images to "_iso" and all folders (Fig. 9).
 Fig. 9 Copying iso images to Zalman ZM-VE500
 Menu overview.
In the main menu, we can see 5 items:
- Mode Select
- Encryption
- Set W-protection
- Information
- Exit
We'll take a closer look at each of them.
1.Mode Select- Choice of the mode of operation of the pocket.
- HDD MODE- Work only in external storage mode. (Will appear as local drive)
- VCD MODE- Work in mode virtual drive... (Will appear as a CD-ROM that you will mount your ISO image to)
- DUAL MODE- Work in two modes at the same time. (Will show up as local drive + virtual CD-ROM where you will mount your ISO)
2.Encription - AES 256 bit real-time hardware encryption. (Simply put, access to files is granted only after entering a password)
- Enable Encription- Enabling encryption.
Enabling and disabling encryption leads to the disappearance of all information from the HDD, make sure you have a copy of the information stored on the HDD, because you will have to recreate the "_ISO" folder and copy the ISO images there.
When you press " Enable Encription " there will be a warning "Data will be lost!" 1. Yes / 2. No confirm your consent / disagreement to continue enabling encryption.
2. No.- will take you back to "Enable Encription"
Click 1. Yes ->"Input Password"- enter a password from 4 to 8 characters. "Confirm Password"- Confirm the password. Then the device will reboot itself and require a password.
Now on the menu Encripton three points:
- "Change Password "- Change password.
- "Hide Password "- Remove power-on password. (The device will not require a password, but if you remove the disk and insert it into another pocket, then the data will remain encrypted and will not be available to the user.) If the password is disabled, the option "Hide Password" replaces "Set Password" - Set password.
- "Disable Encription "- Disable encryption.
Personally, I am satisfied with the passwordless access to the device, so I will disable encryption.
Push "Disable Encription" device uswarns "Data will be lost!"(Data will be lost), press 1. Yes / 2. No
2.No- will take you back to "Disable Encription".
By clicking 1. Yes, we will be asked to confirm our consent again "Confirm Again", apparently for complete confidence. 1. Yes / 2.No confirm your consent / disagreement to continue disabling encryption.
2.No- will take you back to "Disable Encription".
We press 1. Yes- and without entering a password, the device goes into reboot, after which we can use Zalmana without a password. Interestingly, those images that remained before encryption were enabled became available to us. Why did it happen when wewarned about their loss, I don't know.
Set W-protection
- Disable W-P - Disable read-only mode - Enable write mode.
- Enable W-P - Enable read-only mode (Protect device from changes).
Information
- HDD Temp: 26 - Hard drive temperature in degrees Celsius.
- HDD Health: Good / Bad - HDD status ( S.M.A.R.T.). If the state Bad make a backup copy of the disk and check it for errors, Good- everything is fine.
- 100505**** - Full serial number of the HDD.
- Firmware: v1.10 - Firmware version.
- Exit - Output.
Interface and control.
In the upper part of the front side of the gadget there is an LCD display, under it there is a touch-sensitive numeric keypad, and buttons Menu and Enter.
In addition to the numbers on the keypad intended for entering the password, the buttons also have control functions. (Fig. 10)
 Fig. 10 Front side of Zalman ZM-VE500
 2 - Up,
4 - Left,
6 - Right,
8 - Way down,
3 - Updating iso file (Update the list of iso images),
5 - Mount (Mount iso image).
Zalman sees only the "_ISO" folder, the folders in it and the iso images that are in them. Using the arrows, you can easily navigate the folders, select desired image, and mount it by clicking on the button 5 ... Also, if you have thrown a new iso-image, then in order for it to be displayed on you, you can reconnect the device or press a number 3 .
Above the display is a LED indicator HDD operation... It glows in two colors, depending on which interface it is connected to, USB3.0 glows blue, USB2.0 glows white. In the upper right corner of the display, you can also see which interface the device is connected to (Fig. 11).
In the upper left corner there is a lock icon that tells us the status of the function Set W-protection.(Simply put, if the lock is open, then the disk is not write-protected, if it is closed, then only read information is available).
The second icon from the left, this is the disk icon, appears only if an iso image is mounted in the CD-ROM.
The third icon from the left indicates the operating mode of Zalmana.
- HDD MODE- letter "H",
- VCD MODE- letter "O" or a disk symbol,
- DUAL MODE- letter "D".
 Fig. 11 Zalman ZM-VE500 interface
 Firmware.
If you are a "fan of updates" or are suddenly dissatisfied with the current firmware version of your device and are sure that it will work better with another firmware, then we will consider the question "How to flash a Zalman ZM-VE500?"
First of all, let's see what version of the firmware is currently installed on the device, click Menu -> Information.
We see Firmware: v1.10.
Fortunately, there is support on the website of the Zalman brand, there we will download the firmware we need.
- Link / Link:http://www.zalman.com/contents/support/downloads.html?find_object=all&find_text=ve500
They have a little confusion with the version descriptions, so I'll attach direct links to the files with the correct descriptions.
- Link / Link: Firmware: v1.10.
- Link / Link:Firmware: v1.11.
- Link / Link:Firmware: v2.00.
Since I want to update the device, therefore I download the archive for the firmware - Firmware: v2.00.
And then I ran into a problem when unpacking the archive I needed ZM-VE500 Firmware Ver_2.00.rar, pops up a message - "The archive is empty". I'll leave a link to this archive for now, maybe Zalmana technical support will fix the problem in the near future, but we seem to have to flash to the version v1.11.
To avoid the problems described in the "Problems" section, I disable encryption and make a backup copy of the disk, which I highly recommend to you too !!!
Unpack the downloaded archive ZALMAN_VE500_3637E_FWUpdater_V1.11.rar
Run the executable file ZALMAN_VE500_3637E_FWUpdater_V1.11.exe
 Fig. 12 Zalman-VE500 firmware
 We press "Install". (Fig. 12)
 Fig. 13 Zalman-VE500 firmware
 Scan bus for "Initio External Storage Devices" - Scanning external storage devices (Fig. 13). Simply put - the computer is looking for Zalman, we connect it, and then everything goes on without user intervention.
Fig. 14 Progress of Zalman-VE500 firmware downloadProgress of downloading the firmware to the device. (Fig. 14)
 Fig. 15 The update is complete!
 The update is complete! (Fig. 15)
Go in Menu -> Information and see Firmware: v1.11... That's all, everything turned out to be very simple.
Problems.
Consider the common problems encountered by users of our gadget.
1 - The disk is not initializing. Personally, I ran into this problem, my Zalman ZM-VE500 did not want to see the disk, everything turned out to be very simple, I inserted the disk that I used for Windows, and did not notice that the first partition of the disk is systemic, 100 Mb in size. The gadget sees the "_ISO" folder only in the first partition of the disk, so divide your HDD correctly, but what is the correct way? written in section "Preparing for use".
2 - Zalman ZM-VE500 password does not match after flashing. You need to flash the device to the firmware version in which encryption and password were enabled, disable these functions and reflash the device.
3 - Zalman ZM-VE500 does not see all iso images. Personally, I again ran into this and thought that this was normal, until I saw that all the images were displayed on exactly the same gadget. In short, the problem is solved with the usual Windows formatting, do not forget to uncheck the box with "Quick (clearing tables of contents)". (Fig.16)
 Fig. 16 Full disk format
 Results. Advantages and disadvantages.
As a result, I will say as in my diploma - "We considered everything that we wanted to consider." : D, but in general the gadget turned out to be very good. Unfortunately, Zalmana has no competitors on the market in this area, so we can only compare with previous models. Zalman ZM-VE200, 300, 350, 400... Of course, we will not do this, because they are all +/- the same in their main functionality. The differences are insignificant, for example, up to the 400th model, the main control element is a joystick and they are sold a little cheaper, etc. I better give you pros and Minuses which I found in reviews on popular online stores.
pros
- Saving time. If we compare it with a USB flash drive, which needs to be prepared to install something from it (format, download a program for recording images, write an image, etc.), then with Zalman ZM-VE500 most likely it will turn out 2-3 times faster.
- Data encryption. You can change up to 50 HDDs and they will remain encrypted.
- Temperature monitoring, and "S.M.A.R.T." HDD.
Minuses
- No safe eject of its own.
- Safely Remove Windows detects a device as Zalman ZM-VE350.
- When updating again, all information disappears. (This is taken from people's feedback, personally, as a result of the update, the files did not disappear)
- When formatting and creating a partition, the MBR may display messages that the disk is not initialized at the next boot of the pocket.
- Price. In stores it is sold at a price of 3500-4000 r. very big money, judging by the salaries of system administrators, and even without HDD, and this is still at least 500r. if you buy used small capacity.

Includes a ZM-VE300 aluminum case, heavy duty carrying case, USB 3.0 cable, installation CD with software, quick start guide, and a small screwdriver with screws to secure the hard drive.


Zalman ZM-VE300 has a spectacular design: a lightweight aluminum case with plastic inserts on the sides, a small LCD screen that displays the status of the disk. On the top edge there is an activity indicator, a socket for connecting a USB cable and a "Backup" button. In addition, on the left side of the box there is a three-position joystick-wheel, with the help of which almost all actions are performed. The activity indicator is two-color. White color is used to indicate operation in USB 2.0 mode, blue - in USB 3.0 mode.


In order to install HDD in Zalman ZM-VE300, you need to pull out the top board with the display and connect the disk itself to it. Then insert the resulting structure into the aluminum case.

Out of three tested 2.5 "disks Zalman ZM-VE300 refused to work with one, accepted two others normally. I did not find any regularity in his preferences, and, as it became clear from reviews on different Internet, this problem arose not for me alone. So it's probably best to have several different discs ready.


When the disk is installed and the functionality is verified, you need to fix it. Bend the seal from the sides of the case, under them are the holes for the bolts. As I said, bolts and a small screwdriver are included, so there should be no problems with the fasteners. But the seal does not want to get up back, since it is made of hard plastic and after bending it starts to dangle. A trifle, of course, but spoils the impression. A seal made of ordinary rubber would look more harmonious here.

In the first Zalman ZM-VE300 models, the firmware allowed working only with disks formatted in FAT32; to support the NTFS file system, it was necessary to install an alternative firmware from a similar device - iODD-2531. In new batches, the firmware is already more recent, with it NTFS disks are perfectly supported without additional gestures. You can download the latest version of the firmware and the programs necessary for updating the program on the off-site.
ZM.VE300.Firmware.Upgrade.R1288N.zip (343,728 bytes)
In order to install firmware from iODD-2531 on Zalman-VE300, you need to slightly modify the flasher program. I have updated the latest firmware. After installing it, the device is defined in the system as iODD, but it will not work any worse. On the contrary, all new features from iODD-2531 will be added to the functionality, which in official firmware Zalman-VE300 is not and is not expected.
iODD.2531.to.ZM.VE300.Firmware.Upgrade.R1600N.zip (345,755 bytes)
The Menu is entered and exited by pressing the side switch for more than 3 seconds. Navigation through the menu and selection of items is performed by the joystick, return to the previous level - the "Backup" button.
- Main menu:
- Mode Select- setting the operating mode of the device
- Setting- adjust LCD brightness and Sleep mode
- Information- view information about HDD and firmware version
- USB Connect- USB connection setup
- Advanced- setting up a virtual HDD connection
- Menu "Mode Select":
- Dual Mode- work in combined mode, external HDD and a virtual DVD-ROM / Blu-Ray drive
- ODD Mode or CD Mode(for iODD firmware) - work only in DVD-ROM / Blu-Ray mode (this mode is usually used when installing the OS)
- HDD Mode- the device is detected only as an external HDD (this mode is used when connecting to devices other than a PC)
- Setting menu:
- LCD Bright- LCD backlight brightness adjustment
- Idle bright- LCD backlight adjustment in sleep mode
- Standby time- setting the time to enter sleep mode
- Load Default- return to default values
- Information menu:
- S.M.A.R.T- S.M.A.R.T information
- HDD Model- display the model name of the hard drive
- HDD Serial- display the serial number of the hard drive
- Firmware Ver.- display firmware version
- USB Speed- display the type of current connection (USB2.0: Hi-Speed, USB3.0: Super-Speed)
- USB Input Volt- display the lowest USB input voltage after connecting to a PC and the current input voltage
- S.M.A.R.T menu:
- HDD Temp.- display HDD temperature
- HDD Health- display HDD status (Good, Warning, Bad). If Warning or Bad appears, immediately back up all data and check HDD
- USB Connect menu:
- Refresh- reconnect the device to PC
- Safe Removal- safe removal of the device
- "Advanced" menu:
- Umount VHDD- unmount all disk and floppy images
- Write protect- enable or disable write protection
- Instant Save- remember the image immediately after its selection (only in iODD firmware)
- Force USB 3.0- priority mode of USB 3.0 (only in iODD firmware)

It is not indicated anywhere in the documentation, but it has been experimentally established that there should be no more than 32 images in the "_ISO" folder at the same time, otherwise Zalman ZM-VE300 will display the message "Too Many Files". This can be easily worked around by creating subfolders, although this leaves the limit of 32 files per folder. There is alternative firmware, where there is no such limitation, but personally, I have all the necessary set of distributions within a dozen files. By the way, as a cheaper alternative to the Zalman ZM-VE300, unscrupulous sellers can offer you enclosures for hard drives of the brand Konoos... Such a replacement is far from equivalent, since the younger models of Konoos cases support only one image, and the more sophisticated ones - only three. Naturally, on the sites of online stores, they are modestly silent about this.

The Zalman ZM-VE300 comes with the Backup Utility. It is recorded on a CD, but the latest version is always available on the off-site. As you might guess, it backs up selected files and folders from a computer to an external hard drive in the Zalman ZM-VE300. In the program, configure the necessary paths, then press the "Backup" button on the box and the utility copies the information.

But that's not all she can do. With the Backup Utility, you can create virtual disks and then save them to the "_ISO" folder on an external hard drive. WITH virtual disks worth understanding better. "Virtual HDD" are empty files given size with the ability to connect them as external drives. Naturally, the Zalman ZM-VE300 is responsible for the connection and emulation functions.

With the "Safe Removal" function, everything should be clear too. You can safely turn off the Zalman ZM-VE300 by pressing the wheel or the "Backup" button on the device itself, or you can do it at the initiative of the computer through this function of the Backup Utility.
And this is how the system displays physical hard drives and virtual drives attached or created using the Zalman ZM-VE300.


Returning to the topic of installing Windows XP on the HP Mini 210-1130ER netbook. The inconveniences of installing the system from a USB flash drive became the last argument for me to purchase the Zalman ZM-VE300. After purchasing it, I conducted an experiment: I wrote the prepared image to an external hard drive, put a clean hard drive in the netbook, then mounted the image on a virtual CD and tried to install the system. As I expected, everything went well.

The instructions that come with the kit are very sparse. All that can be learned from it is where to attach the bolts and how to install the backup software. On the Internet, there are instructions in electronic form, even translated into Russian, but in fact they are no different from the paper version. Full documentation is rumored to be available in Korean, but this is unlikely to help. So you have to be content with what you have.
Zalman.ZM.VE300.Manual.RUS.zip (546,663 bytes)
Zalman.ZM.VE300.Manual.ENG.zip (492,463 bytes)
Since the instructions are rather short, and they do not describe all the features of the Zalman ZM-VE300. In preparing this review, I collected from different sources and systematized useful tips and undocumented features. Other possible problems discussed in detail at the IXBT conference.
- If you hold the "Backup" button while connecting the device, the write protection will turn on.
- If you hold down the joystick wheel while connecting, the write protection is released, and the device goes into "Dual Mode".
- If you hold the joystick wheel up while connecting, the "ODD Mode" is set.
- If you hold down the joystick wheel while connecting, the "HDD Mode" mode is set.
- If you turn down and hold the joystick wheel during operation, the device will be safely turned off. The same will happen if you press and hold the "Backup" button.
- If you turn up and hold the joystick wheel during operation, the "_ISO" folder will be rescanned and the list of images in it will be updated. This is very convenient if new images were recorded on the device in the "Dual Mode" or "HDD Mode" mode.
- In order for the Zalman VE-300 to remember the last mounted image, it must be safely disabled. Install the desired image, press and hold the "Backup" button or the wheel down, wait for the message "Data Saving ..." and disconnect the disk from the computer. After that, the Zalman VE-300 will start with the selected image.
- To unmount a floppy disk image or a drive with a "Virtual HDD", go to the "End Of List" item and hold down the wheel for 3 seconds.
- When connecting to a stationary computer, it is better to use the USB ports that are located on the back system unit instead of on the front panel.
- If the hard disk installed in the case is divided into several partitions, then the partition with the "_ISO" folder must be Primary.
- It is not recommended to install SSDs in Zalman ZM-VE300, as they are more sensitive to insufficient power supplied via USB and may fail.

The most convenient way to defragment files and directories is free program WinContig. Its main feature is fast defragmentation of individual files without having to defragment the entire disk. Just start WinContig, select one or several image files and defragment, after that Zalman ZM-VE300 mounts everything quietly.
What can I say as a summary? Zalman ZM-VE300 is a very cool piece that justifies its cost to the penny. Now the problem with the preparation of installation flash drives, a pack of CD / DVD discs with different distributions has been solved once and for all, all this remains in the past. Zalman ZM-VE300 will be an excellent assistant for system administrators and advanced users who often have to rearrange the system or use different boot disks.
Despite all the advantages, there were some drawbacks. There is no list of recommended models of hard drives that work with Zalman ZM-VE300 neither in the manual nor on the office. In an extreme case, it would be possible to indicate the recommended characteristics, such as amperage and rotation speed, so that you can independently select the desired model, but this information is nowhere to be found. The supplied USB cable is short and VERY hard, which means that if you use it frequently, there is a risk of damage to the case connector. It would not hurt to provide additional power supply so that the Zalman ZM-VE300 could be connected to old computers. Of course, no one bothers to find and purchase the right cable on their own, but it's strange that the manufacturer made such a wonderful device and saved on a penny cable. Judging by the reviews, for some hard drives, you have to additionally put a seal in the case so that the drive does not dangle inside. In my case, this was not necessary, but in general I agree that the fastening system could have been thought out better. Otherwise, I am very pleased with the purchase.
UPD... After the untimely death of Zalman ZM-VE300 (connected to a problematic system unit, and there was a breakdown of electricity to the USB port), I purchased the original iODD-2531. So, there are no problems with the seals described there. They are of sufficient length and have "horns" at the end, which are tucked under the side caps and hold perfectly. Zalman also has these "horns", but the seal itself is shorter, as a result they are useless. The cable is also long and flexible. But the iODD case is uncomfortable - soft. Replaced it with a vacant cover from Zalman. So it makes sense to acquire original devices iODD, not crookedly copied replicas.
2.5 "Zalman ZM-VE350 external box is an affordable and multifunctional solution. The manufacturer took into account all the nuances and created the ideal device. The case is black, it is made of metal and has a pleasant texture, a solid construction. There is an LCD display, it will be especially useful when using the model as a virtual drive.
Zalman ZM-VE350 comes with an extended package. Together with the device, the owner receives a screwdriver to install the disc into the box. A convenient and high-quality case, USB cable, screws are provided.
An important feature will be the availability of compatibility with Windows and Mac OS operating systems. There will be no connection problems, the model is suitable for all users. USB interface 3.0 allows you to copy large amounts of information in a short time.
The box has compact dimensions, it fits easily into any bag and is easy to carry. The user will be able to independently create an external hard drive, just select a suitable module and install it in a dedicated compartment.
The total shrinkage of the optical drives market under the pressure of external hard drives and flash drives is due to quite objective reasons, but it also leads to some unpleasant side effects. In particular, the software is still actively sold on CD and DVD, so installing it on computers without drives is not always a trivial task. Of course, installation packages can often be simply copied to the same VZD, but tinkering with a huge number of small files is corny inconvenient. In the best way The solution to the problem is to use images, since each disk turns into one file, and you can put a lot of them on one small drive. However, this requires a convenient solution to the problem of subsequent use. Translating from clerical to Russian, you will need an installed program on your computer to work with the recorded images. But what if this is a "foreign" computer, where it is not? Or, even worse, there is no system at all that just needs to be installed? Microsoft, of course, offers a utility for transferring Windows 7 from disk to flash drive (or other USB drive), but the range on the market is not limited to this operating system. And there are also all sorts of special disks for diagnostics or system recovery, and just a LiveCD for getting acquainted with various operating systems, etc. In general, when all this was recorded on a CD, it was easier - I inserted the disk into the drive, and that's it. If necessary, just booted from it. Moreover, from any ready-made disk, since all products do not depend on each other and you do not need to prepare a bootable flash drive every time (not to mention the fact that not all software correctly transfers the migration from CD to USB-drive).
Is there a convenient way to solve all these problems? Now it is. It is even strange that he appeared so late, although the problem became urgent for a long time. And it is doubly strange that not one of the old participants in the external storage market was involved in solving the questions raised, but the company Zalman, better known for its coolers and other related products (although in fact the original developer is actually different here, as is often the case, but he is generally unknown to the general public). Now here's a breakout into a completely different market. Moreover, solving the problem of using ISO images on any system is one of the main features of the ZM-VE200, but not its only advantage. Which makes you want to get to know the product better.
Design
Even externally, the device is slightly different from most "typical" external modules, although it has the same design. The case measures 135.3 x 78.6 x 13.1 mm and weighs 98.5 grams for the most part made of anodized aluminum and can be black or silver. Soundly, albeit not exclusive :)

But a small monochrome LCD display in the upper part of the front surface is an unusual element. But very useful, although its main task is just to select a "working" image (which is done using the jog-dial on the left side of the box), which will be mounted on the virtual optical drive. However, in addition to this, the screen allows you to get information about installed disk, its temperature (how many paranoid people lack this in "ordinary" boxes!), operating mode, firmware version (it can be updated), etc.
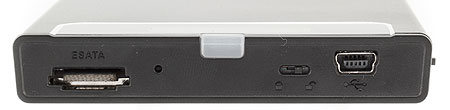
All other active elements are traditionally concentrated on one of the short ends and include eSATA and USB mini-B connectors, as well as a write blocking slider. An archival thing for a person who maintains computers (and just often walks to suspicious places) - you don't have to worry about picking up and carrying with you some kind of infection. In general, the last one plus support for two interfaces and, to a lesser extent, built-in diagnostics are already enough to make the product interesting for purchase. And we haven't gotten to the main feature yet! For now, let's just note that if support for ISO images and an eSATA interface are not required, you can save a lot by purchasing the ZM-HE100 model: it is also equipped with write protection.
Contents of delivery
In the box with the device, in addition to itself, you can also find a pair of interface cables (USB and eSATA), each 50 cm long, a couple of bolts for securely fixing the assembled drive, a miniature screwdriver for screwing / unscrewing them and a protective case made of imitation leather. The design of the latter allows the use of a hard drive without removing it from the case, although if you plan for a long continuous operation, it is worth taking it out of harm's way - it will cool better. And one more element of the kit - a transparent film, about the size of a hard drive - baffles, as it turned out, a lot of buyers who cannot find a scope for it, and this issue has not been worked out in the manual :) In fact, we have an example touching care of Zalman designers about the little things - it should be under the hard drive and put. The rationale is simple: the box itself is made of aluminum, that is, it conducts an electric current, and there is an open one on the "belly" of the hard drive. printed circuit board, so theoretically something can be closed unsuccessfully, and it will fail.
Functionality
And now, finally, we got to the most “delicious” one. A fly in the ointment, however, is that in the "high-speed" mode (ie, when connected to a computer using eSATA), the device does not have any additional functionality to simple copying and storing data. The display just displays "eSATA Mode" and that's it. Even, by the way, the ability to find out the current temperature of the disk disappears.

So in order to fully enjoy the "features", you should connect the box to your computer using USB. And it should also have a daddy named "_ISO", which should contain ISO images in an amount not exceeding 32 pieces (by the way, when using a firmware earlier than 61F dated April 29, you also need to use the file system on the disk NTFS - FAT32 and exFAT were added only in it).

If all this is respected, we get the opportunity to choose one of three operating modes, and the current one is shown on the display: HDD Mode Similar to eSATA mode (and 99% of external modules on the market and ready-made external drives), the device works like a banal external hard drive. for the VE-200 system looks like a USB CD / DVD / BD-ROM, into which one of the “discs” recorded in the folder is installed. Which specific ISO image will be mounted can be selected manually using the wheel on the left side, controlling the process by changing file names on the display. Unfortunately, in addition to the above, they will have to be called short names and not use Cyrillic characters: long ones are truncated, and non-Latin characters are displayed with spaces. However, it is difficult to consider this as such a serious limitation. For especially curious tuning lovers, we will briefly hint that the problem of Russification, as well as expanding the list of supported disk image types (in fairness, any exotic), can be solved using the firmware, but at your own peril and risk ... Yes, and to flash it instead of the "native" follows in a not too trivial way (and here's how - look on the Net yourself;)). Dual Mode Compilation of the two modes described above: an external module connected to a computer generates two devices - both VZD and optics. Accordingly, we get access to all stored files (and, as mentioned above, it can be limited to reading only, which is very useful when working on someone else's potentially unsafe computer), as well as the ability to work with ISO images.
The latter is possible in two modes. The first and the simplest, namely mounting images with a loaded operating system, always works great and does not cause problems. Thus, you can throw out all CDs and DVDs with distributions stored at home, having previously "rolled" them into images. The limitation on 32 files will not hinder this much - after all, images can be stored in different folders (such as "ISO_office_program", "ISO_linux", "ISO_windows_system", "ISO_games", etc.) by simply renaming the desired one to "_ISO" before use. A more serious limitation, perhaps, will be that this format is not quite suitable (or not at all suitable) for storing some copy-protected toys. But here there are no claims to Zalman - the company did not plan to encourage piracy. And such disks do not belong to system disks, so it is quite possible to work with them in the old fashioned way - using software virtual CDs.
For system disks (from different Linux distributions to all kinds of "reanimators"), another scenario of use is most relevant, namely booting from a virtual CD drive! To be honest with her, not everything is going smoothly. As practice has shown, such virtual drives are not supported by a considerable number of motherboard Intel boards(more precisely, used by the company BIOS version), and not only sold as a separate version, but also found in laptops. This problem applies not only to the ZM-VE200 - we also encountered it, for example, when testing the Silicon Power Ultima 155, where the controller is clearly different. So the culprit should be sought among the programmers who worked on the loading module (the problem manifests itself only at this stage), but this, of course, does not make it any easier. However, most of the tested computers are devoid of such problems - booting from a virtual drive is exactly the same as from a normal one: you just need to select it in the BIOS or (which is available on most modern motherboards) use a special boot menu. Accordingly, you can install any operating system - not necessarily originally designed for this use case (which is true for Windows 7) and without any traditional dancing with a tambourine and fiddling with third party programs(which are needed for such a Windows XP installation). At the same time, unlike flash drives, some of which support the allocation of a part of disk space for a virtual CD, it is not necessary to be limited to just one system - there can be several "boot" disks. You just need to choose the one you want - and it will be a special LiveCD for "repairing" the system or a bootable Windows disk 95, the drive (and the computer) doesn't care :)
Testing methodology
The question arises - did all this advanced functionality affect how the VZhD obtained after installing the hard drive will cope with traditional tasks, such as storing and transferring information? That is why we have subjected it to traditional testing. The technique is described in detail in a separate article... There you can get acquainted with both the configuration of the test bench and the software used. The only change is that instead of the Seagate Momentus 5400.5 ST9320320AS hard drive traditionally used in tests of external modules, which is too small and slow from the point of view of modernity, we decided to take the top model of Seagate: Momentus XT ST95005620AS. It is clear that for an external hard drive, this drive with a platter rotation speed of 7200 rpm and an additional flash buffer is redundant (especially since it costs twice as much as "ordinary powder" of the same capacity, and 750 GB in a traditional execution can be bought cheaper), but in this case you can be sure that it will not become a "bottleneck". And we will compare the subject with fast two-interface models.
Competitors
As the latter, we took the recently tested Verbatim Store'n'Go (with a 500 GB Samsung HM500JI inside) and a Seagate FreeAgent GoFlex (inside a 500 GB Momentus 5400.6 ST9500325AS) with a "stock" interface module (supporting USB 2.0) and Power eSATA Upgrade Cable. While GoFlex does not provide versatility in an easy way (you have to swap out an interface module to go from USB 2.0 to eSATA and vice versa), it is one of the few (like the Verbatim drive) to support powered eSATA, which is slightly better than a couple of cables. VE-200, for which the latter can be blamed. But you can not find fault :)
Lavalys Everest 5.0
As for the speed of data transfer via the interface, the Zalman product has nothing to boast about - regardless of the interface, it lags behind the competitors. Let's see how this affects tests that are closer to practical use.
IOMeter
But on random operations, where the hard drive installed inside is decisive, the kit we assembled easily and without straining unconditionally takes the first place.
Intel NAS Performance Toolkit
A fast hard drive in conjunction with eSATA allows the VE-200 to compete with some success for the leadership, but once you switch to the more widespread USB 2.0, it immediately begins to lag behind the competition.
A similar state of affairs occurs when recording data. However, is it worth it to be very upset? Yes, of course, about 20% lag is a lot, but the external module supports not only USB 2.0. So it's enough to just use eSATA - this option is much faster than USB. Moreover, regardless of the implementation;)
If, of course, you lean on the use of VZD for transferring information, and not as a "working" drive, then the situation cannot be corrected with a quick interface. Alas, this is the price for a functionally complex controller.
Prices
The table shows the devices in Moscow that are relevant at the time you read this article:
| Zalman ZM-VE200 |
| N / A (0) |
Total
If you try, you can present a whole list of complaints to the Zalman VE-200: there is no support for USB 3.0, eSATA without power, the performance is lower than it could have been. All this is so ...

However, the real and potential drawbacks are more than offset by the truly unique functionality! In principle, as we have already said, initially this was not a Zalman development, however, since the company was able to discern a good idea and become the main global seller of its implementation, the reward, it seems to us, will be quite right :) Indeed, the need for something like this has been hovering for a long time in the air, because often the only task that an optical drive performs in modern computer is the installation of the operating system. Or some kind of service activities. In general, for the sake of occasional loading, keeping such a device (despite its low price) on the farm becomes uninteresting. In the face of the ZM-VE200, we get a very convenient and fast CD / DVD-ROM in addition to a capacious and efficient external hard drive. Moreover, all the shortcomings of the second functional component are not critical - against the background of still well-sold VZD, equipped with only USB 2.0, it demonstrates a completely different level of performance in good conditions;) What is only exacerbated by the support of write protection, which, judging by our Conference , for many users of mobile external drives, forced to work with them and on potentially unsafe computers, is very relevant. And there are no complaints about the first one, if we compare it with, for example, a USB drive. All in one. Perhaps, of course, the price will scare off some potential individual buyers, but in the economy of a system administrator, service engineer or a real enthusiast of computer technology, such a box, it seems to us, will be an indispensable thing.


